Thingiverse

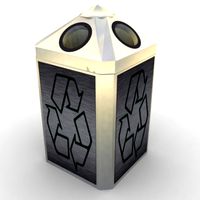
Cajetín para reciclar rollo filamento SmartMaterials de 1 kg, como organizador 2.0. (Box for recycling filament roll SmartMaterials of 1 kg, as organizer 2.0?) by fjma23
by Thingiverse
Last crawled date: 3 years, 1 month ago
Cuando decidí reciclar los rollos de filamento vacios, vi un cajetin aquí en thinviverse, el cual tengo en "hechos" (https://www.thingiverse.com/make:448163) pero que no me venia bien, era un poco más grande.
Entonces, decidí diseñar otro con las medidas que necesitaba, este lo tengo en "mis diseños" (https://www.thingiverse.com/thing:2794324). Este es un poco más pequeño, con las paredes más finas y la pestaña para abrir más pequeña, para gastar menos plastico.
Con esta, al imprimirla, surgió un problema, que la base de la pestaña, al ser más pequeña, por warping, no tengo cama caliente, se levantaba y al pasar la tobera del ventilador de capa, chocaba y el extrusor se descalibraba y se iba por otros lugares de la cama teniendo que parar la impresión. Así que decidí hacer la versión 2.0.
En esta versión tenemos:
-Quitar la pestaña. (cajeta_smart2_0)
-Hacerle un agujerito para poner un tornillo para enroscar un pomo. Con Freecad al atravesar la pared curva con un cilindro, resta de piezas, me daba error, al hacerlo con un cubo no había problema, por eso el agujero es cuadrado.
-Hacer un pomo (POMO) para abrir el cajetín: al pomo no le he hecho el agujero para el tornillo, pero con un pequeño taladro y una broca, lo hacemos al tamaño del tornillo.
-Hacer dos modelos más, uno con una separación (cajeta_smart2) y otro con dos (cajeta_smart3).
-Para el agujero del rollo había pensado en utilizarla para meter cosas, pero al poner tres alturas, era dificil coger algo pequeño que metieras, así que decidí poner un portalapices, el fondo es redondo para no tener que ponerle soporte a la hora de imprimir, se puede sacar facilmente por si queremos meter alguna goma de borrar, clips, etc. (PORTALAPICES).
-Al unir los rollos con las barras roscadas con tuercas, me di cuenta de dos cosas: que en lugar de poner tres, ponia dos y la separación central la podía hacer con tuercas, que además servirían para que girara el cajetín (podeis poner una arandela pequeña si lo creeis necesario, yo no lo hice pero creo que lo haré), y segundo, las tuercas inferiores podrían rayar la mesa o la superficie donde pusieramos el conjunto. Por esto ultimo decidí hacer la base (BASE). Esta tiene el radio optimo para que pueda imprimirse con mi Anycubic Kossel Pulley. Los agujeros de la base es para gastar menos filamento, el vastago interior se podría poner hasta que chocara con el portalapices pero no lo vi necesario. Algunos han diseñado un vastago interior con rodamientos para que ruede mejor. Este no girará demasiado pero creo que no es necesario dependiendo de donde coloqueis el aparato. Los agujeros se pueden aprovechar para meter cositas aunque para cojerlas tendreis que sacar los rollos.
Espero que os guste, además reciclaremos los rollos de filamento.
Nota: en la base le pegué Goma-Eva.
Traducción Google:
When I decided to recycle the empty filament rolls, I saw a box here in thinviverse, which I have in "facts" (https://www.thingiverse.com/make:448163) but that did not suit me, it was a little bigger .
Then, I decided to design another one with the measurements I needed, this one I have in "my designs" (https://www.thingiverse.com/thing:2794324). This is a bit smaller, with the thinner walls and the smaller opening tab, to spend less plastic.
With this, when printing it, a problem arose, that the base of the flange, being smaller, by warping, I do not have a warm bed, it got up and when passing the nozzle of the layer fan, it collided and the extruder was decalibrated and I went to other places in the bed, having to stop printing. So I decided to do version 2.0.
In this version we have:
-Remove the tab. (cajeta_smart2_0)
-Make a hole to put a screw to screw a knob. With Freecad when crossing the curved wall with a cylinder, subtraction of pieces, I gave error, when doing it with a cube there was no problem, that's why the hole is square.
-Make a knob (POMO) to open the box: the knob I have not made the hole for the screw, but with a small drill and a drill, we do the size of the screw.
-Make two more models, one with a separation (cajeta_smart2) and another with two (cajeta_smart3).
-To the hole in the roll I had thought to use it to put things, but when putting three heights, it was difficult to take something small that you put, so I decided to put a portaplays, the bottom is round to not have to support it when printing , can be easily removed if we want to put some eraser, clips, etc. (PORTALAPICES).
-When joining the rolls with the threaded rods with nuts, I realized two things: that instead of putting three, I put two and the central separation could be made with nuts, which would also serve to turn the box (you can put a small washer if you think it necessary, I did not do it but I think I will), and second, the lower nuts could scratch the table or the surface where we put the set. Therefore, I decided to make the base (BASE). This has the optimal radius so that it can be printed with my Anycubic Kossel Pulley. The holes in the base is to spend less filament, the inner rod could be placed until it collided with the clip holder but I did not see it necessary. Some have designed an inner rod with bearings to make it roll better. This will not rotate too much but I think it is not necessary depending on where you place the device. The holes can be used to put little things but to take them you will have to remove the rolls.
I hope you like it, we will also recycle the filament rolls.
Note: I hit Goma-Eva on the base.
Similar models
thingiverse
free

SOPORTE FILAMENTO (Filament support) by fjma23
...re) so you can adapt them to the tolerances of your printer and improve the design. i also put the files of the profiles of cura.
thingiverse
free

Brazo largo para servo de 9 gramos by diegojjd
...más bonito.
lo he editado en thinkercad con el nombre de brazo largo servo. es público, así que si lo necesitas puedes editarlo.
thingiverse
free

soporte rollo bq by chikitin
...rollo arriba en el soporte que se sujeta en la pantalla no me entraba el que tenia por quedar porco espacio entre soporte y rollo
thingiverse
free

Puerta lavadora Aspes Optima by maestroflema
...rabajo de post-impresión, como eliminar el material de apoyo y hacer algún agujero más grande, pero quizás lo edite más adelante.
thingiverse
free

Carro X - 2 Hotend - Soporte - S-BOX by diegognavarro
...
actualicé la versión original moviendo 3mm los agujeros del endstop para que no choquen los terminales con el soporte del hotend
thingiverse
free

Soporte rollo filamento by Tonyastur
... simple pieza con el fin de que vaya más suave y la verdad se nota.
apto para la mayoría de los rollos de filamento de éste tipo.
thingiverse
free

Termómetro ambiental con batería AAA. by jpo41
... de un gancho. tu elijes.
.
print settings.
printer brand: anet
printer: a6
rafts: no
supports: no
filament: bq easy go pla negro
thingiverse
free

Tapones cortina trasera techo solar Mercedes CLC by MakerMou
... de ese diametro más resistente. en los archivos stl se aprecia.
espero que os sirva. cualquier mejora será bienvenida.
un saludo
thingiverse
free

Soporte accesorios Cecotec Conga Rockstar 900 by Teisman
...r los accesorios. esta es una idea de la pieza hecha por drtaly para la rockstar 500, que usa accesorios de un diametro inferior.
thingiverse
free

CORREA FLEXIBLE by AMUVIM
..., ya que quizás es más fácil hacerle los agujeros con posterioridad, según las necesidades de la persona a la que vaya destinada.
Cajetín
thingiverse
free

Cajetín para reciclar rollo filamento SmartMaterials de 1 kg, como organizador. (Box for recycling filament roll SmartMaterials of 1 kg, as organizer?) by fjma23
...store all the pots of the printer. when i finish mounting it, i will upload the image, i have the threaded rod and the 5 mm nuts.
3dwarehouse
free

Caja Contador de Agua
...caja contador de agua 3dwarehouse cajetín medidas homologadas para registro de aguas y...
Reciclar
thingiverse
free

Soporte Reciclar Papelera, Paper Support
...hingiverse
soporte para separar bolsas basura, para poder reciclar
reciclar
impreso con petg, sin soportes, en impresora ender 3
thingiverse
free

Embudo para reciclar aceite by InoxCrom
...las botellas de boca ancha vendidas en españa.
recomendado 3 capas de contorno y soporte para la parte inferior, pero no externa.
thingiverse
free

Marco para reciclar un Tetrabrik by Unprotec3D
...andelas,...), buzón para dejar mensajes, limpieza de pinceles, etc.
¿para qué lo podías utilizar tú?
más ejemplos en unprotec3d.
thingiverse
free

Filament spool drawer-SUNLU spool box by BobbyR1M
...spool box by bobbyr1m thingiverse diseño de cajas para reciclar las bobinas de hilo de sunlu. puede contener algun...
thingiverse
free

Top can by fitimollas
...turn it into a pen holder. este aro permite reciclar una lata vacia y convertirla en un posa...
thingiverse
free

Endstop + Click by peslatino
...de mouse, idea de referencia tomada de http://www.thingiverse.com/thing:610037 para reciclar piezas de...
thingiverse
free

Portanotas con portaboligrafos para reciclar papel A-4 en 6 trozos (2x3). Porta notes with pen holder to recycle A-4 paper in 6 pieces (2x3)? by fjma23
...em as the portanotas that usually sell or give propaganda have measures that when cutting the papers is wasted an important part.
thingiverse
free

Circuito bolas futbolìn y ping-pong by OskarRamajo
...bolas futbolìn y ping-pong by oskarramajo thingiverse piezas para reciclar pequeños tramos de filamento 2,85 mm procedente de impresora...
thingiverse
free
Cajetín para reciclar rollo filamento SmartMaterials de 1 kg, como organizador. (Box for recycling filament roll SmartMaterials of 1 kg, as organizer?) by fjma23
...store all the pots of the printer. when i finish mounting it, i will upload the image, i have the threaded rod and the 5 mm nuts.
thingiverse
free

SPOOL BOX by Kirolab
...(may design more in the future) https://www.materials3dimpresion.com/inicio.php caja para reciclar todos esos muchos... muchos carretes. solo necesitas tornillos de...
Smartmaterials
3d_export
$10

Bedroom Set
...10 high quality leather smart material: https://www.artstation.com/a/3162367 10 bone smartmaterials package: https://www.artstation.com/a/12987696 15 pbr japanese fabric material:...
3dbaza
$2

10 metal smartmaterials and pbr textures (128720)
...psm<br>note : the 3d model is not in the package,<br>to download the ironman helmet 3d model please use link below :
artstation
$5

Burned cloth SP SmartMaterial
...inter 2020.<br>you can add custom burn holes or edit automask. (just add paint layer to mask in burned edge opacity layer )
thingiverse
free

Soporte ligero filamento SmartMaterial 2x1. Light support strand SmartMaterial 2x1.? by fjma23
...2, since with this you can play with the distances. i also advise you to put eva rubber so that it will hold well to the surface,
thingiverse
free
Cajetín para reciclar rollo filamento SmartMaterials de 1 kg, como organizador. (Box for recycling filament roll SmartMaterials of 1 kg, as organizer?) by fjma23
...store all the pots of the printer. when i finish mounting it, i will upload the image, i have the threaded rod and the 5 mm nuts.
thingiverse
free

Clip curvado para Smartmaterials 3DCPI by iirodriguezsoler
...o ajusta y suele pillar varios filamentos con el "ala" larga, pero aun así no se suelta.
espero que le sirva a alguien.
thingiverse
free

Spool Smartmaterials3D Organizer by Jb3designer
...
in case you like the highest organizer, you can print a cylindrical connector with the same dimension as the central hole in 3d.
thingiverse
free

Junta de goma para reproductor audio de cintas grandes Revox. (Rubber gasket for Revox large tape audio player?) by fjma23
...player?) by fjma23 thingiverse hecha con filamento flexible de smartmaterials la imagen que he subido del reproductor no es...
artstation
free

20 Rusted Metal Smart Materials Vol.01 (SPSM)
...t;this material was created by 3dsarash, you can access my portfolio on artstation by the link:<br>adding new free material
Fjma23
thingiverse
free

soporte gopro para tornillo de apriete by fjma23
...o para tornillo de apriete by fjma23
thingiverse
soporte gopro para base de tornillo https://www.thingiverse.com/thing:2943779.
thingiverse
free

Vaso ondulado. by fjma23
...ncontrado lo en subido. queda bastante robusto, yo lo he dejado para poner lapices o si pillo alguna planta lo usaré como maceta.
thingiverse
free

Abrelatas (mando) - Opener (handler)? by fjma23
... de un abrelatas antiguo que tenía mi madre que se me rompio. realizado en freecad que ajusta como un guante a la parte metalica.
thingiverse
free

Soporte baldas (Shelf support?) by fjma23
...o para pernos de 5 mm. permite ampliar la base de apoyo de las baldas de un armario. es una simple prueba pero tiene su utilidad.
thingiverse
free

soporte vaporizador (Vaporizer holder?) by fjma23
... para poder dejarlo con el cable cargador puesto. os subo también la primera versión pero vimos que el vaporizador se puede caer.
thingiverse
free

Llavero logo vistalegre personalizado. Key chan? by fjma23
...habitualmente el material de oficina.
traduccion google:
a gift for the commercial that usually supplies us with office supplies.
thingiverse
free

SOPORTE SOLDADOR JBC 14N. (JBC 14N WELDER SUPPORT?) by fjma23
...y fjma23
thingiverse
un soporte para dejar este mini-soldador, que por cierto, es una bestia parda, cuando está caliente o frío.
thingiverse
free

Tope Z impresora 3DSteelPro 3DEspaña by fjma23
...e que se salga dicho eje. el tope z izquierdo se puede imprimir (yo he utilizado slic3r) haciéndole un reflejo (flip) al derecho.
thingiverse
free

Cadena. Chain? by fjma23
... to make a design that must be printed with supports. this anger to grab the pacifier of a niece-granddaughter to the cart, hehe.
thingiverse
free

Gomas prismaticos SANJU 9X30 by fjma23
...in the images. see the print settings at https://www.thingiverse.com/thing:2894704 and https://www.thingiverse.com/thing:2885935.
Rollo
turbosquid
$10

Dining group Rollo
... group rollo for download as max, max, obj, 3ds, max, and fbx on turbosquid: 3d models for games, architecture, videos. (1644164)
turbosquid
$13

Diamond cut Rollo Chain CH005
... chain ch005 for download as max, c4d, max, max, fbx, and obj on turbosquid: 3d models for games, architecture, videos. (1659414)
3d_export
$10

dining set rollo
...corona render, it is recommended to install at least version 1.5, since the glossiness of materials is adjusted with pbr in mind.
thingiverse
free

Cuelga rollos by Hitorimaru
...cuelga rollos by hitorimaru
thingiverse
cuelga rollos para la cocina.
thingiverse
free

Porta Rollo by pdiqlosis
...porta rollo by pdiqlosis
thingiverse
es solo un porta rollos
thingiverse
free

Soporte Rollo by Valvulin
...soporte rollo by valvulin
thingiverse
soporte para rollo de filamento, con encastre para cuadro metálico
thingiverse
free

soporte rollos by samu235
...soporte rollos by samu235
thingiverse
soporte para rollos hecho con varillas roscadas m8 y piezas impresas
thingiverse
free

Rollo Halter by petzi
...alter by petzi
thingiverse
halter für rollos mit vielzahn.
mein erstes projekt, verbesserungsvorschläge werden gerne angenommen!
thingiverse
free

Rollo Halter by Verticalascend
...rollo halter by verticalascend
thingiverse
ersatzhalterung für ein rollo, der haken für das fenster
roller blind holder
thingiverse
free

Soporte rollo cocina by einsausti88
...soporte rollo cocina by einsausti88
thingiverse
soporte para rollo de cocina forma espirall
Organizador
3d_export
$8

organizador
...organizador
3dexport
organizador marca paduit
thingiverse
free

organizador tornillo by jise311
...organizador tornillo by jise311
thingiverse
organizador de tornilleria
thingiverse
free

Organizadores by JoseMaker
...organizadores by josemaker
thingiverse
solidworks
thingiverse
free

Organizador by Riversparrot
...organizador by riversparrot
thingiverse
some designs
thingiverse
free

Organizador by CircuitoMaker
...organizador by circuitomaker
thingiverse
https://www.youtube.com/circuitomaker
thingiverse
free

Organizador
...se
this is a simple drawer organizer, consisting of small plates and t connectors.
included .blend file with two other patterns.
thingiverse
free

Organizador 1G by Gustavo_Isola
...nes que van de una división a ocho, pudiendo elegir cual imprimir y armar tu organizador. las medidas del mismo son 135x120x125.
thingiverse
free

Organizador de Controles by gibevilacqua
...organizador de controles by gibevilacqua
thingiverse
organizador para controles remotos
thingiverse
free

Organizador de tornillos by rubenomar_2k2
...organizador de tornillos by rubenomar_2k2
thingiverse
organizador de tornillos para muebles
thingiverse
free

Organizador by Riversparrot
...organizador by riversparrot
thingiverse
printed whit anet a8 temperature: 209 pla
Filamento
thingiverse
free

Cubre Filamento by DanielPafundi
...cubre filamento by danielpafundi
thingiverse
cubre filamento
thingiverse
free

centrador filamento by redghost3d
...centrador filamento by redghost3d
thingiverse
centrador filamento
thingiverse
free

soporte filamento by redghost3d
...soporte filamento by redghost3d
thingiverse
soporte filamento
thingiverse
free

Soporte Filamento by fraidias
...soporte filamento by fraidias
thingiverse
soporte para bobinas de filamento
thingiverse
free

Soporte filamento by AIP_
...soporte filamento by aip_
thingiverse
soporte para mesa para filamento
thingiverse
free

Suporte de Filamento by AndrezinhoCosta
...suporte de filamento by andrezinhocosta
thingiverse
suporte de filamento com guia para o filamento
thingiverse
free

Segura Filamento by apcks
...segura filamento by apcks
thingiverse
é um suporte para segurar o filamento no carretel.
thingiverse
free

Remix soporte filamento by tximy
...remix soporte filamento by tximy
thingiverse
remix soporte filamento
thingiverse
free

Guia de Filamento by Emma6487
...guia de filamento by emma6487
thingiverse
guia para filamento
thingiverse
free

soporte filamento by jise311
...soporte filamento by jise311
thingiverse
soporte para el roolo de filamento simples y economico para impresora tronxy
Recycling
turbosquid
$1
RECYCLE
... available on turbo squid, the world's leading provider of digital 3d models for visualization, films, television, and games.
3ddd
$1

Recycle bin
...recycle bin 3ddd recycle , recycling , bin , can , container , trash ,...
3d_ocean
$25

Recycle Bins
...bins city containers disposal ecology garbage hi poly recycle recycling shader trash urban vray hi poly recycle bins garbage...
3d_ocean
$2
Recycle Arrow
...cycle environmental conservation green isolated isolated on white pollution recycling recycling symbol render reuse sign single object symbol three-dimensional...
turbosquid
$9

Recycling Bin
...quid
royalty free 3d model recycling bin for download as fbx on turbosquid: 3d models for games, architecture, videos. (1386366)
turbosquid
$10

Recycle Bin
...ty free 3d model recycle bin for download as ma, obj, and fbx on turbosquid: 3d models for games, architecture, videos. (1203083)
turbosquid
$9
Recycle Bin
...y free 3d model recycle bin for download as max, obj, and fbx on turbosquid: 3d models for games, architecture, videos. (1152735)
turbosquid
$2

Recycle Basket
...e 3d model recycle basket for download as blend, obj, and fbx on turbosquid: 3d models for games, architecture, videos. (1702963)
turbosquid
$29

recycling bin
...3d model recycling bin for download as 3ds, obj, c4d, and fbx on turbosquid: 3d models for games, architecture, videos. (1400375)
turbosquid
$15
Recycling Stand
...l recycling stand for download as max, max, fbx, obj, and 3ds on turbosquid: 3d models for games, architecture, videos. (1642505)
Kg
turbosquid
$5

Kettlebell 10 kg
...ll 10 kg for download as blend, blend, 3ds, dae, fbx, and obj on turbosquid: 3d models for games, architecture, videos. (1583701)
turbosquid
$5

Kettlebell 7.5 kg
...l 7.5 kg for download as blend, blend, 3ds, dae, fbx, and obj on turbosquid: 3d models for games, architecture, videos. (1583699)
turbosquid
$5

Kettlebell 5 kg
...ell 5 kg for download as blend, blend, 3ds, dae, fbx, and obj on turbosquid: 3d models for games, architecture, videos. (1583695)
turbosquid
$5

Kettlebell 2 kg
...ell 2 kg for download as blend, blend, 3ds, dae, fbx, and obj on turbosquid: 3d models for games, architecture, videos. (1583690)
turbosquid
$5

Kettlebell 1 kg
...ell 1 kg for download as blend, blend, 3ds, dae, fbx, and obj on turbosquid: 3d models for games, architecture, videos. (1583687)
3ddd
$1

SIEMENS KG 49NS50
...siemens kg 49ns50
3ddd
siemens , холодильник
текстуры в архиве.
turbosquid
$30

Wouxun KG-UVD1P radio
...ouxun kg-uvd1p radio for download as 3ds, obj, fbx, and blend on turbosquid: 3d models for games, architecture, videos. (1198344)
turbosquid
$39

Gorilla Kettlebell 20 Kg
... available on turbo squid, the world's leading provider of digital 3d models for visualization, films, television, and games.
turbosquid
$5

Fixed Barbell 5 kg
... barbell 5 kg for download as blend, blend, 3ds, dae, and obj on turbosquid: 3d models for games, architecture, videos. (1584064)
turbosquid
$5

Gas LPG 3 Kg
...odel gas lpg 3 kg for download as c4d, 3ds, dae, fbx, and obj on turbosquid: 3d models for games, architecture, videos. (1327329)
Como
3ddd
$1

chair COMO
...chair como
3ddd
como
chair como
3ddd
$1

como classic
...como classic
3ddd
como
комод como classic (corona render)
3ddd
$1

Como Cavio
...1000х890
3ds max 2013+2011+fbx+текстуры
como, "cavio", italy, (wхdхh): 1240х1000х890 mm
3ds max 2013+2011+fbx+textures
3ddd
$1

Brabbu COMO SOFA
...brabbu como sofa
3ddd
brabbu , como
brabbu como sofa
3d_export
$7

como bed
...como bed
3dexport
name:
turbosquid
$16

COMO BED
...urbosquid
royalty free 3d model como bed for download as max on turbosquid: 3d models for games, architecture, videos. (1282330)
turbosquid
$10

Como Dining
...royalty free 3d model como dining for download as max and fbx on turbosquid: 3d models for games, architecture, videos. (1281838)
turbosquid
$5

COMO SOFA
...lty free 3d model como sofa for download as max, fbx, and obj on turbosquid: 3d models for games, architecture, videos. (1650880)
3ddd
$1

Cavio Como ArtC0320
...tc0320
3ddd
cavio , como , письменный
65x130x85
turbosquid
$25

COMO-sofa
... available on turbo squid, the world's leading provider of digital 3d models for visualization, films, television, and games.
Roll
archibase_planet
free

Roll
...roll
archibase planet
beef-roll food roll
roll 1 - 3d model (*.gsm+*.3ds) for interior 3d visualization.
archibase_planet
free

Roll
...roll
archibase planet
beef-roll roll meat loaf
roll 3 - 3d model (*.gsm+*.3ds) for interior 3d visualization.
archibase_planet
free

Roll
...roll
archibase planet
roll beef-roll meat loaf
roll 4 - 3d model (*.gsm+*.3ds) for interior 3d visualization.
archibase_planet
free

Roll
...roll
archibase planet
meat loaf beef-roll roll
roll 2 - 3d model (*.gsm+*.3ds) for interior 3d visualization.
archibase_planet
free

Roll
...roll
archibase planet
roll scroll
roll n070707 - 3d model for interior 3d visualization.
3d_ocean
$5

Roll-Up
...roll-up
3docean
advertise roll-up
roll-up
3d_ocean
$5

Deodorant Roll
...deodorant roll
3docean
deodorant roll-on
deodorant roll-on product. label map included.
3d_ocean
$2

Roll-Up
...roll-up
3docean
presentation roll-up system
roll-up presentation system
turbosquid
$5

Roll on
...turbosquid
royalty free 3d model roll on for download as max on turbosquid: 3d models for games, architecture, videos. (1319449)
turbosquid
$9

Roll
...squid
royalty free 3d model roll for download as fbx and obj on turbosquid: 3d models for games, architecture, videos. (1547498)
Organizer
3ddd
$1

Organic Chair / Organic Highback
... organic highback , vitra
присутствует формат .fbx
3ddd
free

Organic Cosmorelax
...organic cosmorelax
3ddd
organic , cosmorelax
organic cosmorelax
turbosquid
$10

Organizer
...d
royalty free 3d model organizer for download as ma and fbx on turbosquid: 3d models for games, architecture, videos. (1241904)
3d_ocean
$9

Organic
...nic
3docean
4d brain cinema disgusting flesh heart material organic putrid realistic
10 shapes 10 materials created in cinema r14
3ddd
$1

Table organic
...table organic
3ddd
обеденный
table organic
3ddd
free

Organic chair
...rganic chair
3ddd
organic
http://www.archiexpo.com/prod/ceccotti-collezioni/organic-design-chairs-wood-4105-147483.html
3ddd
free

organic bed
...organic bed
3ddd
mostafa omar
organic bed for interior furniture
design_connected
$18

Organic Highback
...organic highback
designconnected
vitra organic highback armchairs computer generated 3d model. designed by eero saarinen.
design_connected
$16

Organic Chair
...organic chair
designconnected
vitra organic chair chairs computer generated 3d model. designed by eero saarinen.
turbosquid
$50

Organic Products
...quid
royalty free 3d model organic products for download as on turbosquid: 3d models for games, architecture, videos. (1398510)
Filament
3ddd
$1

Filament Cage
...filament cage
3ddd
лофт , filament cage
модель бра, делалась по фото!
turbosquid
$3

FILAMENT COUNTER
...d
royalty free 3d model filament counter for download as stl on turbosquid: 3d models for games, architecture, videos. (1563049)
3d_export
$5

Filament lamp 3D Model
...filament lamp 3d model
3dexport
filament lamp 3d model kevin 54161 3dexport
3d_export
$5

Filament bulb candle 3D Model
...filament bulb candle 3d model
3dexport
filament bulb-candle
filament bulb candle 3d model kevin 54163 3dexport
3d_export
$5

Filament led light bulb
...filament led light bulb
3dexport
realistic 3d model of filament light bulb with v-ray materials.
3d_export
$5

Filament led light bulb
...filament led light bulb
3dexport
realistic 3d model of filament light bulb with v-ray materials.
3d_export
$5

Filament led light bulb
...filament led light bulb
3dexport
realistic 3d model of filament light bulb with v-ray materials.
3d_export
$5

Filament led light bulb
...filament led light bulb
3dexport
realistic 3d model of filament light bulb with v-ray materials.
3d_export
$5

Filament led light bulb
...filament led light bulb
3dexport
realistic 3d model of filament light bulb with v-ray materials.
3ddd
$1

Factory filament metal shade
...factory filament metal shade
3ddd
restoration hardware
restoration hardware. 20th c. factory filament metal shade.
0
turbosquid
$12

Calligraphic Digit 0 Number 0
...hic digit 0 number 0 for download as max, obj, fbx, and blend on turbosquid: 3d models for games, architecture, videos. (1389318)
3d_export
$6

set-0
...set-0
3dexport
turbosquid
$6

hedge 0
...yalty free 3d model hedge 0 for download as max, obj, and fbx on turbosquid: 3d models for games, architecture, videos. (1450353)
turbosquid
$5

Nuber 0
...oyalty free 3d model nuber 0 for download as ma, obj, and fbx on turbosquid: 3d models for games, architecture, videos. (1564674)
turbosquid
$22

0.jpg
... available on turbo squid, the world's leading provider of digital 3d models for visualization, films, television, and games.
turbosquid
free

Steam Locomotive Fowler 4F 0-6-0
... available on turbo squid, the world's leading provider of digital 3d models for visualization, films, television, and games.
turbosquid
$10

Liquid Number 0
... model liquid number 0 for download as c4d, 3ds, fbx, and obj on turbosquid: 3d models for games, architecture, videos. (1689919)
turbosquid
$45

Dragon360_perspShape_tmp.0.jpg
... available on turbo squid, the world's leading provider of digital 3d models for visualization, films, television, and games.
turbosquid
$8

Rocks Debris 0
... available on turbo squid, the world's leading provider of digital 3d models for visualization, films, television, and games.
3d_export
$18

wood-guardrail-fence 0
...wood-guardrail-fence 0
3dexport
wood-guardrail-fence 0<br>3ds max 2015
Box
archibase_planet
free

Box
...box
archibase planet
box carton cardboard box
box 2 - 3d model (*.3ds) for interior 3d visualization.
archibase_planet
free

Box
...box
archibase planet
carton cardboard box box
box 1 - 3d model (*.3ds) for interior 3d visualization.
3d_export
$6

box
...box
3dexport
box
3d_export
$5

Box
...box
3dexport
box
3d_export
$5

box
...box
3dexport
box
3d_export
$5

box
...box
3dexport
box
archibase_planet
free

Box
...box
archibase planet
box box for paper notebook pencil
box - 3d model (*.gsm+*.3ds) for interior 3d visualization.
archibase_planet
free

Box
...box
archibase planet
box carton cardboard box
box n170111 - 3d model (*.gsm+*.3ds) for interior 3d visualization.
archibase_planet
free

Box
...box
archibase planet
box carton cardboard box
box n050411 - 3d model (*.gsm+*.3ds) for interior 3d visualization.
archibase_planet
free

Boxes
...boxes
archibase planet
boxes box case bin
boxes n281213 - 3d model (*.gsm+*.3ds+*.max) for interior 3d visualization.
Para
turbosquid
free

Para-Goomba
... available on turbo squid, the world's leading provider of digital 3d models for visualization, films, television, and games.
turbosquid
$2

CAJA PARA MUNICIONES
...oyalty free 3d model caja para municiones for download as obj on turbosquid: 3d models for games, architecture, videos. (1706506)
turbosquid
$1

mueble para tv
...uid
royalty free 3d model mueble para tv for download as max on turbosquid: 3d models for games, architecture, videos. (1602158)
3ddd
$1

batu ukir paras jogja
...batu ukir paras jogja
3ddd
batu ukir paras jogja , soft stone material
turbosquid
$12

Para vert one
...ara vert one for download as max, max, max, fbx, obj, and max on turbosquid: 3d models for games, architecture, videos. (1619628)
3ddd
free

SLV Para 380
...выполненная в размер. всё сгруппировано, имеет логические имена. все текстуры в комплекте. вставляй и пользуйся! :) всем успехов!
3d_export
$8

soporte para gpu
... spec alpha gabinete atx gaming con una asus turbo rtx 2060 se puede ajustar el tamaño del modelo ( formato para zbrush.obj.stl )
3d_export
free

escritorio para set de tv
...escritorio para set de tv
3dexport
escritorio para set de programa de tv.
3d_export
$5

abajur moderno para sala
...abajur moderno para sala
3dexport
turbosquid
$50

NIVELADOR TACOS PARA MUEBLES
... available on turbo squid, the world's leading provider of digital 3d models for visualization, films, television, and games.
1
turbosquid
$69

armchairs(1)(1)
... available on turbo squid, the world's leading provider of digital 3d models for visualization, films, television, and games.
turbosquid
$15

ring 1+1
... available on turbo squid, the world's leading provider of digital 3d models for visualization, films, television, and games.
turbosquid
$10

chair(1)(1)
... available on turbo squid, the world's leading provider of digital 3d models for visualization, films, television, and games.
turbosquid
$8

Chair(1)(1)
... available on turbo squid, the world's leading provider of digital 3d models for visualization, films, television, and games.
turbosquid
$2

RING 1(1)
... available on turbo squid, the world's leading provider of digital 3d models for visualization, films, television, and games.
turbosquid
$1

house 1(1)
... available on turbo squid, the world's leading provider of digital 3d models for visualization, films, television, and games.
turbosquid
$1

Table 1(1)
... available on turbo squid, the world's leading provider of digital 3d models for visualization, films, television, and games.
turbosquid
$59

Formula 1(1)
...lty free 3d model formula 1 for download as max, fbx, and obj on turbosquid: 3d models for games, architecture, videos. (1567088)
design_connected
$11

No 1
...no 1
designconnected
sibast no 1 computer generated 3d model. designed by sibast, helge.
turbosquid
$2

desert house(1)(1)
...3d model desert house(1)(1) for download as 3ds, max, and obj on turbosquid: 3d models for games, architecture, videos. (1055095)
2
design_connected
$11

No 2
...no 2
designconnected
sibast no 2 computer generated 3d model. designed by sibast, helge.
turbosquid
$6

Cliff Rock 2-2
...uid
royalty free 3d model cliff rock 2-2 for download as obj on turbosquid: 3d models for games, architecture, videos. (1619161)
turbosquid
$29

Book variation 2 2
...3d model book variation 2 2 for download as max, obj, and fbx on turbosquid: 3d models for games, architecture, videos. (1366868)
turbosquid
$22

Classic baluster (2) (2)
...assic baluster (2) (2) for download as max, obj, fbx, and stl on turbosquid: 3d models for games, architecture, videos. (1483789)
turbosquid
$99

Smilodon 2 Pose 2
... available on turbo squid, the world's leading provider of digital 3d models for visualization, films, television, and games.
turbosquid
$20

Barrel Barricade 2-2
... available on turbo squid, the world's leading provider of digital 3d models for visualization, films, television, and games.
turbosquid
$6

Wall Trophy (2) (2)
... available on turbo squid, the world's leading provider of digital 3d models for visualization, films, television, and games.
turbosquid
free

Tire label 2 of 2
... available on turbo squid, the world's leading provider of digital 3d models for visualization, films, television, and games.
3ddd
$1

Кровать, 2 тумбочки, 2 светильника
...кровать, 2 тумбочки, 2 светильника
3ddd
кровать, 2 тумбочки, 2 светильника
нормальное качество
формат 3ds max
без текстур
3ddd
free

Кровать, 2 тумбочки, 2 светильника
...кровать, 2 тумбочки, 2 светильника
3ddd
кровать, 2 тумбочки, 2 светильника
нормальное качество
формат 3ds max
без текстур