Thingiverse

C3PO Torso by Jesse_M
by Thingiverse
Last crawled date: 3 years ago
***Update 4/19/2019 - Added a remix of Tim Osullivan's throat valve (Credit to Tim for the original model)
***Update 10/10/2018 - Added STLs for the front and back chest pieces cut in half for those aren't keen with Meshmixer or Netfabb
***Update 8/06/2018 - The previous version had the side bolts mirrored left to right. This was not correct. The right bolt goes into the front chest half whereas the left bolt goes into the back chest half. I updated the front and back halves of the chest for the correct placement of the right side bolt and moved the inside lip on the right side to the back half of the chest.
***Update 7/28/2018 - Added new revision of the belly circle to include the thin outer ring that was missing.
These were modeled from scratch using Blender and Autocad. Reference mainly taken from the 3D scans of the Don Post statue by TheHappyOne and photos from TK409 and MrTea's reference libraries online. I have not printed them. If you do, please provide feedback and post. Wall thickness is mostly 3mm. These will be able to be assembled and glued together to make a complete front and back assembly and shoulder assemblies. I included small alignment holes in each part. The holes are modeled 1.75mm in diameter so you can use printer filament if you want. You may want to use small screws instead of glue on the pistons, back panel and neck rings so you can take them on and off. If so, you can drill out the small holes for whatever sized screws that will work (probably #4 screws). Just be careful when drilling. I drill by hand (without power tools) to keep from splitting parts. I included a lip on the seam edge of the chest front to align and support the back of the chest. There is a small hole through this lip and the back chest part in the location that the side button goes. The side button is the same as the one on the shorts so I did not include it here again. I did not model the throat valve because a good model is already available on thingiverse. For the throat valve, a large hole can be cut into the front shell using the small hole as a center guide. This can allow you to insert the whole throat valve into the larger hole. Alternatively, you can print the throat valve shallower and just glue it directly on top of the front shell. The shoulder bearings are intended to be glued directly onto the shoulder bells. Only one shoulder is uploaded. You can mirror it for the other side.I wished I could have designed fully functioning shoulders with ball bearings and hinges, but I decided to simplify the design for the time being. I may revisit the shoulders after I have completed the remainder of the parts. One thing I noticed when modeling this is that the overall scale of the Don Post model is definitely smaller than real life. I will continue to model all my parts to this scale but I recommend you take measurements of yourself or other purchased parts you have and choose a scale to print appropriately.
Similar models
thingiverse
free

Fishing Stand Rod Support by WSM25
...ing rod support. to be used with m6 nut / bolt. the small lips on the back support is so you can hang your strop next to the rod.
thingiverse
free

e3d Titan aero X-carriage by zlizz
...rt that you can mount a layer fan that goes under the carriage (tested and dont work that good, new version will come 17-12-09 )
thingiverse
free

WPL Teardrop Beadlock Wheel by the_law_man01
...r at your disposal and would like a set of wheels, contact me.
thank you and enjoy.
update 09/25/2018:
made the inner ring wider.
thingiverse
free

Filastruder Drilling Templates by mrflippant
... bolts.
hopefully this doesn't happen to you, but this will make it easy to add new holes to remedy the situation if it does.
thingiverse
free

Bumper Brackets for Axial SCX10 Rock Crawler by SirGed
...ll the screw hole yourself to 2.4 mm as well.
this will fit both the front and the back. the green are the parts on the crawler.
thingiverse
free

Perfect case for Anet A8_Cover Remix by zerogee42
...so you can drill a small hole yourself where you like. i only put one hole in the top right part of the cover and it works great.
thingiverse
free

Virtual Pinball Playfield Stops by Kook
...in these parts for the carriage bolt). these parts are compatible with a standard widebody cabinet and 43 inch playfield monitor.
thingiverse
free

Hangers for cordless drill by igortopolski
...r m4 bolt.
no support required if printed on the side, however, i'd recommend raft.
make sure you let me know if you like it!
thingiverse
free

Neo 3d Front Cylinder by Hakzel
...oles of the front at one side, and on the other side you have to drill one ø 4,5 mm hole in the side wall.
the screws are all m4.
thingiverse
free

PVC Art Shelf Brackets
... hole, use a 1" screw to hold it, turn it over and mark the hole on the second side, drill and now you have a straight hole.
C3Po
3d_export
free

c3po starstorm
...c3po starstorm
3dexport
c3po starstorm 3d model low quality
3d_export
$99

C3PO Star Wars Droid Robot 3D Model
...r movie star wars sci-fi scifi rigged riged robot droid 3dsmax c3po c3p0
c3po star wars droid robot 3d model squir 73933 3dexport
cg_studio
$99

C3PO Star Wars Droid Robot3d model
... .c4d .fbx .lwo .max .obj - c3po star wars droid robot 3d model, royalty free license available, instant download after purchase.
cg_studio
$99

C3PO Star Wars Droid Robot Rigged for MAYA3d model
... c3p0
.mb - c3po star wars droid robot rigged for maya 3d model, royalty free license available, instant download after purchase.
3d_export
$99

C3PO Star Wars Droid Robot Rigged for MAYA 3D Model
...p0
c3po star wars droid robot rigged for maya 3d model download .c4d .max .obj .fbx .ma .lwo .3ds .3dm .stl squir 109605 3dexport
3d_export
$19

Low Poly Sci-Fi Bracelet C3PO
...;- if you have any question feel free to contact me through cgtrader<br>reselling these assets is not allowed, but other th
cg_studio
$199

C-3PO Star Wars Droid3d model
...star wars sci-fi scifi rigged riged robot droid 3dsmax c3po c3p0 c-3po .mb .max .lwo .fbx .c4d .3ds .obj...
cg_studio
$239

Star Wars R2D23d model
...model cgstudio star wars droid r2d2 r2 d2 r2-d2 c3po robot scifi movie character space skywalker darth vader riged...
cg_studio
$129

STAR WARS BB-8 DROID3d model
...model cgstudio droid wars robot skywalker lucas space star c3po r2d2 sci-fi spaceship scifi r2-d2 darth vader bb-8 rigger...
thingiverse
free

C3Po head by wthierry
...c3po head by wthierry
thingiverse
this is a model of c3po from star wars
Jesse
design_connected
$11

Jess
...jess
designconnected
minotti jess computer generated 3d model. designed by dordoni, rodolfo.
3ddd
$1

Jesse CINDY
...y
3ddd
jesse , cindy
http://www.gomodern.co.uk/store/jesse-cindy-armchair.html
3ddd
$1

Стеллаж Jesse Aleph
... aleph , jesse
стеллаж для книг от фабрики jesse.
3ddd
$1

Jesse Cindy Chair
...jesse cindy chair
3ddd
jesse
jesse cindy armchair in 3dsmax2012 vray scene with maps & materials + obj format.
turbosquid
$28

Jesse Daniel
... 3d model jesse daniel for download as max, max, fbx, and obj on turbosquid: 3d models for games, architecture, videos. (1645675)
turbosquid
$12

Nowodvorski jess
... available on turbo squid, the world's leading provider of digital 3d models for visualization, films, television, and games.
turbosquid
$10

Sofa JESSE Oliver
...
royalty free 3d model sofa jesse oliver for download as max on turbosquid: 3d models for games, architecture, videos. (1198542)
turbosquid
$20

Jesse Bed Prince
...ty free 3d model jesse bed prince for download as max and obj on turbosquid: 3d models for games, architecture, videos. (1644622)
turbosquid
$20

Jesse Bed Mark
...alty free 3d model jesse bed mark for download as max and obj on turbosquid: 3d models for games, architecture, videos. (1643600)
turbosquid
$20

Jesse Sofa Ives
...lty free 3d model jesse sofa ives for download as max and obj on turbosquid: 3d models for games, architecture, videos. (1639129)
Torso
3d_export
$5

female torso
...female torso
3dexport
female torso
turbosquid
$39

Torso
...royalty free 3d model torso for download as max, fbx, and obj on turbosquid: 3d models for games, architecture, videos. (1518041)
turbosquid
$2

Torso
... available on turbo squid, the world's leading provider of digital 3d models for visualization, films, television, and games.
3ddd
$1

654 Torso
...654 torso
3ddd
paolodeganello , cassina
кресло 654 torso дизайн paolo deganello
3ddd
$1

Potocco Torso
...potocco torso
3ddd
potocco
стол и стул potocco torso. стек модификаторов не свернут.
design_connected
$18

Torso 654
...torso 654
designconnected
cassina torso 654 armchairs computer generated 3d model. designed by paolo deganelo.
3d_export
$10

female torso
...female torso
3dexport
3d_export
$8

female torso
...female torso
3dexport
turbosquid
$15

turning torso
...quid
royalty free 3d model turning torso for download as 3dm on turbosquid: 3d models for games, architecture, videos. (1525931)
turbosquid
$10

Female Torso
...squid
royalty free 3d model female torso for download as ztl on turbosquid: 3d models for games, architecture, videos. (1709332)
M
turbosquid
$20
Stage M&M
... available on turbo squid, the world's leading provider of digital 3d models for visualization, films, television, and games.
3ddd
$1

bag m&m's
...bag m&m's
3ddd
bag m&m's
bag m&m;'s
3d_export
$35
iskander m
...iskander m
3dexport
iskander m 3d model
design_connected
$7
barstool m
...barstool m
designconnected
barstool m computer generated 3d model.
3ddd
free
CACTUS M
...cactus m
3ddd
cactus , lzf
настольный светильник cactus m
производитель lzf
design_connected
$13
Anfora M
...anfora m
designconnected
lzf anfora m computer generated 3d model. designed by herranz, miguel.
3ddd
$1
зеркало M Gastone
...зеркало m gastone
3ddd
зеркало m gastone
зеркало m gastone
design_connected
$16
Dogon M
...dogon m
designconnected
emmemobili dogon m chairs computer generated 3d model. designed by ferruccio laviani.
design_connected
$9
Sunlight M
...sunlight m
designconnected
bonacina pierantonio sunlight m computer generated 3d model. designed by bizzozzero, franco.
3ddd
$1
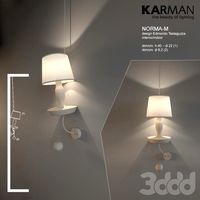
Karman / Norma-M
...arman , norma-m
http://www.karmanitalia.it/en/prodotto/norma-m/norma-m-ap640n/