Thingiverse
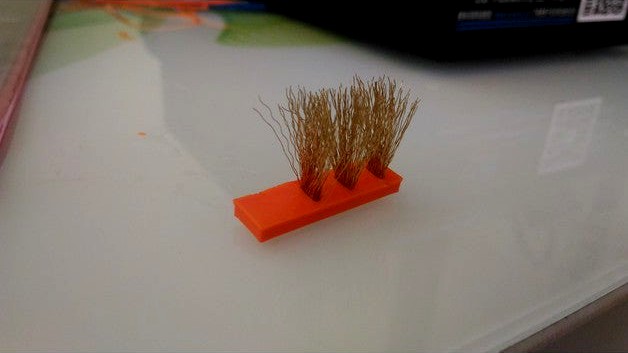
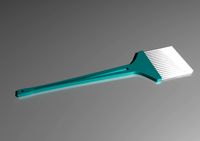
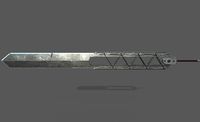
Brush for cleaning Nozzle with the Start G-Code by 3jcube
by Thingiverse
Last crawled date: 3 years ago
My way to clean the Nozzle before each print For the CR10 printers and all like
Here is my story...
The printer came with a concave glass like many of you and of course the solution is to replace it.
So I went to the local mirror store and asked the man to cut a piece 300X300 mm like what is known about the dimensions of the printer
He suggested to chamfer the edges for safety and I agreed
When I returned home I put the mirror on the heated bed plate
I found that it came short and after some measurements I discovered the mistake I had made
First the heated bed plate dimensions are 310X310 mm.
Second process of chamfering the edges took approximately 3 mm from each side.
The total becomes about 15 mm short.
Of course, it is not big problem, because I do not think I will print anything with a diameter bigger than 290 mm and the clamps hold the mirror well.
After a while I noticed that in many printers there is a system to clean the nozzle before each print.
And even many have made copies of these systems on their printers if you do some search on youtube you will find some like
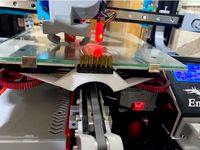
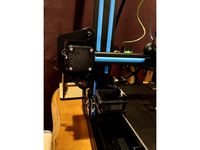
So I thought to take advantage of this extra space of the plate next to the mirror and do a system to cleaning the nozzle with a metal brush.
and this was the product of that idea.
Of course, as you will notice in the videos I have integrated two techniques to achieve the best results using the metal brush and also do some extra extrusion.
The extrusion code is custumized code taken from DIY3DTech YouTube Channel
" Creality CR10 - GCode to Clean Nozzle Before Printing "
The attached code can be replaced by the printers start G-code and you should find the exact numbers to be placed in the code, depending on where the brush is placed on your plate.
Of course, a very important point must be taken. The brush must be at least 80 mm away from the front of the plate in order not to obstruct the bed leveling
I hope you find it useful
and as usual feel free to customize and change what it takes to have a successful nozzle cleaning
And Please be careful about anything you do and if you do not have enough experience, do not risk anything
I'm not responsible for any problem or error you get
Do it at your own risk.
I used superglue to paste it to the plate
I'm using cura 3.4.1
you will find the start g-code under
Preferences -> Printers -> Machine settings -> Start G-Code
please take a copy of your original start g-code in case you want to go back.
This is the code you see it working in the video " Attempt no.4 "
I'm Sorry about children's voices in the background ;-)
https://youtu.be/uxPJLbfihL4
M82 ;absolute extrusion mode
M117 Clean ; Indicate nozzle clean in progress on LCD
M107 ; Turn layer fan off
G21 ; Set to metric [change to G20 if you want Imperial]
G90 ; Force coordinates to be absolute relative to the origin
G28 ;Home
G92 E0 ; Reset extruder to [0] zero end of cleaning run
G1 E-3 F500 ; Retract filiment by 3 mm to reduce string effect
G1 Z5 F4000 ;Move up 5mm to good position so the nozell hit the tip of brush;
G1 Y83 F4000 ;Move back to the first line of brush
G1 X10 F4000 ;Move side to do the first wipe
G1 Y91 F4000 ;Move back to the 2nd line of brush
G1 X0 F4000 ;Move side to do the 2nd wipe
G1 Y98 F4000 ;Move back to the 3ed line of brush
G1 X10 F4000 ;Move side to do the 3ed wipe
G1 Z25 E-3 F500 ;Move up 25mm to safety ; Retract filiment by 3 mm to reduce string effect
G4 P5000 ;stop for 5seconds to do extra manual cleaning if needed
; the coming code is doing some extrusion to cleaning nozel this is custumized code taken from
; DIY3DTech YouTube Channel " Creality CR10 - GCode to Clean Nozzle Before Printing! "
G1 X10 Y137 F4000 ; Move in 10mm from edge 40mm back to privent hiting the brush
G1 Z0.15 F4000 ;[z] 0.15mm close to heated bed
G92 E0 ; Set extruder to [0] zero
G1 Y237 E20 F500 ; Extrude 20mm filiment along Y axis to prime and clean the nozzle
G92 E0 ; Reset extruder to [0] zero end of cleaning run
G1 E-3 F500 ; Retract filiment by 3 mm to reduce string effect
G1 Z5 F4000 ; Move over and rise to safe Z height
M117 Printing ; Indicate Printing in progress on LCD
Here is my story...
The printer came with a concave glass like many of you and of course the solution is to replace it.
So I went to the local mirror store and asked the man to cut a piece 300X300 mm like what is known about the dimensions of the printer
He suggested to chamfer the edges for safety and I agreed
When I returned home I put the mirror on the heated bed plate
I found that it came short and after some measurements I discovered the mistake I had made
First the heated bed plate dimensions are 310X310 mm.
Second process of chamfering the edges took approximately 3 mm from each side.
The total becomes about 15 mm short.
Of course, it is not big problem, because I do not think I will print anything with a diameter bigger than 290 mm and the clamps hold the mirror well.
After a while I noticed that in many printers there is a system to clean the nozzle before each print.
And even many have made copies of these systems on their printers if you do some search on youtube you will find some like
So I thought to take advantage of this extra space of the plate next to the mirror and do a system to cleaning the nozzle with a metal brush.
and this was the product of that idea.
Of course, as you will notice in the videos I have integrated two techniques to achieve the best results using the metal brush and also do some extra extrusion.
The extrusion code is custumized code taken from DIY3DTech YouTube Channel
" Creality CR10 - GCode to Clean Nozzle Before Printing "
The attached code can be replaced by the printers start G-code and you should find the exact numbers to be placed in the code, depending on where the brush is placed on your plate.
Of course, a very important point must be taken. The brush must be at least 80 mm away from the front of the plate in order not to obstruct the bed leveling
I hope you find it useful
and as usual feel free to customize and change what it takes to have a successful nozzle cleaning
And Please be careful about anything you do and if you do not have enough experience, do not risk anything
I'm not responsible for any problem or error you get
Do it at your own risk.
I used superglue to paste it to the plate
I'm using cura 3.4.1
you will find the start g-code under
Preferences -> Printers -> Machine settings -> Start G-Code
please take a copy of your original start g-code in case you want to go back.
This is the code you see it working in the video " Attempt no.4 "
I'm Sorry about children's voices in the background ;-)
https://youtu.be/uxPJLbfihL4
M82 ;absolute extrusion mode
M117 Clean ; Indicate nozzle clean in progress on LCD
M107 ; Turn layer fan off
G21 ; Set to metric [change to G20 if you want Imperial]
G90 ; Force coordinates to be absolute relative to the origin
G28 ;Home
G92 E0 ; Reset extruder to [0] zero end of cleaning run
G1 E-3 F500 ; Retract filiment by 3 mm to reduce string effect
G1 Z5 F4000 ;Move up 5mm to good position so the nozell hit the tip of brush;
G1 Y83 F4000 ;Move back to the first line of brush
G1 X10 F4000 ;Move side to do the first wipe
G1 Y91 F4000 ;Move back to the 2nd line of brush
G1 X0 F4000 ;Move side to do the 2nd wipe
G1 Y98 F4000 ;Move back to the 3ed line of brush
G1 X10 F4000 ;Move side to do the 3ed wipe
G1 Z25 E-3 F500 ;Move up 25mm to safety ; Retract filiment by 3 mm to reduce string effect
G4 P5000 ;stop for 5seconds to do extra manual cleaning if needed
; the coming code is doing some extrusion to cleaning nozel this is custumized code taken from
; DIY3DTech YouTube Channel " Creality CR10 - GCode to Clean Nozzle Before Printing! "
G1 X10 Y137 F4000 ; Move in 10mm from edge 40mm back to privent hiting the brush
G1 Z0.15 F4000 ;[z] 0.15mm close to heated bed
G92 E0 ; Set extruder to [0] zero
G1 Y237 E20 F500 ; Extrude 20mm filiment along Y axis to prime and clean the nozzle
G92 E0 ; Reset extruder to [0] zero end of cleaning run
G1 E-3 F500 ; Retract filiment by 3 mm to reduce string effect
G1 Z5 F4000 ; Move over and rise to safe Z height
M117 Printing ; Indicate Printing in progress on LCD
Similar models
thingiverse
free
Custom start Gcode by monopriceman
... a priming/wiping line to the rear)
g0 z3
g0 y0
g0 z0
g1 x-1;(move a little closer to the print area)
g1 e15 f250;(small retract)
thingiverse
free
SVO2 Purge Bucket and GCODE by RedSquirrelHobbies
... positioning on
g1 z-1 f1000 ; lower nozzle by 1mm
g90 ; absolute positioning on
m400 ; wait for finish
thingiverse
free

Anet A8 Filament Scraper by DasEimer
... z0
g29 /autolevel
g1 z2 x-20 f9000
g1 y2 f9000
g92 e0
g1 e25 f500 /extrude 25mm
g4 s1
g1 x0 f2000 /wipe
g92 e0
g1 f9000
m117
thingiverse
free

Purge Bucket for A10M (cleaned up) by carterlewellyn
... e0 ;reset extruder positioning
g1 e-2 f5000 ;retract filament to resting spot
g92 e0 ;reset extruder positioning
i hope it helps
thingiverse
free

ANET A8 Nozzle Filament Wiper - Cleaner - Updated by andy_spoo
...
g1 y50 f3000 ; move out of the way of wiper
g;; 1 x10 y10 f3000; back to 'near' front left
g92 e0; zero extruder
; *****
thingiverse
free

Bukito Purge box
...ing code for use with purge box
g28 ;home
g1 z.1 f6000 ;move the platform down .1mm
;prime the extruder
g92 e0
g1 f200 e10
g92 e0
thingiverse
free
A20M A10M BigMac MKII 5015 Blower
...
g1 e70 f3000
g92 e0
g1 e30 f200
g92 e0
g4 s3
g0 f10000
; end extruder 2
g92 e0
g1 e-5 f6000
g1 x-10.5 f8000
g1 e-70 f3000
g92 e0
thingiverse
free
Ender 3/Pro Ender5/Pro Bed Nozzle Brush by blindley125
...1 z10.0 f3000 ; move z axis up little to prevent scratching of heat bed
g1 x8 y20 z0.3 f5000.0 ; move over to prevent blob squish
thingiverse
free
Geeetech A10t Purge Bucket with removable bucket by 123TaDa
...ipe
g0 x0 f2000 ; return
m211 s1 ; turn on soft stops once more
g1 e-0.5 ; try to prevent pips
g92 e0
; start extruder script end
thingiverse
free

Geeetech i3 Pro B extruder wiper by Damien68
...0 ;zero the extruded length
g1 f200 e3 ;extrude 3mm of feed stock
g92 e0 ;zero the extruded length again
g1 f9000
m117 printing ;
3Jcube
thingiverse
free

Soldering Tip cleaner + Fan Holder by 3jcube
...soldering tip cleaner + fan holder by 3jcube
thingiverse
under writing
https://www.thingiverse.com/thing:1725308
thingiverse
free

box files tool by 3jcube
...ple box for file-tools
the clips need some changes to fit perfectily
i uplowaded the orijinal max file feel free to customize it
thingiverse
free

Aquarium cave ( thin walls ) by 3jcube
... prim with 4-5 lines
ps:
i'm using cura slicer and i printed mine with uniform scaling by 75% on x an y and left it 100% on z
thingiverse
free

creality cr10 sd card cover by 3jcube
...der-adapter-car-gps-mobile/32721250427.html?spm=a2g0s.9042311.0.0.98ce4c4dragstp
so i did this remix
the 3dsmax file version 2016
thingiverse
free

Yet another belt tension for the MPCNC ( 10mm belt + 2 Bearing ) by 3jcube
...place i used 10mm m3 bolts.
its need support for printing so if you don't like work with supports this thing is not for you.
Brush
3d_export
free

brush
...brush
3dexport
brush
3d_export
free

brush
...brush
3dexport
it is brush
archibase_planet
free

Brush
...brush
archibase planet
brush toilet brush sanitary ware
brush - 3d model (*.gsm+*.3ds) for interior 3d visualization.
archibase_planet
free

Brush
...rush
archibase planet
rack brush cleaner toilet brush sanitary ware
brush - 3d model (*.gsm+*.3ds) for interior 3d visualization.
archibase_planet
free

Brush
...brush
archibase planet
brushes
brush - 3d model (*.gsm+*.3ds) for interior 3d visualization.
archibase_planet
free

Brush
...brush
archibase planet
?oilet brush sanitary ware
brush - 3d model (*.gsm+*.3ds) for interior 3d visualization.
design_connected
$11

Brushes
...brushes
designconnected
smallaccents brushes computer generated 3d model.
turbosquid
$1
Brush
...rush
turbosquid
royalty free 3d model brush for download as on turbosquid: 3d models for games, architecture, videos. (1391784)
3d_export
$5
brush
...brush
3dexport
comb
turbosquid
$10
Brush
...squid
royalty free 3d model brush for download as ma and obj on turbosquid: 3d models for games, architecture, videos. (1191257)
Code
turbosquid
$1

Code
...code
turbosquid
royalty free 3d model code for download as on turbosquid: 3d models for games, architecture, videos. (1293119)
3ddd
$1

банкетка code
...e , банкетка , капитоне
производитель
3d_export
$5

Code lock
...code lock
3dexport
realistic hight-poly model of code lock with high quality pbr textures (4096x4096). rendering in v-ray.
3d_export
$5

Code lock
...code lock
3dexport
realistic hight-poly model of code lock with high quality pbr textures (4096x4096). rendering in v-ray.
turbosquid
$10

Code Lock
...
royalty free 3d model code lock for download as max and fbx on turbosquid: 3d models for games, architecture, videos. (1368816)
turbosquid
$30

Code: MRN
... available on turbo squid, the world's leading provider of digital 3d models for visualization, films, television, and games.
3ddd
$1

DV home / CODE
...dv home / code
3ddd
dv home
итальянская фабрика dv home / стул code
3ddd
free

Blastation, Code 27
...ddd
blastation , code 27
диван фабрики blastation. размер 2700х950 h1100. 135 883 polys.
turbosquid
$10

Code Sofa, ENNE
...id
royalty free 3d model code sofa, enne for download as max on turbosquid: 3d models for games, architecture, videos. (1192986)
turbosquid
free

Armani Sport Code
...e 3d model armani sport code for download as ma, obj, and fbx on turbosquid: 3d models for games, architecture, videos. (1204039)
Nozzle
3d_export
$5
nozzle
...nozzle
3dexport
3d_export
$49
fuel nozzles
...fuel nozzles
3dexport
fuel nozzles 3d model. include max, obj, fbx files.
archive3d
free

Nozzle 3D Model
...archive3d
nozzle hair-drier ware
nozzle - 3d model (*.gsm+*.3ds) for interior 3d visualization.
turbosquid
$25

Pirouette Nozzle
... available on turbo squid, the world's leading provider of digital 3d models for visualization, films, television, and games.
turbosquid
$10

Fuel Nozzle
...model fuel nozzle for download as c4d, fbx, obj, 3ds, and stl on turbosquid: 3d models for games, architecture, videos. (1672732)
3d_export
$10

laval airjet nozzle
...laval airjet nozzle
3dexport
a simple modified laval nozzle (airjet shooter) for sorting purposes.
3d_export
$36

Gas nozzle 3D Model
... 3d model
3dexport
gas pump nozzle dispenser filling station petrol fuel spout tank gun
gas nozzle 3d model tartino 1945 3dexport
turbosquid
$39
Rocket nozzle, supressor.
... available on turbo squid, the world's leading provider of digital 3d models for visualization, films, television, and games.
cg_studio
$12

Oil Nozzle Gun3d model
...zle gun
.max .obj .jpg .fbx .dxf .3ds - oil nozzle gun 3d model, royalty free license available, instant download after purchase.
3d_export
$29

Fuel Pump Nozzle 3D Model
...l nozzle pump fuel fueling hose station photoreal detailed textures materials
fuel pump nozzle 3d model guidovrola 47129 3dexport
G
3ddd
free

G. Moscatelli
...алка
вешалка 25 / 26 / 27коллекция: belle heleneбренд: g. moscatelliстрана: италияразмеры: высота - 190 / 195; диаметр - 50 / 60.
3ddd
$1
G Plan Vintage
...g plan vintage
3ddd
винтаж , g plan
g plan vintage armchair
turbosquid
free
G protein
...otein
turbosquid
free 3d model g protein for download as c4d on turbosquid: 3d models for games, architecture, videos. (1309660)
turbosquid
$14

Fence G
...turbosquid
royalty free 3d model fence g for download as fbx on turbosquid: 3d models for games, architecture, videos. (1310122)
turbosquid
$7

G for Gun
...rbosquid
royalty free 3d model g for gun for download as max on turbosquid: 3d models for games, architecture, videos. (1685215)
turbosquid
$5

G Ring
...
turbosquid
royalty free 3d model g ring for download as stl on turbosquid: 3d models for games, architecture, videos. (1285079)
turbosquid
$5

Letter G
...urbosquid
royalty free 3d model letter g for download as max on turbosquid: 3d models for games, architecture, videos. (1408463)
turbosquid
$5

Letter g
...urbosquid
royalty free 3d model letter g for download as max on turbosquid: 3d models for games, architecture, videos. (1408408)
3ddd
$1

Infiniti / G-Chair
...infiniti / g-chair
3ddd
infiniti
www.infinitidesign.it/ita/g-chair.php
3ddd
$1
кресло G-68
...кресло g-68
3ddd
кресло
кресло руководителя g-68
Start
turbosquid
$50

The starting post
... available on turbo squid, the world's leading provider of digital 3d models for visualization, films, television, and games.
turbosquid
$25

Starting Block
... available on turbo squid, the world's leading provider of digital 3d models for visualization, films, television, and games.
turbosquid
$8

car start
... available on turbo squid, the world's leading provider of digital 3d models for visualization, films, television, and games.
3d_export
$100

start race motocross
...start race motocross
3dexport
start race motocross
3d_ocean
$2

Two Start Buttons
...cording for easy navigation – modeled from an image file can be used for different matters - great to start presantations in a...
turbosquid
$10

Kitchen Start Time
...
royalty free 3d model kitchen start time for download as max on turbosquid: 3d models for games, architecture, videos. (1502055)
turbosquid
$35

Start Finish CheckPoint
...tart finish checkpoint for download as max, 3ds, fbx, and obj on turbosquid: 3d models for games, architecture, videos. (1652558)
turbosquid
$41

Stairs Post Starting
... available on turbo squid, the world's leading provider of digital 3d models for visualization, films, television, and games.
turbosquid
$79

The starting post "Leon"
... available on turbo squid, the world's leading provider of digital 3d models for visualization, films, television, and games.
cg_studio
$80

Horses start-cages3d model
...del
cgstudio
.3ds .c4d .dxf .obj - horses start-cages 3d model, royalty free license available, instant download after purchase.
Cleaning
turbosquid
$29

Clean Bow
...osquid
royalty free 3d model clean bow for download as blend on turbosquid: 3d models for games, architecture, videos. (1257234)
turbosquid
$25
Jacuzzi Clean
...quid
royalty free 3d model jacuzzi clean for download as max on turbosquid: 3d models for games, architecture, videos. (1461249)
turbosquid
$1
Zanbato - Clean
...ree 3d model zanbato - clean for download as ma, obj, and fbx on turbosquid: 3d models for games, architecture, videos. (1328531)
turbosquid
$10

Cleaning Products
...model cleaning products for download as ma, max, fbx, and obj on turbosquid: 3d models for games, architecture, videos. (1559247)
turbosquid
$25
cleaning kit
... available on turbo squid, the world's leading provider of digital 3d models for visualization, films, television, and games.
turbosquid
$20

Cleaning pads
... available on turbo squid, the world's leading provider of digital 3d models for visualization, films, television, and games.
turbosquid
$16
Cleaning Bucket
... available on turbo squid, the world's leading provider of digital 3d models for visualization, films, television, and games.
turbosquid
$10
cleaning bucket
... available on turbo squid, the world's leading provider of digital 3d models for visualization, films, television, and games.
turbosquid
free

Cleaning robot
... available on turbo squid, the world's leading provider of digital 3d models for visualization, films, television, and games.
turbosquid
free

Cleaning Equipment
...ng equipment for download as max, 3ds, dae, dxf, fbx, and obj on turbosquid: 3d models for games, architecture, videos. (1693554)