Thingiverse
Brio - Mechanical (Geared) Interchange/Switch - M1 Track by cgillstrap
by Thingiverse
Last crawled date: 3 years, 1 month ago
Overview
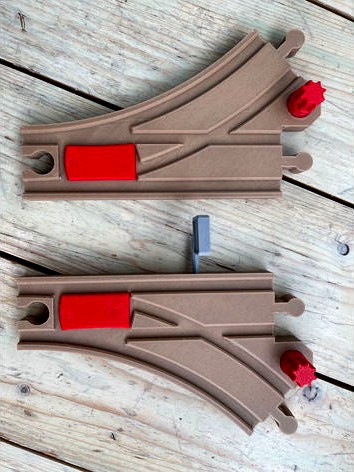
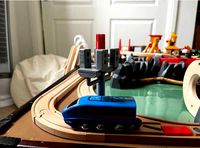
I had downloaded and printed some of the switches for brio as my son has several powered trains that need a guide. The issue with those is that the stick that comes out of the side blocks cars or ships on his play set and there was a desire to make things more compact.
Also, this is been designed to be remixed into a signalled interchange, which is a work in progress.
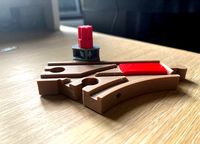
I printed these switches with Amolen wood PLA for the track and Prima select red PETG for the functional accessories. The optional sign was printed in grey Prusament PLA.
All the components can be printed in PLA but I have found that the accessories are more durable if printed in PETG.
Assembly Notes
You will need to decide if you want a right or left turn. As the mechanic are under the track, it is not possible to flip this over to reverse directions.
You will want to print one of each of the common accessories and then one of each for the accessories that are paired to the track (RH or LH)
There are a couple of pieces with tight tolerances, to ensure that things do not move once assembled. These are:
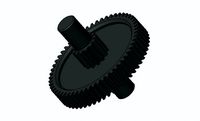
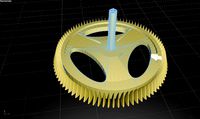
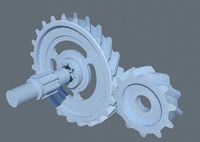
Retaining plate: After you insert the 50mm gear, the retaining plate goes over this and slots into the holes on either side. This will be a tight fit by design. I have found success in positioning the peg into the hole and them pushing down firmly on a flat surface on each side to seat. This plate keeps the 50mm cog within the assembly. It should be flush to the bottom once assembled.
20mm Gear and Gear Cap: The gear cap shaft is intentionally .5mm wider than the gear hole. This is to ensure a tight fit with no slippage. One side of the gear is filleted and that is the side that needs to face into the track. That should help push the shaft into the gear. Similar to the retaining plate you may find success if you position the gear and cap and then pushing down the track on a flat surface.
In general I found forcing things too much causes breakages. A tip I found useful was to lubricate parts with liquid soap to help put in place if there was issues. Apologies if you have assembly issues, printing screws or fasteners at these tolerances does not seem like the right answer.
Future Iterations
I had started to modify this design to become an L1 track (Male peg at the single track and female holes at the switches) but I found that cutting the holes would interfere with the gearing. I note that Brio themselves on their switching station do not offer an L1 option so I don't think this will happen for a while. It would require some major tinkering with the gearing and potentially more complex movements.
As mentioned above, the next remix of this will include stop and go signals when you switch the track. That is a work in progress.
I had downloaded and printed some of the switches for brio as my son has several powered trains that need a guide. The issue with those is that the stick that comes out of the side blocks cars or ships on his play set and there was a desire to make things more compact.
Also, this is been designed to be remixed into a signalled interchange, which is a work in progress.
I printed these switches with Amolen wood PLA for the track and Prima select red PETG for the functional accessories. The optional sign was printed in grey Prusament PLA.
All the components can be printed in PLA but I have found that the accessories are more durable if printed in PETG.
Assembly Notes
You will need to decide if you want a right or left turn. As the mechanic are under the track, it is not possible to flip this over to reverse directions.
You will want to print one of each of the common accessories and then one of each for the accessories that are paired to the track (RH or LH)
There are a couple of pieces with tight tolerances, to ensure that things do not move once assembled. These are:
Retaining plate: After you insert the 50mm gear, the retaining plate goes over this and slots into the holes on either side. This will be a tight fit by design. I have found success in positioning the peg into the hole and them pushing down firmly on a flat surface on each side to seat. This plate keeps the 50mm cog within the assembly. It should be flush to the bottom once assembled.
20mm Gear and Gear Cap: The gear cap shaft is intentionally .5mm wider than the gear hole. This is to ensure a tight fit with no slippage. One side of the gear is filleted and that is the side that needs to face into the track. That should help push the shaft into the gear. Similar to the retaining plate you may find success if you position the gear and cap and then pushing down the track on a flat surface.
In general I found forcing things too much causes breakages. A tip I found useful was to lubricate parts with liquid soap to help put in place if there was issues. Apologies if you have assembly issues, printing screws or fasteners at these tolerances does not seem like the right answer.
Future Iterations
I had started to modify this design to become an L1 track (Male peg at the single track and female holes at the switches) but I found that cutting the holes would interfere with the gearing. I note that Brio themselves on their switching station do not offer an L1 option so I don't think this will happen for a while. It would require some major tinkering with the gearing and potentially more complex movements.
As mentioned above, the next remix of this will include stop and go signals when you switch the track. That is a work in progress.
Similar models
thingiverse
free

Brio - Mechanical (Geared) Interchange/Switch - O1/P1 Track by cgillstrap
...was to only develop the o1 switch. assembly notes similar to the m1 instructions, the installation is pretty much...
thingiverse
free
Brio - Mechanical Switch - Signals by cgillstrap
...o the direction the track is in before the knob is assembled into the 20mm gear at the base.
hopefully, you should be good to go.
thingiverse
free
Brio M1 - Signal Lights by cgillstrap
..., most of the parts are reusable, with the exception of the 20mm open gear and the gear knob, which are superseded by this print.
thingiverse
free

peg and hole toothpaste squeezer by dav88
...ed vertically.
the peg/holes are tight until u work them awhile. work then turn to next hole then work your way around the holes.
thingiverse
free

Longer Peg For Gear Cube by kwm
... to turn. this is the peg only, print 8 of them. if there are any issues with the license, attribution, etc please let me know.
thingiverse
free

Combined tunnel and track for thomas trains with removable connector by dxk3355
...oden railway spare peg for old type brio tracks by pablocases https://www.thingiverse.com/thing:1258789 and glue it into the hole
thingiverse
free

Brio Train Track hole guide
...ge sided has the extra large hole for a metal tube insert and the brio train track guide 2 single sided has the smaller 1/4 hole.
thingiverse
free

Replacement Brio Train Track Connector with Peg by ThePlanetMike
...nnector with peg by theplanetmike
thingiverse
this is a pressure fit replacement brio train compatible track connector with peg.
thingiverse
free

Duplo to Brio converter brick by cqexbesd
...ome non-brio parts. the compatible files reduce this spacing so fit better with brio clone tracks. the duplo sides are identical.
thingiverse
free

Fidget Cube - fits 6x mechanical keyboard switches by onebigdoor
...hes easy to install, but you may want a tighter fit so the switches don't come out easily. it would require editing the .stl.
Cgillstrap
thingiverse
free

Brio - Shipping Container Bogey/Trailer by cgillstrap
...ndard brio car.
for a two tone print, do a colour change at 10mm.
printed using prusament pla grey and proto-pasta htpla black
thingiverse
free
Brio M1 - Signal Lights by cgillstrap
..., most of the parts are reusable, with the exception of the 20mm open gear and the gear knob, which are superseded by this print.
thingiverse
free

ZeroView Raspberry Pi Cover by cgillstrap
...berry pi dealers such as here:
https://thepihut.com/products/zeroview
(no endorsement to thepihut, i just bought mine from there)
thingiverse
free
Brio - Mechanical Switch - Signals by cgillstrap
...o the direction the track is in before the knob is assembled into the 20mm gear at the base.
hopefully, you should be good to go.
thingiverse
free
Brio - Mechanical (Geared) Interchange/Switch - O1/P1 Track by cgillstrap
...ys, interested in comments. i haven't found a mechanical switch of any sort for this pattern so hope people find this useful
thingiverse
free

Brio - British Rail Class 67 battery powered train by cgillstrap
...rd and reverse movement.
once all is assembled and in place, it should all close snugly and hopefully give you hours of enjoyment
Brio
3ddd
$1

Piermaria | Brio
...piermaria | brio
3ddd
brio , piermaria
фабрика piermaria, кресло brio
3ddd
free

NATUZZI brio
...natuzzi brio
3ddd
natuzzi , brio
47 000 полигонов
2180 * 1060 * 720 (мм.)
3ddd
free

Andromeda murano brio
... andromeda
наименование: murano brio
фабрика: andromeda
высота: 445мм
ширина:445мм
глубина:70мм
материал: метал, стекло
3ddd
free
Roche Bobois / BRIO
...obois / brio
3ddd
roche bobois , комод
комод brio sideboard. производитель: roche bobois
3ddd
free
Roche Bobois / BRIO
...ois / brio
3ddd
roche bobois , консоль
консоль brio console. производитель: roche bobois
turbosquid
$5

Brio Toy Plane
...ree 3d model brio toy plane for download as max, obj, and fbx on turbosquid: 3d models for games, architecture, videos. (1152544)
turbosquid
$8
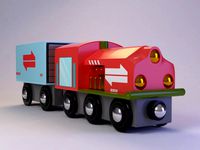
Brio Toy Train
...l brio toy train 3d model for download as blend, fbx, and obj on turbosquid: 3d models for games, architecture, videos. (1542682)
turbosquid
$26

Brio Bed Roche Bobois
... brio bed roche bobois for download as mat, max, obj, and fbx on turbosquid: 3d models for games, architecture, videos. (1194760)
turbosquid
$39
Chair BRIO Roche Bobois
... available on turbo squid, the world's leading provider of digital 3d models for visualization, films, television, and games.
humster3d
$75

3D model of Honda Brio 2012
...y a detailed 3d model of honda brio 2012 in various file formats. all our 3d models were created maximally close to the original.
Interchange
3d_ocean
$9
Traffic Chair
...traffic chair 3docean chair traffic features highly-resistant interchangeble feet. quality model – traffic...
3d_export
$10

teapot
...teapot 3dexport modern teapot with interchangeble cover to keep warm. the handle is foldable. approximate...
3d_ocean
$5

Realistic Eyeball
...eyeball face iris pupil realistic eyeball textured with 5 interchangeble iris colors. photoshop psd included for iris texture editing....
3d_export
$9

props highways
...or the foundation for any roadway network. use the interchange various-ramps, loops, semi-directs and much...
3d_export
$95
Nikon V1 with Nikkor 10mm and 1030mm lens 3D Model
...v1 digital camera lens nikkor 10mm 10-30mm photo mirrorless interchangeble compact new j1 nikon v1 with nikkor 10mm and...
3d_export
$10

Handgun Fire
...in common usage the two terms are often used interchangebly. this model can be applied to animated films, short...
3d_ocean
$49

Siege Weapons Pack Low Poly
...of high-quality siege weapons that come in modular and interchangeble building blocks, and can be mix-and-matched for a large...
3d_ocean
$5

Low Poly Skull
...digital sculpting; content: 1 maya file (ma) 1 fbx (interchange format) – 3ds max; mudbox; ... 1 obj easy...
3d_export
$20

happy mime
...series 2. he has printed arms. he includes three interchangeble heads and a black display stand. he has 3...
3d_export
$20

sad mime
...series 2. he has printed arms. he includes three interchangeble heads and a black display stand. he has 3...
M1
turbosquid
$34

M1 Garand
...turbosquid
royalty free 3d model m1 garand for download as on turbosquid: 3d models for games, architecture, videos. (1310638)
turbosquid
$25

M1 Garand
...
turbosquid
royalty free 3d model m1 garand for download as on turbosquid: 3d models for games, architecture, videos. (1316837)
turbosquid
free

M1 carbine
...bine
turbosquid
free 3d model m1 carbine for download as fbx on turbosquid: 3d models for games, architecture, videos. (1650978)
design_connected
free

M1 Armchair
...m1 armchair
designconnected
ka design m1 armchair free models computer generated 3d model. designed by joachim kleine allekotte.
turbosquid
$16

chai m1
...turbosquid
royalty free 3d model chai m1 for download as max on turbosquid: 3d models for games, architecture, videos. (1283302)
turbosquid
$15

M1 Garand
...rbosquid
royalty free 3d model m1 garand for download as fbx on turbosquid: 3d models for games, architecture, videos. (1188984)
turbosquid
$6

M1 CARBINE
...bosquid
royalty free 3d model m1 carbine for download as jpg on turbosquid: 3d models for games, architecture, videos. (1310947)
turbosquid
$6

M1 CARBINE
...bosquid
royalty free 3d model m1 carbine for download as jpg on turbosquid: 3d models for games, architecture, videos. (1310946)
turbosquid
$3

M1 Garand
...rbosquid
royalty free 3d model m1 garand for download as c4d on turbosquid: 3d models for games, architecture, videos. (1509389)
turbosquid
$45

m1 carbine
...
royalty free 3d model m1 carbine for download as lwo and fbx on turbosquid: 3d models for games, architecture, videos. (1397666)
Track
design_connected
$11

Tracks
...tracks
designconnected
bonaldo tracks computer generated 3d model. designed by gilles, alain.
3d_export
$30

TRACK
...track
3dexport
turbosquid
$20

tracks
... available on turbo squid, the world's leading provider of digital 3d models for visualization, films, television, and games.
turbosquid
$5

Tracks
... available on turbo squid, the world's leading provider of digital 3d models for visualization, films, television, and games.
turbosquid
$5

Track
... available on turbo squid, the world's leading provider of digital 3d models for visualization, films, television, and games.
turbosquid
$2

Track
... available on turbo squid, the world's leading provider of digital 3d models for visualization, films, television, and games.
3d_export
$65

track
...track
3dexport
simple rendering of the scene file
3d_export
$65

track
...track
3dexport
simple rendering of the scene file
3d_export
$65

track
...track
3dexport
simple rendering of the scene file
3ddd
free

Стол Bonaldo Tracks
...onaldo , tracks , обеденный
стол bonaldo tracks
Switch
archibase_planet
free
Switch
...switch
archibase planet
switch cluster switch
light switch 1 - 3d model for interior 3d visualization.
archibase_planet
free
Switch
...switch
archibase planet
switches switch
switch 1 - 3d model (*.gsm+*.3ds) for interior 3d visualization.
archibase_planet
free
Switch
...switch
archibase planet
closer button switch cluster switch
switch - 3d model (*.3ds) for interior 3d visualization.
archibase_planet
free
Switch
...switch
archibase planet
switch closer
light switch 2 - 3d model for interior 3d visualization.
archibase_planet
free
Switch
...switch
archibase planet
closer button switch
switch n300808 - 3d model (*.gsm+*.3ds) for interior 3d visualization
archibase_planet
free
Switch
...switch
archibase planet
closer button switch
switch n141108 - 3d model (*.gsm+*.3ds) for interior 3d visualization.
archibase_planet
free

Switch
...switch
archibase planet
cluster switch closer
switch n260609 - 3d model (*.gsm+*.3ds) for interior 3d visualization.
archibase_planet
free

Switch
...switch
archibase planet
button switch closer
switch 2 - 3d model (*.gsm+*.3ds) for interior 3d visualization.
archibase_planet
free

Switch
...switch
archibase planet
button switch closer
switch n070510 - 3d model (*.gsm+*.3ds) for interior 3d visualization.
3d_export
$5

switch
...switch
3dexport
3d model of a low-poly switch
Geared
3d_ocean
$4
Gears
...gears
3docean
gear gears iron
4 different size of gears
3d_export
$5
gear
...gear
3dexport
gear
3d_export
free
Gears
...gears
3dexport
gears
3d_export
$5
gear
...gear
3dexport
a simple model of gear
3d_export
$5

gear
...gear
3dexport
gear for transmission , case machine
3d_ocean
$3
Gears
...nical parts process steampunk vehicle wheel work
10 different gear models volume 01-10 files: .3ds .c4d .obj note: you need vray
3d_ocean
$1

Spur Gear
...spur gear
3docean
decoration gear
a typical spur gear
3d_ocean
$4
Gear wheels
...gear wheels
3docean
engine engineering gear gears industry machinery mechanical toothwheel wheel
pair of gear wheels : animated.
turbosquid
$9
Gear
...gear
turbosquid
royalty free 3d model gear for download as on turbosquid: 3d models for games, architecture, videos. (1712328)
turbosquid
$2

Gears
...rs
turbosquid
royalty free 3d model gears for download as ma on turbosquid: 3d models for games, architecture, videos. (1166710)
Mechanical
3d_export
$50

Mechanism
...mechanism
3dexport
mechanism -------- animation is present only in the blender file.
3d_export
$5

mechanics
...mechanics
3dexport
turbosquid
$50
mechanic
... available on turbo squid, the world's leading provider of digital 3d models for visualization, films, television, and games.
3ddd
$1
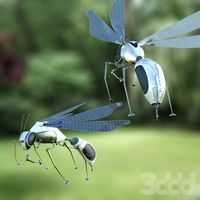
Mechanical Wasp
...mechanical wasp
3ddd
робот
mechanical wasp
3d_export
$20
Mechanical tail
...mechanical tail
3dexport
mechanical tail<br>four-part movement
3d_export
$5
mechanical ballista
...mechanical ballista
3dexport
a mechanical ballista useful for medieval or fantasy games does not contain animations
turbosquid
$59

Mechanical Part
...id
royalty free 3d model mechanical part for download as c4d on turbosquid: 3d models for games, architecture, videos. (1410833)
turbosquid
$50
Mechanical Spider
...royalty free 3d model mechanical spider for download as blend on turbosquid: 3d models for games, architecture, videos. (1599864)
turbosquid
$45

Mechanical Pencil
...royalty free 3d model mechanical pencil for download as blend on turbosquid: 3d models for games, architecture, videos. (1503379)
turbosquid
$35

Mechanical fish
...id
royalty free 3d model mechanical fish for download as max on turbosquid: 3d models for games, architecture, videos. (1152530)