Thingiverse
Brig's 3DFused Hemera Mount by Brigandier
by Thingiverse
Last crawled date: 3 years, 3 months ago
UPDATE: 10/10/2020
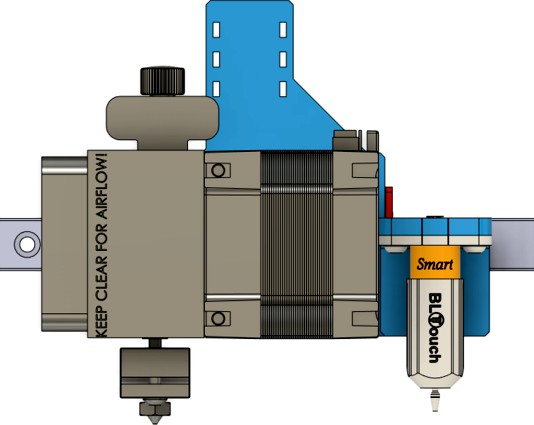
I recently upgraded my Hemera to Volcano and decided to make the move to BLTouch. I've added a BLTouch volcano mount and updated the Fusion 360 source file. Enjoy.
What is this thing?
This is a (hopefully) well designed Hemera mount for 3Dfused kits or anyone else needing to mount a Hemera to an MGN12H block.
After having some issues printing PET (not PETG but real PET. It's awesome, check out https://fusionfilaments.com/collections/pet-standard-spools ) with my Microswiss all metal hotend, I decided to make the jump to Hemera. During my search for a mounting solution, I came to the following conclusion:
People suck at making things.
Why are the other solutions bad?
Here's a short list on what I didn't like about the existing options:
They quite frequently leave the 3Dfused X carriage plate on. Why? It's just extra weight. Are you scared of that homing switch destroying plastic?
With or without the carriage plate, they frequently mount the heaviest Hemera component (the stepper) far away from the screws that attach the flexy plastic mounting plate to the printer. This creates a condition where the plate may flex under fast movement, affecting hotend position.
They all look cheesy.
Okay, how is yours different?
Here's how mine differs from the above:
It's tiny, the whole thing is nearly hidden behind the Hemera's stepper,
It very rigidly mounts into the MGN12H block directly, which then mounts very rigidly (and centered) in relation to the Hemera stepper. No flexing or bouncing here, if you print the plate strong enough. Take the old aluminum carriage plate and use it as a coaster,
It supports both EZABL and BLTouch or any other type of bed leveling sensor you may want to use,
It has minimalistic cable management that still rigidly holds your cables stiff so no movement is happening at the hotend/bed sensor,
It's designed in such a way that you home further left, MUCH further left. Your hotend will have to travel 54mm before hitting the X "0" point. Why do this? Because it allows your bed leveling sensor to level your bed edge to edge,
It comes with an upgraded combo rail endcap / X limit switch for those of you not yet using sensorless homing.
How should I print this?
I would recommend printing this in Fusion Filaments PET: https://fusionfilaments.com/collections/pet-standard-spools - This is not PETG, you'll need a printer capable of doing around 270C to print it. If you can't do PET, I would recommend Fusion Filaments 3d870 (HTPLA+): https://fusionfilaments.com/pages/high-performance-pla to get this off the ground and reprint it in PET once you have Hemera working. PET has much higher heat deflection temp and better suited for a part hear the hotend, but HTPLA+ or PETG may work okay as well.
I have designed the mount plate holes with built in bridges. No need for supports. I would print the plate at 5 walls with 100% infill (if you can't do this without a mess, you're over extruding). This part needs to be very rigid. 0.2mm layer height is fine.
The X endstop piece and sensor mounts can be printed at more sane values to save weight, use your discretion.
Some Assembly Required
Here's how I went about installing this (all screws should use Loctite Blue!):
Print an MGN12H insert (I used https://www.thingiverse.com/thing:1972859 ),
Take the right hand X rail endcap off and thread the MGN12H block carefully onto the insert. Be careful, doing this wrong will cause the bearings to drop out of the block and you may lose them. Set the block aside,
Attach the bed leveling sensor of your choice to the mounting plate using two M3 screws. They will thread directly into the printed sensor mount, don't strip them out. This needs to be done before putting on the block, as the block covers a screw hole slightly,
Being careful that the keeper doesn't fall out, attach the MGN12H block to the mounting plate using 4 appropriately sized M3 socket head screws. Don't forget the Loctite!
On the Hemera, slide in two more flat nuts into the back end. By default it already has two captive towards the center of the unit, this will be the ones on the end. This needs to be done now, as the filament sensor will cover one of them,
Attach the plate to the Hemera using M3 socket head screws. Make sure these are short enough to not bottom out into the Hemera and cause damage. Also, don't forget the Loctite!
Very carefully align the assembly to the rail, and slide it off the keeper,
Replace the right hand X rail endcap,
Remove the crummy left hand X rail endcap, mail this back to 3Dfused and tell them to quit printing such horrible parts,
Replace the left hand X rail endcap with the new one, only putting in one screw (the one that is deeply inset),
Attach your limit switch using a long M3 screw in the top left that will thread all the way through to the 3dFused backing plate (don't overtighten, snug is fine). Use a smaller M3 in the bottom left, don't strip the plastic,
Attach limit switch cable, ensure that the hotend assembly clears the switch and that the switch isn't buckled out. These things are cheaply made and may vary, so be careful there,
Thread one end of your X belt through the attach point on the back, the teeth should be pointing up as you thread this through,
After threading through, fold over the end of the belt onto itself so that the teeth mesh together. The folded over section needs to be approximately 1/2 to 5/8 long,
Push the folded over section back into the hole it came out of, being careful to keep it pinched together hard. As you keep it pinched and apply downward pressure, begin to pull on the belt using your other hand. The hole the belt is going into is tapered so that the further in it goes the tighter it squeezes, and it works great once you get it to "bite" hard enough,
Repeat this for the other end of the belt,
Tension the X belt.
Part Cooling
Due to my design's full frontal Hemera exposure, I leave cooling completely up to you. There's many Hemera cooling designs, choose the one you like best.
Design Notes
I'm by far not a professional CAD designer, I do this as a hobby. This was designed in Fusion 360 with a lot of trial, error, and test parts. Expect some dirty work in the attached Fusion 360 file; but hey, I included the real source file and not some crummy STL or step!
Similar models
thingiverse
free

ADIMLab Gantry MGN12H Linear Rail Hemera Mount
... the mount with 4 x m3-6mm screws and uses a 5015 blower fan.
hotend wiring can run up the 10mm hole through the mount and block.
thingiverse
free

Modular Tevo Tarantula Dual Extruder X Carriage for MGN12H Linear Rail by terryb58
...ghts, etc.
if you're interested in a single extruder version message me and if there's enough interest i'll make one.
thingiverse
free

CR-10S Stock Filament Sensor Mount for 3DFused X-Axis
... top left bracket bolt into the block
(4) press fit (and/or eopxy) the block into the bottom of the stock filament sensor housing
thingiverse
free

E3D Hemera Linear Mount, BLTouch
...giverse.com/thing:4034643
i decided to completely remake it with integrated bltouch mount and better clearance for the belt mount
thingiverse
free

Aluminum Hemera Carriage Mount Plate
.... is as compact as i think it can get, and doesn't weigh much considering how stable, straight, and true it keeps everything.
thingiverse
free

E3D Hemera Mount for Tronxy X5SA Pro by Fatezero
...this is the parts cooling fan i used:
hemera v6/ volcano part cooling duct & mount
https://www.thingiverse.com/thing:4042492
thingiverse
free

Ender 3 X MGN12H Y MGW12 BMG Hemera by stenc55
...ws for y belt fix.
m8x50 screw for y bet tensioner.
y and x belts, about 10mm longer than stock.
10mm 4040 radiator
some zip ties
thingiverse
free

3Dfused Linear Rail Belt Tensioner Camera mount
... was looking for a camera mount for the 3dfused linear rail setup but didn't see one so i stitched one together in tinkercad.
thingiverse
free

3DFused Ender 3 Hemera Mount
...es a strain relief attached to it. this was tested and printed in petg and speeds of up to 120 mm/s.
print with 5 or more walls.
thingiverse
free

Geeetech A30 X MGN12H Linear rail mod (A10 A10M)
...tallation of rail, you can use this guidehttps://www.thingiverse.com/thing:2152669
here a demo video:https://youtu.be/vfeug0_gqi4
Brigandier
thingiverse
free

Quick Grip Cam Mount by Brigandier
...my desk. this slides onto the bar end of an irwin quick grip clamp, letting you quickly clamp your webcam to all sorts of places.
thingiverse
free

Neewer 660 Light Grid by Brigandier
...ground you'd like to keep dark or, like me, colored accent lighting in the background you'd like to have "pop".
thingiverse
free

Prusa i3 MK3 Bowden Extruder by Brigandier
...tech's raise3d extruder from here: http://www.bondtech.se/en/products/freebies-stl-files/
the motor mount is my own creation.
thingiverse
free

QU-BD OneUp Gantry Leveling Pulley System by Brigandier
...g fixes for this, so here's my version.
you will need 3qty 8x22x7 bearings and a guitar tuning head to complete this project.
thingiverse
free

Prusa i3 MK3 TPU Micro Spring by Brigandier
...see https://shop.prusa3d.com/forum/original-prusa-i3-mk3-f30/-testers-needed-tpu-micro-springs--t15061.html for more information!
thingiverse
free

CR-10 FANG OEM carriage with ezabl + fillets by Brigandier
...be prone to cracking.
i have added some strategic filleting and chamfers to both increase strength and improve looks of the part.
thingiverse
free

Prusa i3 MK3 R3 Extruder Body w/bearing support by Brigandier
...
to use this modification you will need the following hardware:
1qty 695zz bearing for the idler
1qty mr95zz bearing for the body
thingiverse
free

Flashforge Dreamer fan grill replacement by Brigandier
...o place in the fan holes and called it a day, but i don't like the look of the chrome guards. it has a very 1990s look to it.
thingiverse
free

Prusa i3 MK3 Flex3Drive Stepper Mount by Brigandier
...t mine in from overseas and hooked up. just wanted to post this in advance in case anyone has one on hand they'd like to try.
thingiverse
free

Prusa i3 MK3 Sorbothane or Felt Feet by Brigandier
...machine doesn't have the ability to bounce. this ends up being louder, but has a much better effect on eliminating artifacts.
3Dfused
thingiverse
free

3DFused Cable Chain Adaptor
...his part with it: https://www.thingiverse.com/thing:4050966
johnnywhiskeys cable links: https://www.thingiverse.com/thing:2920060
thingiverse
free
3DFused Ender 3 Hemera Mount
...es a strain relief attached to it. this was tested and printed in petg and speeds of up to 120 mm/s.
print with 5 or more walls.
thingiverse
free

Main mount for 3DFused mounting plate by Jingerale79
...g threaded hole on the 3dfused mounting plate. i also filled some counterbores that were no longer needed with the 3dfused mount.
thingiverse
free

3dfused Direct Drive Adapter for EZR Extruder by North013
...i made one and it currently is working great. feel free to use it as 3dfused did't have a downloadable file on their website.
thingiverse
free
3Dfused Linear Rail Belt Tensioner Camera mount
... was looking for a camera mount for the 3dfused linear rail setup but didn't see one so i stitched one together in tinkercad.
thingiverse
free

3Dfused Z Limit Bracket by Meurk
...s space for the limit switch pins.
i suggest prethreading the holes first, it will be much easier when intalling the limit switch
thingiverse
free

Improved Tensioner for 3Dfused Rail Kits
...luded by 3dfused.
source files:
as always, i have included the f3d files if you'd like to mod this for your own setup. enjoy.
thingiverse
free

3dfused belt driven ender 3 X axis plate by Evilkoal
...did not fit my 3dfused x gantry linear rail. i smashed this together (badly) from the two files you can see in the remixed files.
thingiverse
free

3DFused X-Carriage Bondtech CR10s Mounting Plate by masta2k9
...behind the nozzle so that the block dont drag / stripe over the already extruded filament.
if you have questions , write me a pm!
thingiverse
free

3DFused Tevo Sensorless Homing X Bumpstop by miremaker
...th 2 of the included screws that are for the mounting the x endstop. see images. i printed it 100% solid with 3 walls/perimeters.
Brig
3ddd
$1

Стол BRIG
...стол brig
3ddd
brig , овальный , стол
стол brig
turbosquid
$25

Divano-moderno-BRIG
... available on turbo squid, the world's leading provider of digital 3d models for visualization, films, television, and games.
3d_export
$50

Brig Mercury 1820 3D Model
...xix 3ds obj blend fbx
brig mercury 1820 3d model download .c4d .max .obj .fbx .ma .lwo .3ds .3dm .stl mixafantast 106549 3dexport
3d_export
$79

Sailboat brig 3D Model
...e game ready mid poly hms royal
sailboat brig 3d model download .c4d .max .obj .fbx .ma .lwo .3ds .3dm .stl sobul 108423 3dexport
humster3d
$75

3D model of Brig Eagle 780 2013
...detailed 3d model of brig eagle 780 2013 in various file formats. all our 3d models were created maximally close to the original.
3d_export
$299

russian brig mercury
...n navy 18-gun, two-masted warship. it is famous for its lopsided battle with two turkish ships, which took place on may 14, 1829.
3d_export
$80

HMS downhold 3D Model
...downhold 3d model 3dexport cabins pirate game ready sailship brig battleship lineship cannon fregate treasure galley sailing sailfish black...
3d_export
$80

HMS trum 3D Model
...trum 3d model 3dexport cabins pirate game ready sailship brig battleship lineship cannon fregate treasure galley sailing sailfish black...
3d_export
$50

HMS wardroom 3D Model
...wardroom 3d model 3dexport cabins pirate game ready sailship brig battleship lineship cannon fregate treasure galley sailing sailfish black...
3d_export
$80

HMS Capitans cabine 3D Model
...cabine 3d model 3dexport cabins pirate game ready sailship brig battleship lineship cannon fregate treasure galley sailing sailfish black...
Hemera
3ddd
$1

Hemera
...d
круглое , напольные
зеркало hemera;
designer:grace feyock
dimensions:46 w x 46 h x 1 d
3ddd
$1

Cофа (MOS)
...cофа (mos) 3ddd угловой hemera l-shape sofa. смоделена по реальным...
3d_sky
free

PROFI Hemera
...profi hemera
3dsky
hemera mirror;
designer: grace feyock
dimensions: 46 w x 46 h x 1 d
thingiverse
free

E3D Hemera Model
...e3d hemera model
thingiverse
official mounting cad for designing your own custom mounts for the e3d hemera.
thingiverse
free

Hemera Troodon mount by vonsy
...hemera troodon mount by vonsy
thingiverse
hemera support for troodon
thingiverse
free

BLTouch Mount for Hemera
...bltouch mount for hemera
thingiverse
attach to hemera heat sink body with 3m vhb tape flush to the top edge.
thingiverse
free

X5S MGN12 Hemera by Festivejelly
... mounting solution for the e3d hemera on a mgn12 rail.
assemble and screw the hemera into the mount before putting onto the rail.
thingiverse
free

Hemera Mount for 2020 (2040)
...hemera mount for 2020 (2040)
thingiverse
2020 mount for the e3d hemera (hermes)
thingiverse
free
MGN12 Toprail mount for Hemera
...mgn12 toprail mount for hemera
thingiverse
hemera mount for mgn12 rails on top like the am8
thingiverse
free

E3D Hemera Blower Duct
...e3d hemera blower duct
thingiverse
blower duct & mount. fits e3d hemera extruder
Mount
3d_export
free

mounting bracket
...mounting plate is the portion of a hinge that attaches to the wood. mounting plates can be used indoors, cabinetry and furniture.
turbosquid
$2

MOUNTING
... available on turbo squid, the world's leading provider of digital 3d models for visualization, films, television, and games.
turbosquid
free

Mounts
... available on turbo squid, the world's leading provider of digital 3d models for visualization, films, television, and games.
turbosquid
free

Mount Fuji
...fuji
turbosquid
free 3d model mount fuji for download as obj on turbosquid: 3d models for games, architecture, videos. (1579977)
3d_export
$5

Headphone mount LR
...headphone mount lr
3dexport
headphone mount l+r
turbosquid
$39

Mount rainier
...quid
royalty free 3d model mount rainier for download as fbx on turbosquid: 3d models for games, architecture, videos. (1492586)
turbosquid
$5

pipe mounting
...quid
royalty free 3d model pipe mounting for download as obj on turbosquid: 3d models for games, architecture, videos. (1293744)
turbosquid
$3

Mounting Tires
...uid
royalty free 3d model mounting tires for download as fbx on turbosquid: 3d models for games, architecture, videos. (1708511)
3d_export
$5

Magnetic GoPro Mount
...pro mount
3dexport
cool magnetic mount for gopro. allows you to mount the camera on flat metal surfaces and get exclusive shots.
turbosquid
$5

Stone Mount
...ty free 3d model stone mount for download as ma, obj, and fbx on turbosquid: 3d models for games, architecture, videos. (1370306)