Thingiverse
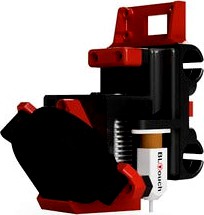
Bowden MK3 R3 X-carriage for the Anycubic I3 Mega by Audisis
by Thingiverse
Last crawled date: 3 years ago
UPDATE 15.02.19:
Relaxed tolerances for X_Carriage files and added the old style Belt mount versions. Be sure to flip the X direction for those (V2). Thanks to Lukasz Mach on Facebook for the help
So what is it?
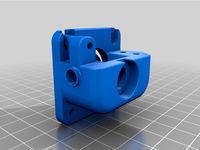
This is a redesigned X-carriage for the Anycubic I3 Mega. It was remixed mainly from the Prusa I3 MK3 R3 extruder, Bowden X-Carriage Mount for E3D V6 and Anycubic I3 Mega Prusa i3 X-Carriage Converter
Why should I use it?
It was designed in such a way that you can use pretty much any Prusa I3 MK3 fan mounts and fan ducts, it's compatible with the new (R3) and old (R2) styles so you aren't locked into just one design. This newest R3 revision also has more air going to the heatsink and you won't have problems with heat creep or clogging. I've been using it for a 2 years now and I can say it works great.
So what do I need?
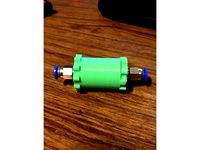
An E3D V6 hotend, or a clone
4x LM8UU bearings, Igus RJ4JP-01-08 bushings or RJMP-01-08 bushings
BLTouch or a clone if you want to use auto bed leveling
Mostly M3 screws and nuts
Some M4 screws and nuts
Why are the parts oriented the way they are?
I see, you're wondering about those X-Carriage files. That's to make them last longer. If you printed them flat, there's a high chance the bushing clamps would snap. Just print them with a brim and you'll be good to go.
Anything else I need to print?
Of course!
You're still missing a few parts that I either didn't modify or I made them separate.
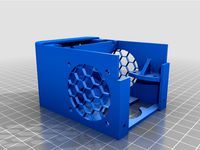
As for the fan mount and fan duct, use whatever you like or head here to see what I'm using: Prusa Mk3 fan duct (Includes double mount adaptor)
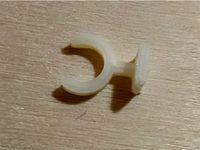
Ratcheting Belt Tensioner modified knob
Bowden MK3 R3 Cable Chain for the Anycubic I3 Mega not mandatory but will make it look a lot cleaner.
How do I assemble it?
The hardest part is getting the X-Carriage plate on the printer. That means loosening the screws that hold X smooth rods in place, moving the rod a bit to a side, sliding on the new part with bearings in place and put everything back together. Remember to only do one rod at a time.
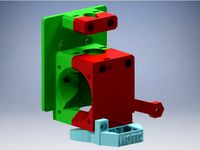
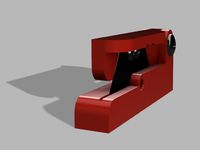
Other than that I'd say that the assembly is pretty straight forward. take a look at the assembly render, that should explain everything.
I don't think anything more is necessary to say, but if you have any questions I'll be happy to help.
Now the big question. How do I install the BLTouch?
Thankfully I don't have to explain that since there already is a tutorial. You don't need to print anything from that tutorial, but you will need to use a different firmware, one that has the correct offsets. You can find that here. There are both uncompiled and compiled versions. Use the fast version if you have Igus bearings and TMC2208 drivers since it would get pretty loud.
Both versions have Thermal runaway protection and bed PID tuning enabled.
There is no need to change the firmware if you don't plan on adding the BLTouch.
UPDATE 15.02.19: Relaxed tolerances for X_Carriage files and added the old style Belt mount versions. Be sure to flip the X direction for those (V2)
It's possible that it's compatible with other printers and if not, I believe just a redesign of X-Carriage plate files would be needed.
Relaxed tolerances for X_Carriage files and added the old style Belt mount versions. Be sure to flip the X direction for those (V2). Thanks to Lukasz Mach on Facebook for the help
So what is it?
This is a redesigned X-carriage for the Anycubic I3 Mega. It was remixed mainly from the Prusa I3 MK3 R3 extruder, Bowden X-Carriage Mount for E3D V6 and Anycubic I3 Mega Prusa i3 X-Carriage Converter
Why should I use it?
It was designed in such a way that you can use pretty much any Prusa I3 MK3 fan mounts and fan ducts, it's compatible with the new (R3) and old (R2) styles so you aren't locked into just one design. This newest R3 revision also has more air going to the heatsink and you won't have problems with heat creep or clogging. I've been using it for a 2 years now and I can say it works great.
So what do I need?
An E3D V6 hotend, or a clone
4x LM8UU bearings, Igus RJ4JP-01-08 bushings or RJMP-01-08 bushings
BLTouch or a clone if you want to use auto bed leveling
Mostly M3 screws and nuts
Some M4 screws and nuts
Why are the parts oriented the way they are?
I see, you're wondering about those X-Carriage files. That's to make them last longer. If you printed them flat, there's a high chance the bushing clamps would snap. Just print them with a brim and you'll be good to go.
Anything else I need to print?
Of course!
You're still missing a few parts that I either didn't modify or I made them separate.
As for the fan mount and fan duct, use whatever you like or head here to see what I'm using: Prusa Mk3 fan duct (Includes double mount adaptor)
Ratcheting Belt Tensioner modified knob
Bowden MK3 R3 Cable Chain for the Anycubic I3 Mega not mandatory but will make it look a lot cleaner.
How do I assemble it?
The hardest part is getting the X-Carriage plate on the printer. That means loosening the screws that hold X smooth rods in place, moving the rod a bit to a side, sliding on the new part with bearings in place and put everything back together. Remember to only do one rod at a time.
Other than that I'd say that the assembly is pretty straight forward. take a look at the assembly render, that should explain everything.
I don't think anything more is necessary to say, but if you have any questions I'll be happy to help.
Now the big question. How do I install the BLTouch?
Thankfully I don't have to explain that since there already is a tutorial. You don't need to print anything from that tutorial, but you will need to use a different firmware, one that has the correct offsets. You can find that here. There are both uncompiled and compiled versions. Use the fast version if you have Igus bearings and TMC2208 drivers since it would get pretty loud.
Both versions have Thermal runaway protection and bed PID tuning enabled.
There is no need to change the firmware if you don't plan on adding the BLTouch.
UPDATE 15.02.19: Relaxed tolerances for X_Carriage files and added the old style Belt mount versions. Be sure to flip the X direction for those (V2)
It's possible that it's compatible with other printers and if not, I believe just a redesign of X-Carriage plate files would be needed.
Similar models
thingiverse
free

E3D V6 Bowden - original prusa i3 mk3 fan by Mr_Austin
...inal prusa i3 mk3 fan by mr_austin
thingiverse
remix bowden x_carriage mount for e3d v6 with original prusa i3 mk3 extruder fan
thingiverse
free
Prusa i3 MK3 Bowden Extruder for E3D v6 by FabLabCordoba
...e by @karimkfoure.
based on original prusa i3 mk3.
inspired by "bowden x-carriage mount for e3d v6" by jackwaterfall.
thingiverse
free

Bowden MK3 R3 Original carriage for the Anycubic I3 Mega - remix by KMETA
...ll other parts can be downloaded here: https://www.thingiverse.com/thing:3092917
i still work to mount somewhere cable connector.
thingiverse
free

Prusa i3 MK3 nozzle fan duct by Atenzas
...t at prusa i3 mk3. i just wanted to make my own version. i don't think there is any advantage but maybe someone like it ;-)
thingiverse
free

Fan and Bltouch holder for BMG Extruder for Prusa i3 MK3 style
...tps://www.thingiverse.com/thing:3165551 i decided to remix the "fan holder" in order to incorporate the bltouch holder.
thingiverse
free

Volcano extension for Anycubic i3 Mega X-Carriage by Maleh3Dprntx by clfaye
...he volcano hot end with this mod. i've been using it for several days now and it really makes a difference with the cooling.
thingiverse
free

Anycubic i3 Mega X-Carriage with direct extruder BMG by eferbel
...te trolley with highly controlled extrusion but you lost one cm of print volume on the x and z axes.
https://youtu.be/mi37gsq2iys
thingiverse
free
Anycubic i3 Mega new hotend housing and BLTouch mount by guilhem034
...eed two m3 screws and nuts.
bltouch which i'm using: https://bit.ly/3vnoet3
offsets:
x probe offset -23.22
y probe offset 3.3
thingiverse
free

Bowden X-Carriage Mount for E3D v6 with 40mm Fan and BLTouch by Emphacy
... the noctua nf a4x10 flx as the cooling fan.
bltouch position (from nozzle): x = +36mm y = 0mm. z = +2mm - z will not be perfect.
thingiverse
free

Anycubic i3 mega direct titan + bltouch
..._belt_holder.stl
everything else that is needed for this carriage is included/
bltouch offset x 31, y 1.4
description in progress
Audisis
thingiverse
free

MOD: Anycubic i3 mega printed X axis cable chain by Audisis
...simple modification of pablo's amazing x axis cable chain that just slides on and lets you keep the original filament sensor.
thingiverse
free

Anycubic i3 mega V6 bowden toolhead by pablogk95
...similar to this:https://www.thingiverse.com/thing:2803377 update: modified_v6_holder.stl thanks to adam ludes (https://www.thingiverse.com/audisisabout) for this clever and useful mod that improves the...
thingiverse
free

Anycubic I3 Mega S Direct Drive Stock Extruder BL-Touch by nicodimarco
...by nicodimarco thingiverse hello this is a remix from audisis mk3 x-carriage: https://www.thingiverse.com/thing:3092917 this remix allows you to mount...
R3
3d_export
$49

Mazda RX8 R3 3D Model
...mazda rx8 r3 3d model
3dexport
mazda rx-8 r3
mazda rx8 r3 3d model dimary3 72304 3dexport
cg_studio
$120

Jaguar R3 20023d model
...jaguar r3 20023d model
cgstudio
.max - jaguar r3 2002 3d model, royalty free license available, instant download after purchase.
3ddd
$1

Лепная розетка R3
...лепная розетка r3
3ddd
розетка
лепнина, лепной декор, розетка, stucco, rosettes
3d_export
$129

Yamaha YZF-R3 2015 3D Model
...rt
2014 bike motorcycle japan 2015 2016 sport superbike 2017 2018 yamaha yzf r3
yamaha yzf-r3 2015 3d model squir 101546 3dexport
cg_studio
$129

Yamaha YZF R3 20153d model
...io
.max .lwo .fbx .c4d .3ds .obj - yamaha yzf r3 2015 3d model, royalty free license available, instant download after purchase.
turbosquid
$49

E3D - Samsung Radiant360 R1 + R3 + R5 3D model
...nt360 r1 + r3 + r5 3d model for download as max, obj, and c4d on turbosquid: 3d models for games, architecture, videos. (1186735)
turbosquid
$29

E3D - Samsung Radiant360 R3 Wireless Speaker 3D model
...3 wireless speaker 3d model for download as max, obj, and c4d on turbosquid: 3d models for games, architecture, videos. (1186511)
3ddd
$1

Биде и Унитаз
...из каталога текстуры в наличии 3ds max9 v-rey 1.5 r3 ...
3ddd
$1

Кованная.лесенка.Классика.
...модель и каркас тоже (можете поэксперементировать!) 3ds max9 v-ray1.5 r3 ...
3d_ocean
$10

Boots with laces sculpt
...laces sculpt 3docean boot boots detail high laces old r3 sculpt shoe shoes sturdy zbrush high poly model of...
Mk3
turbosquid
$50

cention mk3
...ty free 3d model cention mk3 for download as ma, obj, and fbx on turbosquid: 3d models for games, architecture, videos. (1454148)
turbosquid
$129

MK3 Tank
... available on turbo squid, the world's leading provider of digital 3d models for visualization, films, television, and games.
turbosquid
$100

Toyota Supra MK3
... available on turbo squid, the world's leading provider of digital 3d models for visualization, films, television, and games.
turbosquid
$44

cention mk3 low poly
...d model cention mk3 low poly for download as ma, obj, and fbx on turbosquid: 3d models for games, architecture, videos. (1454666)
turbosquid
$30

Challenger I Mk3 Falcon
... available on turbo squid, the world's leading provider of digital 3d models for visualization, films, television, and games.
turbosquid
$10

American Frag hand grenade MK3
...free 3d model american frag hand grenade mk3 for download as on turbosquid: 3d models for games, architecture, videos. (1393624)
turbosquid
$20

Mk3 US Navy Combat Knife
...ty free 3d model mk3 us navy combat knife for download as fbx on turbosquid: 3d models for games, architecture, videos. (1172791)
3d_export
$29

Ford Fiesta MK3 Modified 3D Model
...7 tumerfx mtumer mehmet t?mer 1993 1995 1996 wrc special modifed modifiye
ford fiesta mk3 modified 3d model mtumer 30698 3dexport
3d_export
$99

Toyota Supra Mk3 19861993 3D Model
...ort fast coupe japan 1986 1987 1988 1989 1990 1991 1992 1993 tuning turbo
toyota supra mk3 19861993 3d model squir 62530 3dexport
turbosquid
$5

Timothy Oulton Mars Chair MK3
...on mars chair mk3 for download as 3ds, max, obj, fbx, and dae on turbosquid: 3d models for games, architecture, videos. (1209782)
Anycubic
thingiverse
free

anycubic filament holder
...anycubic filament holder
thingiverse
anycubic filament holder
thingiverse
free

Cableholder Anycubic Mega
...cableholder anycubic mega
thingiverse
cableholder anycubic mega
thingiverse
free

AnyCubic Toolholder by WildManPrinting
...anycubic toolholder by wildmanprinting
thingiverse
anycubic i3 mega toolholder that clips on the side of the spool a-frame.
thingiverse
free

AnyCubic Funnel by phana007
...anycubic funnel by phana007
thingiverse
funnel for anycubic resin and also a reducer for a normal soda bottle.
thingiverse
free

Anycubic Kossel PID calibration
...ir mount:
kossel raspberry camera ir mount
extruder pid calibration.
simple extruder temperature calibration of your 3d printer.
thingiverse
free

anycubic mega i3
...anycubic mega i3
thingiverse
anycubic i3 mega/mega s led 30mm 10-14v 6500k
thingiverse
free

Handle for anycubic by cruiser7
...handle for anycubic by cruiser7
thingiverse
its easier to handle the cover of the anycubic mono x and wash&care
thingiverse
free

anycubic predator Printbed by Lihyon
...anycubic predator printbed by lihyon
thingiverse
anycubic predator printbed
thingiverse
free

Anycubic Predator Triggers by marcelcountry
...anycubic predator triggers by marcelcountry
thingiverse
anycubic predator triggers
thingiverse
free

support anycubic cable by sarpdental
...support anycubic cable by sarpdental
thingiverse
support anycubic cable
Bowden
turbosquid
$199
Vintage Ben Bowden Spacelander bike
... available on turbo squid, the world's leading provider of digital 3d models for visualization, films, television, and games.
3ddd
$1

Manooi Artica
...and pendants in various sizes and forms. suspension: galvanized bowden - dia. 1,5 mm. bulb: max 60 w -...
thingiverse
free
Remix Compact Bowden extruder - m6 bowden couplers and bowden tube pass-through
...ouplers and bowden tube pass-through
thingiverse
remix compact bowden extruder - m6 bowden couplers and bowden tube pass-through
thingiverse
free

Bowden Extruder
...bowden extruder
thingiverse
i have created bowden extruder for flsun delta 3d printer.
thingiverse
free

bowden 3mm by spee_D
...bowden 3mm by spee_d
thingiverse
for bowden 3mm
thingiverse
free
Bowden Tube Cutter
...bowden tube cutter
thingiverse
bowden tube cutter
thingiverse
free
Customizable Bowden Clip
...customizable bowden clip
thingiverse
customizable bowden clip
thingiverse
free
Bowden Oiler by fcheshire
...bowden oiler by fcheshire
thingiverse
inline bowden oiler
thingiverse
free

Bowden adapter by helkaroui
...bowden adapter by helkaroui
thingiverse
this is a fixed bowden adapter
thingiverse
free

Adventure3 Bowden Clip
...adventure3 bowden clip
thingiverse
adventure3 bowden clip
Mega
3ddd
$1
BoConcept / Mega
...boconcept / mega
3ddd
boconcept
boconcept mega
3ddd
free

Angelo - Mega shoin
... mega shoin , shoin
angelo - mega shoin - 3dmax 2008
3ddd
$1

Комод MEGA
...вана по фото с учетом реальных размеров.
стек не сколапсен, есть возможность регулировки уровня сглаживания.
текстуры в архиве.
3ddd
$1
Hulsta / Mega-design
...hulsta / mega-design
3ddd
hulsta
hulsta mega-design
design_connected
$18
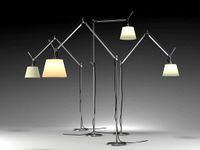
Tolomeo Mega
...
photo-realistic 3d models of the tolomeo mega floor lamps from artemide for 3d architectural and interior design presentations.
turbosquid
$119

Mega Soldier
... free 3d model mega soldier for download as obj, c4d, and fbx on turbosquid: 3d models for games, architecture, videos. (1148568)
turbosquid
$100
Mega Yacht
... free 3d model mega yacht for download as obj, fbx, and blend on turbosquid: 3d models for games, architecture, videos. (1368903)
3ddd
$1

Massproductions Mega
... massproductions , mega
ширина: 180 см
глубина: 90 см
высота: 79 см
3d_export
$4

mega metro station
...mega metro station
3dexport
mega metro station. ready to game. thanks all downloaders!!
3ddd
$1
BAS Mega
...bas mega
3ddd
bas , ванна
ванна
Carriage
archibase_planet
free

Carriage
...arriage
archibase planet
perambulator baby carriage pram
carriage n250908 - 3d model (*.gsm+*.3ds) for interior 3d visualization.
3d_export
free

carriage
...carriage
3dexport
old fashion carriage model, more files here:
turbosquid
$140

Carriage
...urbosquid
royalty free 3d model carriage for download as max on turbosquid: 3d models for games, architecture, videos. (1482052)
turbosquid
$25

Carriage
...urbosquid
royalty free 3d model carriage for download as max on turbosquid: 3d models for games, architecture, videos. (1285944)
3d_export
free

carriage
...carriage
3dexport
game cart
3d_ocean
$15

Barrel Carriage
...ieval oak old transport wheels wine wood
this model contains a barrel and a carriage. it is a medieval type of wood oak carriage.
turbosquid
$40

Carriage
...ty free 3d model carriage for download as obj, fbx, and blend on turbosquid: 3d models for games, architecture, videos. (1290094)
turbosquid
free

Carriage
...yalty free 3d model carriage for download as ma, obj, and fbx on turbosquid: 3d models for games, architecture, videos. (1239157)
3d_export
$5

Medieval carriage
...medieval carriage
3dexport
medieval carriage in fairy style
turbosquid
$58

Carriage
...d model carriage with scene for download as max, obj, and fbx on turbosquid: 3d models for games, architecture, videos. (1276262)
I3
3d_export
$10

suv i3
...suv i3
3dexport
suv i3 2013 series
3d_ocean
$89

BMW i3 2012
...y, in real units of measurement, qualitatively and maximally close to the original. model formats: - *.max (3ds max 2008 scanl...
cg_studio
$99

BMW i3 20143d model
...
cgstudio
.3ds .c4d .fbx .lwo .max .obj - bmw i3 2014 3d model, royalty free license available, instant download after purchase.
cg_studio
$99

BMW i3 20123d model
...tudio
.3ds .c4d .fbx .lwo .max .mb .obj - bmw i3 2012 3d model, royalty free license available, instant download after purchase.
cg_studio
$99

BMW i3 20143d model
...tudio
.3ds .c4d .fbx .lwo .max .mb .obj - bmw i3 2014 3d model, royalty free license available, instant download after purchase.
humster3d
$75

3D model of BMW i3 2014
...
buy a detailed 3d model of bmw i3 2014 in various file formats. all our 3d models were created maximally close to the original.
humster3d
$40

3D model of Kitchen Set I3
...uy a detailed 3d model of kitchen set i3 in various file formats. all our 3d models were created maximally close to the original.
3d_ocean
$30

Kitchen set i3
...ensils oven plates shelves sink table ware
kitchen set i3 include 3d models: cooker, oven, sink, cupboards, table, chair, plates.
3d_ocean
$89

BMW i3 2014
...y, in real units of measurement, qualitatively and maximally close to the original. model formats: - *.max (3ds max 2008 scanl...
cg_studio
$99

BMW i3 Concept 20113d model
...i3
.3ds .c4d .fbx .lwo .max .obj - bmw i3 concept 2011 3d model, royalty free license available, instant download after purchase.