Thingiverse

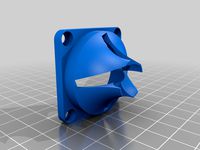
Black Diamond E3D V6 Fan Shroud Remix by heatvent
by Thingiverse
Last crawled date: 3 years, 1 month ago
It seemed like the Black Diamond E3D mount was never going to adapted for the v6 hot end so I did some crude customizing in Tinkercad. I basically shorted the fan shroud by 7.4mm and lowered the holes on the X-axis moutn where the fan shroud / E3D mount attach to accommodate for the shorter body length of the E3D v6 vs the v5. This seemed to be the easiest way so that the heat block is in the same position and the rest of the pieces remain in tact. I have an Anet A8 so I modified the Anet A8 X bracket. Not sure of the difference since both versions say they are for X-rods that at 45mm apart.
WARNING! I have not tried this yet so use at your own risk!
UPDATE: I started over and I think I got this to be printable. The round part of the fan shroud was so thin it was difficult to get this to work. Also, the original version didn't seem to be fully water tight. So I shored up some spots to fill in any holes I found in the model and I added a couple of additional supports just to make sure this thing didn't fall apart as I pulled it from the printer bed.
I HAD TO USE A BRIM given the thin fan shroud. I couldn't get this to print as that part is so thin and fragile and difficult to get the ABS to stick to the bed on its own with getting pushed by the printhead and distorted. I printed the shroud and the bracket using ABS. I used PLA for the X-axis mount as this doesn't get near the hot end.
Let me know how this works out for you!
UPDATE (TBD) - I didn't have the threaded brass fittings and didn't like the idea of jamming regular M3/4 nuts into round holes (actually had marginal success when I tried). So I made another change to include captive M3 nuts for the optional mounts on the bottom of the front and M4 for the other spots were things were getting "secured/bolted" to the main X-axis plate. You have to use the "Pause at Height" plugin for Cura or similar to stop at 4.0mm (0.8mm / 4 layers then 3.2mm for the nut) and 19.2mm so the print will stop at these layers and let you drop / push the nuts into the model before printing is resumed. Be very careful not to move the print bed when doing this which can be a bit tricky because I made the space for the nuts a fairly tight fit.
RECOMMENDATION: I would print the X-axis carriage at at least 40% and 5 perimeters (1.0mm walls with 0.2mm layer height) to make sure there is enough strength and durability. The design is quite intricate in spots and I have broken this when pulling off the build plate, etc. as there are certainly some weak spots.
Similar models
thingiverse
free

E3D v6 Blower Fan Adapter with shroud by etrombly
...ant to bolt on the original shroud. i merged them together and got rid of the bolt holes. seems to be working really well so far.
thingiverse
free

Anet A8 E3D V6 Direct Mount with extra holes by cyberbask
...the cables with flanges, and extra holes for the x-axis strap attachment part. i also needed to move the holes for the layer fan.
thingiverse
free

Wanhao Duplicator I3 Bowden Extruder for E3D V6 / Clone WITHOUT DUCT/FAN HOLE by jacob-danell
... printer didn't want to print the fan-hole. i don't need the fan-hole myself so i removed it. here is the model for that!
thingiverse
free

IR Probe Mount for E3D V6 Shroud by rs4race
...
ir probehttps://miscsolutions.wordpress.com/mini-height-sensor-board/
e3d v6http://e3d-online.com/e3d-v6/full-kit/v6-3mm-direct
thingiverse
free

Folgertech FT-5 Layer fan for BMG extruder and E3D v6 by taskiss
... 24v 50mmx15mm blower for the fan
the fan mount has nylon lock nuts pressed fit and mounted using the top extruder stepper screws
thingiverse
free

ANet A8 X axes stopper for the E3D V6 Minimal Extruder by dstasiak
...r.
in case anyone is interested, here is the e3d 30mm to 40mm fan adapter i'm using.https://www.thingiverse.com/thing:2748800
thingiverse
free

E3D v6 Kossel mini effector by RalphHilton
...39;t find it necessary. i have also added files for mounting the heat bed in the think3dprint3d kit with nut traps for the bolts.
thingiverse
free

Lulzbot Taz E3D v6 mount by Bracken
...unt at all, so i changed it.
this one also uses captive nuts rather than th threaded metal inserets.
original by chiphead420.
thingiverse
free

Semi Circle E3D v6 Mount fan duct. by daveposh
...by daveposh
thingiverse
semi circle fan mount. i did not include mounting holes as my mount is tight and didn't require it.
thingiverse
free

Chimera Layer Fan Shroud by Cutlass
...d.
there is enough clearance for a dual volcano, cyclops, or dual v6 print head.
this shroud will fit the original layer fan.
Heatvent
thingiverse
free

universal car heatvent mount by plastkort
...our own models, and is not a stand alone.
feel free to improve it, but upload it to thingiverse and take a photo of your item:)
thingiverse
free

Atari 2600 Light Sixer Non-Destructive IO Video Ports by heatvent
...ack of atari 2600 6 switch without modifying the case.
print with the ports facing the build plate and will not require supports.
thingiverse
free

Intermatic Malibu LD622 LED Landscape Accent Light - Remix by heatvent
.... wires are then soldered to one end and run through the wire holders. i will post pics when i get a chance but may be a while.
thingiverse
free

AM8 Parts by heatvent
...m8 frame...order lots of extra button head m5x10 screws and m5 square nuts! you will want to bolt more things to your new frame.
thingiverse
free

Anet A8 X-Belt Tensioner Remix by heatvent
...into the original mount for the pulley so you don't need a longer x-axis belt to use this.
i edited the designs in tinkercad.
thingiverse
free

Tamiya Rising Fighter Upper Body / Spoiler Mount (Part D3) by heatvent
...ng. however, i thought i would post in case someone else is in a similar situation or just likes printing parts for the rc cars.
thingiverse
free

Mister FPGA Retro Controllers USB Adapter Case by heatvent
...eedle nose pliers to tighten them down as there isn't much room.
there is a version with an atari logo and one plain/no logo.
thingiverse
free

Anet A8/AM8 to Hypercube Evolution Upgrade Path - Phase II Remix by heatvent
...lcd12864 to be mounted on the 3030 extrusions from this thing (https://www.thingiverse.com/thing:2267628)
note: parts to be added
thingiverse
free

Pinewood Derby Axle Drilling Template by sparticus1701
...large block or variations in printers. thanks to heatvent (https://www.thingiverse.com/heatvent for the suggestion. v4 adds a hole in the...
Shroud
3d_export
$500

Centrifugal pump volute casing with impeller
...casing with impeller 3dexport volute casing with impeller and shroud ...
3d_export
$35
The Holy Face base relief 3D Model
...the holy face base relief 3d model 3dexport shroud turin veronica veronica's veil gospel ikon jesus holy face...
3d_export
$20
present car cloth presentation transport transportation shape concepts show celebration cover showro
...transportation shape concepts show celebration cover showroom covered revealin shroudd cover covering tarp draped fabric cloth showroom reveal revealing...
3d_export
$5

Lockheed F-117 Nighthawk lowpoly stealth bomber
...initial operating capability status in 1983. the aircraft was shroudd in secrecy until it was revealed to the public...
3d_export
$49
kriss vector gen 2 sub-d
...rear flip sight.<br>- vector ejection port.<br>- vector crb square shroud / 16"" sliencer.<br>- ds150 stock.<br>- .ma (maya 2020 ascii)<br>-...
3d_export
$10

vichy dining table
...in oak, sycamore and walnut marquetry.<br>even if the restaurant shroud the vichy in a long table cloth, two slender...
3d_export
$500

us navy pcu sterett ddg-104 arleigh burke class destroyer flight iia max
...the position has been shifted.<br>q. where are the exhaust shroud for the stacks?<br>a. since ddg-89, the exhaust system was...
thingiverse
free

shroud by samshay317
...shroud by samshay317
thingiverse
shroud
thingiverse
free

Fan Shroud
...fan shroud
thingiverse
this is a fan shroud for a 140mm fan
thingiverse
free
40mm fan shroud
...40mm fan shroud
thingiverse
40mm fan shroud
E3D
turbosquid
$23

E3D - Google Home
... 3d model e3d - google home for download as max, obj, and c4d on turbosquid: 3d models for games, architecture, videos. (1192509)
cg_studio
free

e3d model
...e3d model
cgstudio
- e 3d model, royalty free license available, instant download after purchase.
turbosquid
$2

Syringe C4D (E3D Ready)
...lty free 3d model syringe c4d (e3d ready) for download as c4d on turbosquid: 3d models for games, architecture, videos. (1336720)
turbosquid
$12

Microphone USB E3D and C4D
...ree 3d model microphone usb e3d & c4d for download as c4d on turbosquid: 3d models for games, architecture, videos. (1568216)
turbosquid
$29

E3D - OnePlus 6 Black
...model e3d - oneplus 6 black for download as max, obj, and c4d on turbosquid: 3d models for games, architecture, videos. (1358534)
turbosquid
$29

E3D - Motorola One 2018
...del e3d - motorola one 2018 for download as max, obj, and c4d on turbosquid: 3d models for games, architecture, videos. (1358533)
turbosquid
$29

E3D - Disney MagicBands 2
...l e3d - disney magicbands 2 for download as max, obj, and c4d on turbosquid: 3d models for games, architecture, videos. (1355515)
turbosquid
$29

E3D - Samsung Z4 Smartphone
...e3d - samsung z4 smartphone for download as max, obj, and c4d on turbosquid: 3d models for games, architecture, videos. (1182179)
turbosquid
$23

E3D - Razer Phone model
...del e3d - razer phone model for download as max, obj, and c4d on turbosquid: 3d models for games, architecture, videos. (1231207)
turbosquid
$23

E3D - Alcatel Idol 5
... model e3d - alcatel idol 5 for download as max, obj, and c4d on turbosquid: 3d models for games, architecture, videos. (1212799)
V6
3d_export
$100

v6 engine
...engine
3dexport
complete v6 engine modeled on solidworks 2017 along with .stl, .sldprt and .sldasm of all th parts and assembly.
3d_export
$10

V6 engine
... the first v6 engines were designed and produced independently by marmon motor car company, deutz gasmotoren fabrik and delahaye.
3d_export
$35

v6 engine
...s a complete model of a v6 engine containing over 400 components. you can contact me for a video of all the components assembling
3d_export
$10

v6 engine
...v6 engine
3dexport
turbosquid
$25

Bed1001-v6
... available on turbo squid, the world's leading provider of digital 3d models for visualization, films, television, and games.
turbosquid
$22

Chair2-v6
... available on turbo squid, the world's leading provider of digital 3d models for visualization, films, television, and games.
turbosquid
$20

V6.mb
... available on turbo squid, the world's leading provider of digital 3d models for visualization, films, television, and games.
3d_export
$20

V6 engine
...rovided in this package is all the parts in sldprt format and assembly in sldasm format. i can also convert the format on demand.
3ddd
$1

Стол V6
...6" в стиле дизельпанк изготовлен из блока двигателя, 4х поршней и 4х шатунов.
столешница изготовлена из стекла толщиной 8мм.
cg_studio
$199

V6 VVTi3d model
...v6 vvti3d model
cgstudio
.3ds - v6 vvti 3d model, royalty free license available, instant download after purchase.
Fan
3d_export
$5

fan
...fan
3dexport
fan 3d model, table fan, fan, electric fan, ventilator
archibase_planet
free

Fan
...fan
archibase planet
fan large fan
fan out n260707 - 3d model for interior 3d visualization.
archibase_planet
free

Fan
...fan
archibase planet
fan ceiling fan ventilator
fan stealth n300615 - 3d model (*.gsm+*.3ds) for interior 3d visualization.
3d_export
$15

fan
...fan
3dexport
is an ancient fan
3ddd
$1

Fan-C-Fan by marco gallegos
...n-c-fan by marco gallegos
3ddd
вентилятор , marco gallegos
fan-c-fan by marco gallegos
3d_export
$10

fan
...fan
3dexport
a detailed fan designed for home or space blowing is now available for only 19.99!
turbosquid
$1

Fan
...fan
turbosquid
free 3d model fan for download as on turbosquid: 3d models for games, architecture, videos. (1427865)
turbosquid
$14

Fan
...fan
turbosquid
royalty free 3d model fan for download as on turbosquid: 3d models for games, architecture, videos. (1415642)
3ddd
$1

Светильник Fan
...светильник fan
3ddd
fan , italamp
светильник fan, производитель italamp
turbosquid
$25

Fan
...fan
turbosquid
royalty free 3d model fan for download as c4d on turbosquid: 3d models for games, architecture, videos. (1483246)
Remix
turbosquid
$5

MODA Collection Remix Chair
... available on turbo squid, the world's leading provider of digital 3d models for visualization, films, television, and games.
3d_export
$12

remix yamaha rm1x
...remix yamaha rm1x
3dexport
geometry triangles 15.2k vertices 7.6k pbr no textures 1 materials 1 uv layers yes
3d_ocean
$5

Vray fabric Kvadrat remix green - tileable
...th vray and 3dsmax. high-resolution texture images (2000×2000 px) file included: shader vray 2.40 texture image 3ds max 2011 file
turbosquid
$20

Gerrit Rietveld 1938 Zig Zag Chair Remix
... available on turbo squid, the world's leading provider of digital 3d models for visualization, films, television, and games.
3d_export
$10

multicolored remix parametric table furniture
... fbx, obj, mtl, archive with textures. the model has no glitches. render and materials - vray . without using plugins. good use!
3ddd
$1

Barovier&Toso / Manhattan Remix 7192
... 004293-142405
в коллекции есть люстры 7, 9, 12 рожковые. диаметр соответственный 1000, 1250, 1500 мм.
3ddd
$1

Muuto fiber chair
...grey/grey, dusty green/dusty green, nature/oak, natural white/oak upholstery options remix 183/black, remix 133/grey, remix 643/dusty red leather options black...
3ddd
$1

Barovier&Toso 7190-7195
...7190-7195 3ddd barovier&toso потолочнай люстра фабрики barovier&toso;, коллекция manhattan remix артикул 7190-7195. размеры в inches: 39"...
3d_export
$5

3D Locking Handle Weatherproof Storage Box Container
...handle weatherproof storage box container 3dexport new, improved and remixd! no screws required. print-in-place. weatherproof. parametric. 2 parts. easy...
cg_studio
$49

HTC One Mini 2 Amber Gold3d model
...cell phone mobile cellular super lcd touchscreen touch screen remix amber gold .max .obj .mb .lwo .fbx .c4d .3ds...
Black
turbosquid
$25
Black Mamba black snake
...ck mamba black snake for download as blend, stl, fbx, and obj on turbosquid: 3d models for games, architecture, videos. (1672843)
turbosquid
$3

Black
...turbosquid
royalty free 3d model black for download as blend on turbosquid: 3d models for games, architecture, videos. (1278842)
3d_export
$5
Black Piano
...black piano
3dexport
black piano
3d_export
$5

Black Oven
...black oven
3dexport
black oven
3ddd
$1

Black curtain
...black curtain
3ddd
black curtain
3d_export
$5

Black coffe
...black coffe
3dexport
sweet black coffe
3d_export
$5
Black Sofa
...black sofa
3dexport
black velvet sofa
3d_export
$5
Black Chair
...black chair
3dexport
black velvet chair
3d_export
free
black desk
...black desk
3dexport
black desk for bedroom
3d_export
free

Black Chair
...black chair
3dexport
black velvet chair
Diamond
3d_ocean
$5

Diamond
...monds. render details. model is rendered in mental ray and renders setup is ready. diamonds are ready to render and photo real...
3d_export
free

diamond
...diamond
3dexport
diamond
3d_ocean
$5

Diamond
...of cinema 4d. included: diamond, material and the studio! there are 2 files included : diamond.c4d : diamond.obj thank you for...
3d_ocean
$5

Diamond
...diamond
3docean
4d c4d cinema diamond glass shine
diamond 3d model in cinema 4d, ready scene to render.
3d_export
$5

diamond
...diamond
3dexport
diamond cnc laser -3d printer -cnc router
3ddd
$1

Diamonds
... diamonds
высота: 156 см
диаметр: 48 смhttp://www.moltoluce.com/index.cfm?seite=diamonds&sprache;=en
3d_ocean
$3

Diamond
...this is a highly detailed, realistic diamond model made in maya. included: diamond, material. files included are .mb, .lox, .obj.
3ddd
$1

DIAMOND
.... nightstand
master bedroom collection
measures:
width: 770 mm (30.31 in.)
depth: 370 mm (14.56 in.)
height: 480 mm (18.89 in.)
3d_export
$7

diamond
...diamond
3dexport
realistic diamond includes: - fbx obj stl & 3ds - keyshot files
3ddd
$1

Diamond
... капитоне , угловой
диван фабрики marinelli. текстуры в архиве