Thingiverse

Birthday Cake with Color-Changeing LED Candles by Thinger13
by Thingiverse
Last crawled date: 3 years, 1 month ago
This is a further development of my other birthday cake:https://www.thingiverse.com/thing:4754407
This one has six independent, slowly color-changeing LEDs. They start with red, then synchronously change to green, blue etc. After a few minutes they become desynchronized and show a bouquet of changeing colors.
For building you need:
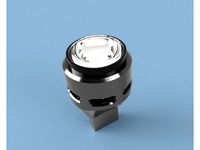
A specific (see picture) 30 mm diameter LED candle light to be modified as a battery holder and on/off switch only, available e.g. on aliexpress.com at KITOSUN Retail Store.
Six slowly color-changeing 3 mm LEDs, available e.g. on aliexpress.com at CHANZON Official Store.
Six small (1/4 Watt, 2.5 mm diameter, 7 mm long) resistors of 470 Ohm. The Ohm value is not very critical and can be chosen between 270 and 1'000 Ohm, but it will determine brightness and battery usage.
Some wires and soldering skills.
Prepare the LED candle light as follows:
Remove both CR2032 batteries and the battery seal.
Remove the O-ring from the battery holder bottom.
Grind the LED dome of the battery holder top until you can pushout the LED together with the PCB (printed circuit board).
Saw the remaining LED dome from the battery holder top.
Unsolder the spring, the tiny black SMD resistor (marked "R1") and the 5 mm LED from the PCB.
Drill the LED PCB holes to a suitable diameter (e.g. 1 mm).
Solder two short (ca. 7.5 cm / 3 in) isolated wires to the LED PCB holes. The flat side of the LED symbol indicates the hole for (-).
Solder the spring to its former place.
Solder a short circuit wire across the SMD resistor (R1) contacts on the PCB.
Insert the so prepared PCB back into the battery holder cap.
Assemble the battery holder top and bottom with only one (only one!) CR2032 battery, keeping the second CR2032 battery as a spare. Do not fully tighten the battery holder bottom to the top (= no voltage across the wires yet).
3D print the cake base.
Insert the prepared battery holder into the cake base from below. Push it firmly to the stop. No glueing should be necessary.
Install the blinking 3 mm LEDs as follows:
3D print the cake top and the flames (the flames preferably with transparent PLA).
Glue the flames to the top of the candles (I use Revell Contact PROFESSIONAL). Let dry.
Turn the printed cake top upside-down. There is a wiring rig on the underside.
Insert the LEDs fully, with each long leg (+) oriented towards the center and the short leg to the outside. Drill the holes to a diameter of 4 mm if you feel resistance while inserting the LEDs.
Click the resistors (470 Ohm, 1/4 Watt, 2.5 mm diameter, 7 mm long) radially into the rig and shorten the resistor wire in the center.
Solder the resistors to the long (innermost, see above) LED legs and cut the resistor wire to size.
Solder all resistors together in the center.
Solder a single circular wire connecting all short (outer) legs of the LEDs (-).
Solder the wires from the PCB (+) to the resistors' center, fropm the PCB (-) to the circular wire.
Check for short circuits. A short will drain the battery quickly and it being a Litium battery it may even start burning or explode.
Fully screw the battery holder bottom upwards until the LEDs light. If they don't light there may be a short circuit.
Assemble cake top and cake base. It is a tight fit, rendering glueing unnecessary.
Check again if the LEDs will light (i.e. no short circuit). If they don't light unscrew the battery holder bottom, remove the battery, push the cake top out via the four slots in the cake base's bottom and check your wiring.
Enjoy!
I include the OpenSCAD source file. It is still a bit of a mess, sorry.
Caution: This is not a toy for small children. They may bite off a flame and swallow it.
This one has six independent, slowly color-changeing LEDs. They start with red, then synchronously change to green, blue etc. After a few minutes they become desynchronized and show a bouquet of changeing colors.
For building you need:
A specific (see picture) 30 mm diameter LED candle light to be modified as a battery holder and on/off switch only, available e.g. on aliexpress.com at KITOSUN Retail Store.
Six slowly color-changeing 3 mm LEDs, available e.g. on aliexpress.com at CHANZON Official Store.
Six small (1/4 Watt, 2.5 mm diameter, 7 mm long) resistors of 470 Ohm. The Ohm value is not very critical and can be chosen between 270 and 1'000 Ohm, but it will determine brightness and battery usage.
Some wires and soldering skills.
Prepare the LED candle light as follows:
Remove both CR2032 batteries and the battery seal.
Remove the O-ring from the battery holder bottom.
Grind the LED dome of the battery holder top until you can pushout the LED together with the PCB (printed circuit board).
Saw the remaining LED dome from the battery holder top.
Unsolder the spring, the tiny black SMD resistor (marked "R1") and the 5 mm LED from the PCB.
Drill the LED PCB holes to a suitable diameter (e.g. 1 mm).
Solder two short (ca. 7.5 cm / 3 in) isolated wires to the LED PCB holes. The flat side of the LED symbol indicates the hole for (-).
Solder the spring to its former place.
Solder a short circuit wire across the SMD resistor (R1) contacts on the PCB.
Insert the so prepared PCB back into the battery holder cap.
Assemble the battery holder top and bottom with only one (only one!) CR2032 battery, keeping the second CR2032 battery as a spare. Do not fully tighten the battery holder bottom to the top (= no voltage across the wires yet).
3D print the cake base.
Insert the prepared battery holder into the cake base from below. Push it firmly to the stop. No glueing should be necessary.
Install the blinking 3 mm LEDs as follows:
3D print the cake top and the flames (the flames preferably with transparent PLA).
Glue the flames to the top of the candles (I use Revell Contact PROFESSIONAL). Let dry.
Turn the printed cake top upside-down. There is a wiring rig on the underside.
Insert the LEDs fully, with each long leg (+) oriented towards the center and the short leg to the outside. Drill the holes to a diameter of 4 mm if you feel resistance while inserting the LEDs.
Click the resistors (470 Ohm, 1/4 Watt, 2.5 mm diameter, 7 mm long) radially into the rig and shorten the resistor wire in the center.
Solder the resistors to the long (innermost, see above) LED legs and cut the resistor wire to size.
Solder all resistors together in the center.
Solder a single circular wire connecting all short (outer) legs of the LEDs (-).
Solder the wires from the PCB (+) to the resistors' center, fropm the PCB (-) to the circular wire.
Check for short circuits. A short will drain the battery quickly and it being a Litium battery it may even start burning or explode.
Fully screw the battery holder bottom upwards until the LEDs light. If they don't light there may be a short circuit.
Assemble cake top and cake base. It is a tight fit, rendering glueing unnecessary.
Check again if the LEDs will light (i.e. no short circuit). If they don't light unscrew the battery holder bottom, remove the battery, push the cake top out via the four slots in the cake base's bottom and check your wiring.
Enjoy!
I include the OpenSCAD source file. It is still a bit of a mess, sorry.
Caution: This is not a toy for small children. They may bite off a flame and swallow it.
Similar models
thingiverse
free

FreeTrack / TrackIR Infrared LED Clip by MelihKa
... resistor
1x on/off switch
1x cr2032 battery holder
1x cr2032 battery
~30cm wire.
epoxy resin or hot glue to fix the components.
thingiverse
free

Led Candle base for CR2032 lithium Battery by ricbordenave
...d candle base for cr2032 lithium battery by ricbordenave
thingiverse
led candle base of 40mm diameter for cr2032 lithium battery
thingiverse
free
1W power led usb case by tcbilge
...led,
led pcb,
4.7 ohm 1w resistor,
led lens and black holder,
usb a connector.
the resistor is soldered between led(+) and usb(+)
thingiverse
free

Illuminated Lens Insert by Thgilcra
...9bmb
(1) 850 mah aaa battery b00cwnmxqw
(1) number 3- 256 screw 3/8 inch long (not listed in the bom) and mating nut.
thingiverse
free

Simple LED Flashlight by ALABS
...on in the square cutout in the acrylic window.
snap the window onto the enclosure.
put batteries in the battery holder and enjoy!
thingiverse
free

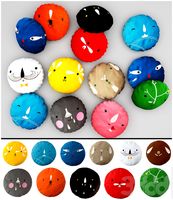
Minimal Dual LED CR2032 Tea Light by jmcbassett
... bottom of the tea light. i stick a piece of green baize fablon on the bottom to ensure the light doesn't scratch the table.
thingiverse
free

LED candle enclosure by Anonaab
... major diameter 65 mm, top thread 30 mm
sorry, i don't have a schematic for the pcb. i used perfboard, attiny84 and smd leds.
cg_trader
$3

Battery Holder CR2032
...battery holder cr2032
cg trader
battery holder for cr2032 with soldering tabs. including battery cr2032.
grabcad
free

CR2032 battery holder
...cr2032 battery holder
grabcad
pcb mount battery holder for cr2032
thingiverse
free

Battery Holder by njd13
...on cell batteries, with slots for inserting wire to test leds/small motors. the battery it is modeled for is 2 cr2032 batteries.
Thinger13
thingiverse
free

HackRF Portapack Antenna Stabilizer by Thinger13
...es the ads-b range of my hackrf+portapack+mayhem receiver combo. i bought the filter via https://tindie.com from https://gpio.com
thingiverse
free

Corona Cookie Cutter with Ejector by Thinger13
...f upon reversing the ejector.
i include the openscad source file, so you can adapt or modify it in case the virus will mutate ;-)
thingiverse
free

Emergency Corona Face Mask by Thinger13
...ask. it is better than no face mask at all, but only just.
warning: this face mask is not certified. its use may be prosecuted.
.
thingiverse
free

Beer tasted positive for Corona by Thinger13
... for pla.
the openscad source file is included. you may want to adapt the cap for other bottle dimensions or a mutated virus ;-).
thingiverse
free

Li-Ion Battery Container (parametric) by Thinger13
...t in case the container is a tight fit. if this window is exposing the contacts of your battery then insert the battery inverted.
thingiverse
free

Birthday Cake with LED Candle Light by Thinger13
... different dimensions and also descrete blinking multicolor leds, which may take some time (= weeks) to arrive and be integrated.
thingiverse
free

Thread Die Holder / Gewindeschneider-Halter by Thinger13
... solution you may scale the .stl in your slicer, but i haven't tested if this works with both die diameter and die thickenss.
thingiverse
free

Replacement Zipper Puller with Paper Clip by Thinger13
...it with a fastener and wait for the glue to dry (severeal hours). hot glue instead of revell is an option for the impatient.
zip.
thingiverse
free

HackRF Portapack H1 Loudspeaker Cover by Thinger13
...lgo_exp_id=3460079d-0530-40c8-8761-bedaeda33767-6
see also my other portapack accessory:https://www.thingiverse.com/thing:4892365
thingiverse
free

Privacy Shutter for Smartphone Camera by Thinger13
...ne with dual-sided sticker tape.
insert the shutter lid into the frame.
revell, samsung and otter box are registered trade marks.
Cake
3d_export
$5

Cake
...cake
3dexport
cake
3d_export
free

Cakes
...cakes
3dexport
stylized cakes.
archibase_planet
free

Cake
...cake
archibase planet
pie cake
cake - 3d model for interior 3d visualization.
3ddd
$1

Cakes
...cakes
3ddd
торт
cake collection
3d_export
$5

CAKE
...cake
3dexport
this cake testy very very 228 slava ukraine
archibase_planet
free

Cake
...cake
archibase planet
pastry cookie biscuit
cake - 3d model for interior 3d visualization.
3d_ocean
$4

Small Cake
...small cake
3docean
cake food small
just a small cake ready for render
3d_ocean
$6

Cake Plates
...s
3docean
cake plates
cake plates. folder .mx(2010) contains four different kinds of cake plates with different texture material.
turbosquid
free

Cake
...cake
turbosquid
free 3d model cake for download as fbx on turbosquid: 3d models for games, architecture, videos. (1297951)
turbosquid
$20

Cake
...ke
turbosquid
royalty free 3d model cake for download as max on turbosquid: 3d models for games, architecture, videos. (1588220)
Birthday
3d_export
$5

happy birthday
...happy birthday
3dexport
this is something you can give your son for his birthday.
turbosquid
$20

Birthday Cake
...yalty free 3d model birthday cake for download as jpg and obj on turbosquid: 3d models for games, architecture, videos. (1261890)
turbosquid
$45

Birthday Cake
...free 3d model birthday cake for download as obj, c4d, and fbx on turbosquid: 3d models for games, architecture, videos. (1353496)
turbosquid
$11

Happy Birthday
...ree 3d model happy birthday for download as max, obj, and stl on turbosquid: 3d models for games, architecture, videos. (1351422)
turbosquid
$50

Birthday Cake
...3d model birthday cake for download as max, 3ds, fbx, and obj on turbosquid: 3d models for games, architecture, videos. (1522603)
turbosquid
$30

Birthday Cake
... available on turbo squid, the world's leading provider of digital 3d models for visualization, films, television, and games.
turbosquid
$20

Birthday Hat
... available on turbo squid, the world's leading provider of digital 3d models for visualization, films, television, and games.
turbosquid
$20

Birthday Balloon
... available on turbo squid, the world's leading provider of digital 3d models for visualization, films, television, and games.
turbosquid
$18

Birthday Cake
... available on turbo squid, the world's leading provider of digital 3d models for visualization, films, television, and games.
turbosquid
$6

Birthday Cake
... available on turbo squid, the world's leading provider of digital 3d models for visualization, films, television, and games.
Candles
3d_ocean
$7

Candle
...candle
3docean
candle gold candle wax
high poly candle .
archibase_planet
free

Candles
...candles
archibase planet
candles candle
candles - 3d model (*.gsm+*.3ds) for interior 3d visualization.
archibase_planet
free

Candles
...candles
archibase planet
candles candle light
candles n070411 - 3d model (*.3ds) for interior 3d visualization.
archibase_planet
free

Candle
...candle
archibase planet
candle
candle - 3d model (*.3ds) for interior 3d visualization.
3d_export
$5

candle and candle holder
...candle and candle holder
3dexport
3d_export
$5

candle
...candle
3dexport
animated red candle
3ddd
$1

Candle
...candle
3ddd
подсвечник , свеча
candle
3d_export
$1

candle
...candle
3dexport
lowpoly animation candle
turbosquid
$2

Candle holder ( with candle )
... available on turbo squid, the world's leading provider of digital 3d models for visualization, films, television, and games.
3d_ocean
$4

Candle
...candle 3docean 3d 3d model 3dmax 3ds candle candles candlesick fire max model the burning candle – it is...
Led
3d_export
$5

led
...led
3dexport
the led is cut with all the parts.
3ddd
$1

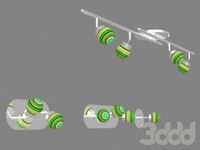
Monacor / PARL56DMX / LED-320RGBW / LED-345RGBW / LED-300RGB
... прожектор
http://www.monacor.dk/
parl56dmx
led-320rgbw
led-345rgbw
led-300rgb
turbosquid
$10

LED
...led
turbosquid
free 3d model led for download as blend on turbosquid: 3d models for games, architecture, videos. (1691856)
3d_export
$5

led lamp
...led lamp
3dexport
led lamp, brightness animation
3ddd
free

leds-c4
...leds-c4
3ddd
leds-c4
современный торшер
3ddd
free

leds-c4
...leds-c4
3ddd
leds-c4
настольный лампа
turbosquid
$19

LED
... available on turbo squid, the world's leading provider of digital 3d models for visualization, films, television, and games.
turbosquid
$12

Led
... available on turbo squid, the world's leading provider of digital 3d models for visualization, films, television, and games.
turbosquid
free

LED
... available on turbo squid, the world's leading provider of digital 3d models for visualization, films, television, and games.
turbosquid
free

LED
... available on turbo squid, the world's leading provider of digital 3d models for visualization, films, television, and games.
Changeing
3d_export
$10
Feed chang
...feed chang
3dexport
turbosquid
$5

Change Dish
... available on turbo squid, the world's leading provider of digital 3d models for visualization, films, television, and games.
design_connected
$29

Basis 25 + Change
...basis 25 + change
designconnected
schramm basis 25 + change computer generated 3d model.
turbosquid
$9

Change black coin
...
royalty free 3d model change black coin for download as max on turbosquid: 3d models for games, architecture, videos. (1494730)
turbosquid
$9

Change gold coin
...d
royalty free 3d model change gold coin for download as max on turbosquid: 3d models for games, architecture, videos. (1494727)
turbosquid
$3

change cup box
...uid
royalty free 3d model change cup box for download as stl on turbosquid: 3d models for games, architecture, videos. (1241132)
turbosquid
$50

110214 da chang
... available on turbo squid, the world's leading provider of digital 3d models for visualization, films, television, and games.
turbosquid
$15

Stove (Color Changing)
... available on turbo squid, the world's leading provider of digital 3d models for visualization, films, television, and games.
turbosquid
$5

Wardrobe Changing Room
...for download as ma, 3ds, max, obj, fbx, unitypackage, and upk on turbosquid: 3d models for games, architecture, videos. (1415915)
3d_export
$9

baby changing table 001
...baby changing table 001
3dexport
modern changing table - chest of drawers for a children room + decor.
Color
design_connected
$11

Colors
...colors
designconnected
zanotta colors lounge chairs computer generated 3d model. designed by ilkka suppanen.
3ddd
$1
pillows colors
...pillows colors
3ddd
pillows colors , подушка
pillows colors
3ddd
free

color dress
...3ddd
color dress , манекен , одежда
color dress
3ddd
$1
светильники Colors
... massive , бельгия
светильники massive серия colors, очень веселые
3d_export
$30

color chameleon
...color chameleon
3dexport
color chameleon
3ddd
$1
color vase
...color vase
3ddd
color vase
3d_ocean
$2
color pen
...3d model of color pen. model is based on edge loop topology. all materials are included. model is render ready and ready for use.
3ddd
$1
Color Parquet
...color parquet
3ddd
паркет
color parquet
3ddd
free
color console
...color console
3ddd
консоль
color console
3d_export
$5
Technum Color
...technum color
3dexport
technum color led от imperiumloft https://imperiumloft.ru/dizajn-loft/technum-color-led.html