Cults
BIG DIY 3D Printer
by Cults
Last crawled date: 6 years, 2 months ago
Big FDM Printer
The idea of this printer is that you can make it as large as you want and as cheap as possible :-)
Basically a printer is an X, Y and Z axis. So I made an X and Y axis that is mountable on any sort of construction that gives it height. This construction can be made of material that you have lying around.
If you have wood you can use that. If you have steel pipes you can use that. You can even build it from stones if you want. I made it on an old CNC Router frame I once build. I just added aluminum pipes I had laying in the backyard. With this I build a squire platform which carries the X and Y axis. If I make this platform higher the printer can print higher. :-)
Then of course you also need a print bed. Most of that construction can also be made of any material you have laying around. I used extruded aluminum lengths that limited me to a height of 710 mm. the printed parts are just to couple them and hold the motors and spindles. The dimensions of the extruded aluminum lengths I used are 30x33mm. So the parts for the Z axis are made to fit that. The gliding part in the vertical direction holds 8 608 bearings each side. “bearing holder L.stl & bearing holder R.stl” are super solid, but take a lot of material. Therefor I also made the “bearing holder small” STL's to save material. No the one peace is hacked in two peaces so they have to be held apart with a threaded rod. You can see it on the pictures. Initially these parts where made for a spindle, but because I could not find them 1 meter long, I used Threaded rod instead. For implementation of the M8 nut, you have to use the M8 nut converter part. Also it's recommended to grease the threaded rod also.
For the X and Y axis setup, I used 10mm x 1000mm guiding rods. That means that the X axis is 714mm and the Y axis is 758mm in length. My heat bed can reach 710mm in height. But the glass plate of my heat bed is only 300 x 300mm so I limited my printer to 300x300x700mm at the moment. Of course the bed can be made bigger and so the print dimensions get bigger.
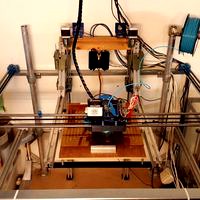
To take away vibrations and keep these long rods straight, you can use the “X axis tension bar holder”. Install one on each end of the x axis rod and mount a M10 threaded rod in them. It's much easier to watch the pictures I guess :-). on the pictures there is installed only one, but I intend to install a second one on the other X axis rod. With only one installed you get an uneven load and uneven vibrations in the two rods.
There is a option for a small 30x30 cooling fan for the X motor, but is optional.
Of course all timing belts have tensioners.
Under the X wagon is an optional slot where a LED strip can be mounted. The dimensions of the strip are 36x9x1 mm made by Dymand v2 DUL2 201611. I took it out of an cheap USB led lamp you cab see on one of the pictures.
Because this is so big, there are two motors for the Y axis and two for the Z axis. The controller is a ramps 1.4 and Arduino Mega. The problem is that you can’t install more than one driver per axis. So you have to solder a second motor driver parallel to the one on the ramps board. It’s advisable to take the motor power directly from the power connector on the board and to install an extra capacitor for each extra driver.
A printer also needs an extruder. :-) Because I print with ABS a lot this one is designed to do just that (but it also works with other filaments).
With ABS printing you do not want to have airflow passing the printed parts.
Therefor the air is inhaled from above. Then passed through to the Hot-end and then back out at the top. The same airflow construction is also made for the motor. This way the printed part never gets cooled by these 2 fans. For the dimensions of these snail house fans, see picture.
Also I wanted an extruder on which changing filament is easy. On most extruders you can’t see the filament wire and that can make it hard to change filament. If you run out of filament due the print, you are in big trouble. Therefor I made this one in such a way that you can always see the filament wire.
Because I have 3 different sizes of Filament (1.75mm, 2.85mm & 3mm) this extruder can use them all.
To do this I have made an exchangeable filament wire guide. For the 1.75 mm filament I also need to put in a Teflon tube because the hot-end is made for 3mm wire. (I can recommend the Teflon tube anyways because the filament go’s in much smoother). The filament guide is also adjustable so you can guide you filament perfectly. In the photos you do not see this guide because that is still the proto type. On that model the 3mm guide is fixed to the body. Not so smart, because you can’t adjust anything anymore. Also I broke it :-) . As a lose part you can just print it out again. The guide is mounted using a washer, M3 nut and 10mm bolt.
The little filament driver (11mm diameter) is mounted on an M8x50mm bolt I had lying around. On the lathe I turned the end of this M8 bolt down to 5mm so the driver can be mounted on it. See pictures.
The Hot-end is a cheap Chinese one I do not even know the name of, but it works very good. For the dimensions of this Hot-end see pictures.
The stepper motor is a Nema 17 x 47mm. I recommend a strong motor for this if you want to use 2.85 & 3mm filament wire. In the picture you see a 42BYGHW811, but I use an SL42S247A at the moment (a bit more torque). As a driver I still use an A9844 with heavy cooling and heat sink.
For the main body I had to add support material. See picture about the removal of the support material. All other parts can be printed without support. After assembly it is wise to put katon tape on the bottom to protect the plastic from all the heat.
This way the plastic holds longer
Also Included is a Marlin script that should work. Hence for printing with PET-G 1.75mm I had to turn the flow-rate back to 49%. Steps/mm for the extruder motor may need some tweaking. For ABS 3mm it did work ok. Hence the blue ABS print has deformed due to warping. But that's expected because it's an open structure. I have order PLA to try that for printing vases. With the transparent PET-G it works great!
For the Z axis setup you need:
16X 608ZZ bearing
1X end switch
16X M8 bolt or threaded rod 85mm and nuts
2X spindle 8mm and spindle nut or M8 threaded rod and nut
2X stepper nema 17
2X motor to spindle connector 5mm to 8mm
6X M4x40mm bolt
6X M4 nut
8X M3x10mm bolt
8x M3x20mm bolt and nuts are optional if you use the M8 converter part.
For the X and Y axis setup you need:
4X sliding rod 10mm length is of you own choise
4X linear bearing LM10UU
4X linear bearing LM10UU in housing
6X F623ZZ bearing for timing belt tension-ers
3X timing belts and pulley's
3X Stepper Nema 17
2X end switch
1X LED strip but is optional
1X 30x30mm Fan but is also optional
8X M3x20mm & nuts are optional for the X axis tension bar
2X M10 threaded rod and 4 nuts are optional for the X axis tension bar
16X M5x10mm
3X M4x40mm bolt
3X M4x40mm bolt
12X M4x10mm bolt
24X M4 nut
24X M3x10mm bolt
8X M3x20mm bolt
32X M3 nut
For the extruder you need:
3x bearing 608z
1x 11mm driver
1X M8 x 50mm bolt or something similar
1x hot-end
2x snail house fan
1X spring (optional, depending on filament material)
1X nema 17 stepper
1x kapton tape
12X M3 nut
4X M3 x6mm bolt
9X M3 x 10 mm bolt
3X M3 x20mm bolt
9X M3 washer (optional)
1X M3 big washer for filament guide
8X M4 nut
5X M4 x20mm bolt
1X M4 x40mm bolt
5X M4 washer (optional)
But of course these parts are just a indication for everybody will build their printer in another way.
That's what this concept is all about. :-)
I hope I didn't forget anything, but If you have questions feel free to ask them :-)
PS: I know, my so called curtains are not very creative :-)
The idea of this printer is that you can make it as large as you want and as cheap as possible :-)
Basically a printer is an X, Y and Z axis. So I made an X and Y axis that is mountable on any sort of construction that gives it height. This construction can be made of material that you have lying around.
If you have wood you can use that. If you have steel pipes you can use that. You can even build it from stones if you want. I made it on an old CNC Router frame I once build. I just added aluminum pipes I had laying in the backyard. With this I build a squire platform which carries the X and Y axis. If I make this platform higher the printer can print higher. :-)
Then of course you also need a print bed. Most of that construction can also be made of any material you have laying around. I used extruded aluminum lengths that limited me to a height of 710 mm. the printed parts are just to couple them and hold the motors and spindles. The dimensions of the extruded aluminum lengths I used are 30x33mm. So the parts for the Z axis are made to fit that. The gliding part in the vertical direction holds 8 608 bearings each side. “bearing holder L.stl & bearing holder R.stl” are super solid, but take a lot of material. Therefor I also made the “bearing holder small” STL's to save material. No the one peace is hacked in two peaces so they have to be held apart with a threaded rod. You can see it on the pictures. Initially these parts where made for a spindle, but because I could not find them 1 meter long, I used Threaded rod instead. For implementation of the M8 nut, you have to use the M8 nut converter part. Also it's recommended to grease the threaded rod also.
For the X and Y axis setup, I used 10mm x 1000mm guiding rods. That means that the X axis is 714mm and the Y axis is 758mm in length. My heat bed can reach 710mm in height. But the glass plate of my heat bed is only 300 x 300mm so I limited my printer to 300x300x700mm at the moment. Of course the bed can be made bigger and so the print dimensions get bigger.
To take away vibrations and keep these long rods straight, you can use the “X axis tension bar holder”. Install one on each end of the x axis rod and mount a M10 threaded rod in them. It's much easier to watch the pictures I guess :-). on the pictures there is installed only one, but I intend to install a second one on the other X axis rod. With only one installed you get an uneven load and uneven vibrations in the two rods.
There is a option for a small 30x30 cooling fan for the X motor, but is optional.
Of course all timing belts have tensioners.
Under the X wagon is an optional slot where a LED strip can be mounted. The dimensions of the strip are 36x9x1 mm made by Dymand v2 DUL2 201611. I took it out of an cheap USB led lamp you cab see on one of the pictures.
Because this is so big, there are two motors for the Y axis and two for the Z axis. The controller is a ramps 1.4 and Arduino Mega. The problem is that you can’t install more than one driver per axis. So you have to solder a second motor driver parallel to the one on the ramps board. It’s advisable to take the motor power directly from the power connector on the board and to install an extra capacitor for each extra driver.
A printer also needs an extruder. :-) Because I print with ABS a lot this one is designed to do just that (but it also works with other filaments).
With ABS printing you do not want to have airflow passing the printed parts.
Therefor the air is inhaled from above. Then passed through to the Hot-end and then back out at the top. The same airflow construction is also made for the motor. This way the printed part never gets cooled by these 2 fans. For the dimensions of these snail house fans, see picture.
Also I wanted an extruder on which changing filament is easy. On most extruders you can’t see the filament wire and that can make it hard to change filament. If you run out of filament due the print, you are in big trouble. Therefor I made this one in such a way that you can always see the filament wire.
Because I have 3 different sizes of Filament (1.75mm, 2.85mm & 3mm) this extruder can use them all.
To do this I have made an exchangeable filament wire guide. For the 1.75 mm filament I also need to put in a Teflon tube because the hot-end is made for 3mm wire. (I can recommend the Teflon tube anyways because the filament go’s in much smoother). The filament guide is also adjustable so you can guide you filament perfectly. In the photos you do not see this guide because that is still the proto type. On that model the 3mm guide is fixed to the body. Not so smart, because you can’t adjust anything anymore. Also I broke it :-) . As a lose part you can just print it out again. The guide is mounted using a washer, M3 nut and 10mm bolt.
The little filament driver (11mm diameter) is mounted on an M8x50mm bolt I had lying around. On the lathe I turned the end of this M8 bolt down to 5mm so the driver can be mounted on it. See pictures.
The Hot-end is a cheap Chinese one I do not even know the name of, but it works very good. For the dimensions of this Hot-end see pictures.
The stepper motor is a Nema 17 x 47mm. I recommend a strong motor for this if you want to use 2.85 & 3mm filament wire. In the picture you see a 42BYGHW811, but I use an SL42S247A at the moment (a bit more torque). As a driver I still use an A9844 with heavy cooling and heat sink.
For the main body I had to add support material. See picture about the removal of the support material. All other parts can be printed without support. After assembly it is wise to put katon tape on the bottom to protect the plastic from all the heat.
This way the plastic holds longer
Also Included is a Marlin script that should work. Hence for printing with PET-G 1.75mm I had to turn the flow-rate back to 49%. Steps/mm for the extruder motor may need some tweaking. For ABS 3mm it did work ok. Hence the blue ABS print has deformed due to warping. But that's expected because it's an open structure. I have order PLA to try that for printing vases. With the transparent PET-G it works great!
For the Z axis setup you need:
16X 608ZZ bearing
1X end switch
16X M8 bolt or threaded rod 85mm and nuts
2X spindle 8mm and spindle nut or M8 threaded rod and nut
2X stepper nema 17
2X motor to spindle connector 5mm to 8mm
6X M4x40mm bolt
6X M4 nut
8X M3x10mm bolt
8x M3x20mm bolt and nuts are optional if you use the M8 converter part.
For the X and Y axis setup you need:
4X sliding rod 10mm length is of you own choise
4X linear bearing LM10UU
4X linear bearing LM10UU in housing
6X F623ZZ bearing for timing belt tension-ers
3X timing belts and pulley's
3X Stepper Nema 17
2X end switch
1X LED strip but is optional
1X 30x30mm Fan but is also optional
8X M3x20mm & nuts are optional for the X axis tension bar
2X M10 threaded rod and 4 nuts are optional for the X axis tension bar
16X M5x10mm
3X M4x40mm bolt
3X M4x40mm bolt
12X M4x10mm bolt
24X M4 nut
24X M3x10mm bolt
8X M3x20mm bolt
32X M3 nut
For the extruder you need:
3x bearing 608z
1x 11mm driver
1X M8 x 50mm bolt or something similar
1x hot-end
2x snail house fan
1X spring (optional, depending on filament material)
1X nema 17 stepper
1x kapton tape
12X M3 nut
4X M3 x6mm bolt
9X M3 x 10 mm bolt
3X M3 x20mm bolt
9X M3 washer (optional)
1X M3 big washer for filament guide
8X M4 nut
5X M4 x20mm bolt
1X M4 x40mm bolt
5X M4 washer (optional)
But of course these parts are just a indication for everybody will build their printer in another way.
That's what this concept is all about. :-)
I hope I didn't forget anything, but If you have questions feel free to ask them :-)
PS: I know, my so called curtains are not very creative :-)
Similar models
cults
free

Geared Extruder 2
...s
1x m8 bolt for the driver gear. see picture for the dimensions
1x filament driver gear
3x bearing 608z
1x nema 17 stepper motor
cults
free

Easy exchange filament extruder
...11mm driver 1x m8 x 50mm bolt or something similar 1x hot-end 2x snail house fan 1x spring (optional,...
cults
free

Geared Extruder
... . for 2,85mm & 3mm filament the holes need to bored out to the correct size.
if you have any questions feel free to ask
cults
free

Hot End mod 3 Anet A6
...he extruder is not depicted. also 2 m3x 20mm bolts that mount into the stepper motor is not shown…. time is a killer i guess :-)
cults
free

My Customized M8 Yin-Yang Fidget Spinner
...r bearing (7mm)
instructions
using the following options:
whichweight = m8
rotation = 135
objects = 2
overlap = 1.5
radius = 2
cults
free

Flat cable knife
...tterfly (may be plastic).
it works with standard 9mm blade.
printed with abs (sorry for quality; i'm testing new material).
cults
free

Flying extruder for Delta printers
.../83ubdp (not sponsored link, i just love this printer :p
if you have any suggestions or questions, do not hesitate to contact me
cults
free

Paper towel man
....
beware that you first have to screw him down and after that you can install the rolling part.
printed in purple abs res. 0.2mm
cults
free

Joystick
...entiometers (b1 p160kn3k) i used 50k ohm because i had those. see print screen for dimensions
printed in pet-g, 0.2mm resolution
cults
free

Mini Kossel Delta 3D Printer Spoolholder
...0mm
3 x m8 washers
3 x m8 nuts
if you have any questions or remarks let me know!
and i will try to help as good i can.
2560
cults
free

Boxing for Mega 2560 and Ramps 1.4 + Lcd plugged on
...for storing the mega2560 / ramps 1.4 assembly, the 12864 lcd connector.
box designed to contain a 10 mm thick 40x40 cooling fan.
cults
free

Arduino Mega 2560 holder
... screws and nuts m3 or tapping screw.
dimensions and other parts available on this site:
http://www.genapart.com/blog/ressources/
cults
free

Electronic case for Arduino Mega 2560 + Ramps 1.4 + LCD 2004 - 3D Modular Systems
...ww.3dmodularsystems.com
twitter: https://twitter.com/3dmodularsystem
youtube: http://www.youtube.com/c/3dmodularsystems3dprinters
cults
free

Anet AM8 RAMPS1.4 + Raspberry Pi 2 and 3 holder bracket 2020, 2040
...washer 4x hammer nut electronics ramps 1.4 board mega 2560 board (arduino clone) 4-5x drv8825 stepper driver raspberry pi...
cults
free

Modular Anet A8 RAMPS 1.4 + Raspberry Pi 2/3 Case
...pi: https://goo.gl/rahxua - ramps 1.4 board: https://goo.gl/ybxuoz - mega 2560 board (arduino clone): https://goo.gl/rvb4lo - 4-5x drv8825 stepper driver:...
Mega
cults
free

mega drive sega
...mega drive sega
cults
sega video console mega drive
support for 4 game megadrive
cults
$3

Arduino Mega Case
...e idea of this stylish cover comes because always the development boards have a rustic style and they are unprotected.
enjoy it.
cults
free
Arduino Mega 2560 holder
... screws and nuts m3 or tapping screw.
dimensions and other parts available on this site:
http://www.genapart.com/blog/ressources/
cults
free

mosfet i3 mega
...oduct/b074kzmjrb/ref=oh_aui_detailpage_o01_s00?ie=utf8&psc=1
4 screws to fix the pc covers
4 allen screws 4x40 + nuts
cults
free

Graphica: MEGA Ghost - Print & Play - via 3DKitbash.com
...lts
graphica: mega ghost - print & play via 3dkitbash.com
graphica: mega ghost - print & play - via 3dkitbash.com
cults
free
Boxing for Mega 2560 and Ramps 1.4 + Lcd plugged on
...for storing the mega2560 / ramps 1.4 assembly, the 12864 lcd connector.
box designed to contain a 10 mm thick 40x40 cooling fan.
cults
free

Nerf MEGA Explosive Tips - Party Snap Foam Dart Tips
... shoot these at people or animals
for instructions and testing results, please view the video at: https://youtu.be/ybzklpjmo1i
cults
free
Electronic case for Arduino Mega 2560 + Ramps 1.4 + LCD 2004 - 3D Modular Systems
...ww.3dmodularsystems.com
twitter: https://twitter.com/3dmodularsystem
youtube: http://www.youtube.com/c/3dmodularsystems3dprinters
cults
free

My Marble Fidget Spinner
...my marble fidget spinner cults printer: anycubic i3 mega rafts: no supports: no resolution: .2mm infill: 100% notes:...
cults
$3

Arduino Uno R3 Case
...arduino uno r3 case cults arduino case mega uno r3 gadget breadbord the idea of this stylish...
Reprap
cults
free

Motor Holder Nema 17 for most RepRap Typs
...d for nema17 engines. the hole spacing is 30 mm (x axis) and 50mm (in the z axis).
i hope it helps you
greeting the chaosmodder
cults
free

Display case Prusa I3
...display case prusa i3 cults prusa i3 display reprap 3d printer housing to shift the display on a...
cults
free

flower ring
...jewelry flower ring its possible to print with a reprap printer but better with a sla...
cults
free

Cable chain for x-axis and z-axis
...cable chain for x-axis and z-axis cults prusa i3 reprap 3d printer cable chain for those who want tidy...
cults
free

Power supply fan protection
...power supply fan protection cults fan power_supply protection reprap rear ventilation exit other versions available on:...
cults
free

Prusa i3 Spool Holder
...holder cults 3d_printer accessory filament_spool filament_spool_holder prusa prusa_i3 prusa_i3_rework reprap spool spool_holder tool a spool holder i made using...
cults
free

RUMBA Board holder
...rumba board holder cults board holder reprap rumba rumba_case fixing with 2 screws and nuts m4....
cults
free

LM8UU bearing holder
...lm8uu bearing holder cults bearing linear_bearing lm8uu lm8uu_holder reprap fixing with 4 screws and nuts m4 dimensions and...
cults
free

Extruder bracket and calibration tutorial
...extruder bracket and calibration tutorial cults nema17 2020 bowden reprap ramps1.4 marlinfw this us a bracket that can secure...
cults
free

Belt tensioner
...belt tensioner cults belt_clamp belt_holder belt_tensioner gt2_belt reprap this tensioner for gt2-6 belt is printed in abs...
Arduino
cults
free

Arduino numeric keypad
...d
cults
keyboard keypad arduino arduino nano
j'ai réalisé ce boitier pour y intégrer un clavier numérique et un arduino nano.
cults
free

Arduino Insect
...w to make and program a arduino insect at: http://www.instructables.com/id/build-your-own-insect-robot-using-arduino-and-serv/
cults
free

Arduino Uno case
...arduino uno case
cults
arduino uno case easy open close light
http://horizonlab.co/2017/08/14/arduino-uno-case/
cults
free

Arduino and Mini Breadboard Caddy
...arduino and mini breadboard caddy
cults
arduino and mini breadboard caddy
arduino and mini breadboard caddy
cults
free

Arduino and NodeMCU box with screen
...arduino and nodemcu box with screen
cults
arduino and nodemcu box with screen
arduino and nodemcu box with screen
cults
free

Bumper for Arduino Uno Clone
...bumper for arduino uno clone
cults
bumper for arduino uno clone
bumper for arduino uno clone
cults
$1

Arduino distance sensor support
... suport sensor distance
arduino distance sensor support 3d print 3d print model
an printable arduino support for distance sensor
cults
free

Arduino Mounting Plate
...it: https://www.adafruit.com/product/275
this mount can be laser cut out of wood or acrylic. in addition, it can be 3d printed.
cults
free

MakerTron Arduino Smart Flight Suit
...makertron arduino smart flight suit
cults
makertron arduino smart flight suit
makertron arduino smart flight suit
cults
free

Arduino Attiny Arcade
...
tutorial
http://circuitomaker.com/attiny-arcade/
facebook
https://www.facebook.com/circuitomaker
https://youtu.be/gq5kqd6f1fs
Big
cults
free

Big Wing
...big wing
cults
big wing
big wing
cults
free

Big Foot
...big foot
cults
big foot
big foot
cults
free

BIG WHEEL SPINNER
...pinner
cults
hand spinner original new big wheel big wheel spinner
a new way to use a hand spinner.
https://youtu.be/7nfksv1iykg
cults
free

Big Thumbs Xbox Joysticks
...big thumbs xbox joysticks
cults
big thumbs xbox joysticks
big thumbs xbox joysticks
cults
$6

Big sneakers and cap
...rtoon stl fun printable model big naskets easy print
the big sneakers version for this happy and funny character.
6 cm high.
cults
free

Marui Big Bear part collection.
...marui big bear part collection.
cults
marui big bear part collection.
marui big bear part collection.
cults
$6

Bubble Chair: Big Mouth
...g mouth
cults
the little chair with the big mouth
nothing says living large like a miniature mouth chair to display and admire.
cults
free

Big bracket
...big bracket
cults
bracket for screw diameter 4 mm
x: 10.3 cm
y: 2.5 cm
z: 15 cm
bracket for screw diameter 4 mm
#dagocults
cults
free

Big Eye Monster
...big eye monster
cults
mike monster wazowski pixar cie wasowski
michael wazowski ~~
it is no need add support for 2 arms ~
cults
free

Ultimaker 2 and 2+ Filament guide for big spools
...ment guide for big spools
cults
ultimaker 2 and 2+ filament guide for big spools
ultimaker 2 and 2+ filament guide for big spools
Diy
cults
$2

DIY wall shelf
...diy wall shelf
cults
diy wall shelf
diy wall shelf
cults
free

DIY Reaction Button
...diy reaction button
cults
diy reaction button
diy reaction button
cults
free

DIY Camera Slider
...diy camera slider
cults
diy camera slider
diy camera slider
cults
free

DIY Cellphone Body
...diy cellphone body
cults
diy cellphone body
diy cellphone body
cults
free

DIY Toy the Joenny
...diy toy the joenny
cults
diy toy the joenny
diy toy the joenny
cults
free

DIY Toy the Joennymal
...diy toy the joennymal
cults
diy toy the joennymal
diy toy the joennymal
cults
free

DIY Sand casting kit
...diy sand casting kit
cults
diy sand casting kit
diy sand casting kit
cults
free

Ventilateur à main DIY
...ventilateur à main diy
cults
ventilateur à main diy
ventilateur à main diy
cults
free

DIY Airtight Spool Holder
...diy airtight spool holder
cults
diy airtight spool holder
diy airtight spool holder
cults
free

DIY Auto Plant Waterer
...diy auto plant waterer
cults
diy auto plant waterer
diy auto plant waterer
4
cults
free

Drinking for 4
...drinking for 4
cults
drinking for 4
drinking for 4
cults
free

Elf 4
...elf 4
cults
elf 4
elf 4
cults
free

Dragon 4
...dragon 4
cults
dragon. keychain pendant earring print
dragon 4
cults
$2

Shark 4
...shark 4
cults
shark fish sea monster beach print toy
shark 4
cults
free

3D Fabric 4
...3d fabric 4
cults
3d fabric 4
3d fabric 4
cults
free

Form Vase 4
...form vase 4
cults
form vase 4
form vase 4
cults
free

String Vase 4
...string vase 4
cults
string vase 4
string vase 4
cults
free

Trophy Riser 4
...trophy riser 4
cults
trophy riser 4
trophy riser 4
cults
free

Trophy Base 4
...trophy base 4
cults
trophy base 4
trophy base 4
cults
free

Unicofil-Vase-4
...unicofil-vase-4
cults
unicofil-vase-4
unicofil-vase-4
1
cults
free

Bracelet No 1
...bracelet no 1
cults
bracelet no 1
bracelet no 1
cults
free

Hook, +1
...hook, +1
cults
hook +1
hook, +1
cults
free

Pokale 1-3, Winnercup 1 - 3
...pokale 1-3, winnercup 1 - 3
cults
pokale 1-3 winnercup 1 - 3
pokale 1-3, winnercup 1 - 3
cults
free

Super Mario Bros World 1-1
...super mario bros world 1-1
cults
super mario bros world 1-1
super mario bros world 1-1
cults
free

Pythagoras Tree (1:1:Sqrt2)
...ap a little bit. the structure is very easy to design in 123d design using the basic idea of similarity. yes, this is a fractal.
cults
$1

Bowl 1
...bowl 1
cults
bowl household mug bread kitchen go flagon
bowl 1
cults
free

Wind Vase 1
...wind vase 1
cults
wind vase 1
wind vase 1
cults
free

magnet mushroom 1
...magnet mushroom 1
cults
mushroom magnet 1
magnet mushroom 1
cults
free

3D Fabric 1
...3d fabric 1
cults
3d fabric 1
3d fabric 1
cults
free

Pumpkin Vase 1
...pumpkin vase 1
cults
pumpkin vase 1
pumpkin vase 1
Printer
cults
free

pixie printer
... card, to avoid bugs in plain print downloaded the foot and multiply by 6 they can raise your printer for better air circulation.
cults
$4

3D printer miniature
...3d printer miniature
cults
miniature printer 3d
give a model 3d printer to your jealous friends!
cults
$2

Printer feeder key
...printer feeder key
cults
3d printer ptfe feeder
ptfe hose clamp on the feeder.
cults
$1

Model printer 3d
...model printer 3d
cults
discover the field of 3d printing thanks to this model printer 3d
cults
free

Z-coupler for printer axle
...z-coupler for printer axle
cults
z-coupler for printer axle
z-coupler for printer axle
cults
free

TitanItalyDelta - for WASP 3D Printers
...titanitalydelta - for wasp 3d printers
cults
titanitalydelta - for wasp 3d printers
titanitalydelta - for wasp 3d printers
cults
free

Money bank of the printer shape
...money bank of the printer shape
cults
money bank of the printer shape
money bank of the printer shape
cults
free

Cardan coupling for 3D printer
...cardan coupling for 3d printer
cults
cardan to replace a flexible (5x8) 3d printer coupler
cults
$1

delta printer rod tensor
...
it requires little material, without losing strength.
avoid layer jumps by vibration of the arms achieving smoother impressions.
cults
$1

delta printer rod tensor
...
it requires little material, without losing strength.
avoid layer jumps by vibration of the arms achieving smoother impressions.