Thingiverse
Bedini Style Window Motor (Metric Magnets and Hardware) by Cotton80
by Thingiverse
Last crawled date: 3 years ago
https://www.youtube.com/watch?v=6oKbeM-Szjo
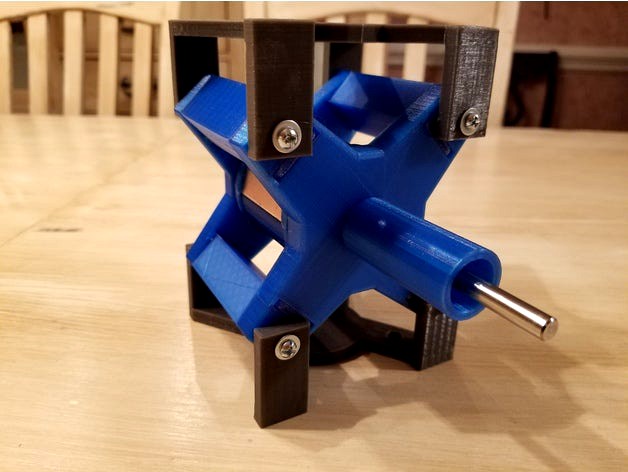
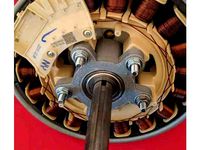
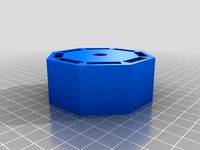
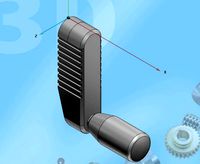
This Thing represents a model which is a basis for studying radiant or flyback energy. It is a compact design. The original designs and applications for these motors should be credited to John Bedini and Ron Cole. I reworked this motor to make it easy for those across seas to source the magnets and hardware. It also has some upgrades. A good place to learn about this technology is here: http://www.energyscienceforum.com/forumdisplay.php?f=48
The moderators worked closely with John Bedini and understand this technology well.
Parts:
6 magnets: 40mm X 10mm X 5mm https://www.magnetexpert.com/rectangular-magnets-c35/40-x-10-x-5mm-thick-n42-neodymium-magnet-8-3kg-pull-p3790 also http://www.magnets365.com/10pcs-40mm-x-10mm-x-5mm-block-cuboid-rare-earth-neodymium-magnets-n50-grade.html for a pack of 10
12 M4 pan head bolts at least 10mm long for the rotor caps 6 per side
8 M5 pan head bolts at least 50mm long 4 per side
8 M5 pan head bolts for mounting the motor 4 top and 4 bottom (optional)
2 8mm X 22mm X 7mm skateboard bearings. I highly recommend ABEC 5+ or Swiss Bearings: https://bonesbearings.com/bones-reg-swiss-skateboard-bearings-8-pack
The wire and the circuit is up to you.
1 8mm shaft rod
3 5mm X 5mm disc magnets for reed or hall triggering (optional) https://www.magnetexpert.com/circular-disc-rod-magnets-c34/5mm-dia-x-5mm-thick-n42-neodymium-magnet-0-9kg-pull-p3558
Print with infill set at 30%..tops and bottoms .8mm...walls 1.2mm....2mm layer height.
You are contending with strong centripetal forces.
Please review https://www.thingiverse.com/thing:1676878 to have an idea how this should fit together. I use a table vise to press the two bearing ends together once I have the tabs lined up on each of the eight corners. This presses them together evenly.
Disclaimer: Disclaimer: Experiment at your own risk. Catastrophic failure of parts spinning at high speed can cause damage to property, injury, or even death. This project contains an electrical function. Electrical shock resulting in injury or death can occur. If you are not experienced with working with electricity do not attempt this project. Know that some frequencies have been speculated to cause cellular disruption leading to cancer.
12/03/2017: The bearing holders had to be adjusted. The corrected file has been posted. It should fit skateboard bearings now.
Similar models
grabcad
free

Motor brushless 6v 3A
...olt
- glue
- star connection, 50 laps
- 2 bearings: 8mm×16mm×5mm
if you need help you can contack me: pangel2002@gmail.com
thingiverse
free

Prusa i3 MK2 Remix (2020 profile) by brydon1593
...h)
main board
rumba or ramps or anything you like
frame
2020 all profiles
2 x 600mm profile
5 x 500mm profile
8 x corner brackets
thingiverse
free

Magnetic Wall Mount Amazon Echo Spot by SnappyFPV
...sind passend für 5mm schrauben.
die 180° version erlaubt ein drehen des echo spot im halter.
referal links supports the designer.
thingiverse
free

Magnetic Whiteboard Marker Holder by dlarts
... and a height of 5mm (http://www.banggood.com/10pcs-10mm-x-5mm-n52-strong-rare-earth-ndfeb-neodymium-disc-magnets-p-988441.html).
thingiverse
free

Magnet Minecraft Pig by mdfolter
...g. w-05-n from supermagnete: https://www.supermagnete.nl/kubusmagneten-neodymium/kubusmagneet-5mm-neodymium-n42-vernikkeld_w-05-n
thingiverse
free

magnetic camera mount 20mm magnet gopro by gummybear223
... - 1/4 inch screw - bolt with pan head width 15mm or smaller, head hight 5mm
1 - 1/4 inch nut
1 - 20mm round by 5mm thick magnet
thingiverse
free

Let's make your own Bedini Motor by arnoldkorea
...e spindle)
1 x m3 bolt (m3x50)
8 x m3 bolt (m3x20)
12 x m3 nut
make your own bedini motor circuit and play with fun !!
thingiverse
free

Laser Cut Bracelets by dsacademy
...b28%3ag%3apc0aaoswe7javcbq&_sacat=0&_nkw=5mm+x+3mm+disc+-+neodymium+magnet&_from=r40&rt=nc&_trksid=m570.l1313
thingiverse
free
Magnet Beam Pulse Motor for Quarter Inch or 8mm Shaft by Cotton80
...his is optional.
the circuit and wire is up to you.
10:24 pm est 02/02/2017: reworked the motor brace to make it easier to print
thingiverse
free
Nema11 Motor Mounts by alaubhan
...n
thingiverse
hardware:
4 - m2.5 x 10mm hex socket cap bolts
2 - m5 x 8mm hex socket cap bolts
2 - m5 washers
2 - m5 t-slot nuts
Cotton80
thingiverse
free
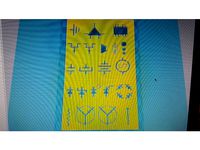
Electronic Symbol Stencils (Basic) by Cotton80
...your pencils. this is two basic stencils to assist with drawing your electronic circuit schematic. they are .8mm thick. enjoy!
thingiverse
free
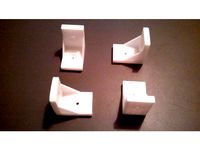
Bracket 3-Point by Cotton80
... to whatever dimensions you like.
disclaimer: use this part in your build at your own risk. load test have not been performed.
thingiverse
free
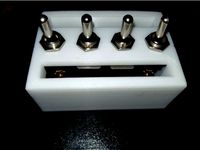
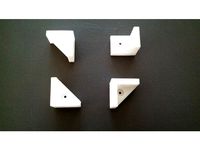
Toggle Switch Mounts (2 or 4) by Cotton80
... in one side for wire access.
also not pictured is 4 mounting holes for 6-32 bolts. they will need to be at least 1.5" long.
thingiverse
free
Bracket 90 Degree L by Cotton80
...able tops, securing chair seats
disclaimer: use this part in your creation at your own risk. load test have not been performed.
thingiverse
free
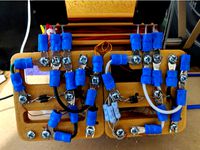
Bedini SSG Solderless Circuit by Cotton80
...elp reduce print time and still remains functional.
i also added a stencil for those who may want to put your circuit on a board.
thingiverse
free
Coupler for 1" Aluminum Square Tube (3-Way) by Cotton80
... support for the two horizontal tube sections.
disclaimer: use this object at your own risk. load test have not been performed.
thingiverse
free
Bearing Hub for PMSM by Cotton80
...en working with electrical equipment, especially when working with capacitors. do not attempt without good electrical knowledge.
thingiverse
free
Magnet Stator for a Mini Windmill Style Generator by Cotton80
...ill bit through the piece to ensure a good fit.
this thing can be scaled up to 200% to fit a 1/2" shaft and 1" magnets.
thingiverse
free

3/4" Rod Holder by Cotton80
...on top to make a light weight shelf. you can use the keyhole hangers to hang pictures in the open instead of directly on a wall.
thingiverse
free
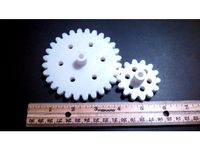
Spur Gears: 1 to 2 Ratio for 1/4" or 8mm shaft by Cotton80
...an easy fit.
the large gear has 28t and the small gear has 14t.
added on 02/05/2017: gears together for 1/4" & 8mm shaft
Bedini
thingiverse
free
Bedini rotor by Syngenta
...ni are in my library. the holes are perfect for 20mm 6mm thick ring magnets.the cover is put onto the magnets for safety reasons.
thingiverse
free

ReDesign3DP Bedini Motor V1 by redesign3dp
...redesign3dp bedini motor v1 by redesign3dp
thingiverse
redesigned bedini motor
thingiverse
free

Bedini Rotor round by Syngenta
...ngenta
thingiverse
this is the round version of my bedini rotor. magnets with 20mm diameter and 7mm in depth fit into the holes.
thingiverse
free

Bedini rotor by Syngenta
...dermagnet-200-x-200-x-30-mm-n45-nickel-m3-senkloch::511.html
(german shop)
coils and other rotors for a bedini are in my library.
thingiverse
free

Optical Tachometer for Bedini 3-pole Kit by liquidbuddha
...istor, with 5mm led plastic holders (both from radio shack). there is a small channel for wires, for the back side led or sensor.
thingiverse
free
Let's make your own Bedini Motor by arnoldkorea
...e spindle)
1 x m3 bolt (m3x50)
8 x m3 bolt (m3x20)
12 x m3 nut
make your own bedini motor circuit and play with fun !!
thingiverse
free
Bedini SSG Solderless Circuit by Cotton80
...elp reduce print time and still remains functional.
i also added a stencil for those who may want to put your circuit on a board.
thingiverse
free

Bedini-Type 6-Pole Magnet Motor by Syrus54
...the size to fit the application.
item is not for sale, royalty free.
[ do not sell nor re-distribute my work ]
you're welcome
thingiverse
free

electric coil by Syngenta
...by syngenta thingiverse this coil is perfect for a bedini pulse motor, the little hole is perfect for 2mm...
thingiverse
free

Bedini SG style motor (mechanical components) by MrCadillacsts
...tl will be glued to the lower side of the mounting plate.
add your bedini circuit and start the motor!!
have fun with this kit!!!
Metric
turbosquid
$15

Hexagonal Metric Nuts
... available on turbo squid, the world's leading provider of digital 3d models for visualization, films, television, and games.
turbosquid
$3

Dynamic bolts (Metric)(1)
...alty free 3d model dynamic bolts (metric) for download as skp on turbosquid: 3d models for games, architecture, videos. (1205770)
3ddd
$1

XAL / Metric LED Floor
...or, от производителя xal
сайт:http://www.xal.com/productsearch?sid=ikhkj8kkejijr4is2n4oucg0uotb3adl5qs9od4c470nak457300
turbosquid
$30

Para metrically Fabricated chair
... available on turbo squid, the world's leading provider of digital 3d models for visualization, films, television, and games.
3d_export
$15

Anchor PFG with metric thread M10 3D Model
...rew bolt nut nuts anchor clip fasteners fastener metric thread
anchor pfg with metric thread m10 3d model kapuravv 30793 3dexport
3d_export
$15

Anchor PFG with metric thread M8 3D Model
...crew bolt nut nuts anchor clip fasteners fastener metric thread
anchor pfg with metric thread m8 3d model kapuravv 30787 3dexport
turbosquid
$15

Anchor PFG with metric thread M10
... available on turbo squid, the world's leading provider of digital 3d models for visualization, films, television, and games.
turbosquid
$15

Anchor PFG with metric thread M8
... available on turbo squid, the world's leading provider of digital 3d models for visualization, films, television, and games.
3d_export
$25

Anchor PFG with metric thread M8 M10 3D Model
...bolt nut nuts anchor clip fasteners fastener metric thread
anchor pfg with metric thread m8 m10 3d model kapuravv 30794 3dexport
turbosquid
$25

Set Anchors PFG with metric thread M8 & M10
... available on turbo squid, the world's leading provider of digital 3d models for visualization, films, television, and games.
Magnets
3d_ocean
$2

Magnet
...
3docean
3d 3ds max electric magnet magnetic magnetism max model polygon realistic tesla
magnet created in 3ds max by umurdesign.
turbosquid
$6

Magnet
...
turbosquid
royalty free 3d model magnet for download as obj on turbosquid: 3d models for games, architecture, videos. (1548733)
turbosquid
$6

magnet
...uid
royalty free 3d model magnet for download as 3dm and max on turbosquid: 3d models for games, architecture, videos. (1670606)
turbosquid
$1

Magnet
...y free 3d model magnet for download as 3ds, max, obj, and fbx on turbosquid: 3d models for games, architecture, videos. (1215037)
turbosquid
$7

Magnet
...agnet for download as blend, unitypackage, fbx, gltf, and obj on turbosquid: 3d models for games, architecture, videos. (1576588)
3d_export
$5

magnetic knife holder
...magnetic knife holder
3dexport
ordinary magnetic knife holder
archive3d
free

Fridge magnet 3D Model
...t fridge magnet magnet
toy magnetic s n280712 - 3d model (*.3ds) for interior 3d visualization.
turbosquid
$35

Magnetic butterflies
...alty free 3d model magnetic butterflies for download as blend on turbosquid: 3d models for games, architecture, videos. (1315792)
turbosquid
$2

Magnetic Board
...quid
royalty free 3d model magnetic board for download as ma on turbosquid: 3d models for games, architecture, videos. (1264141)
turbosquid
$977
Magnetic Lego
...oyalty free 3d model magnetic lego for download as ma and obj on turbosquid: 3d models for games, architecture, videos. (1142761)
Hardware
3ddd
$1

Restoration Hardware
...restoration hardware
3ddd
restoration hardware
restoration hardware
3ddd
$1
RESTORATION HARDWARE
...restoration hardware
3ddd
restoration hardware , телескоп
restoration hardware
3ddd
$1

Restoration Hardware
...restoration hardware
3ddd
restoration hardware
restoration hardware, кресло,
3ddd
$1

Restoration Hardware
...restoration hardware
3ddd
restoration hardware , декоративный набор
restoration hardware
3ddd
$1

Restoration Hardware
...restoration hardware
3ddd
restoration hardware , декоративный набор
restoration hardware
3ddd
$1

Restoration Hardware
... hardware , боров , свинья
restoration hardware
3ddd
$1

Restoration Hardware
...ardware , корона , медведь
restoration hardware
3ddd
$1

Restoration Hardware
...ation hardware
3ddd
restoration hardware , тумба
тумба прикроватная restoration hardware
3ddd
free

Restoration Hardware
... кашпо , куст , свеча
restoration hardware
3ddd
free
Restoration Hardware
...restoration hardware
3ddd
restoration hardware
restoration hardware menlo table lamp
Motor
archibase_planet
free

Motor
...base planet
motor motor engine engine electric motor
motor wagner n250213 - 3d model (*.gsm+*.3ds) for interior 3d visualization.
archibase_planet
free

Motor
...motor
archibase planet
motor motor engine engine
motor n151112 - 3d model (*.gsm+*.3ds) for interior 3d visualization.
archibase_planet
free

Motor
...motor
archibase planet
motor motor engine engine
motor n150615 - 3d model (*.gsm+*.3ds+*.max) for interior 3d visualization.
turbosquid
$15

Motor
...otor
turbosquid
royalty free 3d model motor for download as on turbosquid: 3d models for games, architecture, videos. (1639404)
3d_ocean
$5

Electric motor
...electric motor
3docean
car electric engine industry motor phase train vehicle
an electric motor enjoy!
3d_ocean
$18

Electric Motor
...electric motor
3docean
electric motor engine machine mover parts
3d model electric motor for hoist crane
turbosquid
$29

Motor
... available on turbo squid, the world's leading provider of digital 3d models for visualization, films, television, and games.
turbosquid
$5

Motor
... available on turbo squid, the world's leading provider of digital 3d models for visualization, films, television, and games.
3d_export
$5

electric motor
...electric motor
3dexport
electric motor use for industrial purposes
3d_export
$5

servo motor
...tor
3dexport
it's a simple part of servo motor 0.75kw for used in machines assembly to show specified motor in own project.
Window
3d_ocean
$3

Window
...window
3docean
window
a lowpoly window .
3d_ocean
$2

Window
...window
3docean
window
a lowpoly window.
3d_ocean
$2

Window
...window
3docean
window
a lowpoly window.
3d_ocean
$2

Window
...window
3docean
window
a lowpoly window .
3d_ocean
$5

Window
...window
3docean
window
a high quality window.
3d_ocean
$4

Window
...window
3docean
window
a high quality window.
3d_ocean
$4

Window
...window
3docean
window
a high quality window.
3d_ocean
$4

Window
...window
3docean
window
a high quality window.
3d_ocean
$3

Window
...window
3docean
window
a high quality window.
3d_ocean
$3

Window
...window
3docean
window
a high quality window .
Style
3ddd
$1

style
...style
3ddd
манекен , одежда
style
3ddd
$1

BM Style
...bm style
3ddd
bm style
кресло bm style с материалами и тестурами
3d_export
$5
style handle
...style handle
3dexport
style handle
3d_export
$6

new style
...new style
3dexport
new style room
turbosquid
$1

style
... available on turbo squid, the world's leading provider of digital 3d models for visualization, films, television, and games.
3d_export
$5

Roman style
...roman style
3dexport
roman style architecture house
3ddd
$1

Ceppi Style
...ceppi style
3ddd
ceppi style
качественная модель классического стола ceppi style с текстурами и материалами v-ray
3ddd
$1

Kolo Style
...kolo style
3ddd
kolo
умывальник kolo style, арт. l21950
3ddd
$1
Banos Style
... style
производитель banos
модель style
в архиве присутствует дополнительная версия с материалами для corona
3ddd
$1

Кухня Free-style
...кухня free-style
3ddd
free-style
кухня free-style