Thingiverse

Bed camera mount for Makergear M2 by robertwallace
by Thingiverse
Last crawled date: 3 years ago
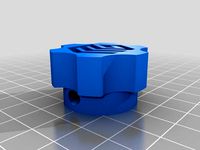
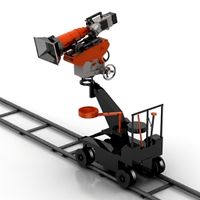
This is a bed camera mount for the Makergear M2. I designed it, originally, to use with a Raspberry Pi camera inside this case: http://www.thingiverse.com/thing:1646474 . I redesigned it to be a little more general by using a tripod-screw mount with a threaded ball mount for the Pi camera case. Now, you can use it with any camera with a tripod mount. Still, you'd be better off using the low-mass Pi camera.
If you're careful, you can mount the camera directly on the bed mount. That's the way I did it. For a while. Then I was rudely reminded that the part-cooling fan may smash into whatever you mount there should your printer move the hot end out near Z0,Y0,X200. The quickly-designed extension arm will help keep the camera out of harms' way. It has serrations to match the bed mount and will lock the camera at your selected position.
To install the camera mount, you will need to remove the rubber corner piece (shown sitting on the bed in one of the photos. Save it somewhere.) Slide the camera mount over the bed's aluminum foot - it should be a snug fit. Replace the M3 screws. The existing ones should work.
Select the parts you want for your configuration and assemble. Remember that the bed will go up 250mm and you'll need enough slack in the camera cable. If using the Pi camera, you can use the cable hangers to help manage the ribbon cable. Note that one of the hangers has nubs to help restrict the cable movement in order to keep the cable movement from moving the camera.
There are 3 lengths of screws - the longer one will be handy if you use the ribbon cable hangers.
I've included one STL that is a plate of the complete set (with an extra nut.) This is for convenience, though you may be better served by only printing what you will need for your particular configuration.
Credits:
I used mike_mattala's Nut Job (http://www.thingiverse.com/thing:193647) for the screws and nuts, with some slight modifications to make the knurled screw. This is an excellent tool for making nuts and bolts and the way he generates the threads makes the result very easy to slice and print successfully.
I originally used Exclusive (Austin Trulove)'s Pi camera mount and case (link, above) with my Prusa i3 Mk2 and I liked the way it worked. When it came time to "Pi" up my M2, this was the only case I considered.
Finally, a disclaimer of sorts:
I designed the mount using the specs of my M2 printer, which is an early model with a 3-point bed leveling system. My mount wraps the front-right aluminum bed foot - if that foot has changed on subsequent M2 versions, please let me know.
Similar models
thingiverse
free

MakerGear M2 Camera Mount for Raspberry Pi by chaltiner
...
the arm is taken from thing:2267182, and the camera case from thing:2307335.
you will need two m3 screws and nuts to assemble.
thingiverse
free

Raspberry PI Zero Camera Case (v. 1.0.0)
...nnector cable 38mm long
5 mb camera module
1/4 inch 6mm high hex nut (for tripod or camera holder mount)
4x m2*5 flat head screws
thingiverse
free

Raspberry Pi 4 Mounting Plate for High Quality Camera by DavidDeeds
...y pi and high quality camera together, plenty of cable clearance and easy access to the raspberry pi 4 ports when used on tripod.
thingiverse
free

Prusa MK2 Raspi Cam Case and Bed Mount by Phredie
...sed:
raspi camera: https://goo.gl/g8ruzr
raspi ribbon cable: https://goo.gl/tororw
compatable fisheye lens: https://goo.gl/lkrjcl
thingiverse
free

Raspberry pi camera mount with cable clips by brianholley
...4
the camera will be held in place with short m2 screws, and both the mount and the clips are held to the bracket with m3 screws.
thingiverse
free

Ender 5 Camera Holder by PhilippSchulz
... view in a lot of other designs here on thingiverse.
if you want to change some dimensions yourself, i attached the freecad file.
thingiverse
free

Raspberry Pi and Camera Holder for Turnigy Fabrikator by cgcrute
...to be neatly routed.
added a stylus holder.
no case on my pi until i find/ design one that will fit my older pi and the tft.
thingiverse
free

1/4 Inch Tripod Nut by ctpearson
...;real" nut, but i'd prefer to stick to plastic. :-)
the nut is threaded correctly and should easily screw onto a tripod.
thingiverse
free

ELP cam case supports by Angelscry
...r my camera tripod (and must be compatible with all kind of tripod)
the case is fixed on these mounts using a m3x25 screw + nuts.
thingiverse
free

Raspi FLIRC case hanger
...er, so if you decide to screw-mount it, you'll need screws with a low-profile head so they don't interfere with the case.
Robertwallace
thingiverse
free

Salt Cellar / Keeper by robertwallace
...zer to allow easy changes to the cellar diameter, height, magnet shape, size and count and, perhaps, customized text for the lid.
thingiverse
free

Legends Core Light Shield by robertwallace
... and blocks the ring light - but has an opening that mimics the usual power-on indicator light of most of your other electronics.
thingiverse
free

Mail Holder - directional by robertwallace
...ifferent font options as well as one with no text. if you want a backdrop for the text, there's a thin piece you can attach.
thingiverse
free

Divider for HF parts drawer by robertwallace
...deling tool in seconds. but i've already done the measuring and testing, so all you need to do is download and print.
enjoy!
thingiverse
free

Yet Another Filament Swatch by robertwallace
... print one of these.
the hole is sized for a normal snap-chain's buckle.
i use a cheap label printer to identify each swatch.
thingiverse
free

spoon / scoop / tamp by robertwallace
... longer but it adds comfortable mass to the tool and it seems to help the scoop part slice and print more easily without support.
thingiverse
free

Extruder Knob / Dial by robertwallace
...st.)
[edit] added a version with a slightly smaller outer diameter to provide clearance when used with my d-bot x/y motor covers.
thingiverse
free

Snap On Portal Bookstand with tiles by robertwallace
...tomic filament's "light gray v2."
[edit 03/17/19] no changes - just added two photos at neocognitron's request.
thingiverse
free

Power Brick hanging bracket by robertwallace
...mmand strips, which work very well. the photos show it temporarily mounted to a piece of plywood and holding my printrbot brick.
thingiverse
free

Desktop Organizer by robertwallace
...uff.
** yes. i regularly use both of those post-it sizes. these containers hold the 3x3 -inch and the 2x1.5 -inch post-it pads.
Makergear
thingiverse
free

MakerGear M2 faceplate by TimEdwards
...frame and holds itself in place.
the makergear logo is presumed to be a trademark of makergear, inc., http://www.makergear.com.
thingiverse
free

spacer for Makergear X-Carriage by mic
...spacer for makergear x-carriage by mic
thingiverse
spacer for makergear x-carriage
thingiverse
free

bioprinter for makergear M2 by goldengrape
...for makergear m2 by goldengrape
thingiverse
remix fromhttps://3dprint.nih.gov/discover/3dpx-008366
try to modify my makergear m2
thingiverse
free

Modified Y-stage by MakerGear
...ified y-stage used for the makergear heated build platform. these files may be helpful for botters using or waiting on their hbp.
thingiverse
free

Makergear M2 Fan Bracket by Werner
...makergear m2 fan bracket by werner
thingiverse
makergear m2 fan bracket for use with fan shroud thing:69327
thingiverse
free

MakerGear HotEnd by RaD
...makergear hotend by rad
thingiverse
it helps you to build new mendel90 model.
thingiverse
free
Makergear Z Axis Knob by Aydelott
...makergear z axis knob by aydelott
thingiverse
makergear z axis knob press in steel when the abs is still a little warm
thingiverse
free

Makergear M2 Filament guide by Werner
...ent guide by werner
thingiverse
slightly optimised 3mm filament guide for makergear m2
with provision for 2. mount for small fan
thingiverse
free

Fan Shroud (MakerGear M2) by JohnShawDesign
...by johnshawdesign
thingiverse
tested fan shroud for makergear m2. centers air flow for better overhangs and more direct cooling.
thingiverse
free

MakerGear M2 Tool Holder by wschleter
...thingiverse
a compact toolholder for a makergear m2. mounts to the frame using two existing holes. freecad source file included.
M2
turbosquid
$50

M2
... available on turbo squid, the world's leading provider of digital 3d models for visualization, films, television, and games.
design_connected
free
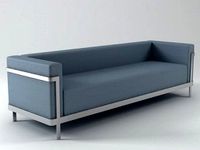
M2 Sofa
...m2 sofa
designconnected
free 3d model of m2 sofa by ka design designed by kleine allekotte, joachim.
turbosquid
$10

M2 Browning_LP
...uid
royalty free 3d model m2 browning_lp for download as lwo on turbosquid: 3d models for games, architecture, videos. (1279588)
turbosquid
$120

Browning M2
...y free 3d model browning m2 for download as 3ds, max, and obj on turbosquid: 3d models for games, architecture, videos. (1298501)
turbosquid
$70

m2 collection
... available on turbo squid, the world's leading provider of digital 3d models for visualization, films, television, and games.
turbosquid
$19

Browning M2
... available on turbo squid, the world's leading provider of digital 3d models for visualization, films, television, and games.
turbosquid
$19
Turntable M2
... available on turbo squid, the world's leading provider of digital 3d models for visualization, films, television, and games.
turbosquid
free

M2 Carbine
... available on turbo squid, the world's leading provider of digital 3d models for visualization, films, television, and games.
turbosquid
free

M2 Grand
... available on turbo squid, the world's leading provider of digital 3d models for visualization, films, television, and games.
turbosquid
free

Lego M2
... available on turbo squid, the world's leading provider of digital 3d models for visualization, films, television, and games.
Camera
archibase_planet
free
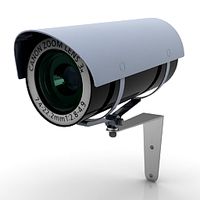
Camera
...base planet
camera surveillance camera video camera
camera surveillance n090211 - 3d model (*.3ds) for interior 3d visualization.
archibase_planet
free

Camera
...hibase planet
camera security camera video camera
camera security n210515 - 3d model (*.gsm+*.3ds) for exterior 3d visualization.
archibase_planet
free
Camera
...se planet
camera web camera webcam
camera butterfly usb pc camera n090713 - 3d model (*.gsm+*.3ds) for interior 3d visualization.
archibase_planet
free
Camera
...mera
archibase planet
surveillance camera video camera camcorder
camera n011211 - 3d model (*.3ds) for exterior 3d visualization.
archibase_planet
free
Camera
...camera
archibase planet
camera digital camera
camera canon digital n041211 - 3d model (*.3ds) for interior 3d visualization.
archibase_planet
free
Camera
...camera
archibase planet
camera film camera phototechnique
camera n100214 - 3d model (*.gsm+*.3ds) for interior 3d visualization.
archibase_planet
free

Camera
...amera
archibase planet
camera video camera camcorder
camera video n070315 - 3d model (*.gsm+*.3ds) for interior 3d visualization.
archibase_planet
free
Camera
...rchibase planet
camera video camera camcorder
camera studio n101213 - 3d model (*.gsm+*.3ds+*.max) for interior 3d visualization.
archibase_planet
free
Camera
...ibase planet
digital camera camera phototechnique
camera canon ixus 400 n310311 - 3d model (*.3ds) for interior 3d visualization.
archibase_planet
free
Camera
...ase planet
photocamera video camera camera
camera sony t300 black n291010 - 3d model (*.gsm+*.3ds) for interior 3d visualization.
Bed
3ddd
$1

bed
...bed
3ddd
bed , постельное белье
bed
3ddd
$1

bed
...bed
3ddd
bed , постельное белье
bed
3ddd
$1

bed
...bed
3ddd
bed , постельное белье
bed
3ddd
$1

bed
...bed
3ddd
bed , постельное белье
bed
3ddd
$1

bed
...bed
3ddd
bed , постельное белье
bed
3ddd
$1

bed
...bed
3ddd
bed , постельное белье
bed
3ddd
free

bed
...bed
3ddd
bed , постельное белье
bed
3ddd
free

bed
...bed
3ddd
bed , постельное белье
bed
3ddd
$1

Bed
...bed
3ddd
bed , постельное белье , постель
bed
3d_export
$7

bed adairs bed
...rs bed
3dexport
bed adairs bed in modern style. if you want a smoother surface, please turn on turbosmooth in the modifier list.
Mount
3d_export
free

mounting bracket
...mounting plate is the portion of a hinge that attaches to the wood. mounting plates can be used indoors, cabinetry and furniture.
turbosquid
$2

MOUNTING
... available on turbo squid, the world's leading provider of digital 3d models for visualization, films, television, and games.
turbosquid
free

Mounts
... available on turbo squid, the world's leading provider of digital 3d models for visualization, films, television, and games.
turbosquid
free

Mount Fuji
...fuji
turbosquid
free 3d model mount fuji for download as obj on turbosquid: 3d models for games, architecture, videos. (1579977)
3d_export
$5

Headphone mount LR
...headphone mount lr
3dexport
headphone mount l+r
turbosquid
$39

Mount rainier
...quid
royalty free 3d model mount rainier for download as fbx on turbosquid: 3d models for games, architecture, videos. (1492586)
turbosquid
$5

pipe mounting
...quid
royalty free 3d model pipe mounting for download as obj on turbosquid: 3d models for games, architecture, videos. (1293744)
turbosquid
$3

Mounting Tires
...uid
royalty free 3d model mounting tires for download as fbx on turbosquid: 3d models for games, architecture, videos. (1708511)
3d_export
$5

Magnetic GoPro Mount
...pro mount
3dexport
cool magnetic mount for gopro. allows you to mount the camera on flat metal surfaces and get exclusive shots.
turbosquid
$5

Stone Mount
...ty free 3d model stone mount for download as ma, obj, and fbx on turbosquid: 3d models for games, architecture, videos. (1370306)