Thingiverse

Bearing Protector Trek 5900 by elhalpern
by Thingiverse
Last crawled date: 3 years ago
This accessory only fits a small number of Trek OCLV full carbon fames/forks. The 5900 model was the top of the line bike that was ridden in the Tour de France in 2003/2004 and cost over $3000 in those years. This is NOT designed to fit Trek's OCLV 5000, 5020, 5200 or 5500 series frames/forks.
The headset on my 2003-2004 Trek 5900 was overdue for replacement and I’d stopped riding it because it had a very obvious center “detent.” I had read that this model had a tapered steering tube but wasn’t sure until I took it apart. I’d also read that this design suffered from corrosion.
I expected the fork to just drop once I unscrewed and removed the center screw & top- cap and loosened the two cross-bolts on the stem. With the center cap & screw and the stem/bars removed the fork just stayed in place. I hit the top of the steering tube with a nylon hammer while supporting the top and head tubes and nothing happened. I got that oh-shit feeling, like what is it going to take to disassemble this.
After removing the stem spacers and the split-beveled centering-washer things still didn’t move with a nylon hammer hit. I then gave the steering tube one shot of “PB Blaster” so it would run down the steering tube and penetrate the bottom bearing. I came back a day later, hit it again with the nylon hammer and the fork dropped out with the bottom bearing firmly attached to the fork-crown.
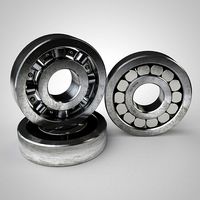
On this aluminum/composite fork the “fork-crown” is a thin ring that’s about 1mm thick and provides a 2mm annular ring. ( see photos )
Next I needed to remove the old bearing and found that the inner ring of the bearing was wide enough to use a large flat-blade screwdriver, a hammer, and soft pine-wood block to cushion the hammer blows. With the fork upside-down I gave a hit on the front of the fork, then one on the back, rotating the fork 180 degrees for each hit to walk the dead bearing down about 1.5 inches until it just fell off the steering tube.
A little re-cap here. The fork and it’s bottom sealed bearing remove as one piece. The bottom headset cup is a snug fit for the outer ring of the bearing and this cup stays with the frame. The top and bottom sealed bearings are a snug fit in the cups that are bonded (glued) to the frame's head-tube.
The steering tube on my fork had lots of surface oxidation, but was otherwise in good shape, unlike pictures of some I've seen posted.
The top surface of the larger bottom bearing had significant rust on it but still looked usable… as if the balls and bearing surfaces inside were still good. They weren’t… this sealed bearing was shot. The rust on the bearing looked like water had made it up around the edges of the bottom cup rusted and dried out on top of the bearing. There was also some rust film on the lowest area inside of the carbon fiber head tube. Seeing this drove me to devise some protector.
So I got out my dial calipers and took measurements, writing down the I.D and O.D of both sealed bearings and the steering tube at the top and the bottom. The top bearing was in good shape and I just need a new bottom bearing. These bearing are not proprietary and once you know their dimensions (ID/OD/Thickness) you can source them anywhere. A bit of internet searching made me realize that the bearing isn't unique, but very much off the shelf if you know what’s needed.
I ended up buy a pair of replacement lower bearings from one eBay seller in the USA, and from one eBay seller in Hong Kong. The USA part arrived in 9-days and was about $22 with shipping and had the Enduro brand name on its rubber seals. The Hong Kong part was about $11 delivered and hasn’t arrived yet (two full weeks & counting). Both bearing had identical published dimensions, and the picture of both made it look like the inner ring had a slight “chamfer” making it easier to install or remove. The inner ring of the Enduro bearing did NOT have any chamfer on it. So much for the picture...
Before installing the new lower bearing I decided to clean up the steering tube using a Harbor Freight buffing wheel in my drill-press and brown-rouge. This got much of the tube to almost a mirror finish.
Next I slid the new bearing down the steering tube and used a piece a 1.75” ID schecule-40 PVC pipe as a tool to slam the new bearing into place. This didn’t work and the sharp edge of the Enduro bearing literally shaved off a few hundredths of a millimeter (less than a human hair). Rather than muscle the bearing into place and let the bearing shave the steering tube I decided to remove the new bearing with a hammer and screw-driver as I’d done with the old (bad) bearing and get out some 220 grit sand paper.
I paused at this moment to wonder how Trek handled this when the frames where being built up? Was the bevel of the original bearing enough to allow easy assembly? Perhaps the newly made steering tubes were completely free of oxidation? Perhaps Trek chilled the fork tube to shrink it and rammed a room temperature bearing onto the cold tube? Someone at Trek 20 years ago knows the answer.
I used a 2x6x8 inch piece of wood and a forstner wood bit that matched the diameter of the top of the steering tube. This allowed me to twist the steering tube snugly into the cross-hole of the 2x6 and clamp the 2x6 into a bench vise so the fork was horizontal. I created sandpaper strips of 220, 400, & 600 grit that were folded over and about 8 x ½ inch long. I used these like a shoe-shiner’s towel to sand away high spots and turn the fork 90 degrees at a time to remove the shavings and any marks made by installing the new bearing. I repeatedly installed the bearing to be snug enough that it would scratch the steering tube, then removed the bearing and sanded just to remove the scratch marks it left behind. This way the sanding wouldn't make the steerer egg-shaped. After about 20-30 minutes I had the bearing within ¼ inch of being fully seated. i cleaned the sanded aluminum tube with alcohol after each sanding volley.
Before the final installation of the bearing to its full down position I rolled an o-ring (3.5mm thick x 30mm ID x 36.5mm OD) all the way down the steering tube, over the tiny fork-crown and had it come to a rest under the fork-crown and well above the front brake mounting hole. The o-ring came in an assortment pack from a local AutoZone store.
This o-ring was installed as part of a 3D printed mini-fender assembly to protect the new bearing from road dirt and water kicked up by the front tire.
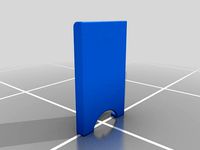
The 3D printed split mini-fender holds itself into place by friction encircling the o-ring and still leaves a 1.5mm gap between the top of the 3D printed parts and the bottom (outside) seal of the lower bearing.
Before doing the final reassembly I gave the top of the lower bearing and the entire steering tube a thin coating of Phil Wood’s green waterproof grease to protect it from future corrosion. I also inspected the o-ring that is built into the upper top cup/cover and painted that o-ring with Phil’s grease as well. Also painted the inside of the steering tube above the star-fangled nut and also painted its threads.
Doing the final assembly of the top bearing, its split-beveled washer, the stem spacers, the stem, and the center screw/cap I used a lot of Phil’s grease to keep moisture out. Going a bit further I put a thin bead of clear silicone caulk under the outer edge of the top cap and around the center screw to keep moisture out. With everything back together and adjusted I used more clear silicone and loaded up the pinch-slot on the back of the stem to keep water and sweat from getting it.
Before the lower bearing was ever an issue and the 5900 was new to me, I knew I needed to keep moisture out of the head-tube and headset bearings. While the lower bearing was shot, but the clear silicone I used years ago kept the damage from being much worse.
And that’s the whole story that led to this odd 3D printed protector.
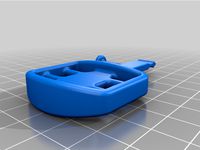
The protector itself is held in place by the o-ring and the alignment fingers at the narrow part of this mini-fender. Three inner-tube slices (rubber bands) cut from an 18-25mm butyl inner-tube are used on the nail-head features I designed into the 3D model.
The fender works as planned and it can be removed or reinstalled as needed. The o-ring can only be installed while the fork is out and does NOT have its bearings in place. However, the o-ring can be removed with an x-acto knife if you just want it to be gone.
The 3D Printed part protects the bearing from head-on rain, and has a v-shaped drain detail at the back to keep water from being trapped, and it is open on the sides to allow it to breath and stay dry. The fender section keeps water and dirt from being splashed at the bearing.
I just road the 5900 for the first time in 4-years with its new lower headset bearing, the prototype bearing fender, and the cleaned and repainted front brake-cable stop and top tube area. All is good and I thought other 5900 owners would benefit from my craziness.
FYI – one of the bikes sold from Robin Williams estate was a Trek 5900 that he acquired while following Lance on some of his races.
The headset on my 2003-2004 Trek 5900 was overdue for replacement and I’d stopped riding it because it had a very obvious center “detent.” I had read that this model had a tapered steering tube but wasn’t sure until I took it apart. I’d also read that this design suffered from corrosion.
I expected the fork to just drop once I unscrewed and removed the center screw & top- cap and loosened the two cross-bolts on the stem. With the center cap & screw and the stem/bars removed the fork just stayed in place. I hit the top of the steering tube with a nylon hammer while supporting the top and head tubes and nothing happened. I got that oh-shit feeling, like what is it going to take to disassemble this.
After removing the stem spacers and the split-beveled centering-washer things still didn’t move with a nylon hammer hit. I then gave the steering tube one shot of “PB Blaster” so it would run down the steering tube and penetrate the bottom bearing. I came back a day later, hit it again with the nylon hammer and the fork dropped out with the bottom bearing firmly attached to the fork-crown.
On this aluminum/composite fork the “fork-crown” is a thin ring that’s about 1mm thick and provides a 2mm annular ring. ( see photos )
Next I needed to remove the old bearing and found that the inner ring of the bearing was wide enough to use a large flat-blade screwdriver, a hammer, and soft pine-wood block to cushion the hammer blows. With the fork upside-down I gave a hit on the front of the fork, then one on the back, rotating the fork 180 degrees for each hit to walk the dead bearing down about 1.5 inches until it just fell off the steering tube.
A little re-cap here. The fork and it’s bottom sealed bearing remove as one piece. The bottom headset cup is a snug fit for the outer ring of the bearing and this cup stays with the frame. The top and bottom sealed bearings are a snug fit in the cups that are bonded (glued) to the frame's head-tube.
The steering tube on my fork had lots of surface oxidation, but was otherwise in good shape, unlike pictures of some I've seen posted.
The top surface of the larger bottom bearing had significant rust on it but still looked usable… as if the balls and bearing surfaces inside were still good. They weren’t… this sealed bearing was shot. The rust on the bearing looked like water had made it up around the edges of the bottom cup rusted and dried out on top of the bearing. There was also some rust film on the lowest area inside of the carbon fiber head tube. Seeing this drove me to devise some protector.
So I got out my dial calipers and took measurements, writing down the I.D and O.D of both sealed bearings and the steering tube at the top and the bottom. The top bearing was in good shape and I just need a new bottom bearing. These bearing are not proprietary and once you know their dimensions (ID/OD/Thickness) you can source them anywhere. A bit of internet searching made me realize that the bearing isn't unique, but very much off the shelf if you know what’s needed.
I ended up buy a pair of replacement lower bearings from one eBay seller in the USA, and from one eBay seller in Hong Kong. The USA part arrived in 9-days and was about $22 with shipping and had the Enduro brand name on its rubber seals. The Hong Kong part was about $11 delivered and hasn’t arrived yet (two full weeks & counting). Both bearing had identical published dimensions, and the picture of both made it look like the inner ring had a slight “chamfer” making it easier to install or remove. The inner ring of the Enduro bearing did NOT have any chamfer on it. So much for the picture...
Before installing the new lower bearing I decided to clean up the steering tube using a Harbor Freight buffing wheel in my drill-press and brown-rouge. This got much of the tube to almost a mirror finish.
Next I slid the new bearing down the steering tube and used a piece a 1.75” ID schecule-40 PVC pipe as a tool to slam the new bearing into place. This didn’t work and the sharp edge of the Enduro bearing literally shaved off a few hundredths of a millimeter (less than a human hair). Rather than muscle the bearing into place and let the bearing shave the steering tube I decided to remove the new bearing with a hammer and screw-driver as I’d done with the old (bad) bearing and get out some 220 grit sand paper.
I paused at this moment to wonder how Trek handled this when the frames where being built up? Was the bevel of the original bearing enough to allow easy assembly? Perhaps the newly made steering tubes were completely free of oxidation? Perhaps Trek chilled the fork tube to shrink it and rammed a room temperature bearing onto the cold tube? Someone at Trek 20 years ago knows the answer.
I used a 2x6x8 inch piece of wood and a forstner wood bit that matched the diameter of the top of the steering tube. This allowed me to twist the steering tube snugly into the cross-hole of the 2x6 and clamp the 2x6 into a bench vise so the fork was horizontal. I created sandpaper strips of 220, 400, & 600 grit that were folded over and about 8 x ½ inch long. I used these like a shoe-shiner’s towel to sand away high spots and turn the fork 90 degrees at a time to remove the shavings and any marks made by installing the new bearing. I repeatedly installed the bearing to be snug enough that it would scratch the steering tube, then removed the bearing and sanded just to remove the scratch marks it left behind. This way the sanding wouldn't make the steerer egg-shaped. After about 20-30 minutes I had the bearing within ¼ inch of being fully seated. i cleaned the sanded aluminum tube with alcohol after each sanding volley.
Before the final installation of the bearing to its full down position I rolled an o-ring (3.5mm thick x 30mm ID x 36.5mm OD) all the way down the steering tube, over the tiny fork-crown and had it come to a rest under the fork-crown and well above the front brake mounting hole. The o-ring came in an assortment pack from a local AutoZone store.
This o-ring was installed as part of a 3D printed mini-fender assembly to protect the new bearing from road dirt and water kicked up by the front tire.
The 3D printed split mini-fender holds itself into place by friction encircling the o-ring and still leaves a 1.5mm gap between the top of the 3D printed parts and the bottom (outside) seal of the lower bearing.
Before doing the final reassembly I gave the top of the lower bearing and the entire steering tube a thin coating of Phil Wood’s green waterproof grease to protect it from future corrosion. I also inspected the o-ring that is built into the upper top cup/cover and painted that o-ring with Phil’s grease as well. Also painted the inside of the steering tube above the star-fangled nut and also painted its threads.
Doing the final assembly of the top bearing, its split-beveled washer, the stem spacers, the stem, and the center screw/cap I used a lot of Phil’s grease to keep moisture out. Going a bit further I put a thin bead of clear silicone caulk under the outer edge of the top cap and around the center screw to keep moisture out. With everything back together and adjusted I used more clear silicone and loaded up the pinch-slot on the back of the stem to keep water and sweat from getting it.
Before the lower bearing was ever an issue and the 5900 was new to me, I knew I needed to keep moisture out of the head-tube and headset bearings. While the lower bearing was shot, but the clear silicone I used years ago kept the damage from being much worse.
And that’s the whole story that led to this odd 3D printed protector.
The protector itself is held in place by the o-ring and the alignment fingers at the narrow part of this mini-fender. Three inner-tube slices (rubber bands) cut from an 18-25mm butyl inner-tube are used on the nail-head features I designed into the 3D model.
The fender works as planned and it can be removed or reinstalled as needed. The o-ring can only be installed while the fork is out and does NOT have its bearings in place. However, the o-ring can be removed with an x-acto knife if you just want it to be gone.
The 3D Printed part protects the bearing from head-on rain, and has a v-shaped drain detail at the back to keep water from being trapped, and it is open on the sides to allow it to breath and stay dry. The fender section keeps water and dirt from being splashed at the bearing.
I just road the 5900 for the first time in 4-years with its new lower headset bearing, the prototype bearing fender, and the cleaned and repainted front brake-cable stop and top tube area. All is good and I thought other 5900 owners would benefit from my craziness.
FYI – one of the bikes sold from Robin Williams estate was a Trek 5900 that he acquired while following Lance on some of his races.
Similar models
thingiverse
free

Bicycle fork steerer tube adapter for maintenance
...and through the headset
remove the fork for maintenance, leaving the scrap steerer in place until you're ready to reassemble.
thingiverse
free

Fork Seal Tool 43 mm by timskloss
...rger tube used as a hammer extension. print very heavy to retain strength. i suggest pet with 2mm of perimeters and 50% infill.
thingiverse
free

Cannondale Headshok installation tool by Allenm00
..., lower the stem, rinse and repeat.
i printed these at 100% infill and had to file the steps on the ramps caused during printing.
thingiverse
free

43mm Fork Seal Driver by WVermaak
... eye out :) if you want other sizes, just give me a comment.
note: you will need to print two halves to fit around the fork tube.
thingiverse
free

Trek 5900 rear-brake cable stop by elhalpern
...e to seal any stray fibers surrounding the hole.
fyi - there is also a lower bearing headset protector design for the trek 5900
thingiverse
free

Self Sealing Stem Bolt by poblockim
...tem bolt by poblockim
thingiverse
here is a self-sealing stem bolt. i made it quickly for my friend from star trek ds9 group \//
thingiverse
free

Lightest fidget spinner bearing remover by AdryJay
...with a better description, because i'm italian and not so good in english language. :-)
please share a photo if you print it!
thingiverse
free

Star Trek DS9 Self Sealing Stem Bolt by randyf
...andyf
thingiverse
a sel-sealing stem bolt from the episode "progress" of star trek
: deep space nine, because why not?
grabcad
free

Stephens Action Cam Fork Tube Mount
...ing tube. forward or rear facing! use 7075 aluminum for strength or 6061 aluminum for a lower cost and more corrosion resistance.
thingiverse
free

hacksaw guide rings for a bicycle carbon fork's steering tube by m013
...e in cura itself
abs is preferred due to heat resistance
not recommended for aluminum tubes, otherwise use cooling or make pauses
Elhalpern
thingiverse
free

Optiplex 160 Stand by elhalpern
...pture slots and grabs the pc more than an inch up its sides. it's a free alternative to dell's # cn-0j163g - j163g
enjoy!
thingiverse
free

Engine Key Briggs & Stratton # 794696 by elhalpern
...
a second version has been uploaded that does not have the support feature for those with resin or sintering printers. 1/27/2020
thingiverse
free

Hyundai Elantra Vent Slide by elhalpern
...vane.
use and install at your own risk. no warranty. user assumes all risk and may freely modify design to suit personal needs.
thingiverse
free

Holder for "Tube cutter hand tool trapezoid blade" by PredatorJr by elhalpern
...d a holder that protects fingers and the blade without changing the set of the filament. just a rubber band to hold it in place.
thingiverse
free

3TTT Stem Plug by elhalpern
...u may need to select metric conversion in slicing software so that it prints the correct size.
keep your stem bolt clean and dry.
thingiverse
free
Engine Key Tecumseh 430492 35062 for Yard Machines 24inch Snow Blower by elhalpern
...rn
thingiverse
replacement key for a yard machines 24" snow blower with a 7hp tecumseh engine key number 430492 or 35062
thingiverse
free
Vent Shield Acer Aspire AXC series by elhalpern
...this shield still allow the cpu to breath, but prevent dust and water mist or droplets from falling directly into the vent holes.
thingiverse
free

Campagnolo Ergo 8 End Cap by elhalpern
...right in and will replace original lost or broken parts. version 2 was uploaded to provide spring clearance for the thumb lever.
thingiverse
free

Honda CRV 02-05 Rear Window Wiper Bridge by elhalpern
...e" solves this issue and protects your rear wiper from getting burnt out or broken and provides reliable rear window wiping.
thingiverse
free
Gerber Baby Food Jar Holder by elhalpern
...s, and anything small. i'm sure some new parent will also appreciate the form and function of this at feeding time. enjoy !
5900
3ddd
$1

Rolf Benz 5900
...rolf benz 5900
3ddd
rolf , benz
manufacturer rolf-benz
model 5900
3ddd
$1

Vian PIRO 5900 5
...vian piro 5900 5
3ddd
vian , piro
люстра vian piro 5900 5
3ddd
$1

Мульти-текстура травертина
...плитки. совместим с плагином multitexture. среднее расширение всех файлов 5900 3540 пикселей, глубина 300...
3d_export
$160

Stage lights set 3D Model
...lamp beam reflector stage lights set 3d model braz 5900 ...
3d_export
$6

old soviet checkpoint
...specular and transparency texture resolution: 4096x4096 and 1024x1024 polygons: 5900 vertices: 3100 including fbx, obj, max created in 3ds...
3d_export
$7

armchair
....jpg<br>-color<br>-bump<br>-normal map<br>1 material for all mesh.<br>low poly model incluide (5900 faces)<br>(.obj .fbx .mb .max .blend)<br>thanks for...
3d_export
$15

Woman 3
...file<br>*unity project already included animations<br>*lod-0 -high quality - 5900(poly) 5900tri) 3063[(vert)<br>*lod-1 -medium----------- 80%<br>*lod-2 -low-----------------50%<br>*lod-3 -very low---------...
3d_sky
free

Rolf Benz 5900
...rolf benz 5900
3dsky
rolf benz
manufacturer rolf-benz model 5900
3d_sky
$8

Vian PIRO 5900 5
...vian piro 5900 5
3dsky
vian piro
chandelier vian piro 5900 5
3dfindit
free

5845, 5850, 5900, 5950
...5845, 5850, 5900, 5950
3dfind.it
catalog: 80/20
Trek
turbosquid
$59

Trek Bicycle
... available on turbo squid, the world's leading provider of digital 3d models for visualization, films, television, and games.
turbosquid
$47

Trekking bike
... available on turbo squid, the world's leading provider of digital 3d models for visualization, films, television, and games.
3ddd
free
Ceccotti Star Trek
...
описание: кресло "star trek"
сайт: www.ceccotticollezioni.it
все subdivision.
внутри архива текстура, 3ds и max файлы.
3ddd
$1

Star Trek - Ceccotti Collezioni
...r_trek/
количество полигонов - 29 000, но стек открыт, так что turbosmooth по желанию
v-ray, corona
max 2011,2014
turbosquid
$25

Star trek The Mandalorian Knife
...e cosplay prop replica for download as max, dwg, fbx, and obj on turbosquid: 3d models for games, architecture, videos. (1607086)
3d_export
$99

Fiat 500l Trekking 2014 3D Model
...ssover allterrain offroad italian 500 italy fiat 2017 500l trekking treking
fiat 500l trekking 2014 3d model squir 71255 3dexport
cg_studio
$99

Fiat 500L Trekking 20143d model
...3ds .c4d .fbx .lwo .max .obj - fiat 500l trekking 2014 3d model, royalty free license available, instant download after purchase.
turbosquid
$25

Star Trek Planter Replica prop
...k planter replica prop for download as max, dwg, fbx, and obj on turbosquid: 3d models for games, architecture, videos. (1598563)
turbosquid
$18
Star Trek Voyager Neural Stimulator
...neural stimulator for download as max, dwg, fbx, obj, and stl on turbosquid: 3d models for games, architecture, videos. (1590142)
turbosquid
$10
Star Trek Exoscalpel Prop Replica
...lpel prop replica for download as max, dwg, fbx, obj, and stl on turbosquid: 3d models for games, architecture, videos. (1596923)
Protector
3d_export
$5
gauge protector
...gauge protector
3dexport
gauge protector
turbosquid
$40

Protector
... available on turbo squid, the world's leading provider of digital 3d models for visualization, films, television, and games.
3d_export
$5

hard gauge protector
...hard gauge protector
3dexport
hard gauge protector
turbosquid
$20

Petit Protector
...alty free 3d model petit protector for download as ma and obj on turbosquid: 3d models for games, architecture, videos. (1168019)
turbosquid
$29

USB Protector
...free 3d model usb protector for download as max, obj, and fbx on turbosquid: 3d models for games, architecture, videos. (1407443)
turbosquid
$25

Surge Protector
... available on turbo squid, the world's leading provider of digital 3d models for visualization, films, television, and games.
turbosquid
$29

Archery Arm Protector
... available on turbo squid, the world's leading provider of digital 3d models for visualization, films, television, and games.
turbosquid
$50

Protector M151-M2 model
...lty free 3d model protector m151-m2 model for download as max on turbosquid: 3d models for games, architecture, videos. (1411642)
turbosquid
$25

Iphone 11 Transparent Case Screen Protector
...ent case + screen protector for download as max, obj, and fbx on turbosquid: 3d models for games, architecture, videos. (1472677)
cg_studio
$59

Kongsberg Protector M151 RWS - Browning M23d model
....lwo .obj - kongsberg protector m151 rws - browning m2 3d model, royalty free license available, instant download after purchase.
Bearing
3d_export
$6

Bear
...bear
3dexport
bear
3d_export
$5
bearing
...bearing
3dexport
bearing
3d_export
$12

bear
...bear
3dexport
bear for 3d printing toy
3d_ocean
$9
Bearing
...ne ball ballbea bearing bearings engine hard industrial machine mechanic metal part piece plastic ring screw sphere steel
bearing
archibase_planet
free

Bear
...bear
archibase planet
statuette bear picturesque element
bear - 3d model (*.gsm+*.3ds) for interior 3d visualization.
3d_export
$5

bear
...bear
3dexport
bear have a stl.,3dm files
archibase_planet
free

Bear
...bear
archibase planet
bear animals omnivorous animal
bear angry n250907- 3d model (*.gsm+*.3ds) for interior 3d visualization.
archibase_planet
free

Bear
...bear
archibase planet
bear animals omnivorous animal
bear easy n250907 - 3d model (*.gsm+*.3ds) for interior 3d visualization.
3ddd
$1

Teddy bear
...teddy bear
3ddd
teddy bear , медведь
teddy bear :)
3d_ocean
$12

Bear
... formats. created with 3d max 9.0. this file is very useful for learning & rigging. it can be used for any professional work.