Thingiverse
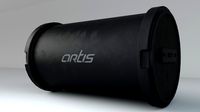
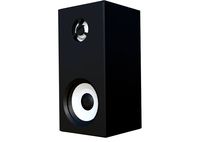
Back Horn Speaker V3.0 Nautilus - Bluetooth, Active, Passive by guppyk
by Thingiverse
Last crawled date: 3 years, 3 months ago
Here it is. Kissing the frog V3.0.
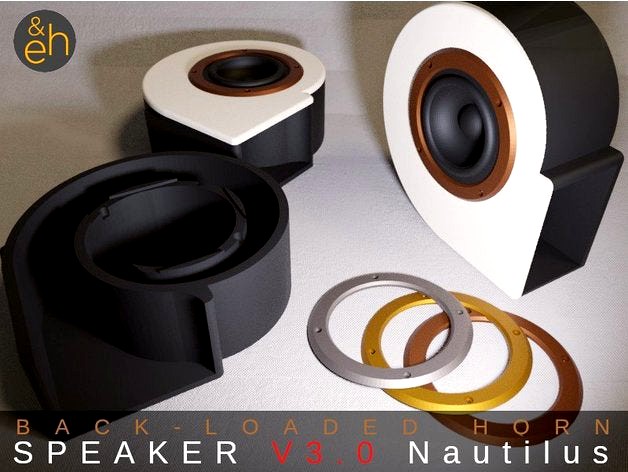
This is mainly a design (aesthetic) upgrade and includes many suggestions for improvements that came from the community in the last weeks - thanks all! I have always wanted to try squeezing that back horn into something that looks like a nautilus (or somewhat more prosaic, snail) shell.
Once again a complete redesign, even more stylish, super cheap, no soldering, and fully printable (and the main body is still a single print).
Here the differences (as compared to V2.0):
The new shell design. This time the horn is a spiral and opens up to the side (which should be fine with lower frequencies)
The enclosure is now designed for a 4" driver (UPDATE06Jan21: I have included an adapter for 3.3" drivers like FRS8M)
Upon request I have added a wall mount to the back. Mount like your favorite painting. Any screw, hook, or nail will do - just remove that old Picasso of yours and mount that shiny new speaker...)
Also upon request (but also because space was really limited), Bluetooth and amplifier are once again optional, this time on a single board (no soldering required!), and mounted in a small box to the back of the enclosure.
Once again the concept remains the same. It is like kissing the frog. You kiss that 4" loudspeaker and hope it turns into a prince. And it does... (actually it turns into some kind of Nautilus. I guess amphibian to mollusc is easier than amphibian to human - and you don't need to be a princess to achieve that).
The enclosure is for a 4" (10 cm) driver. You can use it as a Bluetooth, active, or passive speaker. There is a box attached to the back for the electronics, which this time is a single BT-amplifier board.
And here is what you will need:
This is the 2x25W TDA7492P MP3 Bluetooth Stereo Amplifier Board (approx. US $ 9), a single board stereo BT amplifier which requires no soldering.
You can use pretty much any 12V-24V/2A+ (the higher, the better) power supply (approx. USD 3 up).
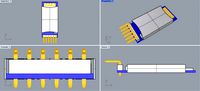
The driver I use is a US $12 McGee 4" (100 mm) 8 Ohm 100W (?) dual cone full range driver, which, on paper, looked good but which I found a little disappointing (I found the smaller 3.3" driver I used in V2.0 actually sounds better). Choose the speaker you like best (also depends on how much you are willing to spend). I have included a drawing of the front opening and mounting holes. Most 4" drivers should fit. If the diameter of mounting holes is (slightly) different you can simply scale the entire model (all parts) in your favorite slicing app to make it fit (the only thing that cannot easily be scaled is the small enclosure for the BT-amplifier).
However, basically any combination will do (as long as the driver is 4" or smaller so it fits the enclosure).
.
OPTION 2. The BT/amplifier board is optional. You can just as well use them as passive speakers. Just connect to your favorite amplifier. I am currently working on an enclosure to match the speaker's design based on this amplifier: 2x50W TPA3116D2 Bluetooth 5.0 Stereo Amplifier Board. Very happy with this board. It is using the same chip (TPA3116D2) as the amplifier I used in V2.0 but has a much better designed board, no noise, it has treble and bass control, and great sound. Stay tuned if that's what you are looking for. I will post the enclosure as soon as it is completed (expect around early Jan). UPDATE 08Jan21: The amplifier is now online: https://www.thingiverse.com/thing:4713469
PRINTING. This should be a simple print. No support or plate adhesion needed. Print in PLA (or ABS, PETG...) at 0.28 mm resolution and (around) 15% infill. I printed the main body in Sunlu carbon PLA (- not so much because it is stronger, rather because carbon gives this beautiful soft touch to the surface), the front in warm white and the speaker ring in silk bronze (and a few other silk colors). The front panel can theoretically be cut from 6-8 mm plywood (however, this time I printed the entire enclosure). Glue the front panel to the body. Attach the speaker ring and speaker with M3 screws. The feet (I print these in TPU) are optional (particularly if you are planning to use the wall mount).
WIRING. This time wiring should be much simpler and requires no soldering (even when using the BT-amplifier). I have included a wiring diagram. You won't need any soldering this time but basic electronic skills are helpful. Make sure that you know what you are doing (particularly dealing with high voltage). All at your own risk and no warranty whatsoever! Remember, the BT-amplifier will give you a stereo output (i.e. is intended for 2 speakers). If you use only a single speaker you need to send a mono BT signal (most mobile phones will support this) to the receiver or you will get half stereo (i.e. only left or right channel, which is not the same as mono).
ASSEMBLY. Print one peace each of the main body, the front cover, the speaker ring, and the little BT/amp enclosure plus 4 pieces of the feet (the last 2 being optional). Mount the speaker to the inside of the front panel and speaker ring with M3 screws/nuts. Lead the speaker cable through the little hole in the center out to the back. Add some damping (e.g. foam) to the back of the main chamber behind the speaker. Glue the front panel to the main body (use course sandpaper to roughen the connecting surfaces before gluing). Attach the speaker cable(s) to the BT/amp board, put it upside down into the little box and mount the box to the back of the main body with 4 M3 (approx. 25 mm) screws. Connect to your power adapter, turn on Bluetooth on your phone, connect, ENJOY!
THEORY. Here a little theory for all those who missed V2.0: What is a back loaded horn speaker? Think of it as a reversed megaphone or gramophone. A (front) horn loudspeaker uses an acoustic horn to increase the overall efficiency of the driving element (i.e. the sound coming out at the front). A back loaded horn speaker does pretty much the same. However, here the horn is mounted at the back of the loudspeaker. So you get the direct output from the front of the driver PLUS the one from the horn at the back. Which frequencies are amplified and how well depends on the air chamber, throat (the narrow part), and on the length, design, and diameter of the horn. Particularly with small (and cheap) drivers this can very much improve the sound quality.
UPDATE 06Jan21: Upon request I have just added an adapter to use 3.3" (like FRS8M) drivers in V3.0.
I REALLY HOPE YOU LIKE IT AND IF YOU LIKE IT, PLEASE LIKE IT! Thanks!
Enjoy!
This is mainly a design (aesthetic) upgrade and includes many suggestions for improvements that came from the community in the last weeks - thanks all! I have always wanted to try squeezing that back horn into something that looks like a nautilus (or somewhat more prosaic, snail) shell.
Once again a complete redesign, even more stylish, super cheap, no soldering, and fully printable (and the main body is still a single print).
Here the differences (as compared to V2.0):
The new shell design. This time the horn is a spiral and opens up to the side (which should be fine with lower frequencies)
The enclosure is now designed for a 4" driver (UPDATE06Jan21: I have included an adapter for 3.3" drivers like FRS8M)
Upon request I have added a wall mount to the back. Mount like your favorite painting. Any screw, hook, or nail will do - just remove that old Picasso of yours and mount that shiny new speaker...)
Also upon request (but also because space was really limited), Bluetooth and amplifier are once again optional, this time on a single board (no soldering required!), and mounted in a small box to the back of the enclosure.
Once again the concept remains the same. It is like kissing the frog. You kiss that 4" loudspeaker and hope it turns into a prince. And it does... (actually it turns into some kind of Nautilus. I guess amphibian to mollusc is easier than amphibian to human - and you don't need to be a princess to achieve that).
The enclosure is for a 4" (10 cm) driver. You can use it as a Bluetooth, active, or passive speaker. There is a box attached to the back for the electronics, which this time is a single BT-amplifier board.
And here is what you will need:
This is the 2x25W TDA7492P MP3 Bluetooth Stereo Amplifier Board (approx. US $ 9), a single board stereo BT amplifier which requires no soldering.
You can use pretty much any 12V-24V/2A+ (the higher, the better) power supply (approx. USD 3 up).
The driver I use is a US $12 McGee 4" (100 mm) 8 Ohm 100W (?) dual cone full range driver, which, on paper, looked good but which I found a little disappointing (I found the smaller 3.3" driver I used in V2.0 actually sounds better). Choose the speaker you like best (also depends on how much you are willing to spend). I have included a drawing of the front opening and mounting holes. Most 4" drivers should fit. If the diameter of mounting holes is (slightly) different you can simply scale the entire model (all parts) in your favorite slicing app to make it fit (the only thing that cannot easily be scaled is the small enclosure for the BT-amplifier).
However, basically any combination will do (as long as the driver is 4" or smaller so it fits the enclosure).
.
OPTION 2. The BT/amplifier board is optional. You can just as well use them as passive speakers. Just connect to your favorite amplifier. I am currently working on an enclosure to match the speaker's design based on this amplifier: 2x50W TPA3116D2 Bluetooth 5.0 Stereo Amplifier Board. Very happy with this board. It is using the same chip (TPA3116D2) as the amplifier I used in V2.0 but has a much better designed board, no noise, it has treble and bass control, and great sound. Stay tuned if that's what you are looking for. I will post the enclosure as soon as it is completed (expect around early Jan). UPDATE 08Jan21: The amplifier is now online: https://www.thingiverse.com/thing:4713469
PRINTING. This should be a simple print. No support or plate adhesion needed. Print in PLA (or ABS, PETG...) at 0.28 mm resolution and (around) 15% infill. I printed the main body in Sunlu carbon PLA (- not so much because it is stronger, rather because carbon gives this beautiful soft touch to the surface), the front in warm white and the speaker ring in silk bronze (and a few other silk colors). The front panel can theoretically be cut from 6-8 mm plywood (however, this time I printed the entire enclosure). Glue the front panel to the body. Attach the speaker ring and speaker with M3 screws. The feet (I print these in TPU) are optional (particularly if you are planning to use the wall mount).
WIRING. This time wiring should be much simpler and requires no soldering (even when using the BT-amplifier). I have included a wiring diagram. You won't need any soldering this time but basic electronic skills are helpful. Make sure that you know what you are doing (particularly dealing with high voltage). All at your own risk and no warranty whatsoever! Remember, the BT-amplifier will give you a stereo output (i.e. is intended for 2 speakers). If you use only a single speaker you need to send a mono BT signal (most mobile phones will support this) to the receiver or you will get half stereo (i.e. only left or right channel, which is not the same as mono).
ASSEMBLY. Print one peace each of the main body, the front cover, the speaker ring, and the little BT/amp enclosure plus 4 pieces of the feet (the last 2 being optional). Mount the speaker to the inside of the front panel and speaker ring with M3 screws/nuts. Lead the speaker cable through the little hole in the center out to the back. Add some damping (e.g. foam) to the back of the main chamber behind the speaker. Glue the front panel to the main body (use course sandpaper to roughen the connecting surfaces before gluing). Attach the speaker cable(s) to the BT/amp board, put it upside down into the little box and mount the box to the back of the main body with 4 M3 (approx. 25 mm) screws. Connect to your power adapter, turn on Bluetooth on your phone, connect, ENJOY!
THEORY. Here a little theory for all those who missed V2.0: What is a back loaded horn speaker? Think of it as a reversed megaphone or gramophone. A (front) horn loudspeaker uses an acoustic horn to increase the overall efficiency of the driving element (i.e. the sound coming out at the front). A back loaded horn speaker does pretty much the same. However, here the horn is mounted at the back of the loudspeaker. So you get the direct output from the front of the driver PLUS the one from the horn at the back. Which frequencies are amplified and how well depends on the air chamber, throat (the narrow part), and on the length, design, and diameter of the horn. Particularly with small (and cheap) drivers this can very much improve the sound quality.
UPDATE 06Jan21: Upon request I have just added an adapter to use 3.3" (like FRS8M) drivers in V3.0.
I REALLY HOPE YOU LIKE IT AND IF YOU LIKE IT, PLEASE LIKE IT! Thanks!
Enjoy!
Similar models
thingiverse
free

4" Back Horn Speaker V2.0 - Bluetooth, Active, Passive by guppyk2
...although at high infill (approx. 60%+) their properties are similar to mdf you may not want to print a...
3dwarehouse
free

Front Horn for 4 Tang Band 1 inch drivers
...om #fostex #full_range #hifi #home_theater #horn #low_power #lowther #solid_hardwood #speaker #speakers #stereo #triode #tube_amp
3dwarehouse
free

Speaker Amplifier Board SANWU HF69B - Dual Channel, Bluetooth
... hf69b - dual channel, bluetooth
3dwarehouse
sanwu hf69b 6w+6w dual channel stereo bluetooth speaker amplifier board 70mm x 40mm
thingiverse
free

AMPLIFIED STEREO BLUETOOTH SPEAKER by Sametk
...you will have a higher and stronger signal with the amplifier circuit we use in the project, and you will disturb your neighbors.
thingiverse
free

"Princess OneEye and the Frog" - A Bluetooth back-horn speaker story by b_cfm
...s. estimated printing time is more or less the same.
any comment or make is welcomed !
print is in progress, stay tuned.
enjoy !
thingiverse
free

3D printed Back Load Horn Bluetooth Speaker-V2 by NEXTFILA
...lly back load horn speaker system is very expensive.
but now, enjoy extreme sound quality with cheap price using your 3d printer!
thingiverse
free

Bluetooth Speaker V2.0 Black (PAM8430) by AlsTechReviews
...s
thingiverse
complete housing for 3d bluetooth speaker v2.0 with pam8403 amplifier.
https://www.youtube.com/watch?v=hkrypy8foge
thingiverse
free

Back Horn Speaker V2.0 for Polymate3D Speaker Driver FD51 / FD52 series by vlaine
...eaker v2.0https://www.thingiverse.com/thing:4668173/files
the remix is based on fd51-4pmhttps://www.thingiverse.com/thing:4127201
thingiverse
free

Back Horn Speaker - 2.75" by denkyem
...ps://mauser.pt/catalog/product_info.php?cpath=324_2395_1252&products_id=011-0635 because i'll use this with an amplifier.
thingiverse
free

PCB button extension for DORK Bluetooth Amp
...fier wireless bt 3.0 4.0 4.1 audio amp board headphone 2 channel 50w+50w bluetooth speaker board small amplifier module with case
Guppyk
thingiverse
free

Radiator Humidifier by guppyk
... resin (approx. us $5) to make my prints 100% waterproof: epoxy resin.
hope you like it and if you like it please like it!
enjoy!
thingiverse
free

Try Square / Carpenter's Square by guppyk
...rint. print at 0.2 mm with 30 % infill. ideally (optional) change filament once the ruler is completetd.
hope you like it. enjoy!
thingiverse
free

Slug / Snail Barrier by guppyk
...ver, you can also use the fastener to attach a second (third, fourth...) print to get larger diameters for larger plants.
enjoy!
thingiverse
free

Bee Queen Transport Cage by guppyk
...t in some transparent color (so you can see what actually happens inside the cage) at 0.2 mm layer height and 100% infill.
enjoy!
thingiverse
free

Bee Queen Excluder by guppyk
... height. no supports or plate adhesion needed. make sure to remove any sharp edges so the bees won't hurt themselves.
enjoy!
thingiverse
free

Universal Table Clamp / Lamp Mount by guppyk
...anything to the back of the clamp with 4 m3 screws (spaced 17.5x20mm) or to the adapter with two m5 screws (spaced 20 mm).
enjoy!
thingiverse
free

Beehive Entrance Reducers - Different Sizes by guppyk
...asy print. no supports or plate adhesion needed. print in any color your bees like at 0.2 mm layer height and 100% infill.
enjoy!
thingiverse
free

Caliper Pen (Metric and Imperial) by guppyk
....12) with 50+% infill in pla (or abs, petg...). you will need to enable support for parta (for the tip).
hope you like it. enjoy!
thingiverse
free

Planter / Pot / Vase - Four Sizes by guppyk
...pe you like it, and if you like it, please like it!
should be an easy print. print with any filament, any infill, any resolution.
thingiverse
free

Key Safe / Vault / Box - Two Sizes by guppyk
...infill. use some unobtrusive color. use two 3 - 4 mm screws to mount.
hope you like it and if you like it, please like it. enjoy!
Nautilus
turbosquid
$20

Nautilus
...urbosquid
royalty free 3d model nautilus for download as c4d on turbosquid: 3d models for games, architecture, videos. (1265425)
3ddd
$1

Nautilus by Neiser
... модульный , угловой
современный модульный диван nautilus
3ddd
$1

Neiser / Nautilus
...neiser / nautilus
3ddd
neiser , угловой
corner sofa nautilus from neiser.
3ddd
$1

Nautilus
...тр 190 мм. ручной душ с 3-х позиционной массажной лейкой. 4 гидромассажные регулируемые форсунки. производитель valentin (france)
3ddd
free

Nautilus Lampshade (tim wigmore)
...nautilus lampshade (tim wigmore)
3ddd
nautilus
nautilus lampshade
turbosquid
$2

Airship Nautilus
...
royalty free 3d model airship nautilus for download as blend on turbosquid: 3d models for games, architecture, videos. (1578862)
3d_export
$12

nautilus 3d model
...nautilus 3d model
3dexport
nautilus 3d model a submarine for stories tales
3ddd
$1

Nautilus
...nautilus
3ddd
ракушка
rebecca asquith, размеры 380mmd x 290mmw x 410mmh. p.s.
turbosquid
$40

Nautilus Topolino
... nautilus topolino for download as blend, blend, 3ds, and jpg on turbosquid: 3d models for games, architecture, videos. (1531476)
3ddd
$1

Банкомат Nautilus Hyosung 5000se
... hyosung , nautilus
банкомат nautilus hyosung 5000se, апофеоз моего моделинга )))
Passive
turbosquid
$15

Antenna Passive Outdoor
...enna passive outdoor for download as blend, dae, fbx, and obj on turbosquid: 3d models for games, architecture, videos. (1648231)
3d_export
$10

Capacitor 3D Model
...capacitor 3d model 3dexport capacitor electronic component condenser passive ceramic terminal electrical energy charge circuit board capacitance current...
3d_export
$42

MAR1 ARM Missile Brazil 3D Model
...rocket arm anti radiation spacecraft military surface to air passive radar guided system projectile tacticle explosive weapon mar1 arm...
3d_export
$10

Capacitor V3 3D Model
...capacitor v3 3d model 3dexport capacitor electronic component condenser passive ceramic terminal electrical energy charge circuit board capacitance current...
3d_export
$10
Capacitor v2 3D Model
...capacitor v2 3d model 3dexport capacitor electronic component condenser passive ceramic terminal electrical energy charge circuit board capacitance current...
3d_export
$10

Resistor 3D Model
...resistor 3d model 3dexport resistor electronic component part fixed passive terminal electrical resistance circuit voltage axial lead board electric...
3ddd
$1

Materia - Omni
...omni offers an attractive meeting point for active or passive interaction. once you’re seated, you’ll discover there’s more to...
3d_export
$6

New generation combat grenade
...arms within a radius of ten meters. in this passive safe mode, the grenade glows green.<br>render in keyshot 10...
3d_export
$13

k-pot
...water. no boiling dry. no stress. just a k-pot. passive and active.<br>excellent catering is no longer synonymous with lots...
3d_export
$100

uss chosin cg-65 ticonderoga class
...authorized in the 1978 fiscal year. the class uses passive phased-array radar and was originally planned as a class...
Bluetooth
3d_ocean
$16
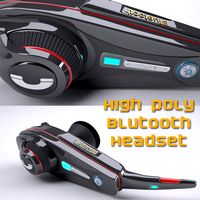
Bluetooth handset
...ooth handset
3docean
bluetooth bluetooth handset concept handset headphone high poly modern music new
high poly bluetooth handset
3ddd
free
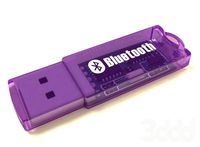
USB-Bluetooth
...luetooth
3ddd
bluetooth
usb-bluetooth с прозрачным корпусом. камера и освещение выставлены. камера проанимирована на презентацию.
3d_export
$5
bluetooth card
...bluetooth card
3dexport
this is a simplified bluetooth card with which you can create cases
turbosquid
$2
Bluetooth Speaker
...royalty free 3d model bluetooth speaker for download as blend on turbosquid: 3d models for games, architecture, videos. (1281743)
turbosquid
$5

Bluetooth Speaker
...y free 3d model bluetooth speaker for download as max and fbx on turbosquid: 3d models for games, architecture, videos. (1336601)
turbosquid
$5
Bluetooth Speaker
...y free 3d model bluetooth speaker for download as max and fbx on turbosquid: 3d models for games, architecture, videos. (1336600)
turbosquid
$5

Bluetooth Speaker
...y free 3d model bluetooth speaker for download as max and fbx on turbosquid: 3d models for games, architecture, videos. (1336599)
turbosquid
$3
Bluetooth speaker
...y free 3d model bluetooth speaker for download as obj and fbx on turbosquid: 3d models for games, architecture, videos. (1165662)
turbosquid
$19
Bluetooth Speaker
...odel bluetooth speaker for download as 3ds, obj, c4d, and fbx on turbosquid: 3d models for games, architecture, videos. (1432534)
3d_export
$15

Bluetooth Headset
...tooth headset
3dexport
3ds max 2018 visan, keyshot 10.2 software , obj file , fbx file , 3ds file , bluetooth head set. new item
Horn
3d_export
$5

car horn
...car horn
3dexport
car horn, car electronics gadgets, horn, speaker
turbosquid
$2

horn
...rn
turbosquid
royalty free 3d model horn for download as max on turbosquid: 3d models for games, architecture, videos. (1619705)
turbosquid
$12

Horn
...d
royalty free 3d model horn for download as ma, ma, and png on turbosquid: 3d models for games, architecture, videos. (1580361)
3ddd
free
AQUA / horn
...aqua / horn
3ddd
aqua creations
aqua / horn
turbosquid
free

Horns
...ee 3d model horns for download as max, obj, fbx, dxf, and dae on turbosquid: 3d models for games, architecture, videos. (1669043)
turbosquid
$20

horn
... available on turbo squid, the world's leading provider of digital 3d models for visualization, films, television, and games.
turbosquid
$6

Horns
... available on turbo squid, the world's leading provider of digital 3d models for visualization, films, television, and games.
turbosquid
$5

Horn
... available on turbo squid, the world's leading provider of digital 3d models for visualization, films, television, and games.
3d_export
$65

horn
...horn
3dexport
simple rendering of the scene file
3d_export
$7

Drinking Horn
...rn diffuse (4096 x 4096) - horn glossiness (4096 x 4096) - horn specular (4096 x 4096) polycounts: - 2523 polygons, 2586 vertices
V3
3d_export
$5
Poison-v3
...poison-v3
3dexport
poison-v3
3ddd
$1

Curtain v3
...curtain v3
3ddd
полупрозрачная штора v3
turbosquid
free
v3
... available on turbo squid, the world's leading provider of digital 3d models for visualization, films, television, and games.
3d_export
$5
potato v3
...potato v3
3dexport
turbosquid
$2

Bitcoin v3
...
royalty free 3d model bitcoin v3 for download as c4d and prj on turbosquid: 3d models for games, architecture, videos. (1182845)
turbosquid
$10
Wheel V3S
...e 3d model wheel v3s for download as 3ds, obj, fbx, and blend on turbosquid: 3d models for games, architecture, videos. (1344250)
turbosquid
$6
surfboard V3
...e 3d model surfboard v3 for download as ma, max, obj, and fbx on turbosquid: 3d models for games, architecture, videos. (1168641)
turbosquid
$30
Droid V3
... available on turbo squid, the world's leading provider of digital 3d models for visualization, films, television, and games.
turbosquid
$19

MOTO V3
... available on turbo squid, the world's leading provider of digital 3d models for visualization, films, television, and games.
turbosquid
$10
Lipstick v3
... available on turbo squid, the world's leading provider of digital 3d models for visualization, films, television, and games.
Active
3ddd
$1

Active
...active
3ddd
стул
офисный стул active
3ddd
$1

Умывальник ACTIVE
...смеситель activeihttp://www.idealstandard.ru/product-details/active-umyvalnik-64-sm-1-otverstie-pod-smesitel/t0547.html
3ddd
$1

CILEK SL ACTIVE
...cilek sl active
3ddd
cilek
cilek active (sl active white) sla-1304 кровать «selen»
3ddd
$1
Cilek SL ACTIVE
...k sl active
3ddd
cilek , стеллаж
cilek active (sl active white) 1501-sla стеллаж «hayal»
turbosquid
$30
Active Speakers
...odel active speakers for download as blend, dae, fbx, and obj on turbosquid: 3d models for games, architecture, videos. (1713003)
3ddd
$1

CILEK SL ACTIVE
...cilek sl active
3ddd
cilek
шкаф фирмы cilek из коллекции sl active white
3ddd
$1
PROFIM active 21v
...dd
profim , стул
кресло "profim"
модель "active 21v"
материал: кожа
3ddd
$1

PROFIM active 11sl
..., кресло
офисное кресло "profim"
модель "active 11sl"
материал: кожа
turbosquid
$19

chilren activity table
...ree 3d model activity table for download as max, fbx, and obj on turbosquid: 3d models for games, architecture, videos. (1643610)
turbosquid
$19
activity table and chairs
...l activity table and chairs for download as max, fbx, and obj on turbosquid: 3d models for games, architecture, videos. (1641128)
Speaker
3d_ocean
$12
Speakers
...speakers
3docean
beautiful customizable customizable speakers
speakers 3d model
3d_ocean
$5

Speaker
...speaker
3docean
audio speaker
minimalist audio speaker for your design.
3d_export
$5
speaker
...speaker
3dexport
speaker
archibase_planet
free

Speaker
...er
archibase planet
acoustic system column speaker loud speaker
speaker 3 - 3d model (*.gsm+*.3ds) for interior 3d visualization.
archibase_planet
free

Speaker
...er
archibase planet
column speaker loud speaker acoustic system
speaker 2 - 3d model (*.gsm+*.3ds) for interior 3d visualization.
archibase_planet
free

Speaker
...er
archibase planet
loud speaker column speaker acoustic system
speaker 1 - 3d model (*.gsm+*.3ds) for interior 3d visualization.
archibase_planet
free

Speaker
...speaker
archibase planet
speaker audio
speaker din - 3d model for interior 3d visualization.
archibase_planet
free

Speakers
...speakers
archibase planet
speaker speakers audio
speakers1 - 3d model for interior 3d visualization.
3d_ocean
$6
Speaker
...speaker
3docean
3d model music sound speaker
model,3d,speaker,sound,best,music
3d_ocean
$4
Speaker
...speaker
3docean
audio computer desktop electronic headphone microphone music pc speaker speakers technology
.
0
turbosquid
$12

Calligraphic Digit 0 Number 0
...hic digit 0 number 0 for download as max, obj, fbx, and blend on turbosquid: 3d models for games, architecture, videos. (1389318)
3d_export
$6

set-0
...set-0
3dexport
turbosquid
$6

hedge 0
...yalty free 3d model hedge 0 for download as max, obj, and fbx on turbosquid: 3d models for games, architecture, videos. (1450353)
turbosquid
$5

Nuber 0
...oyalty free 3d model nuber 0 for download as ma, obj, and fbx on turbosquid: 3d models for games, architecture, videos. (1564674)
turbosquid
$22

0.jpg
... available on turbo squid, the world's leading provider of digital 3d models for visualization, films, television, and games.
turbosquid
free

Steam Locomotive Fowler 4F 0-6-0
... available on turbo squid, the world's leading provider of digital 3d models for visualization, films, television, and games.
turbosquid
$10

Liquid Number 0
... model liquid number 0 for download as c4d, 3ds, fbx, and obj on turbosquid: 3d models for games, architecture, videos. (1689919)
turbosquid
$45

Dragon360_perspShape_tmp.0.jpg
... available on turbo squid, the world's leading provider of digital 3d models for visualization, films, television, and games.
turbosquid
$8

Rocks Debris 0
... available on turbo squid, the world's leading provider of digital 3d models for visualization, films, television, and games.
3d_export
$18

wood-guardrail-fence 0
...wood-guardrail-fence 0
3dexport
wood-guardrail-fence 0<br>3ds max 2015
Back
3d_export
free
Back yard
...back yard
3dexport
back yard 3d model in isometric art style
design_connected
$27
Get Back
...get back
designconnected
erba italia get back computer generated 3d model. designed by soressi, giorgio.
turbosquid
$1

Back Pack
...osquid
royalty free 3d model back pack for download as blend on turbosquid: 3d models for games, architecture, videos. (1463340)
3d_export
$40
delorean back to the future
...delorean back to the future
3dexport
delorean back to the future
3ddd
$1
Chair High back
... офисный стул , cosmo
офисный стул high back от cosmo
3d_export
$10

Back Stage
...back stage
3dexport
3d_export
$5

back of the chair
...back of the chair
3dexport
3ddd
$1
cross back chairs
...cross back chairs
3ddd
flexform
cross back chairs
turbosquid
$5

BACK CARRIAGE
...3d model back carriage for download as c4d, 3ds, fbx, and obj on turbosquid: 3d models for games, architecture, videos. (1560468)
3ddd
$1
494 back
...494 back
3ddd
tsinps , барный
www.tsinos.gr