Thingiverse
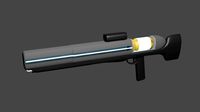
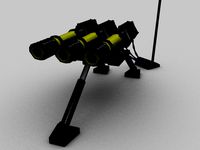
Automatic Laser Gun by enricoaleandri
by Thingiverse
Last crawled date: 3 years ago
Laser Gun - ESP driver
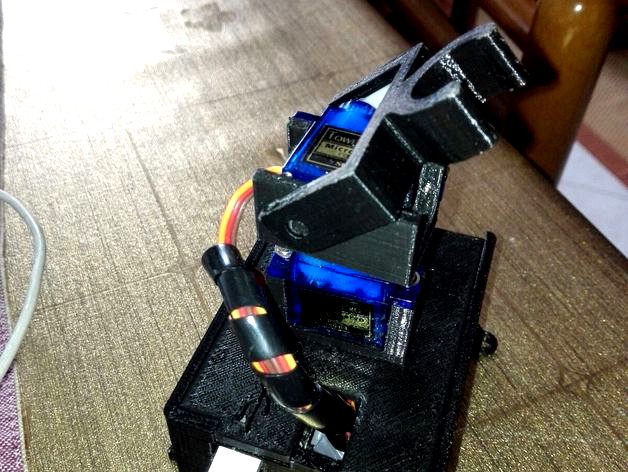
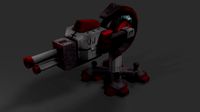
This is the driver of ESP8266 for the Timed Laser Gun project (here the WebInterface), a remix ofRemotely controlled torch robot by JJRobots.
Timed Laser Gun project is an automatic toy to let you cat play with laser pointer. I used an ESP to control the servo motors and a RTC to
provide a correct timing to schedule the events.
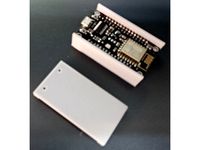
Running on ESP NodeMCU
To programm the ESP, use the Arduino IDE, then follow this step :
Go on File > Preferences, and change the URL of Board Manager with "http://arduino.esp8266.com/package_esp8266com_index.json", then click OK
Now go on Tools > Board:Arduino one > Board Managers
Search For "esp8266" and Click Install ( it will take a while )
After installation go back on Tools > Board:Arduino one and click on "NodeMCU 0.9 (ESP-12E Module)"
Now you can connect it and lunch the Load process
Build Hardware
The hardware part is made by :
x1 ESP8266 NodeMCU
x2 Servo motor 9g
x1 RTC
I used an RTC, to have a real timinig and schedule the event, but you can also use a Virtual RTC to simulate the timer
( obviously it will not be precise like RTC but you can every day sync with a remote server and it will be enough ).
Here the class I wrote and here how to use it :
void setup(){
//String TimeNow = YourCustomTimeService.getStringTime(); // this in case you have a service that provide this string date format dd/mm/yyyy HH:mm:ss
String TimeNow = "dd/mm/yyyy HH:mm:ss";
String d = TimeNow.substring(0,2);
String h = TimeNow.substring(3,5);
String m = TimeNow.substring(6,8);
String s = TimeNow.substring(9,11);
rtc_timer = Rtc();
rtc_timer.setup(d.toInt(), h.toInt(),m.toInt(),s.toInt());
}
void loop() {
rtc_timer.loopTime();
int seconds = rtc_timer.getSeconds();
int minutes = rtc_timer.getMinutes();
int hours = rtc_timer.getHours();
int days = rtc_timer.getDays();
// here you will use it
}
I removed the soldered pins just to save space, but I think you can do it without desoldering, just force a little bit.
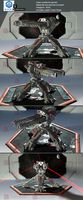
Use this ( I not if is ugly I'm not a painter :D ) datasheet to build the hardware, I just make a simple list of connection points:
Servo X
GND -> GND
Vcc -> Vcc ( +5 )
Sign -> D6
Servo Y
GND -> GND
Vcc -> Vcc ( +5 )
Sign -> D5
RTC
GND -> GND
Vcc -> Vcc ( +3 )
SDA -> D2
SCL -> D1
Battery
(do not plug microUSB and connect battery simultaneously, I didn't try but I suggest to do not try)
Positive -> Vcc ( +5 )
Negative -> GND
Here the datasheet
Here my result
Then put all in the base case, use 2/3 mm screws ( I'm not sure ) to fix the ESP to the base, and that's it, program it and enjoy it.
USE the Laser Gun
For the information about the functionality of ESP, refer the WebInterface documentation
This is the driver of ESP8266 for the Timed Laser Gun project (here the WebInterface), a remix ofRemotely controlled torch robot by JJRobots.
Timed Laser Gun project is an automatic toy to let you cat play with laser pointer. I used an ESP to control the servo motors and a RTC to
provide a correct timing to schedule the events.
Running on ESP NodeMCU
To programm the ESP, use the Arduino IDE, then follow this step :
Go on File > Preferences, and change the URL of Board Manager with "http://arduino.esp8266.com/package_esp8266com_index.json", then click OK
Now go on Tools > Board:Arduino one > Board Managers
Search For "esp8266" and Click Install ( it will take a while )
After installation go back on Tools > Board:Arduino one and click on "NodeMCU 0.9 (ESP-12E Module)"
Now you can connect it and lunch the Load process
Build Hardware
The hardware part is made by :
x1 ESP8266 NodeMCU
x2 Servo motor 9g
x1 RTC
I used an RTC, to have a real timinig and schedule the event, but you can also use a Virtual RTC to simulate the timer
( obviously it will not be precise like RTC but you can every day sync with a remote server and it will be enough ).
Here the class I wrote and here how to use it :
void setup(){
//String TimeNow = YourCustomTimeService.getStringTime(); // this in case you have a service that provide this string date format dd/mm/yyyy HH:mm:ss
String TimeNow = "dd/mm/yyyy HH:mm:ss";
String d = TimeNow.substring(0,2);
String h = TimeNow.substring(3,5);
String m = TimeNow.substring(6,8);
String s = TimeNow.substring(9,11);
rtc_timer = Rtc();
rtc_timer.setup(d.toInt(), h.toInt(),m.toInt(),s.toInt());
}
void loop() {
rtc_timer.loopTime();
int seconds = rtc_timer.getSeconds();
int minutes = rtc_timer.getMinutes();
int hours = rtc_timer.getHours();
int days = rtc_timer.getDays();
// here you will use it
}
I removed the soldered pins just to save space, but I think you can do it without desoldering, just force a little bit.
Use this ( I not if is ugly I'm not a painter :D ) datasheet to build the hardware, I just make a simple list of connection points:
Servo X
GND -> GND
Vcc -> Vcc ( +5 )
Sign -> D6
Servo Y
GND -> GND
Vcc -> Vcc ( +5 )
Sign -> D5
RTC
GND -> GND
Vcc -> Vcc ( +3 )
SDA -> D2
SCL -> D1
Battery
(do not plug microUSB and connect battery simultaneously, I didn't try but I suggest to do not try)
Positive -> Vcc ( +5 )
Negative -> GND
Here the datasheet
Here my result
Then put all in the base case, use 2/3 mm screws ( I'm not sure ) to fix the ESP to the base, and that's it, program it and enjoy it.
USE the Laser Gun
For the information about the functionality of ESP, refer the WebInterface documentation
Similar models
grabcad
free

Nodemcu ESP8266 ESP-12E
...nodemcu esp8266 esp-12e
grabcad
nodemcu esp8266 esp-12e
thingiverse
free

Flexible NodeMCU ESP8266 programmer (for ESP-12 / ESP-08 / ESP-07) Case by Shojo
...(for esp-12 / esp-08 / esp-07)
(http://www.ebay.de/itm/flexible-nodemcu-esp8266-programmer-for-esp-12-esp-08-esp-07/302294635835)
thingiverse
free
Box for ESP8266, ESP-12E WiFi Module NodeMcu by MartinDubois
...box for esp8266, esp-12e wifi module nodemcu by martindubois
thingiverse
box for esp8266, esp-12e wifi module nodemcu
grabcad
free

NodeMCU box
...nodemcu box
grabcad
i just made a box to fil your esp in it
for nodemcu esp8266
grabcad
free

NodeMCU Lua Lolin V3 Module ESP8266 ESP-12EWiFi
...nodemcu lua lolin v3 module esp8266 esp-12ewifi
grabcad
nodemcu lua lolin v3 module esp8266 esp for arduino
thingiverse
free

NodeMcu Lua ESP8266 ESP-12E Top Case by FunFlyFPV
...nodemcu lua esp8266 esp-12e top case by funflyfpv
thingiverse
top case for the nodemcu lua esp8266 esp-12e with button holes.
thingiverse
free

NodeMCU ESP8266 ESP-12F/ESP-12E case by succoria
...nodemcu esp8266 esp-12f/esp-12e case by succoria
thingiverse
esp8266 12f/12e case
grabcad
free

NodeMcu V3 ESP8266 ESP-12E Development Board Lolin
...oard lolin
pins are 0.1" (2.54mm) pitch with a 1.1" (27.94mm) wide footprint
remake from marcell stoer added pin labels
thingiverse
free

NodeMCU ESP8266 + LCD nokia 5110 + DHT22 by Txurtxil
... the nodemcu esp8266.
i have used esp easy firmware in order to use it witch domoticz : https://sourceforge.net/projects/espeasy/
grabcad
free

ESP8266 - ESP01
...esp8266 - esp01
grabcad
esp nodemcu
https://divyanshbansal.tech/
Enricoaleandri
thingiverse
free

Custom keyrings ( Pandora love ) by enricoaleandri
...ngs ( pandora love ) by enricoaleandri
thingiverse
this is a custom keyrings for a friend of mine.
just want to share with you.
thingiverse
free

MacBook PRO support by enricoaleandri
...mpany branded but i will upload a neutral version.
also there is a problem with angulation, it need to be decreased of 20 degree.
thingiverse
free

Wall Keyholder by enricoaleandri
...lder, can keep 8 bunches of keys, sone gate remote controls and wallet.
soft design ( someone says it's retro like 90's )
thingiverse
free

Toy Car wheel ( repair ) by enricoaleandri
...verse
this is a improved wheel for a r/c toy car, for a better grip on grass, sand, water and street.
this wheel is 35mm larger.
thingiverse
free

Bolier gas Knob Valve ( 5mm diameter ) by enricoaleandri
...gas knob valve ( 5mm diameter ) by enricoaleandri
thingiverse
this is a boiler gas knob for pressure valve. just a replacement.
thingiverse
free

Smoke Ring by enricoaleandri
...n, if is too small, scale it with slicer, i made a 115% scale to fit it in 22,5 mm (diameter) finger printed in 27 min.
enjoy it.
thingiverse
free

Food Feeder ( no Electricity ) by enricoaleandri
..., i will upload one with a unique thread, with the joint to attach to anything.
now you can use only if have the same container
thingiverse
free

hang hangers ( repair ) by enricoaleandri
...s ).
about the dimension of stick, i got a stick with 10 mm diameter, so the hole is 10.5 mm to compensate for the printer error.
thingiverse
free

Comb Beard ( inspired on groomarang ) - Er belli baffetti by enricoaleandri
...t an example inspired on groomarang.
i just called this brand "er belli baffetti", pretty nice for a comb beard name :)
thingiverse
free

Water feeder ( drinking pond ) by enricoaleandri
... doesn't really matter, but i used a 40% just to be sure.
need a printer with minimum 230x230 mm printing area. ( sorry )
Automatic
archibase_planet
free

Automat
...automat
archibase planet
automat equipment
automat n190510 - 3d model (*.gsm+*.3ds) for interior 3d visualization.
3d_export
$17

Automatic wire bending machine wire automatic bending machine
...atic wire bending machine wire automatic bending machine
3dexport
automatic wire bending machine, wire automatic bending machine
archive3d
free

Automat 3D Model
...ive3d
automat equipment
automat n190510 - 3d model (*.gsm+*.3ds) for interior 3d visualization.
3d_export
$20

Design of automatic laminator
...design of automatic laminator
3dexport
design of automatic laminator
3d_export
$6
Automatic soldering machine
...automatic soldering machine
3dexport
automatic soldering machine
turbosquid
$20

automatic rifle
...id
royalty free 3d model automatic rifle for download as fbx on turbosquid: 3d models for games, architecture, videos. (1163137)
turbosquid
$9

automatic gun
...yalty free 3d model automatic gun for download as max and obj on turbosquid: 3d models for games, architecture, videos. (1226948)
turbosquid
$5

Automatic Knife
...lty free 3d model automatic knife for download as max and fbx on turbosquid: 3d models for games, architecture, videos. (1378253)
turbosquid
$15

Automatic Stamp
...d model automatic stamp for download as ma, max, fbx, and obj on turbosquid: 3d models for games, architecture, videos. (1569569)
turbosquid
$1
flashlight for automat
...flashlight for automat for download as 3ds, max, obj, and fbx on turbosquid: 3d models for games, architecture, videos. (1314717)
Laser
3d_export
$5
laser
...laser
3dexport
a 3d laser
3d_export
free
cnc 3dp laser nozzle for 2w laser opt lasers
...logy that gave birth to cutting and engraving laser heads this laser nozzle was designed for, read the article in the link below:
3d_export
free
cnc laser mount opt lasers
...eive the engraving and cutting laser heads this cnc machine laser mount was designed for, read the article on the following page:
turbosquid
$20

Laser
... available on turbo squid, the world's leading provider of digital 3d models for visualization, films, television, and games.
turbosquid
$15
Laser
... available on turbo squid, the world's leading provider of digital 3d models for visualization, films, television, and games.
turbosquid
$3
Laser
... available on turbo squid, the world's leading provider of digital 3d models for visualization, films, television, and games.
3d_export
$5

laser sword
...laser sword
3dexport
it is a blue laser sword with a metal frame
3d_ocean
$19
Laser Turret
...be used in any sf type of game, especially in tower defense games. - laser turret: 3025 polygons - props: 270 polygons - textu...
3d_export
free

workbee cnc laser mount for opt lasers
...the specifications of engraving and cutting laser heads this mount was designed for, please take a look at the following website:
3d_export
free

shapeoko cnc laser mount for opt lasers
...ind out the opportunities that adding a cutting and engraving laser head to your cnc can bring, take a look at the website below:
Gun
archibase_planet
free
Gun
...t
gun tommy gun thompson gun thompson submachine gun
gun thompson n120313 - 3d model (*.gsm+*.3ds) for interior 3d visualization.
archibase_planet
free
Gun
...gun
archibase planet
gun machine-gun submachine gun
gun m4a1 n260713 - 3d model (*.gsm+*.3ds+*.max) for 3d visualization.
archibase_planet
free
Gun
...base planet
gun submachine gun sub-machine-gun
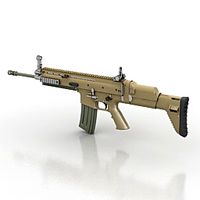
gun fn scar mark16 n091210 - 3d model (*.gsm+*.3ds) for interior 3d visualization.
archibase_planet
free
Gun
...gun
archibase planet
gun rifle hand-gun
gun n221010 - 3d model (*.gsm+*.3ds) for interior 3d visualization.
archibase_planet
free
Gun
...gun
archibase planet
gun automatic machine machine gun
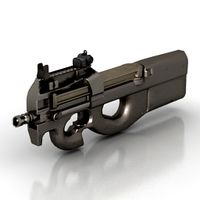
gun p90 n020515 - 3d model (*.gsm+*.3ds+*.max) for 3d visualization.
archibase_planet
free
Gun
...gun
archibase planet
gun automatic rifle submachine-gun
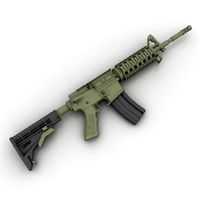
gun m4 n221112 - 3d model (*.gsm+*.3ds) for interior 3d visualization.
archibase_planet
free
Gun
...gun
archibase planet
gun m16 machine gun
gun m16 n030613 - 3d model (*.gsm+*.3ds+*.max) for interior 3d visualization.
archibase_planet
free
Gun
...gun
archibase planet
machine-gun gun fire-arms shooter
gun n270211 - 3d model (*.gsm+*.3ds) for interior 3d visualization.
archibase_planet
free
Gun
...hibase planet
gun automatic machine machine gun
gun jackhammer mk3a1 n290415 - 3d model (*.gsm+*.3ds+*.max) for 3d visualization.
archibase_planet
free
Gun
...n
archibase planet
paintball gun gun paintball
gun paintball bt 4 renta n280611 - 3d model (*.3ds) for interior 3d visualization.