Thingiverse
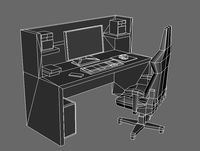
Atomic Pi Delux Vertical Desktop Case - Enhanced parts
by Thingiverse
Last crawled date: 4 years, 2 months ago
I made a few adjustments to JISpal01's design to suit my desires.
I didn't buy the developer kit, and didn't want to track down those antennas or something sufficiently similar. I had some ipx to rp-sma pigtails left over from another project, so the with-bolts top is remixed to accept SMA connectors. I apologize that you will need two wrenches to tighten the nuts.
You can get a pair of pigtails and antennas on amazon or ebay or aliexpress for way less than the correct antennas to match the original design. Even sold in a complete kit.
https://www.amazon.com/HUACAM-5-8GHz-Dual-Band-Wireless-Network-Antenna/dp/B06WD7FZV4/ref=sr_1_23
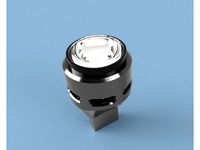
The "finisher" (rear bottom piece) has two small holes in it to accommodate a momentary switch attached to the clearly marked "pwr" connector pads, and a power indicator LED connected to pin 8 of the eeprom pads in the bluetooth area. Just solder fine wires to the pads and glue them down.
The switch hole is sized for, uh, i dunno, a common pushbutton momentary switch. I think Cherry (who made the one i used) would call it "subminiature" though you can surely find smaller. The hole in 6.5mm to fit quarter-inch-ish barrels.
The LED hole is sized for a standard clip-on holder for a 5mm led. You'll want a 200 ohm or so resistor in series.
The power button acts just like any other computer's power button. momentary press to turn on or to trigger shutdown, hold down 15 seconds to force power off.
The LED will turn off when a shutdown completes successfully but weirdly not when forcing power off.
See this reddit wiki page for tweaks to get (l)ubuntu to shut down successfully, and other tweaks:
https://www.reddit.com/r/Atomic_Pi/wiki/ubuntu
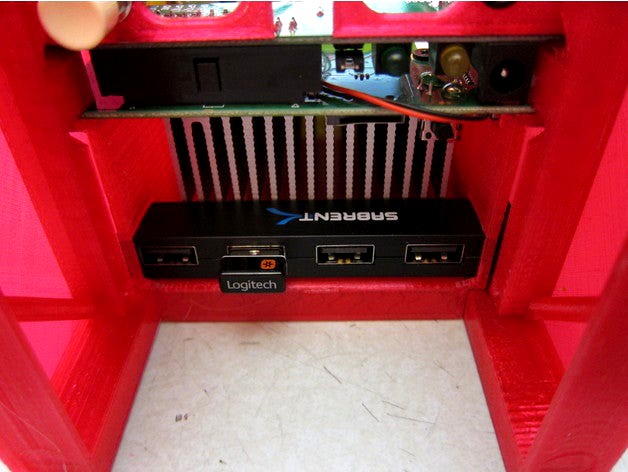
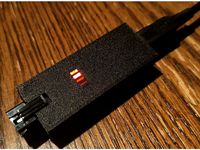
The lower duct has been remixed to accommodate a slim USB hub.
https://www.amazon.com/gp/product/B00L2442H0/ref=ppx_yo_dt_b_asin_title_o04_s00
I would bet that you can get the same hub on aliexpress or ebay under various brands and unbranded.
This part is printed with support on the build plate obviously.
In order to make it fit you have to take the housing off of the usb hub (just slip a dull tool into the gap and pry, there's no glue or clips) and trim off the plastic at the end where the cable enters to about where the board starts. As seen in my pictures.
Connecting it is pretty straightforward if you have JST-PH connectors and crimper and know how to use them. Or you can solder. The pinout is available a bunch of places on the web. It has two grounds and you only need one.
The "camera" connector on the board is a JST-PA which is pretty unusual. You can get the plug and assembled wires from Digikey - I think the links are on the digital loggers site at this point, or at least the part numbers. You can get the JST-PA stuff and solder the wires to the board in the hub just as you would if you were soldering to a single usb port per the original design.
The remix of the "structure" piece is just to make the holes on the sides small enough that they need to be tapped for m4 screws. I use the combination drill-and-tap bits that I am pretty sure are often referred to as "power taps" but i only ever use them on plastic by putting them in a screwdriver handle.
I didn't buy the developer kit, and didn't want to track down those antennas or something sufficiently similar. I had some ipx to rp-sma pigtails left over from another project, so the with-bolts top is remixed to accept SMA connectors. I apologize that you will need two wrenches to tighten the nuts.
You can get a pair of pigtails and antennas on amazon or ebay or aliexpress for way less than the correct antennas to match the original design. Even sold in a complete kit.
https://www.amazon.com/HUACAM-5-8GHz-Dual-Band-Wireless-Network-Antenna/dp/B06WD7FZV4/ref=sr_1_23
The "finisher" (rear bottom piece) has two small holes in it to accommodate a momentary switch attached to the clearly marked "pwr" connector pads, and a power indicator LED connected to pin 8 of the eeprom pads in the bluetooth area. Just solder fine wires to the pads and glue them down.
The switch hole is sized for, uh, i dunno, a common pushbutton momentary switch. I think Cherry (who made the one i used) would call it "subminiature" though you can surely find smaller. The hole in 6.5mm to fit quarter-inch-ish barrels.
The LED hole is sized for a standard clip-on holder for a 5mm led. You'll want a 200 ohm or so resistor in series.
The power button acts just like any other computer's power button. momentary press to turn on or to trigger shutdown, hold down 15 seconds to force power off.
The LED will turn off when a shutdown completes successfully but weirdly not when forcing power off.
See this reddit wiki page for tweaks to get (l)ubuntu to shut down successfully, and other tweaks:
https://www.reddit.com/r/Atomic_Pi/wiki/ubuntu
The lower duct has been remixed to accommodate a slim USB hub.
https://www.amazon.com/gp/product/B00L2442H0/ref=ppx_yo_dt_b_asin_title_o04_s00
I would bet that you can get the same hub on aliexpress or ebay under various brands and unbranded.
This part is printed with support on the build plate obviously.
In order to make it fit you have to take the housing off of the usb hub (just slip a dull tool into the gap and pry, there's no glue or clips) and trim off the plastic at the end where the cable enters to about where the board starts. As seen in my pictures.
Connecting it is pretty straightforward if you have JST-PH connectors and crimper and know how to use them. Or you can solder. The pinout is available a bunch of places on the web. It has two grounds and you only need one.
The "camera" connector on the board is a JST-PA which is pretty unusual. You can get the plug and assembled wires from Digikey - I think the links are on the digital loggers site at this point, or at least the part numbers. You can get the JST-PA stuff and solder the wires to the board in the hub just as you would if you were soldering to a single usb port per the original design.
The remix of the "structure" piece is just to make the holes on the sides small enough that they need to be tapped for m4 screws. I use the combination drill-and-tap bits that I am pretty sure are often referred to as "power taps" but i only ever use them on plastic by putting them in a screwdriver handle.
Similar models
thingiverse
free
Arduino Nano Addressable LED Case by MVstudios
...able leds can be powered directly and the jst sm connector can back feed power to the arduino eliminating the need for usb power.
thingiverse
free

Tiny Whoop Charger by jasonlove199450
...e 2.0 jst ph connectors.
step 11: use hot glue cover to cover all solder joints.
step 12: use superglue to glue close the case :)
thingiverse
free
1W power led usb case by tcbilge
...led,
led pcb,
4.7 ohm 1w resistor,
led lens and black holder,
usb a connector.
the resistor is soldered between led(+) and usb(+)
thingiverse
free

MFG CrossWind mount for USB Hub by RCHeliGuy
...drons gets confused if you have more than 3 usb devices connected. dcs on the other hand seems happy with any number of devices.
thingiverse
free

Atari XL/XE USB Power Adapter Box by piep3d
...-bit computers and solder to a micro-usb connector. salvage the nameplate off the power supply and decorate the boring black box.
thingiverse
free

3D-Printer Controller Box
...t. you need to figure out how to connect stuff and configure the software of course. you can ask me if you have any questions! :)
thingiverse
free

The OctoPanel: OctoPrint hardware for the Rostock Max V2. by DougLorenz
...ir flow because "why the hell not?"
i will diagram the mounting later, i just wanted to get this up as i begin testing.
thingiverse
free

Wemos D1 Mini Pro case for Pixel LEDs by U4Unique
...ntenna and add sealant in the cover and screw area.
coming soon...
opening for a usb connector.
cover with oled screen attachment
thingiverse
free
Front LED Mount for Emax KnightHawk 250 quad by RotorGator
...l mounting of wire. (yes, i realize i have the wire mounted on the side in the picture, but just reused an already soldered led).
thingiverse
free

Fatshark 25mW Transmitter case by MarcoDesigns
...the hole where the antenna connector sticks through a bit bigger. just make it snug and not too lose or you will lose durability.
Delux
turbosquid
$1

delux
... available on turbo squid, the world's leading provider of digital 3d models for visualization, films, television, and games.
design_connected
$13

Deluxe pendant
...deluxe pendant
designconnected
murano due deluxe pendant computer generated 3d model. designed by archirivolto.
3ddd
$1

DELUXE 50 PL
...deluxe 50 pl
3ddd
leucos deluxe , archirivolto
люстра leucos deluxe 50 pl, italy
turbosquid
$3

stepper deluxe
...osquid
royalty free 3d model stepper deluxe for download as on turbosquid: 3d models for games, architecture, videos. (1284335)
3ddd
$1

BoConcept / Mariposa Deluxe
...boconcept / mariposa deluxe
3ddd
boconcept
стул mariposa deluxe фабрики boconcept
turbosquid
$80

Set-Deluxe
... available on turbo squid, the world's leading provider of digital 3d models for visualization, films, television, and games.
turbosquid
$45

The-Deluxe.3dm
... available on turbo squid, the world's leading provider of digital 3d models for visualization, films, television, and games.
turbosquid
$8

Deluxe Bed
... available on turbo squid, the world's leading provider of digital 3d models for visualization, films, television, and games.
3ddd
$1

BoConcept - Mariposa Deluxe
... boconcept , boconcept
chair - boconcept
model: mariposa deluxe
size: h82½/47xw43xd59cm
3ddd
$1

SLY DELUX SOFA BED
...sly delux sofa bed
3ddd
sly , delux
modern sofa bed
Atomic
archibase_planet
free

Atomizer
...atomizer
archibase planet
atomizer spray pulverizer
atomizer - 3d model (*.gsm+*.3ds) for interior 3d visualization.
turbosquid
$4

Atom
...atom
turbosquid
free 3d model atom for download as blend on turbosquid: 3d models for games, architecture, videos. (1428066)
3d_export
$5

atoms
...atoms
3dexport
turbosquid
$17

Atom
... available on turbo squid, the world's leading provider of digital 3d models for visualization, films, television, and games.
turbosquid
$10

Atom
... available on turbo squid, the world's leading provider of digital 3d models for visualization, films, television, and games.
turbosquid
free

Atom
... available on turbo squid, the world's leading provider of digital 3d models for visualization, films, television, and games.
3ddd
$1

Atom - Relax
...atom - relax
3ddd
atom
имеются настройка v-ray + текстуры
3d_export
$10

Atom
...atom
3dexport
just a representation of the unit of matter
3d_export
$5

Atom 3D Model
...atom 3d model
3dexport
atom sings
atom 3d model rem 48528 3dexport
archive3d
free

Atomizer 3D Model
...ve3d
atomizer spray pulverizer
atomizer - 3d model (*.gsm+*.3ds) for interior 3d visualization.
Desktop
3d_export
$5
desktop
...desktop
3dexport
full desktop
3d_export
$15

Desktop
...desktop
3dexport
desktop, monitor, system unit, backlit keyboard.
3d_export
$5
desktop
...desktop
3dexport
desktop with shelving. very convenient and practical find.
turbosquid
$5
Desktop
...turbosquid
royalty free 3d model desktop for download as jpg on turbosquid: 3d models for games, architecture, videos. (1329464)
turbosquid
$1

Desktop
...turbosquid
royalty free 3d model desktop for download as fbx on turbosquid: 3d models for games, architecture, videos. (1661325)
3d_export
$10
110x60 desktop
...110x60 desktop
3dexport
110x60 desktop
turbosquid
$20

Desktop
...lty free 3d model desktop for download as blend, fbx, and obj on turbosquid: 3d models for games, architecture, videos. (1624648)
turbosquid
$20
Desktop
...oyalty free 3d model desktop for download as ma, obj, and fbx on turbosquid: 3d models for games, architecture, videos. (1309418)
turbosquid
$15

Desktop
...yalty free 3d model desktop for download as 3ds, obj, and c4d on turbosquid: 3d models for games, architecture, videos. (1445073)
3d_export
$5
desktop
...desktop
3dexport
a desk will fit into the room
Enhanced
turbosquid
free
Enhance Flame.max
... available on turbo squid, the world's leading provider of digital 3d models for visualization, films, television, and games.
turbosquid
$1

Enhanced Arwing with Original
... available on turbo squid, the world's leading provider of digital 3d models for visualization, films, television, and games.
turbosquid
$40

Airbus A380 aircraft enhanced
... available on turbo squid, the world's leading provider of digital 3d models for visualization, films, television, and games.
turbosquid
$5

Rapidlash Eyelash Enhancing Serum
... available on turbo squid, the world's leading provider of digital 3d models for visualization, films, television, and games.
turbosquid
$119

Sig Sauer P226 Enhanced Elite 9mm
... available on turbo squid, the world's leading provider of digital 3d models for visualization, films, television, and games.
turbosquid
$119

Sig Sauer P229 Enhanced Elite 9mm
... available on turbo squid, the world's leading provider of digital 3d models for visualization, films, television, and games.
3d_export
$23

bio-enhanced soldier
... shoulders_roughness stuff_base_color stuff_height stuff_metallic stuff_mixed_ao stuff_normal stuff_normal_opengl stuff_roughness
humster3d
$75
3D model of Mk 14 Enhanced Battle Rifle
... 3d model of mk 14 enhanced battle rifle in various file formats. all our 3d models were created maximally close to the original.
turbosquid
$29

Star Trek TNG Voyager Transporter Pattern Enhancers
...rter pattern enhancers for download as max, dwg, fbx, and obj on turbosquid: 3d models for games, architecture, videos. (1629422)
turbosquid
$165

Alvar Aalto's Furnitures Collection 1 Enhanced Edition
... available on turbo squid, the world's leading provider of digital 3d models for visualization, films, television, and games.
Pi
design_connected
$11

Pi
...pi
designconnected
ligne roset pi chairs computer generated 3d model. designed by thibault desombre.
3d_export
$5

raspberry pi
...raspberry pi
3dexport
carcasa para la raspberry pi
turbosquid
$18

pied
... available on turbo squid, the world's leading provider of digital 3d models for visualization, films, television, and games.
3ddd
$1

Emme pi light
...emme pi light
3ddd
emme pi light
люста emme pi light
3ddd
$1

Emme pi light
...emme pi light
3ddd
emme pi light
бра классическое emme pi light
3ddd
$1

Emme Pi Light
...emme pi light
3ddd
emme pi light
3ddd
$1

Emme Pi Light
...emme pi light
3ddd
emme pi light
design_connected
$16

Pi-Air
...pi-air
designconnected
living divani pi-air lounge chairs computer generated 3d model. designed by harry & camila.
3d_ocean
$15

Manneken Pis
...picting a naked little boy urinating into a fountain’s basin. (wikipedia) the model was sculpted in blender 2.70a rendered wit...
3ddd
$1

Emme pi light
...emme pi light
3ddd
emme pi light
люстра классическая фирма: emme pi light
артикул: 3595/5/cot/12/wh
Vertical
3ddd
$1
Vertical curtain
...vertical curtain
3ddd
роллеты
vertical curtain
modern curtain
design_connected
$11
Mr.Tubes Vertical
...mr.tubes vertical
designconnected
tonone mr.tubes vertical computer generated 3d model.
3ddd
free

Vertical gardening
... фитомодуль , фитостена
vertical gardening
2000x1000x165
vizpark
$5

Einstein Vertical
...tical is a set of 3d brick textures for modern buildings, including mulit-textures and 4k tileable textures with material layers.
turbosquid
$5

brazier vertical
... free 3d model brazier vertical for download as sldas and ige on turbosquid: 3d models for games, architecture, videos. (1647570)
turbosquid
$18
Vertical blinds
...ee 3d model vertical blinds for download as max, obj, and fbx on turbosquid: 3d models for games, architecture, videos. (1604868)
3d_export
$40

vertical stirling engine
...vertical stirling engine
3dexport
vertical stirling engine
turbosquid
$6
vertical fence
...d model vertical fence for download as c4d, 3ds, dxf, and obj on turbosquid: 3d models for games, architecture, videos. (1571631)
turbosquid
$50

Vertical Garden
... available on turbo squid, the world's leading provider of digital 3d models for visualization, films, television, and games.
turbosquid
$20

vertical flag
... available on turbo squid, the world's leading provider of digital 3d models for visualization, films, television, and games.
Case
3d_export
$1

case
...case
3dexport
case
archibase_planet
free

Case
...case
archibase planet
showcase show-case glass case
glass-case + cakes - 3d model for interior 3d visualization.
archibase_planet
free

Case
...case
archibase planet
showcase show-case glass case
glass-case for chips - 3d model for interior 3d visualization.
archibase_planet
free

Case
...case
archibase planet
case shelving drawer
case - 3d model for interior 3d visualization.
archibase_planet
free

Case
...case
archibase planet
case rack locker
case - 3d model for interior 3d visualization.
archibase_planet
free

Case
...case
archibase planet
case drawer kitchen furniture
case - 3d model for interior 3d visualization.
archibase_planet
free

Case
...case
archibase planet
case cupboard shelving
glass case - 3d model for interior 3d visualization.
archibase_planet
free

Case
...case
archibase planet
case handbag suitcase
case - 3d model (*.gsm+*.3ds) for interior 3d visualization.
archibase_planet
free

Case
...case
archibase planet
case suitcase
case 5 - 3d model (*.gsm+*.3ds) for interior 3d visualization.
archibase_planet
free

Case
...case
archibase planet
locker case dresser
case - 3d model (*.gsm+*.3ds) for interior 3d visualization.
Parts
3d_export
$5
Parts
...parts
3dexport
parts
3d_export
$5
Part
...part
3dexport
part
3d_export
$5

Part
...part
3dexport
machine part
3d_export
$65
Part
...part
3dexport
simple rendering of the scene file
3d_export
$65

Part
...part
3dexport
simple rendering of the scene file
3d_export
$30

fan part
...fan part
3dexport
this is a part of fan of pedastal
3d_export
$10
machine parts
...machine parts
3dexport
3d part modeling work ,contact for 3d work
turbosquid
$59

Mechanical Part
...id
royalty free 3d model mechanical part for download as c4d on turbosquid: 3d models for games, architecture, videos. (1410833)
turbosquid
$17
Road parts
...bosquid
royalty free 3d model road parts for download as 3ds on turbosquid: 3d models for games, architecture, videos. (1192967)
turbosquid
$9

Cutter Parts
...squid
royalty free 3d model cutter parts for download as stl on turbosquid: 3d models for games, architecture, videos. (1220010)