Thingiverse
Arduino Litho Click Box(s) & Parking Sensor by MrBancroft
by Thingiverse
Last crawled date: 4 years, 8 months ago
Update 7.18.18
Installed and working after a part failure 7.18.18
Update 9.30.18 see below
If you have any questions please let me know and I would be happy to help you recreate this or modify it.
Also, if you have any suggestions please let me know as I am always ready to learn!
CREATION IN ACTION-https://youtu.be/gJPS7HRmfeo
Back Story-
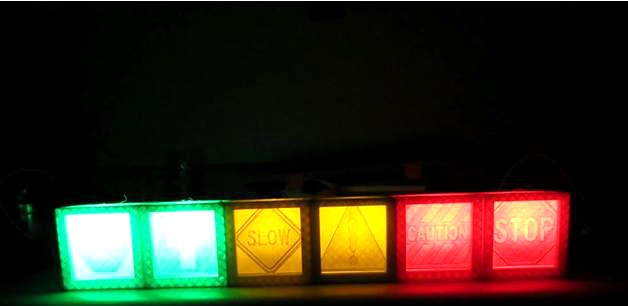
The overall point of this project was not to make litho boxes but that is what ended up happening. I wanted to make lights that would alert my wife and
I to how close our truck was to the wall when parking in the garage. I modified the sensor code off the Arduino website and made some litho boxes to be illuminated by the LEDs.
The Boxes:
The boxes turned out to be quite awesome. I realized when I was making them that these could also be used as a decoration to spell out someone's name or to make a cool custom lamp.
Each box contains a LED and a wire that runs to the board. The boxes have a passthrough channel so the wires are hidden. Each litho pane slides in so you can change them without removing the boxes. Be careful when printing as there is a left, right and middle box. Make sure that when connecting your LED that you use a resistor that is suited to your LED.
Litho panes-
I used paulbovbel litho pane customizer and in my slicer. I made them .75 of the original. The panes, as I said above, are able to slide into the the boxes without removing the boxes themselves, enabeling you to change what appears easlly.
Thank you paulbovbl! LINK----> http://bit.ly/SWEETLITHO
to his page.
Not included:
I did print a case for the arduino and the ultrasonic sensors; however, since I did not make these I will not include the files. A quick search and you will find many suited to your needs.
UPDATE: I added a picture of the schematics for an UNO keep in mind that the code below is for a mega. You only need to redefine the Echo and Trigger pins for the uno. I also have the code for both if you would like it.
I am thinking about adding in a garage door sensor to tell when it is in the up position.
Code for arduino:
I used the MEGA but this can be adapted for almost all of the arduinos.You may have to redefine the pins in the code. I also uploaded the .ino (arduino code) file above.
define trigPin 7
define echoPin 6
define led 13
define led2 12
define led3 11
define led4 10
define led5 9
define led6 8
void setup() {
Serial.begin (9600);
pinMode(trigPin, OUTPUT);
pinMode(echoPin, INPUT);
pinMode(led, OUTPUT);
pinMode(led2, OUTPUT);
pinMode(led3, OUTPUT);
pinMode(led4, OUTPUT);
pinMode(led5, OUTPUT);
pinMode(led6, OUTPUT);
}
void loop() {
long duration, distance;
digitalWrite(trigPin, LOW);
delayMicroseconds(2);
digitalWrite(trigPin, HIGH);
delayMicroseconds(10);
digitalWrite(trigPin, LOW);
duration = pulseIn(echoPin, HIGH);
distance = (duration/2) / 29.1;
if (distance > 13 && distance < 200) { //green 1
digitalWrite(led, HIGH);
}
else {
digitalWrite(led,LOW);
}
if (distance > 13 && distance < 125) { //green2
digitalWrite(led2, HIGH);
}
else {
digitalWrite(led2, LOW);
}
if (distance > 13 && distance < 100) { //yellow 1
digitalWrite(led3, HIGH);
}
else {
digitalWrite(led3, LOW);
}
if (distance > 13 && distance < 50) { //yellow 2
digitalWrite(led4, HIGH);
}
else {
digitalWrite(led4,LOW);
}
if (distance > 13 && distance < 30) { //red1
digitalWrite(led5, HIGH);
}
else {
digitalWrite(led5,LOW);
}
if (distance > 13 && distance < 20) { //red2
digitalWrite(led6, HIGH);
}
else {
digitalWrite(led6,LOW);
}
if (distance >=200 || distance <=13){
Serial.println("Out of range");
}
else {
Serial.print(distance);
Serial.println(" cm");
}
}
Installed and working after a part failure 7.18.18
Update 9.30.18 see below
If you have any questions please let me know and I would be happy to help you recreate this or modify it.
Also, if you have any suggestions please let me know as I am always ready to learn!
CREATION IN ACTION-https://youtu.be/gJPS7HRmfeo
Back Story-
The overall point of this project was not to make litho boxes but that is what ended up happening. I wanted to make lights that would alert my wife and
I to how close our truck was to the wall when parking in the garage. I modified the sensor code off the Arduino website and made some litho boxes to be illuminated by the LEDs.
The Boxes:
The boxes turned out to be quite awesome. I realized when I was making them that these could also be used as a decoration to spell out someone's name or to make a cool custom lamp.
Each box contains a LED and a wire that runs to the board. The boxes have a passthrough channel so the wires are hidden. Each litho pane slides in so you can change them without removing the boxes. Be careful when printing as there is a left, right and middle box. Make sure that when connecting your LED that you use a resistor that is suited to your LED.
Litho panes-
I used paulbovbel litho pane customizer and in my slicer. I made them .75 of the original. The panes, as I said above, are able to slide into the the boxes without removing the boxes themselves, enabeling you to change what appears easlly.
Thank you paulbovbl! LINK----> http://bit.ly/SWEETLITHO
to his page.
Not included:
I did print a case for the arduino and the ultrasonic sensors; however, since I did not make these I will not include the files. A quick search and you will find many suited to your needs.
UPDATE: I added a picture of the schematics for an UNO keep in mind that the code below is for a mega. You only need to redefine the Echo and Trigger pins for the uno. I also have the code for both if you would like it.
I am thinking about adding in a garage door sensor to tell when it is in the up position.
Code for arduino:
I used the MEGA but this can be adapted for almost all of the arduinos.You may have to redefine the pins in the code. I also uploaded the .ino (arduino code) file above.
define trigPin 7
define echoPin 6
define led 13
define led2 12
define led3 11
define led4 10
define led5 9
define led6 8
void setup() {
Serial.begin (9600);
pinMode(trigPin, OUTPUT);
pinMode(echoPin, INPUT);
pinMode(led, OUTPUT);
pinMode(led2, OUTPUT);
pinMode(led3, OUTPUT);
pinMode(led4, OUTPUT);
pinMode(led5, OUTPUT);
pinMode(led6, OUTPUT);
}
void loop() {
long duration, distance;
digitalWrite(trigPin, LOW);
delayMicroseconds(2);
digitalWrite(trigPin, HIGH);
delayMicroseconds(10);
digitalWrite(trigPin, LOW);
duration = pulseIn(echoPin, HIGH);
distance = (duration/2) / 29.1;
if (distance > 13 && distance < 200) { //green 1
digitalWrite(led, HIGH);
}
else {
digitalWrite(led,LOW);
}
if (distance > 13 && distance < 125) { //green2
digitalWrite(led2, HIGH);
}
else {
digitalWrite(led2, LOW);
}
if (distance > 13 && distance < 100) { //yellow 1
digitalWrite(led3, HIGH);
}
else {
digitalWrite(led3, LOW);
}
if (distance > 13 && distance < 50) { //yellow 2
digitalWrite(led4, HIGH);
}
else {
digitalWrite(led4,LOW);
}
if (distance > 13 && distance < 30) { //red1
digitalWrite(led5, HIGH);
}
else {
digitalWrite(led5,LOW);
}
if (distance > 13 && distance < 20) { //red2
digitalWrite(led6, HIGH);
}
else {
digitalWrite(led6,LOW);
}
if (distance >=200 || distance <=13){
Serial.println("Out of range");
}
else {
Serial.print(distance);
Serial.println(" cm");
}
}