Thingiverse
ArduCam Mount with Bracket by dewhisna
by Thingiverse
Last crawled date: 4 years, 4 months ago
I wanted to mount a webcam in my FlashForge Creator Pro to use with my OctoPi for printer monitoring and time lapse videos. I had settled on a OV5647 style camera for my Raspberry Pi and found this excellent ArduCam Stand design here on Thingiverse (https://www.thingiverse.com/thing:1579435) to mount it in.
I printed the stand, which printed well and worked well for my camera, but I had issues getting it to fit into my printer at an acceptable location without either obstructing the view or having collision problems with the extruder head. I even tried reworking the casing of the stand to flip the mounting flange around so that it would pivot the other direction. That worked a little better, but still had collision issues.
I really liked the ArduCam Stand casing for the camera, so I set about designing a new mounting system for it by trimming off the mounting flange and getting rid of the foot and figure out a new attachment method.
My first attempt was a simple 45-degree wedge on the back that could be attached to the printer with Velcro. But after trying that, I didn't like the fixed non-adjustable nature of it, so I redesigned the wedge to attach to a bracket that can allow it to pivot a full 60-degrees in either direction and attach the bracket to the printer with Velcro.
I have included both the Plain Wedge and the Adjustable Wedge/Bracket here, along with the OpenSCAD file to create them and to modify the original ArduCam Casing. And I've also included the lid pieces so that you have a complete print here without searching elsewhere. I did not include the mounting foot from the original design, as it isn't needed any more. For the original design variation, visit the original thing (https://www.thingiverse.com/thing:1579435).
I did parameterize the OpenSCAD source and there are adjustments that can be made if so desired. But it works very optimally as presented. By default, all 3 pieces (MainBase/Casing, Wedge, and Bracket) are rendered simultaneously in the OpenSCAD file. If making changes, simply comment out the function calls in the "Rendering" section of the source to render specific parts to STL.
While the Wedge can be printed as part of the Main Base or Casing, it is a lot easier to print with them separate so that no supports are required. Otherwise, you waste a lot of material printing supports and end up with a rough looking part (unless you have PVA support material or something).
So, print the Wedge and Main Base/Casing as separate pieces and glue them together. If you print them in ABS, as I did, use Acetone as the "glue".
Use a M3 tap and tap the four screw holes in the casing for attaching the lid (as described in the original ArduCam details). You'll need four M3x10 screws to attach the lid pieces to the casing. The lid is already set up for flat-head screws, but you can also use button-head screws, which also work well and is what I had on-hand and used.
Assemble the bracket to the wedge with a M3x35 screw (I used M3x40 since that's what I had on-hand) and a M3 nylon locknut. I also recommend flat washers to be used with the screw and nut, placed on either side of the bracket, but it works OK without them.
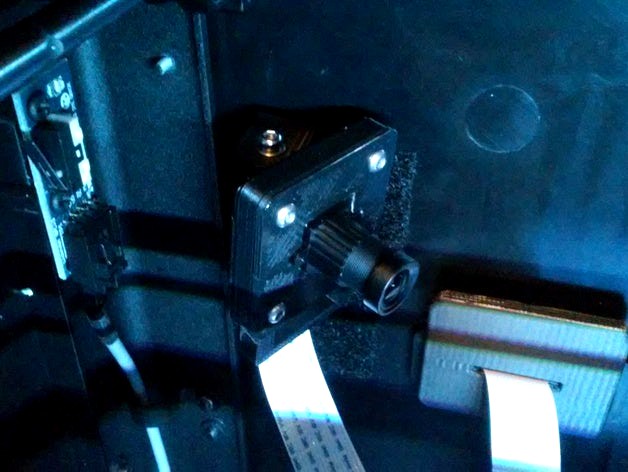
This mount can obviously be used in a lot of different applications, but if replicating my application, the mount/bracket can be attached with Velcro to the back wall of the printer. There's a spot on the back-left wall that has decent visibility of the build plate and is out of the way of the extruder head assembly.
The camera I used was this one:https://www.amazon.com/gp/product/B013JTY8WY/
It has the same OV5647 board as the camera used in the original ArduCam Stand design, but has a different lens. I chose the smaller lens version to help ensure that it didn't collide with the extruder head.
This camera would be a little better if it had a slightly wider angle lens, but it isn't bad as it is, particularly for viewing the current area being printed. It, however, doesn't fully capture the entire print volume when the print has completed as the lens angle is a little too small inside the confines of the printer. But still, it's quite decent.
Here's a link to a short 2-minute time-lapse video of this camera mounted with this mount and it's view of the FlashForge print bed. This video will give you a chance to see what this particular camera "sees" when mounted in the FlashForge Creator Pro printer with this mount. In the video, it's actually printing another one of these camera mounts for use in my other FlashForge printer:http://cloud.dewtronics.com/videos/arducam_casing_remix_20160909214358.mpg
This camera mount works really well in conjunction with the OctoPi case for the spool holder holes on the back of the FlashForge (https://www.thingiverse.com/thing:1751234). If mounting in the same location as I did, a 300mm (12") camera cable works well, as is visible in the last picture below. Use double-sided tape to hold the cable to the back of the printer out of the way.
I printed the stand, which printed well and worked well for my camera, but I had issues getting it to fit into my printer at an acceptable location without either obstructing the view or having collision problems with the extruder head. I even tried reworking the casing of the stand to flip the mounting flange around so that it would pivot the other direction. That worked a little better, but still had collision issues.
I really liked the ArduCam Stand casing for the camera, so I set about designing a new mounting system for it by trimming off the mounting flange and getting rid of the foot and figure out a new attachment method.
My first attempt was a simple 45-degree wedge on the back that could be attached to the printer with Velcro. But after trying that, I didn't like the fixed non-adjustable nature of it, so I redesigned the wedge to attach to a bracket that can allow it to pivot a full 60-degrees in either direction and attach the bracket to the printer with Velcro.
I have included both the Plain Wedge and the Adjustable Wedge/Bracket here, along with the OpenSCAD file to create them and to modify the original ArduCam Casing. And I've also included the lid pieces so that you have a complete print here without searching elsewhere. I did not include the mounting foot from the original design, as it isn't needed any more. For the original design variation, visit the original thing (https://www.thingiverse.com/thing:1579435).
I did parameterize the OpenSCAD source and there are adjustments that can be made if so desired. But it works very optimally as presented. By default, all 3 pieces (MainBase/Casing, Wedge, and Bracket) are rendered simultaneously in the OpenSCAD file. If making changes, simply comment out the function calls in the "Rendering" section of the source to render specific parts to STL.
While the Wedge can be printed as part of the Main Base or Casing, it is a lot easier to print with them separate so that no supports are required. Otherwise, you waste a lot of material printing supports and end up with a rough looking part (unless you have PVA support material or something).
So, print the Wedge and Main Base/Casing as separate pieces and glue them together. If you print them in ABS, as I did, use Acetone as the "glue".
Use a M3 tap and tap the four screw holes in the casing for attaching the lid (as described in the original ArduCam details). You'll need four M3x10 screws to attach the lid pieces to the casing. The lid is already set up for flat-head screws, but you can also use button-head screws, which also work well and is what I had on-hand and used.
Assemble the bracket to the wedge with a M3x35 screw (I used M3x40 since that's what I had on-hand) and a M3 nylon locknut. I also recommend flat washers to be used with the screw and nut, placed on either side of the bracket, but it works OK without them.
This mount can obviously be used in a lot of different applications, but if replicating my application, the mount/bracket can be attached with Velcro to the back wall of the printer. There's a spot on the back-left wall that has decent visibility of the build plate and is out of the way of the extruder head assembly.
The camera I used was this one:https://www.amazon.com/gp/product/B013JTY8WY/
It has the same OV5647 board as the camera used in the original ArduCam Stand design, but has a different lens. I chose the smaller lens version to help ensure that it didn't collide with the extruder head.
This camera would be a little better if it had a slightly wider angle lens, but it isn't bad as it is, particularly for viewing the current area being printed. It, however, doesn't fully capture the entire print volume when the print has completed as the lens angle is a little too small inside the confines of the printer. But still, it's quite decent.
Here's a link to a short 2-minute time-lapse video of this camera mounted with this mount and it's view of the FlashForge print bed. This video will give you a chance to see what this particular camera "sees" when mounted in the FlashForge Creator Pro printer with this mount. In the video, it's actually printing another one of these camera mounts for use in my other FlashForge printer:http://cloud.dewtronics.com/videos/arducam_casing_remix_20160909214358.mpg
This camera mount works really well in conjunction with the OctoPi case for the spool holder holes on the back of the FlashForge (https://www.thingiverse.com/thing:1751234). If mounting in the same location as I did, a 300mm (12") camera cable works well, as is visible in the last picture below. Use double-sided tape to hold the cable to the back of the printer out of the way.