Thingiverse

AnyCubic Predator Silicone Sock
by Thingiverse
Last crawled date: 4 years, 3 months ago
Edit:Note 1: The use of a sock during bed levelling may be an issue if your probe does not fit tightly on its mount. There is not a lot of space between the back of the probe and the block. I test fitted my probe with the thicker walled sock and it fits snugly. However I can't guarantee that this will be the same on your printer. Be aware of this when you fit your probe for levelling.
Note 2: I have not tested how much clearance a sock allows when printing to the outside edges of the build plate. Due to the nature of the Delta design there tends to be some tilt to the effector when it is reaching its outer limits. Because of this the outside corners of a sock may come close to the print surface. I considered chamfering the outer edges of the sock to help (if this is the case) but decided that it would make removal from the mould more difficult. It is probably just as easy to slightly trim off the outer edges with a side clipper.If you notice this as a problem please leave a comment and I will look at angling the bottom edges.
Note 3: Personally, I would not recommend the use of a Sock on the Predator while using the stock cooling shroud.
At least on my machine, the vents for the shroud are too close to the effector base and actually blow towards the block more than the print surface. With a sock, extending out and around the block, this will probably limit the airflow hitting the print. Using the sock with an improved cooling shroud should work fine, but always check for any possible interference of air flow.
27/01/2020
I have uploaded the new version of the Predator Sock Mould. Version4
The silicone walls are thicker so it should provide a little better insulation and be a little stronger. It is a little more difficult fitting over the block while installed on the printer as you need to get the top of the sock past the probe base and over the top of the block. Its not too difficult but it may require a small screwdriver or toothpick to help push it through. Don't try and force the double thickness of the top and wall through at the same time. Bend the sock out so the top slides through before the wall.
I have included a pusher block that can be used to help push the centre out of the casing, and if you print two casings you can place one on top of the other to help slide the sock out. These are not necessary but some may find it makes the removal process easier.
I would strongly recommend the soap/IPA release agent (noted below) and allow extra curing time as the thicker walls may take longer for the silicone to harden up enough for removal. I would suggest allowing 48 hours to be sure.
Note: If you do start taking the mould apart and notice the there are soft parts leave it longer to cure. You can also repair damaged parts by carefully spreading some more silicone over the damaged areas and then allowing it to cure.
23/01/2020
I am experimenting with a couple of different release agents.
Petroleum Jelly dissolved in mineral spirits. Take a small amount of mineral spirits and add petroleum jelly to it. Warm it up and allow the petroleum jelly to dissolve. Add enough PJ until it reaches saturation. Keep it in a closed glass container. This appears to work well but the smell is a little much for in the house.
1 part dish soap to 2 parts 99% Isopropyl Alcohol. I mix up a small amount as its really easy. Mix the two parts together well before applying.
I believe that both of these work better than plain dish soap. The solvent allows the release agent (PJ and dish soap) to be spread easily and thinly.
They both released about the same but I think I prefer the IPA Soap better just because it was a little easier to mix and with my limited test, it did appear to release a little easier.
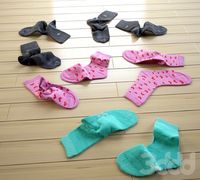
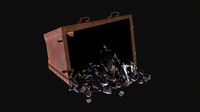
I have included a photo showing the released pieces sitting on the rough printed PLA. The pieces are flipped over to show the detail on the released silicone.
I am in the process of testing a thicker sock build for the Predator. When it has been tested and checked for fit I will add it here.
Summary
I had already made a custom silicone sock mould for my MPMD so I decided to create another for my AnyCubic Predator. For additional photos and other basic information you can go to my other mould for the MPMD
www.thingiverse.com/thing:3501929
For the silicone I used Permatex ULTRA COPPER gasket maker which I got for under $10 CAD. One tube makes a lot of socks.
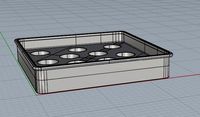
There are 4 parts to the mould.
I printed with supports (touching the bed) and a skirt only. It probably doesn't need the supports but I wanted a clean hex opening in the base for the nut as well as the same for the machine screw head on the top.
I altered the design a little because I couldn't reach the nut with an M3 20mm originally. With the new design it reaches and actually extends a little. I probably could remove the indent on the top but was too lazy to remove and test it.
Once the parts are printed ensure they fit together properly, sand or file parts that need it to ensure you have a good fit. Also test fit your 20mm M3. I preset the nut in the base to make it easier to assemble.
Start by soaping down all mould parts before assembling.
Place the casing on the base first and add some high temp silicone to the container. Ensure that the corners are filled before adding the centre piece. There should not be any liquid soap on the parts or it will mix in with the silicone and cause other issues.
Carefully place the centre on the protruding alignment rod and press down slowly.
Note: The centre piece needs to be oriented correctly before placing it. I did not add any key to ensure that it would only fit on one way. Make sure the two larger protrusions are near the top.
Once the centre piece is in place fold in any extra silicone over the top and remove any excess silicone or add if needed, then place the top piece on. Ensure that air pockets have been filled.
Slowly squeeze the top piece down removing any excess silicone that squeezes out the vent holes. Use a 20mm M3 machine screw and nut to tighten the parts together.
Notes:
Before applying silicone wipe the mould down with dish soap which acts as a separating compound. Don't leave excess soap inside. Wipe it lightly with a paper towel to remove any excess.
Squeezing the silicone through the tiny spout hole is really hard so I found that using a tube squeezer made it much easier.
I assembled the base and the casing and then filled the space a little less than 1/2 full. I then placed the inner block and pressed it down slowly allowing the silicone to squeeze out around the block. I made sure it folded back in over the block. Add a little more, if needed, to ensure it covered the top of the core. I then carefully placed the top and pressed it down to a point where I could use the screw to tighten the top down. There should be enough silicone in the space to allow it to squeeze out the vent holes but not too much so that it comes out between the casing and the top. The lid should tighten down snugly but be careful not to over-tighten.
Allow the silicone about 24 hours to cure before disassembling.
The parts should separate fairly easily.
I remove the top and bottom and then press the centre part out. If you print an extra casing it can be placed underneath to hold the top casing when pushing down.
Trim off any excess silicone using a small set of scissors or clippers.
Note: Don't expect perfect results all the time. If you do not let the silicone cure long enough or you don't have enough release agent on your mould expect some bad results. I also believe that if soap mixes with the silicone it inhibits its ability to cure which will cause soft areas in the sock which will require extra time to cure. I Have included a picture of a failed casting so you can see what to look for. Keep in mind that the pieces are quite thin and can tear easily.
If you are having a really hard time getting the sock out of the mould it is probably due to insufficient release agent and possibly silicone that has not cured long enough. Rather than forcing the part out leave it another 24 hours and hopefully it will be cured enough that it will release from the sides.
If not clean up the mould and try again.
Note 2: I have not tested how much clearance a sock allows when printing to the outside edges of the build plate. Due to the nature of the Delta design there tends to be some tilt to the effector when it is reaching its outer limits. Because of this the outside corners of a sock may come close to the print surface. I considered chamfering the outer edges of the sock to help (if this is the case) but decided that it would make removal from the mould more difficult. It is probably just as easy to slightly trim off the outer edges with a side clipper.If you notice this as a problem please leave a comment and I will look at angling the bottom edges.
Note 3: Personally, I would not recommend the use of a Sock on the Predator while using the stock cooling shroud.
At least on my machine, the vents for the shroud are too close to the effector base and actually blow towards the block more than the print surface. With a sock, extending out and around the block, this will probably limit the airflow hitting the print. Using the sock with an improved cooling shroud should work fine, but always check for any possible interference of air flow.
27/01/2020
I have uploaded the new version of the Predator Sock Mould. Version4
The silicone walls are thicker so it should provide a little better insulation and be a little stronger. It is a little more difficult fitting over the block while installed on the printer as you need to get the top of the sock past the probe base and over the top of the block. Its not too difficult but it may require a small screwdriver or toothpick to help push it through. Don't try and force the double thickness of the top and wall through at the same time. Bend the sock out so the top slides through before the wall.
I have included a pusher block that can be used to help push the centre out of the casing, and if you print two casings you can place one on top of the other to help slide the sock out. These are not necessary but some may find it makes the removal process easier.
I would strongly recommend the soap/IPA release agent (noted below) and allow extra curing time as the thicker walls may take longer for the silicone to harden up enough for removal. I would suggest allowing 48 hours to be sure.
Note: If you do start taking the mould apart and notice the there are soft parts leave it longer to cure. You can also repair damaged parts by carefully spreading some more silicone over the damaged areas and then allowing it to cure.
23/01/2020
I am experimenting with a couple of different release agents.
Petroleum Jelly dissolved in mineral spirits. Take a small amount of mineral spirits and add petroleum jelly to it. Warm it up and allow the petroleum jelly to dissolve. Add enough PJ until it reaches saturation. Keep it in a closed glass container. This appears to work well but the smell is a little much for in the house.
1 part dish soap to 2 parts 99% Isopropyl Alcohol. I mix up a small amount as its really easy. Mix the two parts together well before applying.
I believe that both of these work better than plain dish soap. The solvent allows the release agent (PJ and dish soap) to be spread easily and thinly.
They both released about the same but I think I prefer the IPA Soap better just because it was a little easier to mix and with my limited test, it did appear to release a little easier.
I have included a photo showing the released pieces sitting on the rough printed PLA. The pieces are flipped over to show the detail on the released silicone.
I am in the process of testing a thicker sock build for the Predator. When it has been tested and checked for fit I will add it here.
Summary
I had already made a custom silicone sock mould for my MPMD so I decided to create another for my AnyCubic Predator. For additional photos and other basic information you can go to my other mould for the MPMD
www.thingiverse.com/thing:3501929
For the silicone I used Permatex ULTRA COPPER gasket maker which I got for under $10 CAD. One tube makes a lot of socks.
There are 4 parts to the mould.
I printed with supports (touching the bed) and a skirt only. It probably doesn't need the supports but I wanted a clean hex opening in the base for the nut as well as the same for the machine screw head on the top.
I altered the design a little because I couldn't reach the nut with an M3 20mm originally. With the new design it reaches and actually extends a little. I probably could remove the indent on the top but was too lazy to remove and test it.
Once the parts are printed ensure they fit together properly, sand or file parts that need it to ensure you have a good fit. Also test fit your 20mm M3. I preset the nut in the base to make it easier to assemble.
Start by soaping down all mould parts before assembling.
Place the casing on the base first and add some high temp silicone to the container. Ensure that the corners are filled before adding the centre piece. There should not be any liquid soap on the parts or it will mix in with the silicone and cause other issues.
Carefully place the centre on the protruding alignment rod and press down slowly.
Note: The centre piece needs to be oriented correctly before placing it. I did not add any key to ensure that it would only fit on one way. Make sure the two larger protrusions are near the top.
Once the centre piece is in place fold in any extra silicone over the top and remove any excess silicone or add if needed, then place the top piece on. Ensure that air pockets have been filled.
Slowly squeeze the top piece down removing any excess silicone that squeezes out the vent holes. Use a 20mm M3 machine screw and nut to tighten the parts together.
Notes:
Before applying silicone wipe the mould down with dish soap which acts as a separating compound. Don't leave excess soap inside. Wipe it lightly with a paper towel to remove any excess.
Squeezing the silicone through the tiny spout hole is really hard so I found that using a tube squeezer made it much easier.
I assembled the base and the casing and then filled the space a little less than 1/2 full. I then placed the inner block and pressed it down slowly allowing the silicone to squeeze out around the block. I made sure it folded back in over the block. Add a little more, if needed, to ensure it covered the top of the core. I then carefully placed the top and pressed it down to a point where I could use the screw to tighten the top down. There should be enough silicone in the space to allow it to squeeze out the vent holes but not too much so that it comes out between the casing and the top. The lid should tighten down snugly but be careful not to over-tighten.
Allow the silicone about 24 hours to cure before disassembling.
The parts should separate fairly easily.
I remove the top and bottom and then press the centre part out. If you print an extra casing it can be placed underneath to hold the top casing when pushing down.
Trim off any excess silicone using a small set of scissors or clippers.
Note: Don't expect perfect results all the time. If you do not let the silicone cure long enough or you don't have enough release agent on your mould expect some bad results. I also believe that if soap mixes with the silicone it inhibits its ability to cure which will cause soft areas in the sock which will require extra time to cure. I Have included a picture of a failed casting so you can see what to look for. Keep in mind that the pieces are quite thin and can tear easily.
If you are having a really hard time getting the sock out of the mould it is probably due to insufficient release agent and possibly silicone that has not cured long enough. Rather than forcing the part out leave it another 24 hours and hopefully it will be cured enough that it will release from the sides.
If not clean up the mould and try again.
Similar models
thingiverse
free

Mould for making silicone sock by darkytoothpaste
...ugly on the heater block especially when heated (where it will expand slightly). try v2 if you find the original to be too loose.
thingiverse
free

Heater Block Silicone Socks mold for Ender 3
...d a paper cutter to trim the edges
(important - use a release agent or hair spray on the inner side of the mold for easy removal)
thingiverse
free

Clone Diamond Hotend sock mold by Sylvainmartin
... http://www.instructables.com/id/worlds-easiest-silicone-mold/
i included the fusion 360 files in case someone needs to modify it
thingiverse
free

Sock mold for E3d clone by MakeToFix
...he silicon after the mold is assembled....less messy...its full when it squirts out the top, excess can be trimmed after curing.)
thingiverse
free

FLSun QQ-S Pro Heater Sock Mold by ArketypeDesign
... you find this a challenging and fun project, like i did.
ps- don't forget to do a pid tune on the hotend after installation.
thingiverse
free

Mk10 HotEnd Heat Block Insulator - mould for silicone by Bencil88
...a thin layer of vaseline or other mould release to help demoulding. i'd recommend applying vaseline to the insert too.
enjoy!
thingiverse
free

E3D (and clones) V5 heater block Silicone Mould. by DjDemonD
...entually.
make sure when reassembling your hot end no little flaps of silicone get into the threads of the heatbreak/nozzle etc..
thingiverse
free

Mould for silicone sleeve by higgsb0son
...stick. then inject silicone using a caulk gun or similar through one of the holes (don't switch holes because...
thingiverse
free

Heater Block Silicone Rubber Sock Mold by boksbox
...the nozzle tip before using.
recalibrate pid settings.
cured siliicone rubber sock can be removed from heater block if necessary.
thingiverse
free

Silicone insulation sock for Raise3D V2 hotend by Anubis132
... it over the heater block without removing anything, although removing the side cooling fan will make it easier. you're done.
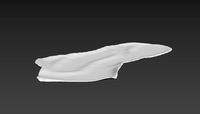
Sock
turbosquid
$7
sock
...ck
turbosquid
royalty free 3d model sock for download as obj on turbosquid: 3d models for games, architecture, videos. (1440718)
3d_export
$25
folded socks calcetines doblados socks display rack calcetin doblado sock socks calcetin calcetin
...rt sock feet wear dirty used realistic cloth socks unisex short fashion clothes foot fur knitted woven plaited character clothing
3ddd
$1
Socks
...socks
3ddd
носок , одежда
носки
turbosquid
$10

Sock
... available on turbo squid, the world's leading provider of digital 3d models for visualization, films, television, and games.
archive3d
free
Sock 3D Model
...l
archive3d
sock toe foot clothing
sock - 3d model (*.gsm+*.3ds) for interior 3d visualization.
turbosquid
$7
sock 2
...
turbosquid
royalty free 3d model sock 2 for download as obj on turbosquid: 3d models for games, architecture, videos. (1440720)
3d_export
$5

Smelly sock 3D Model
...smelly sock 3d model
3dexport
sock smelly sock clothing foot
smelly sock 3d model vizzi 37073 3dexport
turbosquid
$40

Christmas Sock
...e 3d model christmas sock for download as blend, fbx, and obj on turbosquid: 3d models for games, architecture, videos. (1662637)
turbosquid
$7

Christmas Sock
...el christmas sock for download as 3ds, obj, fbx, dae, and stl on turbosquid: 3d models for games, architecture, videos. (1482119)
turbosquid
$5
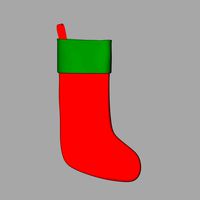
christmas socks
... available on turbo squid, the world's leading provider of digital 3d models for visualization, films, television, and games.
Predator
3d_export
$15

predator
...predator
3dexport
predator
3d_export
$18

predator
...predator
3dexport
turbosquid
$9

Predator
...r
turbosquid
royalty free 3d model predator for download as on turbosquid: 3d models for games, architecture, videos. (1322726)
3d_export
free
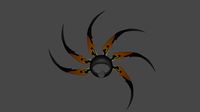
predator shuriken
...predator shuriken
3dexport
predator shuriken
turbosquid
$10
Predator
...d
royalty free 3d model predator for download as 3ds and obj on turbosquid: 3d models for games, architecture, videos. (1152845)
3d_export
$6
predator mask
...predator mask
3dexport
predator mask lowpoly
turbosquid
$299

Predator
... available on turbo squid, the world's leading provider of digital 3d models for visualization, films, television, and games.
3d_export
$5

mask predator
...mask predator
3dexport
an incredible mask, very detailed. based on predator. any questions write me please
3d_export
$17

MQ-1B Predator
...mq-1b predator
3dexport
mq-1b predator
3d_ocean
$5

Predator
...plane poly predator remote texture uav vehicle
ready to be used in production ready situation including all the major 3d formats.
Anycubic
thingiverse
free

anycubic filament holder
...anycubic filament holder
thingiverse
anycubic filament holder
thingiverse
free

Cableholder Anycubic Mega
...cableholder anycubic mega
thingiverse
cableholder anycubic mega
thingiverse
free

AnyCubic Toolholder by WildManPrinting
...anycubic toolholder by wildmanprinting
thingiverse
anycubic i3 mega toolholder that clips on the side of the spool a-frame.
thingiverse
free

AnyCubic Funnel by phana007
...anycubic funnel by phana007
thingiverse
funnel for anycubic resin and also a reducer for a normal soda bottle.
thingiverse
free

Anycubic Kossel PID calibration
...ir mount:
kossel raspberry camera ir mount
extruder pid calibration.
simple extruder temperature calibration of your 3d printer.
thingiverse
free

anycubic mega i3
...anycubic mega i3
thingiverse
anycubic i3 mega/mega s led 30mm 10-14v 6500k
thingiverse
free

Handle for anycubic by cruiser7
...handle for anycubic by cruiser7
thingiverse
its easier to handle the cover of the anycubic mono x and wash&care
thingiverse
free

anycubic predator Printbed by Lihyon
...anycubic predator printbed by lihyon
thingiverse
anycubic predator printbed
thingiverse
free

Anycubic Predator Triggers by marcelcountry
...anycubic predator triggers by marcelcountry
thingiverse
anycubic predator triggers
thingiverse
free

support anycubic cable by sarpdental
...support anycubic cable by sarpdental
thingiverse
support anycubic cable
Silicone
3d_export
$5
cake molds silicone
...cake molds silicone
3dexport
silicone cake molds
turbosquid
$19

Bunny Silicone
...ree 3d model bunny silicone for download as max, fbx, and obj on turbosquid: 3d models for games, architecture, videos. (1672014)
turbosquid
free
silicone spatula
... available on turbo squid, the world's leading provider of digital 3d models for visualization, films, television, and games.
turbosquid
$5
Container Silicon
...for download as ma, max, obj, fbx, prj, unitypackage, and upk on turbosquid: 3d models for games, architecture, videos. (1415212)
turbosquid
$1
Silicone Oil Brush
...
royalty free 3d model silicone oil brush for download as max on turbosquid: 3d models for games, architecture, videos. (1700355)
cg_studio
$35
silicon gun3d model
...cgstudio
industrial slicon gun tool
.lwo - silicon gun 3d model, royalty free license available, instant download after purchase.
turbosquid
free
Acetic Silicon Sealant
... available on turbo squid, the world's leading provider of digital 3d models for visualization, films, television, and games.
turbosquid
$19

Silicone Cute Modern Lamp
...l silicone cute modern lamp for download as max, obj, and fbx on turbosquid: 3d models for games, architecture, videos. (1161149)
3ddd
$1

Silicon Power Ultima II I-Series
... usb , флешка
флеш накопитель silicon power ultima ii i-series.
turbosquid
$12
Pendant lamp shade silicone mold
...nt lamp shade silicone mold for download as max, max, and obj on turbosquid: 3d models for games, architecture, videos. (1610347)