Thingiverse

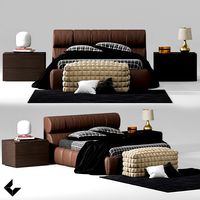
Anycubic Mega X Direct Drive conversion kit by Pops668
by Thingiverse
Last crawled date: 3 years ago
Parts used:
1) E3D V6 hot-end kit w/30mm fan
2) Printer Mods V1.3 mounting plate
3) Anycubic Mega X printer
4) Parts from this post.
Steps in general:
Print parts.
Remove extruder from bracket, install E3D v6 hot-end in extruder.
Install mounting plate onto extruder, making sure to keep edges aligned.
Remove X-rail, remove Anycubic carriage.
Install Printer Mods V1.3 plate on X-rail, set belt tension.
Install mounting plate and PCB-mount onto V1.3 Plate.
Extend the heater wires using 18 ga. stranded wire.
Extend fan and thermistor wires.
Install PCB, plug in connectors.
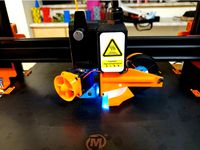
Install X-probe. Adjust height to meet limit switch, M3 screw sets depth.
Install fan-shroud and fan. Very tight fit, should 'click' into place.
Re-route and extend extruder wiring, insert into main cable.
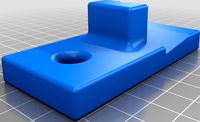
Install Anchor, secure main cable in position.
Bowden tube is threaded into Anchor...tight fit may not need screws!
Z-axis screws had to be backed out about 15mm.
The Z-screws are stabilized with chunks of white high-density foam; the screw can turn but is held in position.
In Cura, I had to set X width to 290mm; I will make a rear-mount cooling fan soon!
Not ideal, but the difference in print quality is amazing!
1) E3D V6 hot-end kit w/30mm fan
2) Printer Mods V1.3 mounting plate
3) Anycubic Mega X printer
4) Parts from this post.
Steps in general:
Print parts.
Remove extruder from bracket, install E3D v6 hot-end in extruder.
Install mounting plate onto extruder, making sure to keep edges aligned.
Remove X-rail, remove Anycubic carriage.
Install Printer Mods V1.3 plate on X-rail, set belt tension.
Install mounting plate and PCB-mount onto V1.3 Plate.
Extend the heater wires using 18 ga. stranded wire.
Extend fan and thermistor wires.
Install PCB, plug in connectors.
Install X-probe. Adjust height to meet limit switch, M3 screw sets depth.
Install fan-shroud and fan. Very tight fit, should 'click' into place.
Re-route and extend extruder wiring, insert into main cable.
Install Anchor, secure main cable in position.
Bowden tube is threaded into Anchor...tight fit may not need screws!
Z-axis screws had to be backed out about 15mm.
The Z-screws are stabilized with chunks of white high-density foam; the screw can turn but is held in position.
In Cura, I had to set X width to 290mm; I will make a rear-mount cooling fan soon!
Not ideal, but the difference in print quality is amazing!
Similar models
grabcad
free

Anycubic Mega X V6 Hotend BMG Direkt Extruder Conversion Plate
...for anycubic mega x with a bmg direct extruder and a e3d v6 hotend.
pch holder included.
m3 nut for the variable compomnent fan.
thingiverse
free

e3d v6 Anycubic Mega Zero by Macia
... zero by macia
thingiverse
e3d v6 mount for the anycubic mega zero.
almost no supports required.
designed for a 50mm radial fan
thingiverse
free

Anycubic Mega X Direct Drive Conversion by rianocerous
...rts, the carriage will need tree supports.
i'm using a bondtech bmg extruder, and a haldis red lizard (e3d v6 size) hot end.
thingiverse
free

TronXY X5s E3D V6 extruder holder by JD_Printing
...nxy x5s. uses the existing mounting plate and e3d cooling fan.
back plate mounts with m3 screws. the front plate with m3 screws.
thingiverse
free

I3 mega E3D V6 clone mount by KMETA
...ger screws and fitting are easy accessible.
the e3d v6 clone are on the same high then v5, but you need to make new bed leveling.
thingiverse
free

E3D V6 Replacement Extruder Kit with Part Cooling Fans
...use bolt on extruder brace which really locks the hot end in and adds mounts for 2x 40mm part cooling fans to main extruder body.
thingiverse
free

Anycubic i3 Mega E3D V6 40mm Fan Hotend Cover by llama_zen
...section
links
40mm fan duct for the e3d hot end: https://www.thingiverse.com/thing:354723
onshape project: https://kutt.it/hngkdm
thingiverse
free

Anycubic i3 Mega Mega-S Upgrade side Cable Holder (Extruder Motor) by hazweio
... cable is held and in a good and tight position. the holder is very strong.
to install the holder you need 8 m3 screws and nuts.
thingiverse
free

ANYCUBIC I3 Mega - Titan Extruder Cable Mount
...,2mm
pla or petg
use a m3x8 screw and an m3 nut to connect the parts.
to fix the cable use velcro tape - thats easy and removable
thingiverse
free

Anycubic i3 Mega top extruder mount
...o mount the extruder on the top of a anycubic i3 mega with the original extruder holder,
you`ll need to extend the extruder cable
Pops668
thingiverse
free
Ruby Laser Rod burnisher by Pops668
...ue it in, but why not?
printed on an anycubic mega x using filaments.ca silver eco-tough pla.
not much more than that for now...
thingiverse
free
MINGDA Rock 3 Pro Parts Cooler by Pops668
...t-end nozzle is touching the build-plate!
7) it is whisper quiet when at 100% cooling effort! you hardly know the thing is on!!!
thingiverse
free

Ah TENSHUN! belt tension guage by Pops668
...i didn't need them, didn't model them, so i am not including them!
can't think of anything else, signing off!
pops668
thingiverse
free

Mingda D2/D3 Service Bulletin #1 by Pops668
...ering and spade. star may need minor sanding but should push fit into the space tightly and not need anything else to secure it.
Anycubic
thingiverse
free

anycubic filament holder
...anycubic filament holder
thingiverse
anycubic filament holder
thingiverse
free

Cableholder Anycubic Mega
...cableholder anycubic mega
thingiverse
cableholder anycubic mega
thingiverse
free

AnyCubic Toolholder by WildManPrinting
...anycubic toolholder by wildmanprinting
thingiverse
anycubic i3 mega toolholder that clips on the side of the spool a-frame.
thingiverse
free

AnyCubic Funnel by phana007
...anycubic funnel by phana007
thingiverse
funnel for anycubic resin and also a reducer for a normal soda bottle.
thingiverse
free

Anycubic Kossel PID calibration
...ir mount:
kossel raspberry camera ir mount
extruder pid calibration.
simple extruder temperature calibration of your 3d printer.
thingiverse
free

anycubic mega i3
...anycubic mega i3
thingiverse
anycubic i3 mega/mega s led 30mm 10-14v 6500k
thingiverse
free

Handle for anycubic by cruiser7
...handle for anycubic by cruiser7
thingiverse
its easier to handle the cover of the anycubic mono x and wash&care
thingiverse
free

anycubic predator Printbed by Lihyon
...anycubic predator printbed by lihyon
thingiverse
anycubic predator printbed
thingiverse
free

Anycubic Predator Triggers by marcelcountry
...anycubic predator triggers by marcelcountry
thingiverse
anycubic predator triggers
thingiverse
free

support anycubic cable by sarpdental
...support anycubic cable by sarpdental
thingiverse
support anycubic cable
Mega
3ddd
$1
BoConcept / Mega
...boconcept / mega
3ddd
boconcept
boconcept mega
3ddd
free

Angelo - Mega shoin
... mega shoin , shoin
angelo - mega shoin - 3dmax 2008
3ddd
$1
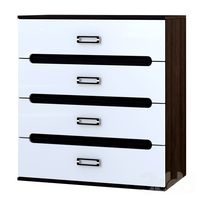
Комод MEGA
...вана по фото с учетом реальных размеров.
стек не сколапсен, есть возможность регулировки уровня сглаживания.
текстуры в архиве.
3ddd
$1
Hulsta / Mega-design
...hulsta / mega-design
3ddd
hulsta
hulsta mega-design
design_connected
$18
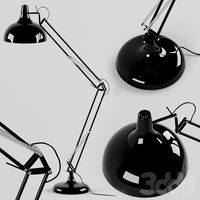
Tolomeo Mega
...
photo-realistic 3d models of the tolomeo mega floor lamps from artemide for 3d architectural and interior design presentations.
turbosquid
$119

Mega Soldier
... free 3d model mega soldier for download as obj, c4d, and fbx on turbosquid: 3d models for games, architecture, videos. (1148568)
turbosquid
$100
Mega Yacht
... free 3d model mega yacht for download as obj, fbx, and blend on turbosquid: 3d models for games, architecture, videos. (1368903)
3ddd
$1
Massproductions Mega
... massproductions , mega
ширина: 180 см
глубина: 90 см
высота: 79 см
3d_export
$4
mega metro station
...mega metro station
3dexport
mega metro station. ready to game. thanks all downloaders!!
3ddd
$1
BAS Mega
...bas mega
3ddd
bas , ванна
ванна
Conversion
3ddd
$1

Conversation Seat
...шетка
the conversation seat made in englandhttp://www.squintlimited.com/products/the_conversation_seat/gold
+ max 2011
3d_export
$10

Converse 3D Model
...converse 3d model
3dexport
converse shoe pc unix mac
converse 3d model electropainter17075 38067 3dexport
turbosquid
$100

converse-shoe
...quid
royalty free 3d model converse-shoe for download as c4d on turbosquid: 3d models for games, architecture, videos. (1398427)
turbosquid
$10

Conversation Furniture
... available on turbo squid, the world's leading provider of digital 3d models for visualization, films, television, and games.
turbosquid
$7

Converse Allstars
... available on turbo squid, the world's leading provider of digital 3d models for visualization, films, television, and games.
design_connected
$16

Conversation Club Chair
...conversation club chair
designconnected
donghia conversation club chair chairs computer generated 3d model. designed by n/a.
design_connected
$27

Hemicycle Conversation Chair
...rsation chair
designconnected
ligne roset hemicycle conversation chair computer generated 3d model. designed by nigro, philippe.
3d_export
$24

Converse keds 3D Model
...converse keds 3d model
3dexport
converse all star ked shoe clothes sports
converse keds 3d model vermi1ion 26201 3dexport
3ddd
$1

Converse All-Star Shoes
...converse all-star shoes
3ddd
кеды , обувь
converse all-star shoes
design_connected
$18

CONVERSE Jack Purcell Sneakers
...converse jack purcell sneakers
designconnected
converse jack purcell sneakers computer generated 3d model.
Direct
design_connected
free
Compas Direction
...compas direction
designconnected
free 3d model of compas direction by vitra designed by prouvé, jean.
design_connected
$18
Direction Pivotant
...direction pivotant
designconnected
vitra direction pivotant computer generated 3d model. designed by prouvé, jean.
turbosquid
$6
not direct the front
...oyalty free 3d model not direct the front for download as max on turbosquid: 3d models for games, architecture, videos. (1213034)
turbosquid
$10

Rails Direct
... available on turbo squid, the world's leading provider of digital 3d models for visualization, films, television, and games.
3d_export
$5

Picto toilet directions
...lude 3d files next to rhino6: x3dv, step, igus, obj and stl. double-sided, flipping changes the gender directions to the toilets.
3ddd
$1
fauteuli direction
...d
chair , vitra , fauteuli
fauteuli vitra chair
design_connected
$18
Fauteuil Direction, 1951
...fauteuil direction, 1951
designconnected
vitra fauteuil direction, 1951 computer generated 3d model. designed by prouvé, jean.
3d_export
$5
Directional tactile 3D Model
...tactile 3d model
3dexport
directional tactile braille tile flooring interior
directional tactile 3d model renob000 71068 3dexport
turbosquid
$26

Radio direction finder A
...ty free 3d model radio direction finder a for download as fbx on turbosquid: 3d models for games, architecture, videos. (1212490)
turbosquid
$7

Wooden direction signage
...ty free 3d model wooden direction signage for download as max on turbosquid: 3d models for games, architecture, videos. (1453747)
Kit
turbosquid
$3

Bathroom Kit Baño kit
... available on turbo squid, the world's leading provider of digital 3d models for visualization, films, television, and games.
turbosquid
$19

Kit
... available on turbo squid, the world's leading provider of digital 3d models for visualization, films, television, and games.
3d_export
$20

Drift Kit
...drift kit
3dexport
turbosquid
$40

BitCoin Kit
...urbosquid
royalty free 3d model bitcoin kit for download as on turbosquid: 3d models for games, architecture, videos. (1519068)
turbosquid
$9

Industrial kit
...osquid
royalty free 3d model industrial kit for download as on turbosquid: 3d models for games, architecture, videos. (1144117)
turbosquid
$6

Kit Vases
...
turbosquid
royalty free 3d model kit vases for download as on turbosquid: 3d models for games, architecture, videos. (1285114)
turbosquid
free

Survival Kit
...rbosquid
royalty free 3d model survival kit for download as on turbosquid: 3d models for games, architecture, videos. (1637721)
turbosquid
$50

Ninja Kit
...rbosquid
royalty free 3d model ninja kit for download as fbx on turbosquid: 3d models for games, architecture, videos. (1672364)
turbosquid
$35

Brushes Kit
...osquid
royalty free 3d model brushes kit for download as max on turbosquid: 3d models for games, architecture, videos. (1216721)
turbosquid
$19
Kit Bedroom
...osquid
royalty free 3d model kit bedroom for download as max on turbosquid: 3d models for games, architecture, videos. (1290049)
Drive
turbosquid
$90
Drive
...turbosquid
royalty free 3d model drive for download as blend on turbosquid: 3d models for games, architecture, videos. (1654393)
3d_export
$10

cycloidal drive
...cycloidal drive
3dexport
cycloidal drive
3d_ocean
$5

Flash Drive
...h drive included : – materials – scene ( lighs / room ) – .c4d + .obj for any questions please feel free to contact me thank you.
3d_ocean
$5

Usb drive
...s shaders and a lighting setup. it also has a small animation of it going in and out. i saved it out as both a .blend file and...
3d_ocean
$5

Pen Drive
...est computer drive game model good low poly new pen pen drive textured unwrapped uv very low poly
a very beautiful low poly model
3d_ocean
$10

External hard drive
... is a detailed model of a trekstor external hard drive. you can easily modify the label on the top. simply edit the text objects.
turbosquid
$60

Star Drive
...squid
royalty free 3d model star drive for download as blend on turbosquid: 3d models for games, architecture, videos. (1254314)
turbosquid
$50
Star Drive
...squid
royalty free 3d model star drive for download as blend on turbosquid: 3d models for games, architecture, videos. (1263524)
turbosquid
$45

Star Drive
...squid
royalty free 3d model star drive for download as blend on turbosquid: 3d models for games, architecture, videos. (1287060)
turbosquid
$40
Star Drive
...squid
royalty free 3d model star drive for download as blend on turbosquid: 3d models for games, architecture, videos. (1261902)