Thingiverse
Antweight 150g BattleBot: Drum Spinner - Blackspin by JC2017
by Thingiverse
Last crawled date: 3 years ago
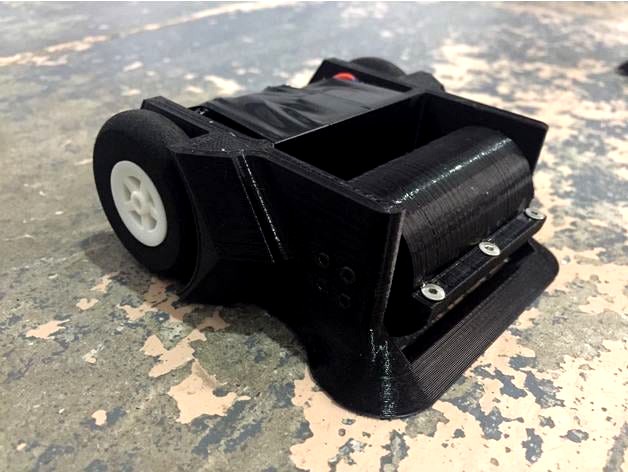
Introducing BlackSpin, from team Deadly Kiwi's
OCT update - this bot has been entered in the EndBots design competition here:http://forum.endbots.com/thread/41/endbots-design-contest-october-2018
Be sure to check them out, they are instrumental in forwarding the sport in AU so give them your live. O and enter any bot you want too!
This is a 150g Antweight Drum Spinner BattleBot.
A few recent fights with V2.https://youtu.be/Prl7PghuMDYhttps://youtu.be/wxlJHwt8pHAhttps://youtu.be/8xXINkV_zuI
This runs this electronics kit - https://combatrobotics.co.nz/product/antweight-bot-kit-pusher/
The wiring guide is here and very simple - http://combatrobotics.co.nz/antweight-bot-kit-build-guide/
You just need a Weapon motor and Weapon ESC.
Its designed to fit into a 100x100mm cube box as per New Zealand Antweight regulations.
Help a guy out and throw me a like to keep me motivated.
TIP me if you want this design to continue on with updates as I patch weaknesses found after my fights.
Design Notes:
The Motor mount has a sunk channel for the motor cable to sit in safely away from the weapon and to pass through the firewall into the body cavity.
I use black electrical tape to keep all components inside the body. I just wrap it around the entire body. This isn't elegant, but works well. Once I get the ESC weight down this will allow for a top plate to be added. I am thinking of a clear polycarb plate cover.
The Drive motors are easily quick tie mounted to little blocks. There are holes in the design for the ties to pass through. These perfectly align the motor flush to the body, keeping the cogs safely protected. Note the ties will fit inside the motor plates, so make sure you turn the motors around so the side with least cogs points out, otherwise the tie could rum on the cogs!
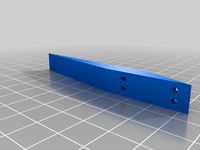
The weapon mount arms are susceptible to horizontal spinners. If you commonly face one (eg: Shrapnel) then put a 5mm wide, strip of .4mm thick aluminum strip down each side. Use double sided 3M anti vibration tape to mount this, adding further shock protection to the brittle PLA plastic. Both of these are common to most model shops. Beware of weight!
I have not yet tried, but suggest looking at adding a flanged bearing to the weapon mount opposite the motor. I have tried with a coper sleeve which gets hot and I am worried will be a point of failure.
Bill of materials V3 Costs ESTIMATES (AUD as of Oct 18)
Specifics of each and alternative upgrades/ downgrades are explained below.
Printing: Who know's depends on so much eg filament, DIY etc??
Transmitter $17
Wheels $5
LIPO 2s $21 for 5 pack.
Drive motors and ESC combo $12.70 + Shipping form US>
Weapon motor $14.70
Weapon ESC $11.83
Motor bearing $2
Motor mount screw $1
Switch, 2x 3mm quickties, JST battery plug, plastic wedges, other misc ?? $few dollars.
Magnet (optional $3)
(Not factored in: Battery charger, Receiver - recommendations below)
UPDATES: Version 2
Drum V2 - [REDESIGN+ New File]After a big hit against another spinner, the drum sheared in two where the motor mount was. This is a weakness due to the nature of 3D printing. To fix this I redesigned the drum with two 1.5mm holes that go the entire way through the body. You can then press a 1.4mm piano wire through the body thus making the drum ridged. It also ads weight to the outer edge adding to the weapons effectiveness. Files and pics of the process added.
Lighter Transmitter
I use this FS2A 4CH AFHDS 2A Mini Compatible Receiver - https://www.banggood.com/Flysky-FS2A-4CH-AFHDS-2A-Mini-Compatible-Receiver-PWM-Output-for-Flysky-i6-i6X-i6S-p-1214269.html?rmmds=search
But its tricky to get the weapon running off it. It requires mixing channels so that ch3 can be mapped to a Var pot on the transmitter for better control of the spin speeds.
google it and their are wiring diagrams out there. Message me if you want help mixing. It may motivate me to write the guide.
Flanged Bearing Drum Mount [New Component] Prior I used a sintered copper sleeve as the drum mount sleeve. It got too hot and melted the plastic in battle. I replaced this with a ID2mm Flanged bearing (details below). This eliminated the heat issue and also made the drum run smoother with less vibrations! Highly recommended. No design change is needed, just drill the mount hole opposite the motor to the desired size. Mount the flange inside the body, (see picture)
Drive Motor ESC V2 - [New Component] I have now started running these ":DC Micro Metal Gear Motor with built in Drivers - 50:1"
They are very reliable, very very light, and save so much internal space! (See added pic)
Wiring is a little tricky as they need power, (If anyone can help me drawing a wiring diagram for everyone please message me)
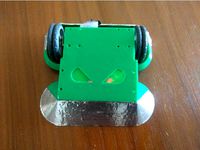
Magnets - [TIP] In New Zealand we run on a metal arena floor, and have no rules against magnet use. I have added a strong N52 magnet to the bottom of the body just in front of the wheels. (see pic) I simply drilled into the body and glued them in, sunken in by 0.5mm to prevent it sticking to floor. This gives added traction for pushing and eliminated any steering issues caused by vibrations of the drum after a few hits and it being slightly unbalanced.
Plastic Film scoop - [TIP] running a very thin plastic film strip across the font helps me get under most opponent. Its mounted with double sided tape, which allows you to replace between battles ensuring a sharp clean edge in every battle.
Weapon Motor - [New Component] - Untested: This motor is apparently the same form factor as the DYS BE1104; but has a much lower KV value of (4000kv). Lower k, means less rpm (slower) but more torque for a given voltage. Slower means you can get a good bite on the other bot per revolution. Too fast and you just end up grinding the other bot, not biting or throwing them. https://rotorxracing.com/products/rx1104-brushless-outrunner-motor?variant=1144930317
If you run the DYS - just run it at half speed or lower for best results.
UPDATES: Version 3
Printed in White PETg for added strength. See the pics.
1) Add a lid to the design. It slots into body and locks into firewall. However it still uses tape to secure the lid down.
2) The motors kept moving slightly, so I put lips onto the mounts to better secure them.
3) Added holes to fire wall to allow motors to be easily swapped in the pits, no more threading wires through the little holes in V1,V2.
4) Added more filleting to some of the back to add strength.
5) Increased the wheel arch diameter. Allows you to add silicon to the 40mm foam wheels for added grip.
Main Components:
Wheels: 2 x40mm Tamiya Foam Wheels. (Can replace with 40mm DShaft Pololu wheels)
Drive Motors: 2 x N20 6v Geared Motors 300-600rpm
(Get slower if you compete in a small arena. If you get the i6x below get the 600rpm, you can setup duel rates on the transmitter to have slow/fast mode on a switch.)
Drive ESC:
2 xFingerTech tinyESC v2 - These are the best. But cost. $34.46CAD each!https://www.fingertechrobotics.com/proddetail.php?prod=ft-tinyESCv2
I used 2 of these, which work but add far too much weight and make fitting the components in very tricky. You also have to mod these to remove and shorten cables etc. Be warned. https://goo.gl/gRbFft -
Weapon Motor: 1 xDYS BE1104 - Brushless Motor 5400KV 2-3Shttps://goo.gl/2K8ekk (Get the lowest KV possible, to fast and the weapon wont bite the opponent. It comes with 2mm mounting bolts)
Weapon ESC: Yet to find one I'd be happy to recommend.
Turnigy Multistar 32bit 12A Race Spec ESC 2~4S (OPTO)
I am currently running this and am happy, but always looking for other options - https://hobbyking.com/en_us/multistar-32bit-12a-0-lite.html
Battery: Turnigy nano-tech 180mAh 2S 25~40Chttps://hobbyking.com/en_us/turnigy-nano-tech-180mah-2s-25-40c-lipo-pack-5pcs.html
Transmitter: FlySky i6 FS-i6 2.4G 6CH AFHDS RC Transmitter Without Receiverhttps://goo.gl/oJPHwo
Receiver: Flysky X6B 2.4G 6CH i-BUS PPM PWM Receiver for AFHDS i10 i6s i6 i6x i4xhttps://goo.gl/H5E2JN (It has a good failsafe for the weapon but is very heavy!)
I use this FS2A 4CH AFHDS 2A Mini Compatible Receiver - https://www.banggood.com/Flysky-FS2A-4CH-AFHDS-2A-Mini-Compatible-Receiver-PWM-Output-for-Flysky-i6-i6X-i6S-p-1214269.html?rmmds=search
But its tricky to get the weapon running off it. It requires mixing channels so that ch3 can be mapped to a Var pot on the transmitter for better control of the spin speeds.
MISC:
2 cable ties to mount the drive motors. needs to be within 2.5-3mm wide and 2mm thick to fit into the motor mount holes. I use these and they are perfect! https://www.bunnings.co.nz/crescent-100-x-2-5mm-black-cable-ties-25-pack_p00319542
1 x spacer to fit between weapon and body wall, on the side opposite the motor.
I used a 10mm OD, 1.5mm thick, with 3mm inner hole.
1 x weapon mount bolt. Goes through the body, then screws into the body.
I used a m2 x 35mm long bolt.
1 x Flanged bearing for the drum mount, opposite the motor. ID 2mm OD 5mm Width 3mm
eg: https://mecha4makers.co.nz/product/ball-bearing-flanged-id-2mm/
1 x 2mm Screw, +-20mm long. Used to mount the drum, opposite the motor. Goes through the flanged bearing. You need long enough to give enough support to the drum as this wears all the impact. 2mm has been strong enough so far, but bigger is better if you have spare weight.
6 x weapon teeth. I used counter sunk m2.5 x 5mm screws. These fit the holes made in the drum teeth face already.
OCT update - this bot has been entered in the EndBots design competition here:http://forum.endbots.com/thread/41/endbots-design-contest-october-2018
Be sure to check them out, they are instrumental in forwarding the sport in AU so give them your live. O and enter any bot you want too!
This is a 150g Antweight Drum Spinner BattleBot.
A few recent fights with V2.https://youtu.be/Prl7PghuMDYhttps://youtu.be/wxlJHwt8pHAhttps://youtu.be/8xXINkV_zuI
This runs this electronics kit - https://combatrobotics.co.nz/product/antweight-bot-kit-pusher/
The wiring guide is here and very simple - http://combatrobotics.co.nz/antweight-bot-kit-build-guide/
You just need a Weapon motor and Weapon ESC.
Its designed to fit into a 100x100mm cube box as per New Zealand Antweight regulations.
Help a guy out and throw me a like to keep me motivated.
TIP me if you want this design to continue on with updates as I patch weaknesses found after my fights.
Design Notes:
The Motor mount has a sunk channel for the motor cable to sit in safely away from the weapon and to pass through the firewall into the body cavity.
I use black electrical tape to keep all components inside the body. I just wrap it around the entire body. This isn't elegant, but works well. Once I get the ESC weight down this will allow for a top plate to be added. I am thinking of a clear polycarb plate cover.
The Drive motors are easily quick tie mounted to little blocks. There are holes in the design for the ties to pass through. These perfectly align the motor flush to the body, keeping the cogs safely protected. Note the ties will fit inside the motor plates, so make sure you turn the motors around so the side with least cogs points out, otherwise the tie could rum on the cogs!
The weapon mount arms are susceptible to horizontal spinners. If you commonly face one (eg: Shrapnel) then put a 5mm wide, strip of .4mm thick aluminum strip down each side. Use double sided 3M anti vibration tape to mount this, adding further shock protection to the brittle PLA plastic. Both of these are common to most model shops. Beware of weight!
I have not yet tried, but suggest looking at adding a flanged bearing to the weapon mount opposite the motor. I have tried with a coper sleeve which gets hot and I am worried will be a point of failure.
Bill of materials V3 Costs ESTIMATES (AUD as of Oct 18)
Specifics of each and alternative upgrades/ downgrades are explained below.
Printing: Who know's depends on so much eg filament, DIY etc??
Transmitter $17
Wheels $5
LIPO 2s $21 for 5 pack.
Drive motors and ESC combo $12.70 + Shipping form US>
Weapon motor $14.70
Weapon ESC $11.83
Motor bearing $2
Motor mount screw $1
Switch, 2x 3mm quickties, JST battery plug, plastic wedges, other misc ?? $few dollars.
Magnet (optional $3)
(Not factored in: Battery charger, Receiver - recommendations below)
UPDATES: Version 2
Drum V2 - [REDESIGN+ New File]After a big hit against another spinner, the drum sheared in two where the motor mount was. This is a weakness due to the nature of 3D printing. To fix this I redesigned the drum with two 1.5mm holes that go the entire way through the body. You can then press a 1.4mm piano wire through the body thus making the drum ridged. It also ads weight to the outer edge adding to the weapons effectiveness. Files and pics of the process added.
Lighter Transmitter
I use this FS2A 4CH AFHDS 2A Mini Compatible Receiver - https://www.banggood.com/Flysky-FS2A-4CH-AFHDS-2A-Mini-Compatible-Receiver-PWM-Output-for-Flysky-i6-i6X-i6S-p-1214269.html?rmmds=search
But its tricky to get the weapon running off it. It requires mixing channels so that ch3 can be mapped to a Var pot on the transmitter for better control of the spin speeds.
google it and their are wiring diagrams out there. Message me if you want help mixing. It may motivate me to write the guide.
Flanged Bearing Drum Mount [New Component] Prior I used a sintered copper sleeve as the drum mount sleeve. It got too hot and melted the plastic in battle. I replaced this with a ID2mm Flanged bearing (details below). This eliminated the heat issue and also made the drum run smoother with less vibrations! Highly recommended. No design change is needed, just drill the mount hole opposite the motor to the desired size. Mount the flange inside the body, (see picture)
Drive Motor ESC V2 - [New Component] I have now started running these ":DC Micro Metal Gear Motor with built in Drivers - 50:1"
They are very reliable, very very light, and save so much internal space! (See added pic)
Wiring is a little tricky as they need power, (If anyone can help me drawing a wiring diagram for everyone please message me)
Magnets - [TIP] In New Zealand we run on a metal arena floor, and have no rules against magnet use. I have added a strong N52 magnet to the bottom of the body just in front of the wheels. (see pic) I simply drilled into the body and glued them in, sunken in by 0.5mm to prevent it sticking to floor. This gives added traction for pushing and eliminated any steering issues caused by vibrations of the drum after a few hits and it being slightly unbalanced.
Plastic Film scoop - [TIP] running a very thin plastic film strip across the font helps me get under most opponent. Its mounted with double sided tape, which allows you to replace between battles ensuring a sharp clean edge in every battle.
Weapon Motor - [New Component] - Untested: This motor is apparently the same form factor as the DYS BE1104; but has a much lower KV value of (4000kv). Lower k, means less rpm (slower) but more torque for a given voltage. Slower means you can get a good bite on the other bot per revolution. Too fast and you just end up grinding the other bot, not biting or throwing them. https://rotorxracing.com/products/rx1104-brushless-outrunner-motor?variant=1144930317
If you run the DYS - just run it at half speed or lower for best results.
UPDATES: Version 3
Printed in White PETg for added strength. See the pics.
1) Add a lid to the design. It slots into body and locks into firewall. However it still uses tape to secure the lid down.
2) The motors kept moving slightly, so I put lips onto the mounts to better secure them.
3) Added holes to fire wall to allow motors to be easily swapped in the pits, no more threading wires through the little holes in V1,V2.
4) Added more filleting to some of the back to add strength.
5) Increased the wheel arch diameter. Allows you to add silicon to the 40mm foam wheels for added grip.
Main Components:
Wheels: 2 x40mm Tamiya Foam Wheels. (Can replace with 40mm DShaft Pololu wheels)
Drive Motors: 2 x N20 6v Geared Motors 300-600rpm
(Get slower if you compete in a small arena. If you get the i6x below get the 600rpm, you can setup duel rates on the transmitter to have slow/fast mode on a switch.)
Drive ESC:
2 xFingerTech tinyESC v2 - These are the best. But cost. $34.46CAD each!https://www.fingertechrobotics.com/proddetail.php?prod=ft-tinyESCv2
I used 2 of these, which work but add far too much weight and make fitting the components in very tricky. You also have to mod these to remove and shorten cables etc. Be warned. https://goo.gl/gRbFft -
Weapon Motor: 1 xDYS BE1104 - Brushless Motor 5400KV 2-3Shttps://goo.gl/2K8ekk (Get the lowest KV possible, to fast and the weapon wont bite the opponent. It comes with 2mm mounting bolts)
Weapon ESC: Yet to find one I'd be happy to recommend.
Turnigy Multistar 32bit 12A Race Spec ESC 2~4S (OPTO)
I am currently running this and am happy, but always looking for other options - https://hobbyking.com/en_us/multistar-32bit-12a-0-lite.html
Battery: Turnigy nano-tech 180mAh 2S 25~40Chttps://hobbyking.com/en_us/turnigy-nano-tech-180mah-2s-25-40c-lipo-pack-5pcs.html
Transmitter: FlySky i6 FS-i6 2.4G 6CH AFHDS RC Transmitter Without Receiverhttps://goo.gl/oJPHwo
Receiver: Flysky X6B 2.4G 6CH i-BUS PPM PWM Receiver for AFHDS i10 i6s i6 i6x i4xhttps://goo.gl/H5E2JN (It has a good failsafe for the weapon but is very heavy!)
I use this FS2A 4CH AFHDS 2A Mini Compatible Receiver - https://www.banggood.com/Flysky-FS2A-4CH-AFHDS-2A-Mini-Compatible-Receiver-PWM-Output-for-Flysky-i6-i6X-i6S-p-1214269.html?rmmds=search
But its tricky to get the weapon running off it. It requires mixing channels so that ch3 can be mapped to a Var pot on the transmitter for better control of the spin speeds.
MISC:
2 cable ties to mount the drive motors. needs to be within 2.5-3mm wide and 2mm thick to fit into the motor mount holes. I use these and they are perfect! https://www.bunnings.co.nz/crescent-100-x-2-5mm-black-cable-ties-25-pack_p00319542
1 x spacer to fit between weapon and body wall, on the side opposite the motor.
I used a 10mm OD, 1.5mm thick, with 3mm inner hole.
1 x weapon mount bolt. Goes through the body, then screws into the body.
I used a m2 x 35mm long bolt.
1 x Flanged bearing for the drum mount, opposite the motor. ID 2mm OD 5mm Width 3mm
eg: https://mecha4makers.co.nz/product/ball-bearing-flanged-id-2mm/
1 x 2mm Screw, +-20mm long. Used to mount the drum, opposite the motor. Goes through the flanged bearing. You need long enough to give enough support to the drum as this wears all the impact. 2mm has been strong enough so far, but bigger is better if you have spare weight.
6 x weapon teeth. I used counter sunk m2.5 x 5mm screws. These fit the holes made in the drum teeth face already.
Similar models
thingiverse
free

Flysky FS-i6 Phone mount for fpv
... transmitter user)
m5 machine screw with corresponding nut and washer is required for installing this onto the radio transmitter.
grabcad
free

Receptor FS2A 4CH mini
...receptor fs2a 4ch mini
grabcad
receptor for afhds signal.
thingiverse
free

Drum spinner battlebot remix
... rear to have more space for the battery and an on/off switch. i use a flysky fs2a mini receiver and a dual esc (both from ebay).
thingiverse
free

10 Channel iBus Receiver Mounting Bracket
...rom here https://www.ebay.co.uk/itm/8-18ch-mini-receiver-with-ppm-ibus-sbus-output-for-flysky-i6-i6x-afhds-2a-transm/222809018932
thingiverse
free

Clip-on Flysky I6/I6X gimbal and Switch Protector by NathanMichaelMoore
...-18: added version without tops for easier printing and also uploaded a step file for easier editing if people want to customize.
thingiverse
free

FlySky gimbal protector for FS-i6 by dudufreeride
...thingiverse
i have designed this to protect the gimbals and switchs of my flysky fs-i6x, and it would also fit a standard fs-i6.
grabcad
free

FlySky fs-i6 / fs-i6x gimbal protector
...x gimbal protector
grabcad
gimbal protector, tested on flysky fs-i6x
referenced from:
https://www.thingiverse.com/thing:3271745
thingiverse
free

Dollar Tree Timer mount for Flysky FS-i6 transmitter by alwaysbroke
... (face down)
use supports - i used grid style in cura
the sides and front are 2mm thick, so i used 1.8 walls so they print solid.
grabcad
free

Quadcopter
...ds rc transmitter with fs-ia6 receiver modules are used. other parts used in the project are modules that can be easily obtained.
thingiverse
free

Fpv monitor mount for Turnigy(Flysky) i6 by garMo
...y when tightened.
bolt and wingnut were created with customizer! http://www.thingiverse.com/apps/customizer/run?thing_id=193647
Jc2017
thingiverse
free

Spool Holder for Filament Dry Box for NZ Tupperware by JC2017
...batrobotics.co.nz/product/50mm-m3-tapped-red-aluminum-standoff/
it still uses the standard 608zz bearings from the original tush
thingiverse
free

LowMow - Antweight Under Cutter Battle Bot by JC2017
...sing threaded inserts, and m2 bolts for strength and so you dont wear out the thread in the body taking the lid off and on again!
150G
turbosquid
$7

Toothpaste Tube 150g
...alty free 3d model toothpaste tube 150g for download as blend on turbosquid: 3d models for games, architecture, videos. (1635602)
turbosquid
$24

Zott Monte 150g 2021
...ree 3d model zott monte 150g 2021 for download as max and max on turbosquid: 3d models for games, architecture, videos. (1704110)
turbosquid
$24

Zott Monte White 150g 2021
... model zott monte white 150g 2021 for download as max and max on turbosquid: 3d models for games, architecture, videos. (1704112)
thingiverse
free

150g Fairyweight Undercutter Frame by InfernalTank
...150g fairyweight undercutter frame by infernaltank
thingiverse
150g fairyweight fighting robot
thingiverse
free

150g vert by Muffin578
...ert spinner.
uses 4 m3 screws, two n20 motors,
two zip tie for motor mounting
weapon motor arm is printed flat and glued in place
thingiverse
free

Rice Measure Cup 150g / ???????? ?? by mirrorboy
...rice measure cup 150g / ???????? ?? by mirrorboy
thingiverse
japanese like rice.
thingiverse
free

150g Combat Robot - Vendetta Jr by dkero4
... and sides. then covered with enough hot glue until 150g is reached.
m2.5 x 6mm screws for the lid
small slider switch for power.
thingiverse
free

150g Combat Robot - Dauntless by dkero4
...o, try with metal gears. not sure if better servos will fit.
weapon used 3mm bamboo skewers.
3x8x3 bearings for the front castor.
thingiverse
free

150g Combat Robot - Agitator by dkero4
...rpm
m3 screw and bolt for weapon axle.
3x8x3 bearings on the weapon.
m2.5 x 6mm screws for the lid
small slider switch for power.
thingiverse
free

150g Combat Robot - Menace by dkero4
...ars. not sure if better servos will fit.
weapon axles are 3mm bamboo
m2.5 x 6mm screws for the lid
small slider switch for power.
Antweight
thingiverse
free

Dropsaw antweight bot body
...dropsaw antweight bot body
thingiverse
chassis for dropsaw antweight battlebot
thingiverse
free
Dropsaw antweight bot tynes
...dropsaw antweight bot tynes
thingiverse
tynes for front of drawsaw antweight battlebot
thingiverse
free

Antweight Robot - 4W Drive by ACE_ROBOTICS
...antweight robot - 4w drive by ace_robotics
thingiverse
150g antweight robot
thingiverse
free

Antweight Robot - MINI Emoji by ACE_ROBOTICS
...antweight robot - mini emoji by ace_robotics
thingiverse
150g antweight robot
thingiverse
free

Antweight Robot - ACE by ACE_ROBOTICS
...antweight robot - ace by ace_robotics
thingiverse
150g antweight robot, based on our hw robot "ace"
thingiverse
free

Kidney Stone antweight by deadpoool
...antweight by deadpoool
thingiverse
this is an antweight battle bot i made for the hell of it. feel free to mod/remix this design
thingiverse
free

Robotwars Antweight inspired by Carbide by alexmordue
...robotwars antweight inspired by carbide by alexmordue
thingiverse
robotwars antweight robot inspired by carbide
thingiverse
free

G1 antweight pusher robot hull
...g1 antweight pusher robot hull
thingiverse
simple antweight combat robot design. created to be driven by two sg90 servo motors.
thingiverse
free

Hex Bug (antweight class battle bot) by TNPI2
...ter of an rc car. the drive motors are small yellow gearboxes which run at 3.3 volts and the battery is a 4.5 volt 650ma battery.
thingiverse
free
Antweight wedge combat robot by Team_Panic
...wedge, or cover it in aluminium tape
use "slightlycrudetopeyes" file to add a section of translucent plastic to the lid
Battlebot
thingiverse
free

1LB Battlebot by BryceTech
...1lb battlebot by brycetech
thingiverse
1lb battlebot
thingiverse
free

Ferocity - BattleBot Logo
...ferocity - battlebot logo
thingiverse
ferocity - battlebot keychain.
thingiverse
free

battlebot flipper grabber by teundedonder
...battlebot flipper grabber by teundedonder
thingiverse
a battlebot wip for a school project
thingiverse
free

Huge BattleBot by FLWE
...ttlebot by flwe
thingiverse
3d model inspired by the huge robot participating in battlebots.
wheels and weapon bar spin freely!
thingiverse
free

Battlebots Beater Bar by slinkous
...battlebots beater bar by slinkous
thingiverse
battlebots beater bar weapon assembly. for insect classes.
thingiverse
free

Mini-Nightmare (Battlebots)
...om battlebots! this model represents the 2016-2019 incarnation of nightmare with the new invertable arms and lack of wheel armor.
thingiverse
free

Battlebot "VIKAT" KEYCHAIN by Roolaid
...battlebot "vikat" keychain by roolaid
thingiverse
video
battlebot vs robot vacuum cleanerhttps://youtu.be/qbtvuft2kra
thingiverse
free

Battlebots Vikat by Roolaid
...battlebots vikat by roolaid
thingiverse
videohttps://youtu.be/qbtvuft2kra
thingiverse
free

Custom Battlebot MANGO wheels by WTDynamics
...custom battlebot mango wheels by wtdynamics
thingiverse
these are the files for custom battlebot mango wheels.
thingiverse
free

Deathroll Battlebot
...ntly the back of the frame that houses the self righting arm as well as the decorative crocodile heads are missing off the model.
Drum
3d_export
$5

drums
...drums
3dexport
drums
3d_ocean
$20

Drums
...iled model of drums. charleston,bass drum, tamtam drums, cymbal,etc. available in .blend, .obj, and .lwo format. ready for render
archibase_planet
free
Drum
...hibase planet
drum musical instrument tambour drum kit
drum taiko n091115 - 3d model (*.gsm+*.3ds) for interior 3d visualization.
design_connected
$9

Drum
...drum
designconnected
brent comber drum computer generated 3d model. designed by comber, brent.
turbosquid
$4

Drum 7 Drum 12
... model drum 7 drum 12 for download as max, max, fbx, and obj on turbosquid: 3d models for games, architecture, videos. (1641795)
3d_export
$15

Conga Drum
...conga drum
3dexport
conga drums
3d_export
$10

electro drums
...electro drums
3dexport
electro drums
3d_export
$5

electric drums
...electric drums
3dexport
electric drums
turbosquid
$1

Drum
...turbosquid
royalty free 3d model drum for download as blend on turbosquid: 3d models for games, architecture, videos. (1480093)
turbosquid
$1

Drums
...s
turbosquid
royalty free 3d model drums for download as max on turbosquid: 3d models for games, architecture, videos. (1240112)
Spinner
turbosquid
$5

Spinner
...turbosquid
royalty free 3d model spinner for download as max on turbosquid: 3d models for games, architecture, videos. (1190412)
turbosquid
$1

Spinner
...turbosquid
royalty free 3d model spinner for download as dwg on turbosquid: 3d models for games, architecture, videos. (1173525)
3d_export
$5
spinner toy
...spinner toy
3dexport
cool spinner toy.
turbosquid
$12

Spinner
...id
royalty free 3d model spinner for download as max and obj on turbosquid: 3d models for games, architecture, videos. (1242592)
turbosquid
$20

Spinner
...lty free 3d model spinner for download as obj, fbx, and blend on turbosquid: 3d models for games, architecture, videos. (1191800)
turbosquid
$15

spinner
...yalty free 3d model spinner for download as max, obj, and fbx on turbosquid: 3d models for games, architecture, videos. (1165932)
turbosquid
$2

Spinner
...oyalty free 3d model spinner for download as ma, obj, and fbx on turbosquid: 3d models for games, architecture, videos. (1187750)
turbosquid
free

Spinner
...lty free 3d model spinner for download as obj, fbx, and blend on turbosquid: 3d models for games, architecture, videos. (1230908)
turbosquid
$29

spinner
... free 3d model spinner for download as 3ds, obj, c4d, and fbx on turbosquid: 3d models for games, architecture, videos. (1471160)
turbosquid
$4

Spinner
...y free 3d model spinner for download as ma, max, obj, and fbx on turbosquid: 3d models for games, architecture, videos. (1201076)