Thingiverse

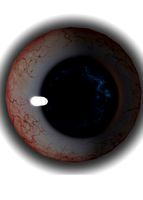
Animatronic mini Eye module by Mark_Valentijn
by Thingiverse
Last crawled date: 3 years ago
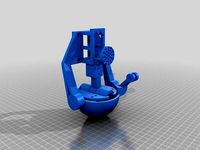
I designed a modular animatronic eye with commonly available parts. The eye module has up/down and left/ right movement as well as individually controllable top and bottom eyelids. It started with only an eye module but quickly grew to be an entire head. I only upload the eye for now because this is the most useful part. The rest is pretty custom. Made in the future I upload the rest.
The eye module size is only:
100mm long
45mm width
30mm height
All the parts where printed in ABS and treated with an acetone vapour bath to make everything very smooth. After the vapour bath all holes were drilled to the correct size because the ABS would deform a little during the process. Please note that some parts require extra sanding to make all parts fit. For example the eyelids have extra material around the holes for the ball bearings to make it easier to print. Don’t sand away to much material because the ABS will crack when pressing in the ball bearing(I messed up quite a few this way)
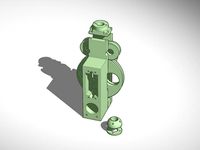
This is a list of all the hardware I used to made one eye:
4X MG90S mini servo
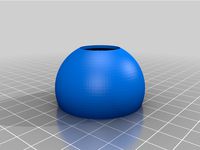
1x 22mm Reborn eye
6x MF63zz ball bearing
34x M2 nut
4x M3 lock nut
28x M2x12 screw
4x M2x5 screw
2x M3x12 screw
2x M3x12 screw sunk head
1x M3x10 screw sunk head
1x M3x10 hex spacer
1x Tamiya 5mm Ball Connector Long (19805825)
2x Tamiya 5mm Stabilizer Ball (15385)
2x Ball and roller link 3.9x2x16mm (230060x10)
2x 57x2mm rod with threat(old bicycle spoke)
2x 22x2mm rod (old bicycle spoke)
8x cable shoe with 2mm hole
I heated the three ball joints with a lighter and pressed them in the Eye coupler. When the plastic was still warm I pressed the plastic down to prevent the balls to pop out of the coupler. After some wiggling around the balls would move smoothly.
I used cable shoes which I modified a bit for the connecting rods but this is not an exact science. You can used other ways like Pushrod Linkage Stoppers or Ball connectors. I just didn’t have enough of these parts so I used the cable shoes.
When you want to make a pair of eye’s like I did. You just need to mirror all the parts and connect them together with two M2 spacers. All servo cables can exit through to back. I used 10mm spacers to make them as close together as possible but you can used any size you want. If you want a row of ten eyes or a dual row of eyes just keep coupling them together.
The sandwich plates are there because it wasn’t as solid as I hoped. There was a little bit of flex between two modules. So I made two plates out of 3mm acrylic. This made it very solid.
I made a short video to demonstrate the head.
https://www.youtube.com/watch?v=92OUb4uLUhk
All servo’s are controlled by a 32ch servo controller running a script on my laptop and sending commands to the controller over USB. These controllers are widely available on Ebay and other sites.
I'd like to see your applications and extension for this.
The eye module size is only:
100mm long
45mm width
30mm height
All the parts where printed in ABS and treated with an acetone vapour bath to make everything very smooth. After the vapour bath all holes were drilled to the correct size because the ABS would deform a little during the process. Please note that some parts require extra sanding to make all parts fit. For example the eyelids have extra material around the holes for the ball bearings to make it easier to print. Don’t sand away to much material because the ABS will crack when pressing in the ball bearing(I messed up quite a few this way)
This is a list of all the hardware I used to made one eye:
4X MG90S mini servo
1x 22mm Reborn eye
6x MF63zz ball bearing
34x M2 nut
4x M3 lock nut
28x M2x12 screw
4x M2x5 screw
2x M3x12 screw
2x M3x12 screw sunk head
1x M3x10 screw sunk head
1x M3x10 hex spacer
1x Tamiya 5mm Ball Connector Long (19805825)
2x Tamiya 5mm Stabilizer Ball (15385)
2x Ball and roller link 3.9x2x16mm (230060x10)
2x 57x2mm rod with threat(old bicycle spoke)
2x 22x2mm rod (old bicycle spoke)
8x cable shoe with 2mm hole
I heated the three ball joints with a lighter and pressed them in the Eye coupler. When the plastic was still warm I pressed the plastic down to prevent the balls to pop out of the coupler. After some wiggling around the balls would move smoothly.
I used cable shoes which I modified a bit for the connecting rods but this is not an exact science. You can used other ways like Pushrod Linkage Stoppers or Ball connectors. I just didn’t have enough of these parts so I used the cable shoes.
When you want to make a pair of eye’s like I did. You just need to mirror all the parts and connect them together with two M2 spacers. All servo cables can exit through to back. I used 10mm spacers to make them as close together as possible but you can used any size you want. If you want a row of ten eyes or a dual row of eyes just keep coupling them together.
The sandwich plates are there because it wasn’t as solid as I hoped. There was a little bit of flex between two modules. So I made two plates out of 3mm acrylic. This made it very solid.
I made a short video to demonstrate the head.
https://www.youtube.com/watch?v=92OUb4uLUhk
All servo’s are controlled by a 32ch servo controller running a script on my laptop and sending commands to the controller over USB. These controllers are widely available on Ebay and other sites.
I'd like to see your applications and extension for this.
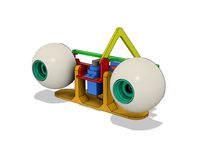
Similar models
thingiverse
free

Animatronic mini Ear module by Mark_Valentijn
...sb. these controllers are widely available on ebay and other sites.
i'd like to see your applications and extension for this.
grabcad
free

Animatronic Eyes
...nt all movement is controlled through servo sg90 motors.
all parts can be 3d printed and assembled, proper clearance is provided.
thingiverse
free

Animatronic lever for Bowden cable by Tioh
...e bicycle brake. i use them for puppet animatronics (controlling ears, eyelids or, the mouth of a rod-puppet with bowden cables).
thingiverse
free

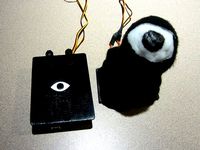
Animatronic Eye Mech by sideburn
...e back of the eyeball itself as shown in the snapshots.
video: https://www.youtube.com/watch?v=n3nvzmhascs&feature=youtu.be
thingiverse
free

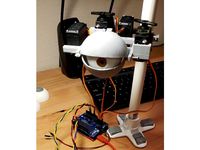
Camera Pan/Tilt Head by suromark
...gs
30mm x 5mm ø steel shaft
55mm x 8mm ø steel shaft
keystone network wiring module
m8 screw 60-100mm
m4 screws
m3 screws
washers
thingiverse
free

Animatronic Eye by mata
...d bike wheel spokes since those were hard enough and had a lot. for the eyelids i used small wood nails with the points cut off.
grabcad
free

RC Servo Robot Arm
...15
bolts and nuts:
- 4x m5x30 bolts
- 2x m5x20 bolts
- 4x m5x12 bolts
- 8x m5 nuts
- 1x m4x12 bolt
- 4x m3x12 bolts
- 3x m3 nuts
grabcad
free

Zack's Aquila Hotend Shroud R1
...for cr touch only)
2x m3 heat set inserts (for cr touch only)
(0x, 2x, 0r 4x) m3 washers for cr touch spacing (for cr touch only)
thingiverse
free

AM8 Upgrades by sobo84
...azsmz mini adapter: 4x m3x12 allen head screw or similar 4x locknuts m3 y belt tensioner: 5mm smooth rod...
thingiverse
free

Fursuit- or puppet-head base - version10 by Tioh
...that fits better in a puppet-sized head. the thickness if the plastic was increased because i wanted this head to be more robust.
Valentijn
artstation
$5

KNRM Valentijn Class - 3D Model
...rintable model.<br>files:<br>knrm_basecolor.jpg<br>knrm_normal.jpg<br>knrm_specular.jpg<br>knrm.fbx
3dwarehouse
free

Valentijn kast
...valentijn kast
3dwarehouse
3dwarehouse
free

valentijn hart
...valentijn hart
3dwarehouse
hart
3dwarehouse
free

Valentijn Amsterdam, The Netherlands
...valentijn amsterdam, the netherlands
3dwarehouse
modeled with building maker
3dwarehouse
free

The Sims Customs Valentijn Car
...obal prix racers rasshu gt 1990s. top speed: 500 km/h engine: supercharged v8 engine based on: global prix racers rasshu gt 1990s
3dwarehouse
free

Wolken :-)
...:-) 3dwarehouse wolken, wit, blauw #blauw #love #lucht #muur #valentijn #wit...
Animatronic
turbosquid
free
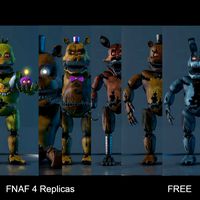
FNAF 4 Animatronic Replicas
... available on turbo squid, the world's leading provider of digital 3d models for visualization, films, television, and games.
thingiverse
free
animatronic eye by Twisttmann
...animatronic eye by twisttmann
thingiverse
this is the mechanic fore a simple animatronic eye.
thingiverse
free
Animatronic Tail by rwinscot
...animatronic tail by rwinscot
thingiverse
for costumes, cosplay, and animatronic cats! well... anything that has a tail.
thingiverse
free
Animatronic Eye Mechanism by Murtaza_Hassan
...animatronic eye mechanism by murtaza_hassan
thingiverse
3d design of a animatronic eye mechanism
thingiverse
free
Animatronic Eye Mechanism by Murtaza_Hassan
...animatronic eye mechanism by murtaza_hassan
thingiverse
3d design of a animatronic eye mechanism.
thingiverse
free
Animatronic Eye by johnbradley
...around when it is controlled by two knobs or via a webserver over a usb connection.
more at:http://makerjohn.com/animatronic-eye/
unity_asset_store
$20

Creepy Animatronic Anims
...low with the creepy animatronic anims asset from ramsterz. find this & other animations options on the unity asset store.
thingiverse
free

Animatronic Sunflower by Hendrikx
...r arduino codes, mp3 files and much more, please support me on patreon: http://www.patreon.com/hendrikxworkshop
thanks, enjoy it!
thingiverse
free
Animatronic Eye
... in action:https://youtu.be/t7kjidlbsdo
the controller used in the video was taken from:https://www.thingiverse.com/thing:2669820
thingiverse
free

animatronic shop arduino case by natmaxex
...animatronic shop arduino case by natmaxex
thingiverse
animatronic shop arduino casehttp://www.animatronicshop.com/
Mark
3ddd
$1
MARK - Ribbon
...mark - ribbon
3ddd
mark , ribbon
mark - ribbon
turbosquid
$20

mark
...squid
royalty free 3d model mark for download as 3ds and stl on turbosquid: 3d models for games, architecture, videos. (1445786)
3d_export
$5

road markings
...road markings
3dexport
construction of road markings
turbosquid
$99

Mark
... available on turbo squid, the world's leading provider of digital 3d models for visualization, films, television, and games.
3ddd
$1
Кресло Mark
...кресло mark
3ddd
mark , david casadesus
760x850x800
david casadesus · 2008
3d_export
$5

check mark and cross mark
...max 2015,cinema4d obj fbx stl dwg dxf warning:dont forget to active turbosmooth after final modeling. enjoy 3d modeling good luck
3ddd
free
Mark Albrecht Chair
...mark albrecht chair
3ddd
mark albrecht
mark albrecht chair
design_connected
$16

Question Mark
...question mark
designconnected
tonon question mark chairs computer generated 3d model. designed by stefan heiliger.
turbosquid
$20
Bed Mark
...d
royalty free 3d model bed mark for download as max and obj on turbosquid: 3d models for games, architecture, videos. (1565907)
turbosquid
$60

Mark IV
...oyalty free 3d model mark iv for download as ma, obj, and fbx on turbosquid: 3d models for games, architecture, videos. (1515462)
Eye
3ddd
$1

Best / Eye Eye
...пристенная best eye eye.
1660 полигонов.
wall mounted range hood best eye eye.
1660 polygons.
file: max 2010, 2012; fbx; obj.
3d_export
$5

eyes
...eyes
3dexport
eyes
3d_ocean
$5

3D EYE
...ocean
body cornia dynamic eye eye eyes human human eye iris nurbs eye organ
detailed eye . purchase and use it for any purpose ..
3d_ocean
$5
3d Eye
...3d eye
3docean
3d eye eyes
this is 3d eye model
3d_export
$5

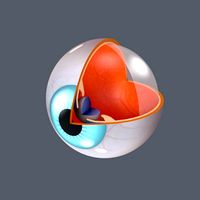
Human eye
...human eye
3dexport
human eye, iris, eyeball, eye anatomy
turbosquid
free

Eye
...eye
turbosquid
free 3d model eye for download as c4d on turbosquid: 3d models for games, architecture, videos. (1429061)
turbosquid
free

Eyes
...eyes
turbosquid
free 3d model eyes for download as blend on turbosquid: 3d models for games, architecture, videos. (1153269)
turbosquid
$25
eye
...e
turbosquid
royalty free 3d model eye for download as blend on turbosquid: 3d models for games, architecture, videos. (1371896)
turbosquid
$10

Eye
...eye
turbosquid
royalty free 3d model eye for download as c4d on turbosquid: 3d models for games, architecture, videos. (1303492)
turbosquid
$5

Eye
...e
turbosquid
royalty free 3d model eye for download as blend on turbosquid: 3d models for games, architecture, videos. (1343488)
Module
turbosquid
$4

Module
...
turbosquid
royalty free 3d model module for download as max on turbosquid: 3d models for games, architecture, videos. (1259603)
3d_export
free

Martian module
...martian module
3dexport
martian module objects 18 textures are missing
design_connected
$39

Kennedee Moduls
...kennedee moduls
designconnected
kennedee moduls computer generated 3d model. designed by massaud, jean-marie.
design_connected
$39
Sayonara Moduls
...sayonara moduls
designconnected
bbb emmebonacina sayonara moduls computer generated 3d model. designed by decursu, giorgio.
design_connected
$27

Togo Moduls
...togo moduls
designconnected
ligne roset togo moduls computer generated 3d model. designed by ducaroy, michel.
design_connected
$34

Nuvola Moduls
...nuvola moduls
designconnected
bonaldo nuvola moduls 2-seater computer generated 3d model. designed by giuseppe viganò.
3d_export
free
Hibernation module
...hibernation module
3dexport
design_connected
$27
Sabi moduls
...sabi moduls
designconnected
paola lenti sabi moduls 2-seater computer generated 3d model. designed by francesco rota.
3d_export
$50

pls concrete module
...pls concrete module
3dexport
pls concrete module<br>pls with concrete mobile mixer module m5
turbosquid
free

Hibernation module
...squid
free 3d model hibernation module for download as blend on turbosquid: 3d models for games, architecture, videos. (1667696)
Mini
turbosquid
$10

Mini Mini Luceplan
...
royalty free 3d model mini mini luceplan for download as max on turbosquid: 3d models for games, architecture, videos. (1227359)
3d_ocean
$39

Mini Cooper
...mini cooper
3docean
cabrioler cooper mini
mini cooper cabrioler
3d_export
$30

Mini lathe
...mini lathe
3dexport
mini lathe
3d_export
$5

mini mouse
...mini mouse
3dexport
mini mouse
3d_export
$5

mini house
...mini house
3dexport
mini house
3d_export
free

Mini Mecha
...mini mecha
3dexport
concept of mini mecha
3d_ocean
$20

Mini Gun
...mini gun
3docean
gatling gun gun machine gun mini gun weapon
model of a mini gatling gun.
3ddd
free

Herve mini
... кофейный , herve
http://www.mobiliavenanti.it/ru/products/hervè-mini
3d_export
$5

mini wall
...mini wall
3dexport
mini wall for living room
3d_export
$5

mini bank
...mini bank
3dexport
mini bank 3d model