Thingiverse
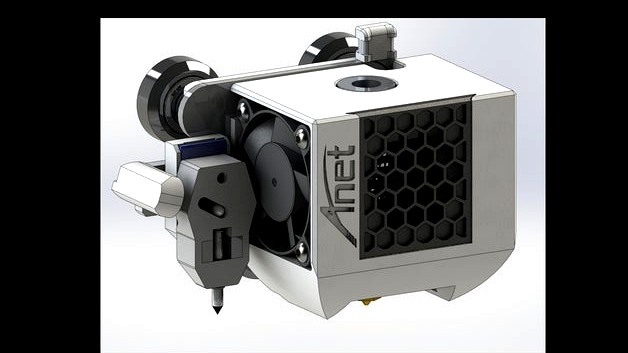
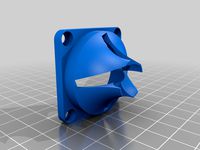
Anet ET5 Shroud for E3D Lite 6 Hotend by PrintorElse
by Thingiverse
Last crawled date: 3 years ago
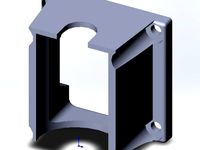
While looking for a visually appealing shroud design for my new E3D hotend, I came across Ammar Faridi's profile (ammaryasir) with many great shroud designs.
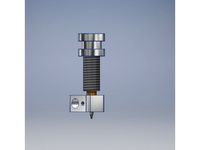
I decided to modify his 'AYF Compact shroud for E3D V6' to fit my Anet ET5 Pro printer with my new E3D Lite 6 Hotend and my Touch-Mi ABL probe.
The design should also be suitable for Anet ET4 printers.
Contrary to the original design, the housing consists of a single body.
The Hotend holder and the housing are separated parts. The Hotend holder is fastened to the X carriage of the printer and the housing with the fans is simply pushed down on from the top.
This means that only the Hotend mount has to be printed from thermostable material. The housing, for example, can be made of easy-to-print PLA.
The original fans can be re-used.
The following instructions have been prepared to the best of the author's knowledge and belief. The realization is at your own risk. No responsibility is assumed for damage or injury.
The modification of the hotend requires a printer flashed with Marlin firmware
(recommended: Marlin 2.0)
Please note that the E3D hotend in this design is placed higher than the original hotend. It may be necessary to adjust the bed to a higher position so that the nozzle can reach it.
Required tools:
M2 thread cutter
M3 thread cutter
Standard tools
1x M3x4 ISO 7380 pan-head screw (Probe Mount)
2x M3x8 ISO 7380 pan-head screw (Hotend Mount)
2x M3x12 ISO 7380 pan-head screw (Hotend Bracket)
1x M3x8 ISO 7380 pan-head screw + M3 hex nut (for Standard Probe)
1x M3x12 ISO 7380 pan-head screw + M3 t-slot nut (for Touch-Mi Probe)
Assembly:
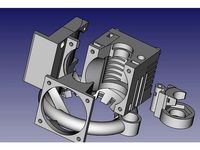
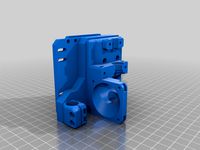
The assembly of the individual parts can be taken from the enclosed exploded-view drawing.
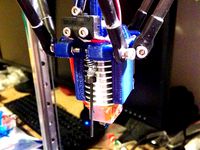
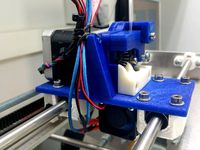
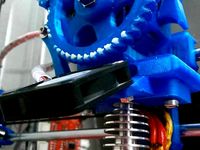
For the assembly, it is recommended to remove the X carriage beforehand. Take this opportunity to check whether the eccentric V-slot wheel of your printer has been mounted correctly. In my case, a washer was missing, so that the entire eccentric wheel was not sitting straight on the carriage (see also attached picture).
-Cut the M3 threads for the hotend bracket into the hotend mount and attach the hotend mount components and the ready-assembled E3D hotend to the X carriage.
-Move the X carriage back on the X axis.
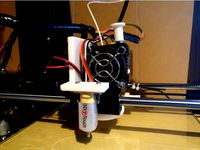
-Cut the M2 and M3 threads into the shroud body and attach the axial and radial fan with the original screws.
-Slide the shroud housing onto the hotend holder from above. Make sure that the cables of the hotend and the cables of the sensor and the fans are in the designated channels and are not squeezed.
-After all cables are reconnected, secure the harness to the strain relief with a cable tie.
Firmware:
In addition to the changes in the Marlin printer firmware for the E3D Hotend (see E3D Installation Guide), the new probe and bed center position must also be defined in Marlin:
New Probe position.
In configuration.h set nozzle offset to:
" #define NOZZLE_TO_PROBE_OFFSET { -44, +4.8, 0 } "
The z-value can be determined and set with the Marlin Z probe wizard (printer configuration menu).
New bed center position.
In configuration.h set Y min position to 0:
" #define Y_MIN_POS 0 "
In configuration.h activate manual Y home position by removing the //:
" #define MANUAL_X_HOME_POS 0 "
In configuration.h set the manual Y home position to -26:
" #define MANUAL_Y_HOME_POS -26 "
Touch-Mi Probe:
In my design I use the Touch-Mi ABL probe from Hotends.fr, which I highly recommend for the Anet ET5 printer.
If you want to know how to install the wiring of the Touch-Mi to the Anet ET5 check out my other designs:https://www.thingiverse.com/thing:4778467https://www.thingiverse.com/thing:4777704
I decided to modify his 'AYF Compact shroud for E3D V6' to fit my Anet ET5 Pro printer with my new E3D Lite 6 Hotend and my Touch-Mi ABL probe.
The design should also be suitable for Anet ET4 printers.
Contrary to the original design, the housing consists of a single body.
The Hotend holder and the housing are separated parts. The Hotend holder is fastened to the X carriage of the printer and the housing with the fans is simply pushed down on from the top.
This means that only the Hotend mount has to be printed from thermostable material. The housing, for example, can be made of easy-to-print PLA.
The original fans can be re-used.
The following instructions have been prepared to the best of the author's knowledge and belief. The realization is at your own risk. No responsibility is assumed for damage or injury.
The modification of the hotend requires a printer flashed with Marlin firmware
(recommended: Marlin 2.0)
Please note that the E3D hotend in this design is placed higher than the original hotend. It may be necessary to adjust the bed to a higher position so that the nozzle can reach it.
Required tools:
M2 thread cutter
M3 thread cutter
Standard tools
1x M3x4 ISO 7380 pan-head screw (Probe Mount)
2x M3x8 ISO 7380 pan-head screw (Hotend Mount)
2x M3x12 ISO 7380 pan-head screw (Hotend Bracket)
1x M3x8 ISO 7380 pan-head screw + M3 hex nut (for Standard Probe)
1x M3x12 ISO 7380 pan-head screw + M3 t-slot nut (for Touch-Mi Probe)
Assembly:
The assembly of the individual parts can be taken from the enclosed exploded-view drawing.
For the assembly, it is recommended to remove the X carriage beforehand. Take this opportunity to check whether the eccentric V-slot wheel of your printer has been mounted correctly. In my case, a washer was missing, so that the entire eccentric wheel was not sitting straight on the carriage (see also attached picture).
-Cut the M3 threads for the hotend bracket into the hotend mount and attach the hotend mount components and the ready-assembled E3D hotend to the X carriage.
-Move the X carriage back on the X axis.
-Cut the M2 and M3 threads into the shroud body and attach the axial and radial fan with the original screws.
-Slide the shroud housing onto the hotend holder from above. Make sure that the cables of the hotend and the cables of the sensor and the fans are in the designated channels and are not squeezed.
-After all cables are reconnected, secure the harness to the strain relief with a cable tie.
Firmware:
In addition to the changes in the Marlin printer firmware for the E3D Hotend (see E3D Installation Guide), the new probe and bed center position must also be defined in Marlin:
New Probe position.
In configuration.h set nozzle offset to:
" #define NOZZLE_TO_PROBE_OFFSET { -44, +4.8, 0 } "
The z-value can be determined and set with the Marlin Z probe wizard (printer configuration menu).
New bed center position.
In configuration.h set Y min position to 0:
" #define Y_MIN_POS 0 "
In configuration.h activate manual Y home position by removing the //:
" #define MANUAL_X_HOME_POS 0 "
In configuration.h set the manual Y home position to -26:
" #define MANUAL_Y_HOME_POS -26 "
Touch-Mi Probe:
In my design I use the Touch-Mi ABL probe from Hotends.fr, which I highly recommend for the Anet ET5 printer.
If you want to know how to install the wiring of the Touch-Mi to the Anet ET5 check out my other designs:https://www.thingiverse.com/thing:4778467https://www.thingiverse.com/thing:4777704
Similar models
thingiverse
free

Anet ET 5 Touch-Mi Mount by PrintorElse
....
there are suitable instructions for this on youtube (e.g. from crosslink: 'bed centering with marlin firmware 1.1.x' ).
thingiverse
free

Anet ET5 Shroud for original Hotend by PrintorElse
...
the remix was made on request and has not been tested by myself. a feedback or suggestions for improvement would be appreciated.
thingiverse
free

Anet A8 Sensor mount for TNS's E3d V6 Carriage Mount by AlexLiu
..."#define front_probe_bed_position 51"
note: if you added a custom offset, adapt the y-parameters above correspondingly!
thingiverse
free
Mini Kossel Effector for E3D Hotend with Z Probe by Thorpydo
...p screws are under z probe.
v4 are the originals
v5 reflects the changes florian requested; screw heads sitting outside clamp
thingiverse
free

18mm Sensor mount (without Cable duct) for Anet A6 E3D Direct Drive Carriage by Xploder270
...issing, so here it is.
"#define x_probe_offset_from_extruder -20"
"#define y_probe_offset_from_extruder -10"
thingiverse
free

E3D Hemera for Creality with TriangleLab Filament Sensor
...quot;#define nozzle_to_probe_offset { -43, -1, 0 }"
you will need 2 m3 x 30 screws and m3 nuts to mount the filament sensor.
thingiverse
free

E3D V6 Mount Geeetech A10 A10M A20 A20M by firepower9966
...s it suits your build.
there is 2 version of fans and probes mounts using m2 or m3 screws, and 2 versions of backplate m2 and m3.
thingiverse
free

E3D V6 Hotend Mount For Creality Printers by 3DQue
...th support interface and 0.2mm support z distance.
probe mount hardware:
2x m3 x 6 cap screw
1x m3 x 25 cap screw
1x m3 hex nut
thingiverse
free

Anet A8 V6 hotend and sensor carriage by aborders
...nd sensor carriage by aborders
thingiverse
mount for e3d v6 hotend clone on anet a8 3d printer with 18mm sensor mount included
thingiverse
free
Anet A6 BLTouch/3DTouch mount (front) by thvranken
...isplay or with command m851) and saved to the eeprom (using the display or with command m500), in my case, this was around -2 mm.
Printorelse
thingiverse
free
Anet ET5 Shroud for original Hotend by PrintorElse
...
the remix was made on request and has not been tested by myself. a feedback or suggestions for improvement would be appreciated.
thingiverse
free

Filament runout sensor holder for BMG Extruder by PrintorElse
...iginal extruder)
2x m3x20 screw
2x m3 hex nut
2x m3x8 screw
2x m3 washers
update 03/14/2021
step file added for customization.
thingiverse
free

LM2596S Converter Housing for Anet ET4 / Anet ET5 by PrintorElse
...
the design fits the anet et4 / anet et5 series.
of course, it can also be universally attached to any suitable aluminum profile.
thingiverse
free
Anet ET 5 Touch-Mi Mount by PrintorElse
....
there are suitable instructions for this on youtube (e.g. from crosslink: 'bed centering with marlin firmware 1.1.x' ).
Et5
thingiverse
free

ANET ET5 by ziouahmed
...anet et5 by ziouahmed
thingiverse
thingiverse
free

Anet ET5 universal spooladapter by Vanny
...will block the spoll from running freely. normal holes are no problemat all.
btw: @thingiverse add the et5 to your printerlist :p
thingiverse
free

Anet ET5 cable chain by santiis2010
...for the anet et5, it is still missing the pice to screw this to the body of the printer but works perfect on the side of the bed.
thingiverse
free

RacerX ET5 LuckyBox Buzzer Mount by JTR1
...here:
canopy : https://www.thingiverse.com/thing:4270167
nano rx and vtx basket mount : https://www.thingiverse.com/thing:4270129
thingiverse
free

TOOL BOX ANET ET5 by elayas84
...tool box anet et5 by elayas84
thingiverse
caja de herramientas para #anetet5pro
thingiverse
free

Anet ET5 Vibration Dampener by skampp
...ccommodate the anet et5 series. print using supports for the foot cup. forgive the stringing, didn't feel like re-printing.
thingiverse
free

Anet et4/ et4x / et5 Z axis mecanichal endstop by scorpio_man30ro
...anet et4/ et4x / et5 z axis mecanichal endstop by scorpio_man30ro
thingiverse
anet et4/ et4x / et5 z axis mecanichal endstop
thingiverse
free

Anet et4/ et4x / et5 Z axis mecanichal endstop by scorpio_man30ro
...anet et4/ et4x / et5 z axis mecanichal endstop by scorpio_man30ro
thingiverse
anet et4/ et4x / et5 z axis mecanichal endstop
thingiverse
free
![[Anet ET5] Spring for Ribbon Cable by marCenzeichen](/t/8107028.jpg)
[Anet ET5] Spring for Ribbon Cable by marCenzeichen
...y.
the spring has a lenght of 35 cm (= 350 mm) with an inner diameter of 38 mm.
the diameter of the spring cross section is 3 mm.
thingiverse
free

Cover Motor X-Axis Anet ET4/ET5 with endstop by Webmoon
...rse
use this cover if on dde in fan 4020 or stock motor extruder
for anet et4 a et5 if you used a hotend cart from ender3 / cr10
Lite
thingiverse
free

DS Lite Stylus
...ds lite stylus
thingiverse
ds lite stylus.
thingiverse
free

Huawei p20 Lite
...huawei p20 lite
thingiverse
great docking station for huawei p20 lite.
thingiverse
free
Lite Kroozer by Tsubureru
...lite kroozer by tsubureru
thingiverse
lite kroozer suitable for battlefleet gothic or similar space games.
thingiverse
free

Hornet XTpro Lite by Lynxtouchl5210
...hornet xtpro lite by lynxtouchl5210
thingiverse
a slinghsot that is lite :)
thingiverse
free

GoPro Lite Mount by DonMigel
...gopro lite mount by donmigel
thingiverse
gopro lite mount
thingiverse
free

MAG-LITE HOLDER by Sautech
...mag-lite holder by sautech
thingiverse
mag-lite holder
thingiverse
free

DS Lite Volume Slider
...ds lite volume slider
thingiverse
ds lite volume slider.
thingiverse
free

Taranis x9 Lite things
...taranis x9 lite things
thingiverse
somethings to taranis x9 lite
thingiverse
free

wind5 Lite by NoxesOne
...wind5 lite by noxesone
thingiverse
.
thingiverse
free

Huawei P30 Lite Case
...huawei p30 lite case
thingiverse
this is the case for cell phone huawei p30 lite.
Shroud
thingiverse
free

shroud by samshay317
...shroud by samshay317
thingiverse
shroud
thingiverse
free

Fan Shroud
...fan shroud
thingiverse
this is a fan shroud for a 140mm fan
thingiverse
free
40mm fan shroud
...40mm fan shroud
thingiverse
40mm fan shroud
thingiverse
free

40mm fan shroud
...40mm fan shroud
thingiverse
40mm fan shroud
thingiverse
free

40mm fan shroud
...40mm fan shroud
thingiverse
40mm fan shroud
thingiverse
free

40mm fan shroud
...40mm fan shroud
thingiverse
40mm fan shroud
thingiverse
free

40mm fan shroud
...40mm fan shroud
thingiverse
40mm fan shroud
thingiverse
free

40mm fan shroud
...40mm fan shroud
thingiverse
40mm fan shroud
thingiverse
free

Fan Shroud by Allyctric
...fan shroud by allyctric
thingiverse
a shroud for a pc fan.
thingiverse
free

Magicfly Shroud by Eli_Funt
...e rain. the screws that came with the product were what i used to mount the doorbell to the shroud, and then to the house siding.
E3D
thingiverse
free

E3D fan Duck adapted for e3D mount by tambu22
...e3d fan duck adapted for e3d mount by tambu22
thingiverse
just try to adapt it to e3d mount
thingiverse
free
Extruder for E3D by xtopolx
...extruder for e3d by xtopolx
thingiverse
extruder for e3d
thingiverse
free
E3D mount by crota
...e3d mount by crota
thingiverse
e3d mount
thingiverse
free

UNI 3D E3D
...uni 3d e3d
thingiverse
e3d for uni 3d
thingiverse
free

Nozzle Holder E3D 8x / Düsenhalter E3D 8x by Walkabout77
...nozzle holder e3d 8x / düsenhalter e3d 8x by walkabout77
thingiverse
nozzle holder e3d 8x
thingiverse
free
E3D Support by Mamath
...e3d support by mamath
thingiverse
integrate e3d heat, for 40mm fan
thingiverse
free

E3d Cyclop and E3d Chimera by TanManGuy
... modeled up the cyclop and chimera
if looking for a fan shroud for it
(check this out- http://www.thingiverse.com/thing:614803)
thingiverse
free
E3D by alex16
...e3d by alex16
thingiverse
enclosure cooling e2d
thingiverse
free

3D model E3D V6 extruder
...3d model e3d v6 extruder.
e3d v6 radiator
e3d v6 volcano nozzle
e3d v6 heat break
e3d v6 heater block
e3d v6 volcano heater block
thingiverse
free

E3D Hemera Model
...e3d hemera model
thingiverse
official mounting cad for designing your own custom mounts for the e3d hemera.
Hotend
thingiverse
free
hotend by fablab_lueneburg
...hotend by fablab_lueneburg
thingiverse
hotend model
thingiverse
free
Hotend for Graber
...hotend for graber
thingiverse
hotend complement pastes for graber printerhttps://youtu.be/0koxhnsuhdy
thingiverse
free
Hotend adapter by antaviana
...hotend adapter by antaviana
thingiverse
hotend adapter
thingiverse
free
hotend fan by mming1106
...hotend fan by mming1106
thingiverse
hotend fan
thingiverse
free

Hotend schema by ione
...hotend schema by ione
thingiverse
hotend project schema
thingiverse
free
Fabtotum XY Hotend holder for E3D Hotend
...s with integrated supports.
more for the project you can see here: https://kf-designs.com/2019/09/07/fabtotum-printer-conversion/
thingiverse
free
HotEnd Stand by onepointdiy
...tend, when you make your new hotend or repair your j-head or mg-plus hotend.
the hole of 16mm, please adjust using a reamer, etc.
thingiverse
free

fast magnetic hotend changer for Chimera Hotend by Draman
...chimera hotend !
and new basis (the hole from original is to small)
it is a remix form skimmy's fast magnetic hotend changer
thingiverse
free

Hotend Fan Adapter for MicroSwiss All Metal Hotend by jo_schi_man
...
thingiverse
little change for the hotend fan adapter to hold the microswiss all metal hotend (slightly longer and sharp edges).
thingiverse
free
Merlin Hotend by Alejanson
...merlin hotend by alejanson
thingiverse
this is a 1:1 drawing of the classic merlin hotend.
Anet
thingiverse
free

Anet by derbodesign
...anet by derbodesign
thingiverse
logo anet
thingiverse
free

Anet e10 , Anet v1.0 by jonathan_943D
...anet e10 , anet v1.0 by jonathan_943d
thingiverse
soporte de ventilador de 80mm, para controladora anet v1.0
thingiverse
free

Anet A8 Anet AM8 Y belt holder
...anet a8 anet am8 y belt holder
thingiverse
anet a8 anet am8 y belt holder
thingiverse
free

Anet A8 Probe Bracket for anet sensor by chelrix
...anet a8 probe bracket for anet sensor by chelrix
thingiverse
anet a8 probe bracket for anet official sensor and marlin firmware
thingiverse
free

Anet logo by JUST3D_PRNTNG
...anet logo by just3d_prntng
thingiverse
anet logo
thingiverse
free

Fan nozzle for Anet A8 with original Anet levelsensor by peteruhlmann
...et levelsensor by peteruhlmann
thingiverse
here is an improved fan nozzle for the anet a8 with original level sensor from anet.
thingiverse
free

Anet Et4 Box
...anet et4 box
thingiverse
tool box for anet et4
thingiverse
free

Anet Logo by Superflex_Plastic_Fantastic
...anet logo by superflex_plastic_fantastic
thingiverse
anet logo to incorporate into designs.
thingiverse
free

Box for Anet ET4
...box for anet et4
thingiverse
this is a simple box for tool of anet et4
thingiverse
free

Anet V1.0 Board Kühlung (80mm Lüfter) / Anet A8 by MadCre8
...anet v1.0 board kühlung (80mm lüfter) / anet a8 by madcre8
thingiverse
anet v1.0 board kühlung (80mm lüfter) / anet a8
6
thingiverse
free

Yellow Ring (6 of 6)
...yellow ring (6 of 6)
thingiverse
last one! please like and collect!
thingiverse
free

NO PHONE v.6/6+ by habib010
... v.6/6+ by habib010
thingiverse
new model based of the iphone 6 & 6+
thin is a prop of the "no phone" series vol.1
thingiverse
free

Gear Bearing 6 in 6 by suvakov
...gear bearing 6 in 6 by suvakov
thingiverse
pla / 0.2mm / infill 10% / no support
thingiverse
free

iPhone 6 / 6 plus screw tray by Anzymanz
...iphone 6 / 6 plus screw tray by anzymanz
thingiverse
iphone 6 / 6 plus screw tray
thingiverse
free

Werkzeugleiste 6 / Toolbar 6 by CBiker
...werkzeugleiste 6 / toolbar 6 by cbiker
thingiverse
werkzeughalter fuer verschiedene werkzeuge mit magnethalter.
thingiverse
free

iPhone 6 and 6 Plus by mattbeechan
...ngiverse.com/jerware) suggested dimensions.
6 plus in two pieces for small print beds. http://www.thingiverse.com/thing:458659
thingiverse
free

Numero 6 by Xbertus
...numero 6 by xbertus
thingiverse
numero 6
thingiverse
free

Iphone 6+ by nitsua8
...iphone 6+ by nitsua8
thingiverse
iphone 6+
thingiverse
free

dress2-6 by paulchancan
...dress2-6 by paulchancan
thingiverse
dress2-6
thingiverse
free

Bird-6- by Centaur
...bird-6- by centaur
thingiverse
bird-6-