Thingiverse

Anet A8 Z Endstop Fine Tuner by klownius
by Thingiverse
Last crawled date: 3 years ago
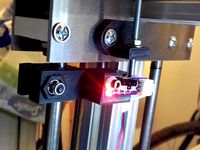
This is an amalgamation of several different mods that I used to create the Z Finely Adjustable Endstop that I needed. Basically, I purchased an autolevel sensor, but I didn't want to mess up my printer updating the firmware to get the sensor to work. I have heard good stories and horror stories.
With this mod, I really don't need an autolevel. I adjusted all four bed screws using A4 paper to get it level initially (one time). Before every print, I just make sure both carriages on the Z threaded rod are at the same height, and then I adjust the nozzle height with this mod using an A4 paper in the middle to check its height. Turn the dial to raise or lower, and home the Z Axis. Do this until the A4 paper has some resistance but not a lot of resistance. When I mess with the bed to install a mod or something, I have to re-do the four bed screws, but that is it.
I printed the barrel fatty part with the hole side up. I printed the top endstop part with supports.
This mod does go over a chain mod, this one specifically:
http://www.thingiverse.com/thing:1905344
If using a different one, please check to make sure this will fit over it. Also, you might need some spacers/washers behind the bottom part depending on your mod situation.
Hardware needed extra (reuse the endstop switch screws and the bolts and nuts the standard Z endstop uses):
4 x M3 Nuts
3 x M3 Washer
1 x M3 Lock Washer
1 x 40mm long (or longer) M3 Screw (any type head)
2 x M3 Screw (longer screws to fit through this mod, the chain, the carriage, and into the motor)
? x Washer/Spacers (as need be)
Need to know how to melt a nut into PLA/ABS. Screw an M3 nut to the very end of a long M3 screw. Use a lighter to heat up the nut for about 22 to 30 seconds (in the BLUE part of the flame - it can get a black coating if using the orange part). Line the nut up over the plastic part, and using the nut into the PLA/ABS with the hole centered. Push until the nut is all the way in, and it is flat (not tilted). Carefully unscrew the bolt, and let it cool in there.
Construction:
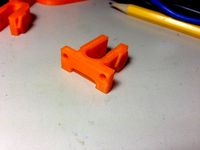
Print one of each of the parts. Melt a nut into the bottom of the thumb wheel (side without numbers). Melt another nut into the fatty endstop cap (the side with the hole).
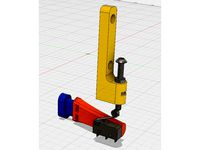
Slide a nut into the Z endstop top part (the little slot there). Screw the 40mm or longer bolt almost all the way in to that nut on the Z endstop top part (look at the picture to see orientation).
Screw an M3 nut onto the 40mm or longer bolt, followed by a lock washer, followed by a regular washer. Screw on the thumb wheel so the numbers are facing the Z endstop top, and do it ways up the bolt. Finally screw on the end cap fatty part all the way onto the bolt so that it is tight without moving (hand tightening is good enough).
Now, screw the thumbwheel down towards the fatty endcap until it is solidly against it, pretty tight (hand tightening is good enough). Push the washer and lock washer down on top of the thumb wheel. Finally, screw the M3 screw all the way down until it is down solid (use a wrench to tighten, but not over tighten).
Now, you should be able to turn the thumbwheel clockwise or counterclockwise so that the screw head near the slotty nut goes up or down. It should turn fairly easily. Vibration doesn't really change it, and I level it between prints, anyway, so there is no real need to lock it down.
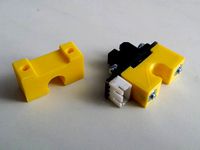
Unlike the other mod this was based off of, do NOT remove the switch arm - it provides a necessary function. When the nozzle head is too close to the bed, you turn the dial so that it pushes the switch arm down a little more (it will bend slightly, and that's fine). When the Z axis is homed, the nozzle will now be raised slight higher. Without the arm, it's not possible to screw it down any more to raise the nozzle - not so good.
Install the top part of the mod as seen in the picture. Install the bottom part of the mod by replacing the current Z endstop and brackets. Be sure that the fatty top part hits the bottom switch end square on. Adjust or use washers/spacers on the bottom part until it does so.
Make sure the carriage isn't over the heated bed when you try leveling initially. Move the thumb wheel until there is about the same amount of bolt space above and below the slotty nut. Set the bottom part to pretty much the bottom. Try homing the Z axis only (again, not over the bed) until it looks like the nozzle is at least 1mm above the bed. THEN and only THEN, try leveling over the bed using an A4 piece of paper.
There it is!
I would like to thank alexan9er and cd1701 for their awesome mods. Without people like them, this mod would not have been possible!
With this mod, I really don't need an autolevel. I adjusted all four bed screws using A4 paper to get it level initially (one time). Before every print, I just make sure both carriages on the Z threaded rod are at the same height, and then I adjust the nozzle height with this mod using an A4 paper in the middle to check its height. Turn the dial to raise or lower, and home the Z Axis. Do this until the A4 paper has some resistance but not a lot of resistance. When I mess with the bed to install a mod or something, I have to re-do the four bed screws, but that is it.
I printed the barrel fatty part with the hole side up. I printed the top endstop part with supports.
This mod does go over a chain mod, this one specifically:
http://www.thingiverse.com/thing:1905344
If using a different one, please check to make sure this will fit over it. Also, you might need some spacers/washers behind the bottom part depending on your mod situation.
Hardware needed extra (reuse the endstop switch screws and the bolts and nuts the standard Z endstop uses):
4 x M3 Nuts
3 x M3 Washer
1 x M3 Lock Washer
1 x 40mm long (or longer) M3 Screw (any type head)
2 x M3 Screw (longer screws to fit through this mod, the chain, the carriage, and into the motor)
? x Washer/Spacers (as need be)
Need to know how to melt a nut into PLA/ABS. Screw an M3 nut to the very end of a long M3 screw. Use a lighter to heat up the nut for about 22 to 30 seconds (in the BLUE part of the flame - it can get a black coating if using the orange part). Line the nut up over the plastic part, and using the nut into the PLA/ABS with the hole centered. Push until the nut is all the way in, and it is flat (not tilted). Carefully unscrew the bolt, and let it cool in there.
Construction:
Print one of each of the parts. Melt a nut into the bottom of the thumb wheel (side without numbers). Melt another nut into the fatty endstop cap (the side with the hole).
Slide a nut into the Z endstop top part (the little slot there). Screw the 40mm or longer bolt almost all the way in to that nut on the Z endstop top part (look at the picture to see orientation).
Screw an M3 nut onto the 40mm or longer bolt, followed by a lock washer, followed by a regular washer. Screw on the thumb wheel so the numbers are facing the Z endstop top, and do it ways up the bolt. Finally screw on the end cap fatty part all the way onto the bolt so that it is tight without moving (hand tightening is good enough).
Now, screw the thumbwheel down towards the fatty endcap until it is solidly against it, pretty tight (hand tightening is good enough). Push the washer and lock washer down on top of the thumb wheel. Finally, screw the M3 screw all the way down until it is down solid (use a wrench to tighten, but not over tighten).
Now, you should be able to turn the thumbwheel clockwise or counterclockwise so that the screw head near the slotty nut goes up or down. It should turn fairly easily. Vibration doesn't really change it, and I level it between prints, anyway, so there is no real need to lock it down.
Unlike the other mod this was based off of, do NOT remove the switch arm - it provides a necessary function. When the nozzle head is too close to the bed, you turn the dial so that it pushes the switch arm down a little more (it will bend slightly, and that's fine). When the Z axis is homed, the nozzle will now be raised slight higher. Without the arm, it's not possible to screw it down any more to raise the nozzle - not so good.
Install the top part of the mod as seen in the picture. Install the bottom part of the mod by replacing the current Z endstop and brackets. Be sure that the fatty top part hits the bottom switch end square on. Adjust or use washers/spacers on the bottom part until it does so.
Make sure the carriage isn't over the heated bed when you try leveling initially. Move the thumb wheel until there is about the same amount of bolt space above and below the slotty nut. Set the bottom part to pretty much the bottom. Try homing the Z axis only (again, not over the bed) until it looks like the nozzle is at least 1mm above the bed. THEN and only THEN, try leveling over the bed using an A4 piece of paper.
There it is!
I would like to thank alexan9er and cd1701 for their awesome mods. Without people like them, this mod would not have been possible!
Similar models
thingiverse
free

Hictop i3 Z Top Bearing Guide by chaoren
...olt in place with proper allen wrench and use a wrench to tighten jam nut down to the z top to prevent the bolt from backing off.
thingiverse
free

Monoprice MP Select Mini Z Axis Adjustable Endstop by divide
...o keep the spring from binding on the head of the screw.
reused:
limit switch m2 screws and nuts
x carriage shield plastic screw
thingiverse
free

Prusa Z Adjuster by lazzymonk
...2 nyloc nuts.
needs about 10mm overhang of the x axis smooth rods.
the blue thumb wheel is http://www.thingiverse.com/thing:29782
thingiverse
free
Anet A8 Z Axis End Stop Adjuster by FredGenius
...a knob to make adjusting easier.
you will need:
2x m3x18mm screws
2x m3 nuts
2x m3x25mm screws
1x m5x40mm hex bolt
1x m5 half nut
thingiverse
free

Tevo Black Widow - Z Endstop Adjustable by bdwalker1
... as well)
m3 washer
m3 thumb screw nut
parts for attaching mount to printer:
m4x8 screw (x2)
m4 washer (x2)
m4 drop-in t-nut (x2)
thingiverse
free

Z-Motor holder with precision Z-Axis calibration for Velleman K8200 / 3Drag by akkenoth
...m3 nut and 4x m3 washer to mount microswitch to plate
to mount z endstop screw block you can use original screw, washers and nut.
thingiverse
free

print bed thumb wheel by tanasibob
...lt with a washer to seat it properly... make this one of your first mods, you will not be sorry (if you dont have auto leveling.)
thingiverse
free

Ender 3 Adjustable Z Endstop Cryo by cryogen
...ing part of the bolt use the lock washed and nut to secure the bolt in the knob.
i use petg for long-term use of the item.
enjoy.
thingiverse
free

Folger Tech 2020 Prusa i3 Robust Adjustable Z Endstop by QuadBert
...spring), and through the square block and nut on the sensor mount part, then on out the top. put a washer and nylock nut on top.
thingiverse
free

Folger Tech Cloner Adjustable Z Endstop Mount by djcdude95
...ustment. much better than the stock design.
flip the top part so it is flat side down. (doesnt matter much which flat side it is)
Klownius
thingiverse
free

Spinner Star Sturdier by klownius
...how i roll...
thanks to m4jin and l1terally for doing what they do!
original thumb screw:http://www.thingiverse.com/thing:2274261
thingiverse
free

Anet A8 Heated Bed Handle by klownius
...e out over a greater area on the plastic thus reducing the pressure (defined as force/area) and lowering the chance for cracking.
thingiverse
free

Anet A8 9mm 6 Turn Spring Washers by klownius
...m/152247887255?_trksid=p2057872.m2749.l2649&sspagename=strk%3amebidx%3ait
customizer:http://www.thingiverse.com/thing:1804488
thingiverse
free

Anet A8 Y Axis Motor Mount Replacement by klownius
...naltered.
here is a link to the motor gaskets so that you know what i am talking about:http://www.makergeeks.com/ne17stga4pa.html
thingiverse
free

Anet A8 Improved Y-Belt Tensioner Bar by klownius
...is. all credit please to audiogod and freemark!
http://www.thingiverse.com/thing:2306072http://www.thingiverse.com/thing:1683085
thingiverse
free

Anet A8 Corner Brace Bottom Right Frame (Minimalistic) by klownius
...e.
see other side:http://www.thingiverse.com/thing:2105996
see upper braces by electrico:http://www.thingiverse.com/thing:1672959
thingiverse
free

Anet A8 Generic Spool Holder by klownius
... asked about it. it's built entirely of hardware store parts. i don't think any of the rods were specially cut, either.
thingiverse
free

Solder Fume Extractor (Minimalistic) by klownius
...o work, but i decided to use a brim. good old brim, nothing beats that. except a raft.
thanks:
thanks to zeebly for the design!
thingiverse
free

Anet A8 Corner Brace Bottom Left Frame (Minimalistic) by klownius
...e.
see other side:http://www.thingiverse.com/thing:2105106
see upper braces by electrico:http://www.thingiverse.com/thing:1672959
Tuner
archibase_planet
free

Tuner
...tuner
archibase planet
tuner
tuner - 3d model for interior 3d visualization.
3d_ocean
$16

Tuner
...here just for render of presentation. all formats includes tuner only. this is audio tuner and this is my own design. this tun...
turbosquid
$15

tuner
... available on turbo squid, the world's leading provider of digital 3d models for visualization, films, television, and games.
archive3d
free

Tuner 3D Model
...tuner 3d model
archive3d
tuner
tuner - 3d model for interior 3d visualization.
archive3d
free

Tuner 3D Model
...deo equipment
tuner digital bbk n250616 - 3d model (*.gsm+*.3ds) for interior 3d visualization.
turbosquid
$29

Shift Tuner
...osquid
royalty free 3d model shift tuner for download as fbx on turbosquid: 3d models for games, architecture, videos. (1236363)
turbosquid
$65

Tuner Card
...ty free 3d model tuner card for download as 3ds, max, and obj on turbosquid: 3d models for games, architecture, videos. (1299311)
turbosquid
$39

Radio Tuner
... available on turbo squid, the world's leading provider of digital 3d models for visualization, films, television, and games.
turbosquid
$10

Guitar Tuner
... available on turbo squid, the world's leading provider of digital 3d models for visualization, films, television, and games.
turbosquid
$29

Shift Tuner red
...id
royalty free 3d model shift tuner red for download as fbx on turbosquid: 3d models for games, architecture, videos. (1486834)
Endstop
thingiverse
free
Endstop-holder for endstop v1.2 by albiuz
...endstop-holder for endstop v1.2 by albiuz
thingiverse
endstop-holder designed for mech endstop v1.2
thingiverse
free
Endstop by 3dboxpro
...endstop by 3dboxpro
thingiverse
endstop
thingiverse
free

Endstop by 1sPiRe
...endstop by 1spire
thingiverse
endstop model for conceptions
thingiverse
free

Endstop holder for Opto or Mechanical endstops by LulzBot
... endstops by lulzbot
thingiverse
these are the standard 1.0 prusa endstops with an added mounting hole for mechanical endstops.
thingiverse
free

Endstop Holder by onurhamdiuzun
...endstop holder by onurhamdiuzun
thingiverse
endstop holder for makerbot endstop and other endstops
thingiverse
free

Endstop Cover
...endstop cover
thingiverse
cover for endstop boards for makerbot design.
thingiverse
free
Endstop Mount for optical Endstops by Whitehawk2000
...whitehawk2000
thingiverse
use two 20mm m3 screws and nuts to screw the endstop onto the mount and just clip it onto the 8mm rod.
thingiverse
free

C-beam endstop mount for Makerbot type endstops
...c-beam endstop mount for makerbot type endstops
thingiverse
c-beam endstop mount for makerbot type endstop boards.
thingiverse
free

Endstop Mount for MakerBot Mecanical Endstop. by nka
...v-slots carriage.
endstop is screw with m3 (8mm) tapped hole and the endstop hold on the extrusion using a m5 (8mm) and t-nuts.
thingiverse
free
ENDSTOP 10mm by desert500
...endstop 10mm by desert500
thingiverse
endstop
A8
turbosquid
$47

Car A8
...
turbosquid
royalty free 3d model car a8 for download as max on turbosquid: 3d models for games, architecture, videos. (1196060)
turbosquid
$50

Audi A8
...yalty free 3d model audi a8 for download as 3dm, obj, and fbx on turbosquid: 3d models for games, architecture, videos. (1580187)
turbosquid
$15

Audi A8
...lty free 3d model audi a8 for download as obj, fbx, and blend on turbosquid: 3d models for games, architecture, videos. (1387519)
turbosquid
$500

Audi A8
... available on turbo squid, the world's leading provider of digital 3d models for visualization, films, television, and games.
3d_export
$5

Audi A8 3D Model
...audi a8 3d model
3dexport
audi a8 cars car
audi a8 3d model ma 20351 3dexport
3d_export
$5

Audi A8 3D Model
...audi a8 3d model
3dexport
3d model of audi a8
audi a8 3d model badyaka 12136 3dexport
3d_ocean
$89

Audi A8 2010
...usiness car car class class f f german german luxury luxury s s s8 s8 sedan sedan vehicle vehicle
new audi a8 2010 detaled model.
turbosquid
$39

A8 2018
...a8 2018 for download as 3ds, obj, wrl, c4d, fbx, dae, and stl on turbosquid: 3d models for games, architecture, videos. (1345349)
turbosquid
free

audi a8 l
...rbosquid
royalty free 3d model audi a8 l for download as obj on turbosquid: 3d models for games, architecture, videos. (1663016)
3d_ocean
$45

Audi A8 restyled
...our door vehicle was created in blender3d 2.62.realistic renderings were created with yafaray 0.1.2 realistic plugin.rendering...
Anet
thingiverse
free

Anet by derbodesign
...anet by derbodesign
thingiverse
logo anet
thingiverse
free

Anet e10 , Anet v1.0 by jonathan_943D
...anet e10 , anet v1.0 by jonathan_943d
thingiverse
soporte de ventilador de 80mm, para controladora anet v1.0
thingiverse
free

Anet A8 Anet AM8 Y belt holder
...anet a8 anet am8 y belt holder
thingiverse
anet a8 anet am8 y belt holder
thingiverse
free

Anet A8 Probe Bracket for anet sensor by chelrix
...anet a8 probe bracket for anet sensor by chelrix
thingiverse
anet a8 probe bracket for anet official sensor and marlin firmware
thingiverse
free

Anet logo by JUST3D_PRNTNG
...anet logo by just3d_prntng
thingiverse
anet logo
thingiverse
free

Fan nozzle for Anet A8 with original Anet levelsensor by peteruhlmann
...et levelsensor by peteruhlmann
thingiverse
here is an improved fan nozzle for the anet a8 with original level sensor from anet.
thingiverse
free

Anet Et4 Box
...anet et4 box
thingiverse
tool box for anet et4
thingiverse
free

Anet Logo by Superflex_Plastic_Fantastic
...anet logo by superflex_plastic_fantastic
thingiverse
anet logo to incorporate into designs.
thingiverse
free

Box for Anet ET4
...box for anet et4
thingiverse
this is a simple box for tool of anet et4
thingiverse
free

Anet V1.0 Board Kühlung (80mm Lüfter) / Anet A8 by MadCre8
...anet v1.0 board kühlung (80mm lüfter) / anet a8 by madcre8
thingiverse
anet v1.0 board kühlung (80mm lüfter) / anet a8
Fine
3ddd
$1

Fine Art
...fine art
3ddd
fine art lamps
торшер fine art
3ddd
$1

Fine Art_Chandelier
...fine art_chandelier
3ddd
fine art lamps
fine art_chandelier, crystal enchantment
3ddd
$1

Fine Art
...fine art
3ddd
fine art lamps
люстра и бра fine art
3ddd
$1

Fine Art
...fine art
3ddd
fine art lamps
люстра для бильярда fine art
3ddd
$1

Fine Art
...fine art
3ddd
fine art lamps
торшер и бра fine art
3ddd
$1
Fine Art
...fine art
3ddd
fine art lamps , сша
бра fine art lamps (сша)
3ddd
$1
Fine Art
...fine art
3ddd
fine art lamps , сша
люстра fine art lamps (сша)
3ddd
$1

Fine Art
...fine art
3ddd
fine art lamps , сша
настольная лампа fine art lamps (сша)
3ddd
$1
Fine Art
...fine art
3ddd
fine art lamps
светильники fine art
люстра и бра 750640
3ddd
$1
Fine Art
...fine art
3ddd
fine art lamps
светильники фирмы fine art
бра 429850
торшер 452230
люстра 429540
Z
3d_export
$5

nissan z
...nissan z
3dexport
nissan z
3ddd
$1

Vase Z
...vase z
3ddd
vase z
3ddd
$1

полотенцесушить Z
...полотенцесушить z
3ddd
полотенцесушитель
полотенцесушить z
design_connected
free

Z-Chair
...z-chair
designconnected
free 3d model of z-chair designed by karman, aleksei.
design_connected
$11

Z Lamp
...z lamp
designconnected
phillips z lamp computer generated 3d model. designed by kalff, louis.
3d_export
$5

Dragon balls z
...dragon balls z
3dexport
dragon ball z
turbosquid
$20

Fighter Z
...
turbosquid
royalty free 3d model fighter z for download as on turbosquid: 3d models for games, architecture, videos. (1292563)
turbosquid
$9

Pen Z
...pen z
turbosquid
free 3d model pen z for download as obj on turbosquid: 3d models for games, architecture, videos. (1686775)
turbosquid
free

z chair
...z chair
turbosquid
free 3d model z chair for download as max on turbosquid: 3d models for games, architecture, videos. (1410230)
turbosquid
$5

Letter Z
...urbosquid
royalty free 3d model letter z for download as max on turbosquid: 3d models for games, architecture, videos. (1408540)