Thingiverse
Anet A8 Y Axis Leadscrew Conversion by 3DPrintVids
by Thingiverse
Last crawled date: 3 years ago
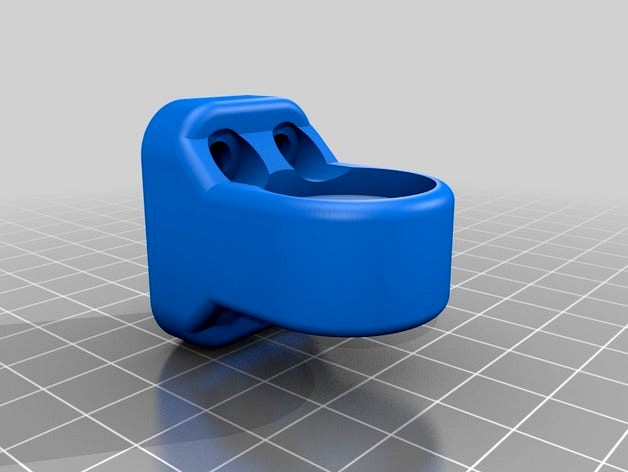
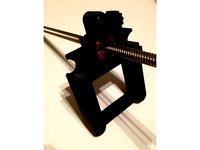
25/03/2018 UPDATE: Well, thats it, it's done, all the parts are designed, the drill holes templated, and it works, firmware change instructions are below... The only thing that may change is the addition of some frame bracing in the middle where i have cut out the centre, just need to do some cable tidying then it'll be time for a test print...
This is an Y Axis Leadscrew conversion for the popular Anet A8 3D Printer...
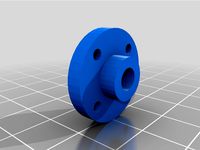
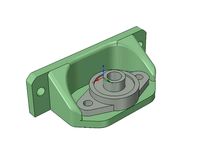
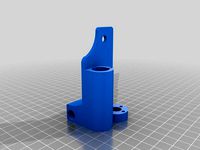
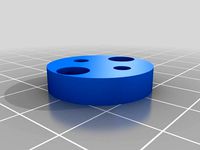
The plan is to run a bearing supported leadscrew with the Y axis motor mounted on the front.
Parts:
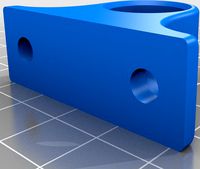
4 x M4 x 16 mm - For Lead Screw Nut Holder to Carriage
2 x M5 x 25 mm - For Front Bearing To Adapter Plate
2 x M5 x 20 mm - For Rear Bearing To Rear Frame
4 x M3 x 40 mm - For Stepper Motor
2 x M3 x 30 mm - To Affix Adapter To Base Board
1 x Leadscrew 8 x 400mm
2 x 8mm Bearings
1 x 8mm Anti Backlash Nut
Cable Extension JST-XT 4 Pin OR Cable/Solder/Heatshrink.
You will need to modify your firmware/speeds:
M92 Y400.00 - Set Steps Per MM to 400
M203 Y40.00 - Set Max Feedrate to 40 units/s
M201 Y100 - Set Max Acceleration to 100
M500 - Save Settings
M501 - Recall Saved Settings to check they are correct...
With a lead screw you can no longer pull the bed forwards, so if like me you want the printer to move the build plate to the front at the end of the print...
Add this to your end of print code box in your slicer/controller software - This moves the bed to the forward position but with no overhang...
G90 ;absolute positioning
G1 Y175;
M84 ;steppers off
Please leave any comments/suggestions below...
Watch these and other items being printed live on my new YouTube channel: Please Like & Subscribe... http://bit.ly/2FNOORr
Check out my new Facebook Page: http://fb.me/3DPrintChannel
This is an Y Axis Leadscrew conversion for the popular Anet A8 3D Printer...
The plan is to run a bearing supported leadscrew with the Y axis motor mounted on the front.
Parts:
4 x M4 x 16 mm - For Lead Screw Nut Holder to Carriage
2 x M5 x 25 mm - For Front Bearing To Adapter Plate
2 x M5 x 20 mm - For Rear Bearing To Rear Frame
4 x M3 x 40 mm - For Stepper Motor
2 x M3 x 30 mm - To Affix Adapter To Base Board
1 x Leadscrew 8 x 400mm
2 x 8mm Bearings
1 x 8mm Anti Backlash Nut
Cable Extension JST-XT 4 Pin OR Cable/Solder/Heatshrink.
You will need to modify your firmware/speeds:
M92 Y400.00 - Set Steps Per MM to 400
M203 Y40.00 - Set Max Feedrate to 40 units/s
M201 Y100 - Set Max Acceleration to 100
M500 - Save Settings
M501 - Recall Saved Settings to check they are correct...
With a lead screw you can no longer pull the bed forwards, so if like me you want the printer to move the build plate to the front at the end of the print...
Add this to your end of print code box in your slicer/controller software - This moves the bed to the forward position but with no overhang...
G90 ;absolute positioning
G1 Y175;
M84 ;steppers off
Please leave any comments/suggestions below...
Watch these and other items being printed live on my new YouTube channel: Please Like & Subscribe... http://bit.ly/2FNOORr
Check out my new Facebook Page: http://fb.me/3DPrintChannel
Similar models
thingiverse
free

Anet A8 E3D Extruder Carriage and X Axis Leadscrew Conversion by 3DPrintVids
...youtube channel: please like & subscribe... http://bit.ly/2fnoorr
check out my new facebook page: http://fb.me/3dprintchannel
thingiverse
free

Prusa MK3 Leadscrew Nut Adapter by b3n3d1k7
...itionally, 2 8mm long m3 screws and nuts for attaching the leadscrew nut to the adapter.
printed and tested - works great so far.
thingiverse
free

Prusa Steel X axis with tensioner and 8mm leadscrew support by fedewolfie
...ner and a m5 screw and nut for the toothed idler, i use a cheap aliexpress toothed idler with a m5 bore.
prints without supports.
thingiverse
free

Anet A8 Rear Brace with Y axis end stop by 3DMagicm
...thingiverse
rear brace for added support and stability for anet a8. also includes the y-axis end stop and stepper motor mount.
thingiverse
free

Anet A8 Plus z-axis synchronizer by toxic049
... gt2 gear
2 12mm diameter 6mm high bearings
2 605z 8mm bearings
6 m5 x 40 mm bolts
modifications:
move both z axis motors up 10mm
thingiverse
free

Anet A8 x-axis v-weel update by Lancerevo21
...te by lancerevo21
thingiverse
3x v-weel
4 x baring 10x5x4
5x m5 x 25 + nuts
6 x m3 nuts
2x m4 nuts
2x m4 x40 screw
12x m5 spacer
thingiverse
free

AM8 RAMPS Y axis endtop mount and target by PapaJohn88
...h
2 x m5 x 10mm screws
2 x m5 square nuts
printer:
anet a8
rafts:
no
supports:
no
resolution:
0.2 (i printed at .12)
infill:
20%
thingiverse
free

Y LM8UU Bearing Mount Anet A8 by Vali24
...ngs, no noises.
you need:
4x y bearing mount
8x m3 nut
8x m3 screw
it's remixed from https://www.thingiverse.com/thing:710913
thingiverse
free

Anet A8 Y-axis stepper mount with bearing
...anet a8 y-axis stepper mount with bearing
thingiverse
you need one bearing 625.
...not tested yet.
thingiverse
free

Cart X-axis Anet A8 by Giovanni1965
...mm v-slot pulleys with 5 mm hole, four m5 nuts, four m5 screws 20 mm long, eight m4 nuts, six 10 mm m4 screws, 2 40 mm m4 screws.
3Dprintvids
thingiverse
free

Anet A8 Extruder Button by 3DPrintVids
...tvids
thingiverse
i know there is a hundred of them out there already, but this is my take on an extruder button for an anet a8
thingiverse
free

Extruder Nozzle Spanner Keyring by 3DPrintVids
...youtube channel: please like & subscribe... http://bit.ly/2fnoorr
check out my new facebook page: http://fb.me/3dprintchannel
thingiverse
free

DIY Night Vision Spotter by 3DPrintVids
...king about for ages, the battery is a 3s 2200mah lipo from one of my rc planes and the screws etc all came out of my parts bin...
thingiverse
free

100mm Encoder Wheel 8T 3mm 5mm by 3DPrintVids
...youtube channel: please like & subscribe... http://bit.ly/2fnoorr
check out my new facebook page: http://fb.me/3dprintchannel
thingiverse
free

100mm Encoder Wheel 16T 3mm 5mm by 3DPrintVids
...youtube channel: please like & subscribe... http://bit.ly/2fnoorr
check out my new facebook page: http://fb.me/3dprintchannel
thingiverse
free

100mm Encoder Wheel 64T 3mm 5mm by 3DPrintVids
...youtube channel: please like & subscribe... http://bit.ly/2fnoorr
check out my new facebook page: http://fb.me/3dprintchannel
thingiverse
free

100mm Encoder Wheel 32T 3mm 5mm by 3DPrintVids
...youtube channel: please like & subscribe... http://bit.ly/2fnoorr
check out my new facebook page: http://fb.me/3dprintchannel
thingiverse
free

100mm Encoder Wheel 4T 3mm 5mm by 3DPrintVids
...youtube channel: please like & subscribe... http://bit.ly/2fnoorr
check out my new facebook page: http://fb.me/3dprintchannel
thingiverse
free

Anet A8 Shelf Frame Support by 3DPrintVids
...youtube channel: please like & subscribe... http://bit.ly/2fnoorr
check out my new facebook page: http://fb.me/3dprintchannel
Leadscrew
thingiverse
free
Leadscrew Support by The_Custom_Side
...w support for 8mm leadscrew.
printed in 0.25mm petg
requires bearing (16mm od, 8mm id).
no supports, no rafts, 20% gyroid infill.
thingiverse
free

Hook for M8 Leadscrew
...hook for m8 leadscrew
thingiverse
hook which holds on m8 leadscrew without pressure on the screw
thingiverse
free
X Idler Leadscrew by GOO2014
...x idler leadscrew by goo2014
thingiverse
x idler leadscrew
thingiverse
free
10mm Leadscrew Knob by carboncopy101
...10mm leadscrew knob by carboncopy101
thingiverse
this is a knob for a 10mm leadscrew for manual turning. enjoy.
thingiverse
free
nut for m5 leadscrew by mbzn
...nut for m5 leadscrew by mbzn
thingiverse
created to use as a nut for m5 threaded bar in place of a leadscrew
thingiverse
free
8mm Leadscrew Crank by dakahler
...igned for the cyclone pcb, but can be used on any 8mm leadscrew.
the captive nut for the set screw is designed to be heat-staked.
thingiverse
free
Z leadscrew support for KFL08 by bajmar
...z leadscrew support for kfl08 by bajmar
thingiverse
z leadscrew support for kfl08
thingiverse
free
X-Axis Leadscrew Idler by brisinger
...x-axis leadscrew idler by brisinger
thingiverse
x-axis leadscrew idler
thingiverse
free
Leadscrew Adapter by PhoenixZip
...rew, and it does not fit our lorei printers.
this adapter allows use of holes that are 16mm apart to our (roughly) 11.85mm holes.
thingiverse
free
Trintcore z-axis modified leadscrew by grubeludouche
... modified leadscrew by grubeludouche
thingiverse
this is a mod to fit a t8 pitch leadscrew, replacing the original m8 leadscrew.
A8
turbosquid
$47

Car A8
...
turbosquid
royalty free 3d model car a8 for download as max on turbosquid: 3d models for games, architecture, videos. (1196060)
turbosquid
$50

Audi A8
...yalty free 3d model audi a8 for download as 3dm, obj, and fbx on turbosquid: 3d models for games, architecture, videos. (1580187)
turbosquid
$15

Audi A8
...lty free 3d model audi a8 for download as obj, fbx, and blend on turbosquid: 3d models for games, architecture, videos. (1387519)
turbosquid
$500

Audi A8
... available on turbo squid, the world's leading provider of digital 3d models for visualization, films, television, and games.
3d_export
$5

Audi A8 3D Model
...audi a8 3d model
3dexport
audi a8 cars car
audi a8 3d model ma 20351 3dexport
3d_export
$5

Audi A8 3D Model
...audi a8 3d model
3dexport
3d model of audi a8
audi a8 3d model badyaka 12136 3dexport
3d_ocean
$89

Audi A8 2010
...usiness car car class class f f german german luxury luxury s s s8 s8 sedan sedan vehicle vehicle
new audi a8 2010 detaled model.
turbosquid
$39

A8 2018
...a8 2018 for download as 3ds, obj, wrl, c4d, fbx, dae, and stl on turbosquid: 3d models for games, architecture, videos. (1345349)
turbosquid
free

audi a8 l
...rbosquid
royalty free 3d model audi a8 l for download as obj on turbosquid: 3d models for games, architecture, videos. (1663016)
3d_ocean
$45

Audi A8 restyled
...our door vehicle was created in blender3d 2.62.realistic renderings were created with yafaray 0.1.2 realistic plugin.rendering...
Anet
thingiverse
free

Anet by derbodesign
...anet by derbodesign
thingiverse
logo anet
thingiverse
free

Anet e10 , Anet v1.0 by jonathan_943D
...anet e10 , anet v1.0 by jonathan_943d
thingiverse
soporte de ventilador de 80mm, para controladora anet v1.0
thingiverse
free

Anet A8 Anet AM8 Y belt holder
...anet a8 anet am8 y belt holder
thingiverse
anet a8 anet am8 y belt holder
thingiverse
free

Anet A8 Probe Bracket for anet sensor by chelrix
...anet a8 probe bracket for anet sensor by chelrix
thingiverse
anet a8 probe bracket for anet official sensor and marlin firmware
thingiverse
free

Anet logo by JUST3D_PRNTNG
...anet logo by just3d_prntng
thingiverse
anet logo
thingiverse
free

Fan nozzle for Anet A8 with original Anet levelsensor by peteruhlmann
...et levelsensor by peteruhlmann
thingiverse
here is an improved fan nozzle for the anet a8 with original level sensor from anet.
thingiverse
free

Anet Et4 Box
...anet et4 box
thingiverse
tool box for anet et4
thingiverse
free

Anet Logo by Superflex_Plastic_Fantastic
...anet logo by superflex_plastic_fantastic
thingiverse
anet logo to incorporate into designs.
thingiverse
free

Box for Anet ET4
...box for anet et4
thingiverse
this is a simple box for tool of anet et4
thingiverse
free

Anet V1.0 Board Kühlung (80mm Lüfter) / Anet A8 by MadCre8
...anet v1.0 board kühlung (80mm lüfter) / anet a8 by madcre8
thingiverse
anet v1.0 board kühlung (80mm lüfter) / anet a8
Conversion
3ddd
$1

Conversation Seat
...шетка
the conversation seat made in englandhttp://www.squintlimited.com/products/the_conversation_seat/gold
+ max 2011
3d_export
$10

Converse 3D Model
...converse 3d model
3dexport
converse shoe pc unix mac
converse 3d model electropainter17075 38067 3dexport
turbosquid
$100

converse-shoe
...quid
royalty free 3d model converse-shoe for download as c4d on turbosquid: 3d models for games, architecture, videos. (1398427)
turbosquid
$10

Conversation Furniture
... available on turbo squid, the world's leading provider of digital 3d models for visualization, films, television, and games.
turbosquid
$7

Converse Allstars
... available on turbo squid, the world's leading provider of digital 3d models for visualization, films, television, and games.
design_connected
$16

Conversation Club Chair
...conversation club chair
designconnected
donghia conversation club chair chairs computer generated 3d model. designed by n/a.
design_connected
$27

Hemicycle Conversation Chair
...rsation chair
designconnected
ligne roset hemicycle conversation chair computer generated 3d model. designed by nigro, philippe.
3d_export
$24

Converse keds 3D Model
...converse keds 3d model
3dexport
converse all star ked shoe clothes sports
converse keds 3d model vermi1ion 26201 3dexport
3ddd
$1

Converse All-Star Shoes
...converse all-star shoes
3ddd
кеды , обувь
converse all-star shoes
design_connected
$18

CONVERSE Jack Purcell Sneakers
...converse jack purcell sneakers
designconnected
converse jack purcell sneakers computer generated 3d model.
Axis
3ddd
$1

Мария Axis
...
3ddd
кухня , классическая , axis
модель кухни.
3d_export
$22

Axis robot 6-axis robotic arm
...ing parts drawings, standard parts purchased parts list, can be produced directly according to the drawings, welcome to download!
3ddd
free

Versatile Axis
...ddd
nexus , плитка
http://bvtileandstone.com/ceramic-porcelain/versatile-axis/
3d_export
$19

robot 2 axis
...robot 2 axis
3dexport
robot 2 axis
turbosquid
$40

Axis R5F
... available on turbo squid, the world's leading provider of digital 3d models for visualization, films, television, and games.
turbosquid
$40

Axis S5F
... available on turbo squid, the world's leading provider of digital 3d models for visualization, films, television, and games.
turbosquid
$30

Axis Athlon
... available on turbo squid, the world's leading provider of digital 3d models for visualization, films, television, and games.
turbosquid
$10

Linear Axis
... available on turbo squid, the world's leading provider of digital 3d models for visualization, films, television, and games.
3d_export
$15

drawing axis
...drawing axis
3dexport
simple rendering of the scene file
3ddd
$1

versatile axis ARC
...versatile axis arc
3ddd
versatile , плитка
versatile axis arc red dot design award
Y
turbosquid
$1

Tetera y Galletas y Caf
... available on turbo squid, the world's leading provider of digital 3d models for visualization, films, television, and games.
3ddd
$1

Смеситель Y-CON
...смеситель y-con
3ddd
смеситель , y-con
смеситель y-con
3ddd
$1

Y-Chair
...y-chair
3ddd
tom dixon
y-chair designed by tom dixon,
3ds max + obj, corona
3ddd
$1

Y Chair compilation
....net/products/us/y-chair-sled-base
y chair swivel basehttp://www.tomdixon.net/products/us/y-chair-swivel-base
turbosquid
$190

Y-8
...y-8
turbosquid
royalty free 3d model y-8 for download as max on turbosquid: 3d models for games, architecture, videos. (1658891)
turbosquid
$7

Bench Y
...turbosquid
royalty free 3d model bench y for download as obj on turbosquid: 3d models for games, architecture, videos. (1488746)
turbosquid
$15

bonePile Y
...oyalty free 3d model bonepile y for download as blend and obj on turbosquid: 3d models for games, architecture, videos. (1546374)
turbosquid
$7

Y for Yarn
...d
royalty free 3d model y for yarn model for download as max on turbosquid: 3d models for games, architecture, videos. (1699732)
turbosquid
$2

FONT Y
...quid
royalty free 3d model font y for download as ma and obj on turbosquid: 3d models for games, architecture, videos. (1549457)
3ddd
$1

WOOD-y
...wood-y
3ddd
wooden guy