Thingiverse

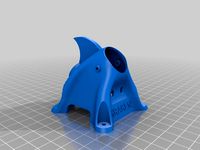
Anet A8 Horizontal E3D Carriage by FerociousDesigns
by Thingiverse
Last crawled date: 3 years ago
This thing is depreciated. See updated version here: https://www.thingiverse.com/thing:2701617
If you have made this thing and find it is useful and or has improved your prints, please consider leaving a tip. Thanks!
Also please consider using my Amazon (<-click here!) link when you buy things from Amazon.co.uk. It costs me a lot in filament to design and perfect these things. All support is very much appreciated!
Updated Part 2: Improved belt holder again. (v5)
Here is the carriage for my horizontal X axis: https://www.thingiverse.com/thing:2563256
I printed in PLA at 25% tetrahedral infill, 4 top/bottom/walls, supports everywhere lines 10% in Cura 2.7. Parts are orientated to get the best print and least supports.
Required Parts:
4x Igus Drylin RJ4JP bearings - IGUS DryLin® RJ4JP 01-08 Bearing – Instead LM8UU – Reprap Mendel – Anet A8 A6 – High-Quality 3D Printer Linear Bearing
2x M3x25mm Bolts + Nuts for blower fan
2x M3x20mm Bolts + Nuts to hold carriage together
4x M3x10mm Bolts to hold 40mm fan to duct
2x M3x5mm Bolts to hold radial fan mount on carriage
Cable ties to hold 40mm duct to E3D heatsink + cable management
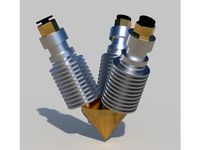
E3D V6 / clone hot end - Xcsource E3D v6 clone
40mm x 10mm PC fan
50mm Radial fan
Fan duct for radial fan
Be careful when inserting the bearings, you can use a flat screwdriver and twist slightly in the gaps to make it easier. This will depend on your printers calibration.
I am using the 'Spaceship' duct: https://www.thingiverse.com/thing:2088006 on my blower fan but you should be able to use any standard duct for the A8. The radial fan is height adjustable.
There are 2xM3 holes 6.5mm apart on each end of the carriage for future mounts / cable chains etc. Feel free to design a mount and please put a link in comments if you do :)
I have not calculated the offsets yet for this carriage, so if you do this please post to comments. Thanks.
Also the 40mm Fan duct is not final. It is functional but will be revised in the near future.
Offsets:
// The size of the print bed
#define X_BED_SIZE 220
#define Y_BED_SIZE 220
// Travel limits (mm) after homing, corresponding to endstop positions.
#define X_MIN_POS -29
#define Y_MIN_POS -10
#define Z_MIN_POS 0
#define X_MAX_POS X_BED_SIZE
#define Y_MAX_POS Y_BED_SIZE
#define Z_MAX_POS 225
You could probably go higher on the Z but my 12864 LCD is in the way :p
Testing Horizontal Carriage 1Testing Horizontal Carriage 2
Check out these 3D printer support groups on facebook for help with your settings or anything else printing related:3D Printer Support GroupOfficial Anet Group
If you have made this thing and find it is useful and or has improved your prints, please consider leaving a tip. Thanks!
Also please consider using my Amazon (<-click here!) link when you buy things from Amazon.co.uk. It costs me a lot in filament to design and perfect these things. All support is very much appreciated!
Updated Part 2: Improved belt holder again. (v5)
Here is the carriage for my horizontal X axis: https://www.thingiverse.com/thing:2563256
I printed in PLA at 25% tetrahedral infill, 4 top/bottom/walls, supports everywhere lines 10% in Cura 2.7. Parts are orientated to get the best print and least supports.
Required Parts:
4x Igus Drylin RJ4JP bearings - IGUS DryLin® RJ4JP 01-08 Bearing – Instead LM8UU – Reprap Mendel – Anet A8 A6 – High-Quality 3D Printer Linear Bearing
2x M3x25mm Bolts + Nuts for blower fan
2x M3x20mm Bolts + Nuts to hold carriage together
4x M3x10mm Bolts to hold 40mm fan to duct
2x M3x5mm Bolts to hold radial fan mount on carriage
Cable ties to hold 40mm duct to E3D heatsink + cable management
E3D V6 / clone hot end - Xcsource E3D v6 clone
40mm x 10mm PC fan
50mm Radial fan
Fan duct for radial fan
Be careful when inserting the bearings, you can use a flat screwdriver and twist slightly in the gaps to make it easier. This will depend on your printers calibration.
I am using the 'Spaceship' duct: https://www.thingiverse.com/thing:2088006 on my blower fan but you should be able to use any standard duct for the A8. The radial fan is height adjustable.
There are 2xM3 holes 6.5mm apart on each end of the carriage for future mounts / cable chains etc. Feel free to design a mount and please put a link in comments if you do :)
I have not calculated the offsets yet for this carriage, so if you do this please post to comments. Thanks.
Also the 40mm Fan duct is not final. It is functional but will be revised in the near future.
Offsets:
// The size of the print bed
#define X_BED_SIZE 220
#define Y_BED_SIZE 220
// Travel limits (mm) after homing, corresponding to endstop positions.
#define X_MIN_POS -29
#define Y_MIN_POS -10
#define Z_MIN_POS 0
#define X_MAX_POS X_BED_SIZE
#define Y_MAX_POS Y_BED_SIZE
#define Z_MAX_POS 225
You could probably go higher on the Z but my 12864 LCD is in the way :p
Testing Horizontal Carriage 1Testing Horizontal Carriage 2
Check out these 3D printer support groups on facebook for help with your settings or anything else printing related:3D Printer Support GroupOfficial Anet Group
Similar models
thingiverse
free

Quick Release E3D Carriage - For 45mm Horizontal X axis by FerociousDesigns
...version of the claw duct. this one is very similar in shape to the spaceship duct and positions the...
thingiverse
free

E3D Chimera mount for Anet A8 (Prusa i3) by ProfChA0s
... fan and a 12mm inductive sensor. a fan duct is also included. pair it with one of these http://www.thingiverse.com/thing:1666094
thingiverse
free

40mm fan for Anet A8 - e3d v6 XtraSolid Support v2.0 by madizmo
...asolid support v2.0 by madizmo
thingiverse
this is a 40mm fan duct for the anet a8 - e3d v6 xtrasolid support, made by ciccio92
thingiverse
free

Compact Modular E3D Carriage by FerociousDesigns
...ith most parts. it feels strong enough like this.
assembly:
assemble as in the picture, it should all be pretty self explanatory.
thingiverse
free

Anet A8 Fan Duct for E3D Hotend by nitro_216
... fan duct for e3d hotend by nitro_216
thingiverse
part cooling fan duct for use with anet a8 e3d v6 carriage and the e3d hotend
thingiverse
free

Anet A8 Direct Feed E3D - Fan Duct by 4noxx
...
fan duct for
anet a8 direct feed e3d carriage mounthttps://www.thingiverse.com/thing:2628855
30.03.2020
works! :)
add step file
thingiverse
free

ANET A8 - E3D V6 holder w. Tron XY Attachment by M4TR1S
...oolholder (right side open for the cables of the hotend)
the attachment for pen comming soon, then you can change it to a plotter
grabcad
free

Anet A8 Bowden Extruder
...d 40mm fan too.
currently it is necessary to cut some threads (m4), but mostly i´ve use nuts.
please feel free to change this.
thingiverse
free

Bearing block for Igus Drylin RJ4JP-01-12 by poberauer
... igus drylin rj4jp-01-12 by poberauer
thingiverse
bearing block for igus drylin rj4jp-01-12
inspired by jori's thing:2404074
thingiverse
free

Anet A8 Direct Feed E3D - Fan Duct 2 by 4noxx
...ew fan duct forhttps://www.thingiverse.com/thing:2628855
anet a8 direct feed e3d - fan duct 2
support: yes, or try it with a brim
Ferociousdesigns
thingiverse
free

Bong mouthpiece by FerociousDesigns
...bong mouthpiece by ferociousdesigns
thingiverse
it is what it is, i printed it with tpu. fits on an acrylic water pipe :)
thingiverse
free
KTM Keyring by FerociousDesigns
...tm keyring by ferociousdesigns
thingiverse
it is what it is, i will be printing from tpu personally but use whatever you want :)
thingiverse
free

'Shaguar' Keyring by FerociousDesigns
...;shaguar' keyring by ferociousdesigns
thingiverse
it is what it is, i will be printing from tpu but use whatever you want :)
thingiverse
free

Ford RS Keyring by FerociousDesigns
...ford rs keyring by ferociousdesigns
thingiverse
it is what it is, i will be printing from tpu but use whatever you want :)
thingiverse
free

Tiger Racing Keyring by FerociousDesigns
...tiger racing keyring by ferociousdesigns
thingiverse
it is what it is, i will be printing from tpu but use whatever you want :)
thingiverse
free
BL Touch Mockup by FerociousDesigns
... ferociousdesigns
thingiverse
a model for use in making brackets and holders. obviously is not functional!
added fusion 360 file
thingiverse
free
3 Colour Mixing 'Diamond' Hotend Mockup by FerociousDesigns
...#39; hotend mockup by ferociousdesigns
thingiverse
this is wip!
i still need to confirm the cold ends are at the correct angles.
thingiverse
free
BoltRC Kraken Pod - Remix by FerociousDesigns
...he original design.
someone asked me to modify it to allow a bit less camera angle. all i have done is elongated the camera hole.
thingiverse
free
Lumenier Pagoda 2 - Short Version - Mockup by FerociousDesigns
...ousdesigns
thingiverse
created this to help with designing pods for quadcopters.
fusion 360 file included to use in your models.
thingiverse
free

Greek Alphabet - Lowercase by FerociousDesigns
...ts already on thingiverse but none suited what they wanted.
maybe someone else would find them useful, so i have uploaded here :)
A8
turbosquid
$47

Car A8
...
turbosquid
royalty free 3d model car a8 for download as max on turbosquid: 3d models for games, architecture, videos. (1196060)
turbosquid
$50

Audi A8
...yalty free 3d model audi a8 for download as 3dm, obj, and fbx on turbosquid: 3d models for games, architecture, videos. (1580187)
turbosquid
$15

Audi A8
...lty free 3d model audi a8 for download as obj, fbx, and blend on turbosquid: 3d models for games, architecture, videos. (1387519)
turbosquid
$500

Audi A8
... available on turbo squid, the world's leading provider of digital 3d models for visualization, films, television, and games.
3d_export
$5

Audi A8 3D Model
...audi a8 3d model
3dexport
audi a8 cars car
audi a8 3d model ma 20351 3dexport
3d_export
$5

Audi A8 3D Model
...audi a8 3d model
3dexport
3d model of audi a8
audi a8 3d model badyaka 12136 3dexport
3d_ocean
$89

Audi A8 2010
...usiness car car class class f f german german luxury luxury s s s8 s8 sedan sedan vehicle vehicle
new audi a8 2010 detaled model.
turbosquid
$39

A8 2018
...a8 2018 for download as 3ds, obj, wrl, c4d, fbx, dae, and stl on turbosquid: 3d models for games, architecture, videos. (1345349)
turbosquid
free

audi a8 l
...rbosquid
royalty free 3d model audi a8 l for download as obj on turbosquid: 3d models for games, architecture, videos. (1663016)
3d_ocean
$45

Audi A8 restyled
...our door vehicle was created in blender3d 2.62.realistic renderings were created with yafaray 0.1.2 realistic plugin.rendering...
E3D
turbosquid
$23

E3D - Google Home
... 3d model e3d - google home for download as max, obj, and c4d on turbosquid: 3d models for games, architecture, videos. (1192509)
cg_studio
free

e3d model
...e3d model
cgstudio
- e 3d model, royalty free license available, instant download after purchase.
turbosquid
$2

Syringe C4D (E3D Ready)
...lty free 3d model syringe c4d (e3d ready) for download as c4d on turbosquid: 3d models for games, architecture, videos. (1336720)
turbosquid
$12

Microphone USB E3D and C4D
...ree 3d model microphone usb e3d & c4d for download as c4d on turbosquid: 3d models for games, architecture, videos. (1568216)
turbosquid
$29

E3D - OnePlus 6 Black
...model e3d - oneplus 6 black for download as max, obj, and c4d on turbosquid: 3d models for games, architecture, videos. (1358534)
turbosquid
$29

E3D - Motorola One 2018
...del e3d - motorola one 2018 for download as max, obj, and c4d on turbosquid: 3d models for games, architecture, videos. (1358533)
turbosquid
$29

E3D - Disney MagicBands 2
...l e3d - disney magicbands 2 for download as max, obj, and c4d on turbosquid: 3d models for games, architecture, videos. (1355515)
turbosquid
$29

E3D - Samsung Z4 Smartphone
...e3d - samsung z4 smartphone for download as max, obj, and c4d on turbosquid: 3d models for games, architecture, videos. (1182179)
turbosquid
$23

E3D - Razer Phone model
...del e3d - razer phone model for download as max, obj, and c4d on turbosquid: 3d models for games, architecture, videos. (1231207)
turbosquid
$23

E3D - Alcatel Idol 5
... model e3d - alcatel idol 5 for download as max, obj, and c4d on turbosquid: 3d models for games, architecture, videos. (1212799)
Anet
thingiverse
free

Anet by derbodesign
...anet by derbodesign
thingiverse
logo anet
thingiverse
free

Anet e10 , Anet v1.0 by jonathan_943D
...anet e10 , anet v1.0 by jonathan_943d
thingiverse
soporte de ventilador de 80mm, para controladora anet v1.0
thingiverse
free

Anet A8 Anet AM8 Y belt holder
...anet a8 anet am8 y belt holder
thingiverse
anet a8 anet am8 y belt holder
thingiverse
free

Anet A8 Probe Bracket for anet sensor by chelrix
...anet a8 probe bracket for anet sensor by chelrix
thingiverse
anet a8 probe bracket for anet official sensor and marlin firmware
thingiverse
free

Anet logo by JUST3D_PRNTNG
...anet logo by just3d_prntng
thingiverse
anet logo
thingiverse
free

Fan nozzle for Anet A8 with original Anet levelsensor by peteruhlmann
...et levelsensor by peteruhlmann
thingiverse
here is an improved fan nozzle for the anet a8 with original level sensor from anet.
thingiverse
free

Anet Et4 Box
...anet et4 box
thingiverse
tool box for anet et4
thingiverse
free

Anet Logo by Superflex_Plastic_Fantastic
...anet logo by superflex_plastic_fantastic
thingiverse
anet logo to incorporate into designs.
thingiverse
free

Box for Anet ET4
...box for anet et4
thingiverse
this is a simple box for tool of anet et4
thingiverse
free

Anet V1.0 Board Kühlung (80mm Lüfter) / Anet A8 by MadCre8
...anet v1.0 board kühlung (80mm lüfter) / anet a8 by madcre8
thingiverse
anet v1.0 board kühlung (80mm lüfter) / anet a8
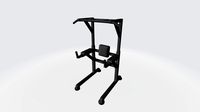
Carriage
archibase_planet
free

Carriage
...arriage
archibase planet
perambulator baby carriage pram
carriage n250908 - 3d model (*.gsm+*.3ds) for interior 3d visualization.
3d_export
free

carriage
...carriage
3dexport
old fashion carriage model, more files here:
turbosquid
$140

Carriage
...urbosquid
royalty free 3d model carriage for download as max on turbosquid: 3d models for games, architecture, videos. (1482052)
turbosquid
$25

Carriage
...urbosquid
royalty free 3d model carriage for download as max on turbosquid: 3d models for games, architecture, videos. (1285944)
3d_export
free

carriage
...carriage
3dexport
game cart
3d_ocean
$15

Barrel Carriage
...ieval oak old transport wheels wine wood
this model contains a barrel and a carriage. it is a medieval type of wood oak carriage.
turbosquid
$40

Carriage
...ty free 3d model carriage for download as obj, fbx, and blend on turbosquid: 3d models for games, architecture, videos. (1290094)
turbosquid
free

Carriage
...yalty free 3d model carriage for download as ma, obj, and fbx on turbosquid: 3d models for games, architecture, videos. (1239157)
3d_export
$5

Medieval carriage
...medieval carriage
3dexport
medieval carriage in fairy style
turbosquid
$58

Carriage
...d model carriage with scene for download as max, obj, and fbx on turbosquid: 3d models for games, architecture, videos. (1276262)
Horizontal
3ddd
$1
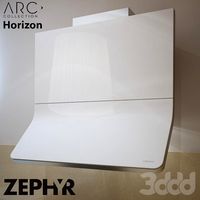
Zephyr Horizont
...zephyr horizont
3ddd
вытяжка , zephyr
вытяжка zephyr horizont
design_connected
$13
Mr.Tubes Horizontal
...mr.tubes horizontal
designconnected
tonone mr.tubes horizontal computer generated 3d model.
3d_export
$5

Horizontal bars
...orizontal bars
3dexport
this is a large horizontal bar for rhythmic gymnastics, as well as for pull-ups and many other exercises
3d_export
$5
Horizontal circular saw
...horizontal circular saw
3dexport
horizontal circular saw
turbosquid
$13

Horizontal tank
...id
royalty free 3d model horizontal tank for download as fbx on turbosquid: 3d models for games, architecture, videos. (1709417)
turbosquid
$1

Decor horizontal
...
royalty free 3d model decor horizontal for download as sldpr on turbosquid: 3d models for games, architecture, videos. (1256236)
3ddd
free
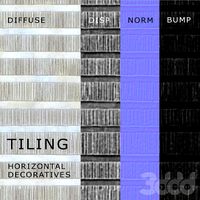
tiling horizontal decoratives
...tiling horizontal decoratives
3ddd
штукатурка
tiling horizontal decorative texture
turbosquid
$19
The horizontal bar
... model the horizontal bar for download as , fbx, stl, and obj on turbosquid: 3d models for games, architecture, videos. (1684719)
turbosquid
$10

Horizontal Bar
...ree 3d model horizontal bar for download as max, obj, and fbx on turbosquid: 3d models for games, architecture, videos. (1435728)
turbosquid
$15
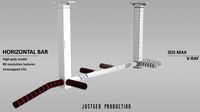
Horizontal Bar
...d model horizontal bar for download as 3ds, max, obj, and fbx on turbosquid: 3d models for games, architecture, videos. (1317823)