Thingiverse
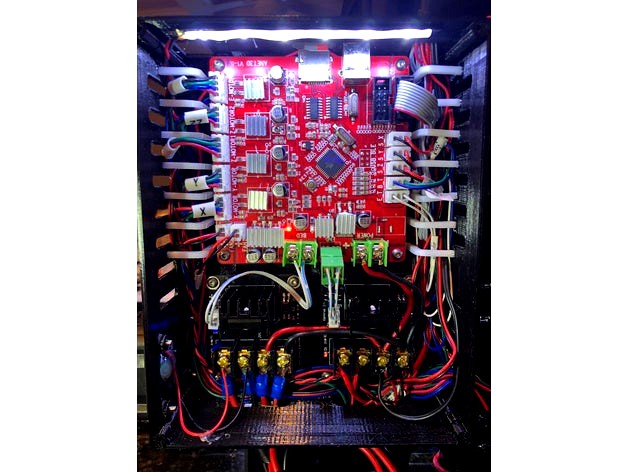
Anet A8 Electrical Box Alternate by kpurintun
by Thingiverse
Last crawled date: 3 years ago
UPDATE 3/23/18: See: https://www.thingiverse.com/thing:2839128
This remix has been remixed from scratch. I have fixed a number of things and added a PiZero side car.
This is my first real “3D printed anything” that I had something to do with, so proceed with caution. I am not buying you replacement filament if this doesn’t work……
First off, all the credit for the brilliant ideas go to feenix82. The layout, cable management, measurements are all his. I chose to remix this because my printer or settings or me struggled to get the venting to work right. While I was in there, I made the walls higher in hopes that I can make a flat cover rather than a cover with walls. I also added some uprights to the side tabs, and added some pretty filleting that I might regret.
I will eventually post the source files which I had to make from scratch. I basically imported the mesh (which imported huge and not to the right scale) then I traced it for the measurements and layout. After I discovered the scaling issue… after I spent an hour or so tracing... I re-scaled it. The cable management I redid with patterns because it would have taken a week to do that manually. The vents were also completed manually. I got a bit OCD about symmetry. so, I made some changes to the vents.
UPDATE: lots of little tweaks.
-added 40mm side fan
-added some fillets to the cable management for strength
-reduced the depth of the cover holes because they didn't need to be 50mm deep.
-raised the posts for the main board by 5mm to help with some clearances for the power input of the main board. (seems like there may be some conflicts)
-had microscopic gaps between the top parts of the cable management loops.
raised the side walls to be 51mm total. hope that clears the heat sinks on the external mosfets. I also stretched the vent holes to match this adjustment.
-left version 1 in there in case someone wants the old version
Edit: V2 had a mistake in the port holes. When I raised the main board, I did not raise the USB and SD card openings.
UPDATE 020518: Had some issues with printing. I actually think this was a combination of print settings and suspect PLA.. The issues I had were with the circuit board posts. These were being made in a flimsy way. Seems when it is being sliced, it will do one layer of the wall for each post then return for another layer. This means it needs to start and stop dropping its bead of filament. Since I have not figured out a super elegant way of making this work well. I linked some posts together to try to force it to do what I want.
note about the cable management... I did find that if I sent the supports overhang to 88*, that it spans the gaps successfully without supports. This will be much easier to crack out the supports.
UPDATE 021118: Had lots of trouble with the cable loops. So i modified the drawing to loose the loops, and add holes in the place instead. there is also a bracket that will click into these loops. my thought was that printing these later would speed up the print, reduce retractions, and also allow me to print those horizontally rather than vertically so that they print stronger. i could also print them in a different color which might be cool.
I will be working on the top cover soon, but wanted to get to a proper test print first. because the box is deeper, the cover can be made simply flat. should make printing easier. i also have a fan on the side, so i will not make a fan for the front.
UPDATE 021318: Was able to successfully print. Super pleased with the outcome. The cable clips glued in with CA glue very nicely. plenty of room for the cables. Will post a cover soon.
Print cover face up with supports. Use "cover1" if you have trouble printing small holes.
Similar models
thingiverse
free

Version 2 - Anet A8 Electrical Box Alternate | w/ Pi Zero by kpurintun
... half of the loops are installed after the cables are installed. i added 14 positions for loops, but they are not all required.
thingiverse
free

BLTouch Cover for Thing 4637453 by rf1989
...ng on the outer side. i also added little clips so there is no need to worry about the print weakening over time and falling off.
thingiverse
free

PCB800099-v9 Housing by jovial_cynic
...fine.
i printed both the new version (1.2) and the lid on their sides to reduce warping when printing in abs. i also used a raft.
thingiverse
free

Ramps 1.4 Box Side with CAT5 connectors by warlock4890
... added some holes to hold my cat5 jacks in this ramps box. i had to do a little post printing cleanup to make them fit perfectly.
thingiverse
free

Jeep Liberty Vent Center Fin by SlashFoxx
...rface. printing so the posts are up and down, makes it easier to remove supporting material, but ultimately makes a weaker piece.
thingiverse
free

Tesla Wall Connector Cable Management by mdriver
...as on a narrow post but the cable loop was a problem.
this is what i designed and printed to solve the cable management problem.
thingiverse
free

MK3 x-carriage for MK2S by langph
... but it does not work with the mk2 because of the missing endstop switches. i adjusted the model, so it can be used with the mk2.
thingiverse
free

Mendel Bowden Cable Interface by D1plo1d
...com/thing:1947
update: design is being reworked - had some issues when i printed - will post a working version once i have one :)
thingiverse
free

Anet A8 Electronics Box by feenix82
...this will now print as desired (thanks to atatoth for helping with this resolution)
update: 3/1/18
**minor fixes to the stl files
thingiverse
free

working V8 engine by Tacotaco2035
...k in" the crank/pistons so that the binding was minimal. the fit is tight, so some grinding is expected with no lubrication.
Kpurintun
thingiverse
free

Hardware Free Lightbar by kpurintun
...into these same holes seems to work pretty well and fits very securely.
the core ideas and measurements are all from puddlefist.
thingiverse
free

40mm Fan Adapter by kpurintun
...nozzles that affix to the outside may need to be trimmed a bit.
i recommend this nozzle:https://www.thingiverse.com/thing:2086191
thingiverse
free

Hardware Free Double Row Lightbar by kpurintun
...this link for the single row: https://www.thingiverse.com/thing:2786712
the core ideas and measurements are all from puddlefist.
thingiverse
free

iPhone 4/4s Wall Plate Cover (Single Switch) by kpurintun
...he back for additional opacity)
print face down. 154mm x 129mm x 10.35mm. glass or kapton/polyimide tape provides a nice gloss.
thingiverse
free
Version 2 - Anet A8 Electrical Box Alternate | w/ Pi Zero by kpurintun
... half of the loops are installed after the cables are installed. i added 14 positions for loops, but they are not all required.
thingiverse
free

Box for MKS 1.4 Ramps Upgrade ANET A8 w/ Pi 3 by kpurintun
... 2 clip versions. v1 is oversized (0.5mm) long wise to give extra clip force. v2 is right sized.
05-31-18 update: added pictures
A8
turbosquid
$47

Car A8
...
turbosquid
royalty free 3d model car a8 for download as max on turbosquid: 3d models for games, architecture, videos. (1196060)
turbosquid
$50

Audi A8
...yalty free 3d model audi a8 for download as 3dm, obj, and fbx on turbosquid: 3d models for games, architecture, videos. (1580187)
turbosquid
$15

Audi A8
...lty free 3d model audi a8 for download as obj, fbx, and blend on turbosquid: 3d models for games, architecture, videos. (1387519)
turbosquid
$500

Audi A8
... available on turbo squid, the world's leading provider of digital 3d models for visualization, films, television, and games.
3d_export
$5

Audi A8 3D Model
...audi a8 3d model
3dexport
audi a8 cars car
audi a8 3d model ma 20351 3dexport
3d_export
$5

Audi A8 3D Model
...audi a8 3d model
3dexport
3d model of audi a8
audi a8 3d model badyaka 12136 3dexport
3d_ocean
$89

Audi A8 2010
...usiness car car class class f f german german luxury luxury s s s8 s8 sedan sedan vehicle vehicle
new audi a8 2010 detaled model.
turbosquid
$39

A8 2018
...a8 2018 for download as 3ds, obj, wrl, c4d, fbx, dae, and stl on turbosquid: 3d models for games, architecture, videos. (1345349)
turbosquid
free

audi a8 l
...rbosquid
royalty free 3d model audi a8 l for download as obj on turbosquid: 3d models for games, architecture, videos. (1663016)
3d_ocean
$45

Audi A8 restyled
...our door vehicle was created in blender3d 2.62.realistic renderings were created with yafaray 0.1.2 realistic plugin.rendering...
Anet
thingiverse
free

Anet by derbodesign
...anet by derbodesign
thingiverse
logo anet
thingiverse
free

Anet e10 , Anet v1.0 by jonathan_943D
...anet e10 , anet v1.0 by jonathan_943d
thingiverse
soporte de ventilador de 80mm, para controladora anet v1.0
thingiverse
free

Anet A8 Anet AM8 Y belt holder
...anet a8 anet am8 y belt holder
thingiverse
anet a8 anet am8 y belt holder
thingiverse
free

Anet A8 Probe Bracket for anet sensor by chelrix
...anet a8 probe bracket for anet sensor by chelrix
thingiverse
anet a8 probe bracket for anet official sensor and marlin firmware
thingiverse
free

Anet logo by JUST3D_PRNTNG
...anet logo by just3d_prntng
thingiverse
anet logo
thingiverse
free

Fan nozzle for Anet A8 with original Anet levelsensor by peteruhlmann
...et levelsensor by peteruhlmann
thingiverse
here is an improved fan nozzle for the anet a8 with original level sensor from anet.
thingiverse
free

Anet Et4 Box
...anet et4 box
thingiverse
tool box for anet et4
thingiverse
free

Anet Logo by Superflex_Plastic_Fantastic
...anet logo by superflex_plastic_fantastic
thingiverse
anet logo to incorporate into designs.
thingiverse
free

Box for Anet ET4
...box for anet et4
thingiverse
this is a simple box for tool of anet et4
thingiverse
free

Anet V1.0 Board Kühlung (80mm Lüfter) / Anet A8 by MadCre8
...anet v1.0 board kühlung (80mm lüfter) / anet a8 by madcre8
thingiverse
anet v1.0 board kühlung (80mm lüfter) / anet a8
Alternate
3ddd
$1

Mobilfresno - Alternative - Kira
... alternative , kira
mobilfresno - alternative - kira
3ddd
$1

MobilFresno - Alternative - Sharon
... alternative , sharon
mobilfresno - alternative - sharon
3d_export
$25
Alternator 3D Model
...alternator 3d model
3dexport
themo nuclear alternator quality models industrial
alternator 3d model rrosado 44369 3dexport
turbosquid
$10
alternative falchion
...alternative sci-fi falchion for download as 3ds, obj, and fbx on turbosquid: 3d models for games, architecture, videos. (1400243)
design_connected
$13

Alternative Christmas Tree
...alternative christmas tree
designconnected
alternative christmas tree computer generated 3d model.
3ddd
$1

Lego Technic Motorbike Alternative
... конструктор , мотоцикл
лего 8051 motorbike alternative
3d_ocean
$4

Alternative Triangle Christmas Tree
...is an alternative design of a christmas tree which you can use in your advertising, scene or whatever you like. you can easily...
turbosquid
$6
Alternative Long Sword
...model alternative long sword for download as ma, obj, and fbx on turbosquid: 3d models for games, architecture, videos. (1385743)
turbosquid
$3

Alternative Sofa Set
... available on turbo squid, the world's leading provider of digital 3d models for visualization, films, television, and games.
3ddd
$1

Alternative Christmas Tree
... полка
alternative christmas tree decor set
model in mm. 1950h 1180w
pol.: 386 667
vert.: 263,209
Electrical
3d_export
$5
Electric pole
...electric pole
3dexport
electric pole for street, electricity line
3ddd
$1

electric mixer
...electric mixer
3ddd
electric mixer , миксер
electric mixer
3ddd
$1

electrical installation
...electrical installation
3ddd
electrical installation , розетка
electrical installation
turbosquid
$19
The electric water heater electric
... available on turbo squid, the world's leading provider of digital 3d models for visualization, films, television, and games.
turbosquid
free
Electrical Outlet electric splitter
... available on turbo squid, the world's leading provider of digital 3d models for visualization, films, television, and games.
3d_ocean
$20
Electric Guitar
...electric guitar
3docean
electric electric guitar guitar music music instrument
model of a electric guitar created in maya.
3d_ocean
$12

Electric Shaver
...electric shaver
3docean
electric electric shaver hair removal personal care shaver shaving
electric shaver created in 3ds max.
3ddd
$1

electrical switch
...h
3ddd
electrical , розетка
electrical switch from bticino company
series livinglight
3d_export
$7
Electric Conveyor
...electric conveyor
3dexport
electric conveyor
3d_export
$5

electric drums
...electric drums
3dexport
electric drums
Box
archibase_planet
free

Box
...box
archibase planet
box carton cardboard box
box 2 - 3d model (*.3ds) for interior 3d visualization.
archibase_planet
free

Box
...box
archibase planet
carton cardboard box box
box 1 - 3d model (*.3ds) for interior 3d visualization.
3d_export
$6

box
...box
3dexport
box
3d_export
$5

Box
...box
3dexport
box
3d_export
$5

box
...box
3dexport
box
3d_export
$5

box
...box
3dexport
box
archibase_planet
free

Box
...box
archibase planet
box box for paper notebook pencil
box - 3d model (*.gsm+*.3ds) for interior 3d visualization.
archibase_planet
free

Box
...box
archibase planet
box carton cardboard box
box n170111 - 3d model (*.gsm+*.3ds) for interior 3d visualization.
archibase_planet
free

Box
...box
archibase planet
box carton cardboard box
box n050411 - 3d model (*.gsm+*.3ds) for interior 3d visualization.
archibase_planet
free

Boxes
...boxes
archibase planet
boxes box case bin
boxes n281213 - 3d model (*.gsm+*.3ds+*.max) for interior 3d visualization.