Thingiverse

Anet A8 3D-Touch Mount by OderWat
by Thingiverse
Last crawled date: 3 years, 1 month ago
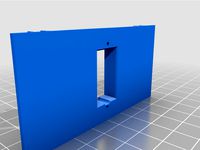
This is a mount for the Geeetech 3D-Touch / BLTouch Sensor for Anet A8 printers.
This design is meant for people which do not use an extruder cooling fan and heatsink.
(Both are not really needed as shown by multiple experiments of different users. Please no discussions about that ;-)
I included the Fusion 360 file which makes it easy to modify if needed.
The mount fits right onto the side of the extruder using the original (shorter) screws. It has little holes for the nuts of the sensor screws to make assembling easy. After assembling the sensor is very stiff connected to the j-frame. It will hardly move or bend on usage. I printed the mount with BDP (GreenTec) filament but I think normal PLA will do. The sensor distance should fit for the standard A8 extruder out of the box.
I also included some information on how to connect the sensor to the Anet motherboard.
The first two images show the sensor mounted to the extruder. The second two images are showing the "draft" wiring and the last three images show my final wiring.
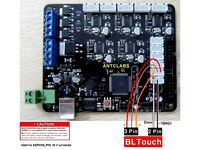
It uses the "LED pin" which is an unused pin on the A8 (using the stock 5 button 2004 LCD). That is the third wire counted from below (where the red marker is on the cable). I simply spliced the cable and cut that wire. This will be the servo signal (yellow).
On the A6, you can use wire no. 7 and FW pin 29. I could verify that with the A6 display I have available.
The +5V (red) and GND (brown/black) are available at the z-end-stop connector as is the signal itself (white).
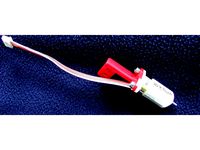
You can simply connect the black and brown wire of the sensor to the GND from the z-end-stop socket. This leaves you with 4 instead of 5 wires from the sensor to the board. On the first of the second two images you can see how I used some patch cables and a wire clamp to draft the connection at the board. In the second of the two images you can see the wiring at the sensor.
After everything worked well I have chosen an old usb mouse cable. Those have exactly 4 wires. I used green for the sensor, red for +5v, black for GND and yellow for the servo signal (originating from the LCD cable). I crimped a fitting connector for the z-end-stop socket and a single connector for the connection to the spliced LCD cable. I also soldered the other end of those 4 wires directly to the PCB inside of the sensor. Soldering is not needed and can be a pain. Beware not to destroy your sensor if you do it. You can see the result in the last three images.
Setting up SkyNet3D / Marlin (the firmware) is pretty straightforward. Besides the entries for the auto bed levelling you need to make the following entries:
#define BLTOUCH
#define SERVO0_PIN 27
#define X_PROBE_OFFSET_FROM_EXTRUDER -20
#define Y_PROBE_OFFSET_FROM_EXTRUDER -15
#define Z_PROBE_OFFSET_FROM_EXTRUDER 0
#define Z_MIN_PROBE_ENDSTOP_INVERTING false
I also used:
#define Z_CLEARANCE_DEPLOY_PROBE 5
#define Z_CLEARANCE_BETWEEN_PROBES 5
#define LEFT_PROBE_BED_POSITION 20
#define RIGHT_PROBE_BED_POSITION 200
#define FRONT_PROBE_BED_POSITION 20
#define BACK_PROBE_BED_POSITION 200
After mounting and uploading the new firmware you can test you sensor:
M280 P0 S10 ; pushes pin down
M280 P0 S90 ; drags pin up
M280 P0 S120 ; does selftest (pin up/down continuously)
M280 P0 S160 ; reset alarm
M280 P0 S60 ; switch triggering test mode
; move pin at the sensor up or down manually
M119 ; reports state of the endstop
; pin up (LED on) z_min should read TRIGGERED
; pin down (LED off) z_min should read open
If your sensor does not selftest but blinks directly or after some few alternating motions you need to adjust the screw in the top of the sensor. One of the allen wrenches which are part of the printer does fit right in. Lose the screw until the light went off, then fasten the screw until it is lit again. I needed some time to find the sweet sport. Using selftest and reset alarm until it worked well.
Finally you can try a G28 command. If everything is OK it will probe twice in the middle of the bed. The tip will go down and up again as soon it touches the surface of the bed. If not you need to check cables and settings.
To adjust the z offset I use the following easy and pretty failsaife procedure:
; preheat for working temperatures
(M502 ; optionally reset to firmware settings)
M851 Z0 ; reset any z-offset
G28 ; home all
G1 X110 Y110 ; move nozzle in center
M211 S0 ; disable software endstop
; now move your nozzle manually onto the bed such that it (strongly) grips paper.
G92 Z0 ; tell the printer that this is Z = 0
G30 X110 Y110 ; move the sensor over the center and let it trigger
; note what z position G30 reports, that, negated, is your z offset
M851 Z-1.23 ; register that z offset (here 1.23 as example)
M500 ; store those values into the EEPROM
You may want to do some G30 X110 Y110 commands to validate how well your sensor works. It should report the same values +/- 0.0x.
You can also enable Z_MIN_PROBE_REPEATABILITY_TEST in the firmware and use M48 L10 P8 V4 to let it test repeatability at the same point with a lot of fake movement in between probes.
There are occasions where the sensor after power on gives an error with the G28 command for no obvious reason. I found that the sequence:
M280 P0 S160 ; Reset 3D-Touch
G4 P500
M280 P0 S10 ; Pin out
G4 P500
M280 P0 S90 ; Pin back
G4 P500
Before the G28 command will reset the sensor in a way that it will alway (tm) work.
UPDATE: I added an alternative design "Distant" for the excellent "Mistral 2" cooling fanduct. This needs slightly changed firmware settings as follows:
#define X_PROBE_OFFSET_FROM_EXTRUDER -26
#define RIGHT_PROBE_BED_POSITION 194
Some links to more information:
Marlin and auto levelling: http://marlinfw.org/docs/configuration/configuration.html
BL Touch: https://www.indiegogo.com/projects/bltouch-auto-bed-leveling-sensor-for-3d-printers
3D-Touch: http://www.geeetech.com/wiki/index.php/3DTouch_Auto_Leveling_Sensor
SkyNet3D download: https://www.facebook.com/skynet3ddevelopment/?fref=ts
Anet A8 Marlin port sources: https://github.com/SkyNet3D/Marlin
"Just Blinking" ? Read this: http://www.geeetech.com/forum/viewtopic.php?f=27&t=18263
Thanks to "Tobi As" for the wiring overview image!
This design is meant for people which do not use an extruder cooling fan and heatsink.
(Both are not really needed as shown by multiple experiments of different users. Please no discussions about that ;-)
I included the Fusion 360 file which makes it easy to modify if needed.
The mount fits right onto the side of the extruder using the original (shorter) screws. It has little holes for the nuts of the sensor screws to make assembling easy. After assembling the sensor is very stiff connected to the j-frame. It will hardly move or bend on usage. I printed the mount with BDP (GreenTec) filament but I think normal PLA will do. The sensor distance should fit for the standard A8 extruder out of the box.
I also included some information on how to connect the sensor to the Anet motherboard.
The first two images show the sensor mounted to the extruder. The second two images are showing the "draft" wiring and the last three images show my final wiring.
It uses the "LED pin" which is an unused pin on the A8 (using the stock 5 button 2004 LCD). That is the third wire counted from below (where the red marker is on the cable). I simply spliced the cable and cut that wire. This will be the servo signal (yellow).
On the A6, you can use wire no. 7 and FW pin 29. I could verify that with the A6 display I have available.
The +5V (red) and GND (brown/black) are available at the z-end-stop connector as is the signal itself (white).
You can simply connect the black and brown wire of the sensor to the GND from the z-end-stop socket. This leaves you with 4 instead of 5 wires from the sensor to the board. On the first of the second two images you can see how I used some patch cables and a wire clamp to draft the connection at the board. In the second of the two images you can see the wiring at the sensor.
After everything worked well I have chosen an old usb mouse cable. Those have exactly 4 wires. I used green for the sensor, red for +5v, black for GND and yellow for the servo signal (originating from the LCD cable). I crimped a fitting connector for the z-end-stop socket and a single connector for the connection to the spliced LCD cable. I also soldered the other end of those 4 wires directly to the PCB inside of the sensor. Soldering is not needed and can be a pain. Beware not to destroy your sensor if you do it. You can see the result in the last three images.
Setting up SkyNet3D / Marlin (the firmware) is pretty straightforward. Besides the entries for the auto bed levelling you need to make the following entries:
#define BLTOUCH
#define SERVO0_PIN 27
#define X_PROBE_OFFSET_FROM_EXTRUDER -20
#define Y_PROBE_OFFSET_FROM_EXTRUDER -15
#define Z_PROBE_OFFSET_FROM_EXTRUDER 0
#define Z_MIN_PROBE_ENDSTOP_INVERTING false
I also used:
#define Z_CLEARANCE_DEPLOY_PROBE 5
#define Z_CLEARANCE_BETWEEN_PROBES 5
#define LEFT_PROBE_BED_POSITION 20
#define RIGHT_PROBE_BED_POSITION 200
#define FRONT_PROBE_BED_POSITION 20
#define BACK_PROBE_BED_POSITION 200
After mounting and uploading the new firmware you can test you sensor:
M280 P0 S10 ; pushes pin down
M280 P0 S90 ; drags pin up
M280 P0 S120 ; does selftest (pin up/down continuously)
M280 P0 S160 ; reset alarm
M280 P0 S60 ; switch triggering test mode
; move pin at the sensor up or down manually
M119 ; reports state of the endstop
; pin up (LED on) z_min should read TRIGGERED
; pin down (LED off) z_min should read open
If your sensor does not selftest but blinks directly or after some few alternating motions you need to adjust the screw in the top of the sensor. One of the allen wrenches which are part of the printer does fit right in. Lose the screw until the light went off, then fasten the screw until it is lit again. I needed some time to find the sweet sport. Using selftest and reset alarm until it worked well.
Finally you can try a G28 command. If everything is OK it will probe twice in the middle of the bed. The tip will go down and up again as soon it touches the surface of the bed. If not you need to check cables and settings.
To adjust the z offset I use the following easy and pretty failsaife procedure:
; preheat for working temperatures
(M502 ; optionally reset to firmware settings)
M851 Z0 ; reset any z-offset
G28 ; home all
G1 X110 Y110 ; move nozzle in center
M211 S0 ; disable software endstop
; now move your nozzle manually onto the bed such that it (strongly) grips paper.
G92 Z0 ; tell the printer that this is Z = 0
G30 X110 Y110 ; move the sensor over the center and let it trigger
; note what z position G30 reports, that, negated, is your z offset
M851 Z-1.23 ; register that z offset (here 1.23 as example)
M500 ; store those values into the EEPROM
You may want to do some G30 X110 Y110 commands to validate how well your sensor works. It should report the same values +/- 0.0x.
You can also enable Z_MIN_PROBE_REPEATABILITY_TEST in the firmware and use M48 L10 P8 V4 to let it test repeatability at the same point with a lot of fake movement in between probes.
There are occasions where the sensor after power on gives an error with the G28 command for no obvious reason. I found that the sequence:
M280 P0 S160 ; Reset 3D-Touch
G4 P500
M280 P0 S10 ; Pin out
G4 P500
M280 P0 S90 ; Pin back
G4 P500
Before the G28 command will reset the sensor in a way that it will alway (tm) work.
UPDATE: I added an alternative design "Distant" for the excellent "Mistral 2" cooling fanduct. This needs slightly changed firmware settings as follows:
#define X_PROBE_OFFSET_FROM_EXTRUDER -26
#define RIGHT_PROBE_BED_POSITION 194
Some links to more information:
Marlin and auto levelling: http://marlinfw.org/docs/configuration/configuration.html
BL Touch: https://www.indiegogo.com/projects/bltouch-auto-bed-leveling-sensor-for-3d-printers
3D-Touch: http://www.geeetech.com/wiki/index.php/3DTouch_Auto_Leveling_Sensor
SkyNet3D download: https://www.facebook.com/skynet3ddevelopment/?fref=ts
Anet A8 Marlin port sources: https://github.com/SkyNet3D/Marlin
"Just Blinking" ? Read this: http://www.geeetech.com/forum/viewtopic.php?f=27&t=18263
Thanks to "Tobi As" for the wiring overview image!
Similar models
thingiverse
free

3DTouch Sensor adapter for e3d clamp by Draxan
... needs slightly changed firmware settings as follows:
define x_probe_offset_from_extruder -26
define right_probe_bed_position 200
thingiverse
free
FLSUN SuperRacer Servo Finish Flag mount by voltNik
...
g1 z+5 e-3 f3000
m280 p0 s60
m280 p0 s120
m280 p0 s60
m280 p0 s120
m280 p0 s60
m280 p0 s120
m280 p0 s60
m280 p0 s120
m280 p0 s60
thingiverse
free

Anet A6 : Auto Leveling bed AND Cable chain ! by Athanasus
... : https://www.facebook.com/skynet3ddevelopment/
don't forget to replace "configuration.h" file by this one for a6.
thingiverse
free

3D touch Black Anet A8 Left_Mount by zerone82
...ne z_min_endstop_inverting false
#define z_min_probe_endstop_inverting false
comment
//#define probe_manually
wiring as per image
thingiverse
free

Prusa i3x Inductive Sensor (12mm) by AcKyL
...usa i3x (marlin firmware out of the box doesn't work with prusa i3x):http://www.geeetech.com/forum/download/file.php?id=1589
thingiverse
free
Sunhokey Prusa i4 BLTouch Setup Marlin 1.1.0 RC8 Firmware by Middleman
....
now you are ready to print with the bltouch!
join the prusa i4 facebook group: https://www.facebook.com/groups/573076312852368
thingiverse
free

Sensor Bracket for Anet A8 Bowden carriage by mkantor
...net with this bracket are as follows:
define x_probe_offset_from_extruder 0
define y_probe_offset_from_extruder -32
thingiverse
free

Servo Optical Auto level for FlyingBear P905x by michalovis
...probe_offset_from_extruder -18
#define y_probe_offset_from_extruder -53
video is here:https://www.youtube.com/watch?v=qamyyhy4yus
thingiverse
free

Custom MakerGear_Bootscreen.h file by SCHMENKE
... the marlin firmware (line 105 in 1.1.0 rc7), it is enabled by un-commenting the line;
"#define show_custom_bootscreen"
thingiverse
free
Anet A8 3DTouch/BLTouch Auto Leveling Sensor Bracket by JMadison
...keeps going until you do pin up/down or release alarm
m280 p0 s160 ; release alarm
hardware: (2) m3 x 8, (2) m3 x 12, (4) m3 nuts
Oderwat
thingiverse
free

Cat Litter Scoop "Detector" by OderWat
...print a cat litter scoop since i got an 3d printer. now 1 1/2 years later i finally did it! have fun and greet your cats from me!
thingiverse
free

Arya Stark's Needle - Blade / Hilt adapter. by OderWat
... mount the blade into the hilt. i used it for my make of the original arya stark's sword, which you can find in the original.
thingiverse
free

Paint Kraken for Vallejo paints by OderWat
...es twelve bottles per level and can easily be stacked up to four times. the current design also contains a rotating base and lid.
thingiverse
free

Funnel Spoon Rev 2 by OderWat
...priority. the design works pretty well, so i thought i share the design with you.
see it in action: https://youtu.be/x21wrc9wdjq
thingiverse
free

Female Mask Fixed by OderWat
...ems with my linear bearings. i got y and x axis layer and single line shifts. i guess it is also a nice test for your hardware :)
thingiverse
free

Knitting Wool Hank Tool by OderWat
... to mount the bolts and nuts inside the plastic parts.
p.s.: i wonder if anybody here will make one! please tell me if you did!11
thingiverse
free

CaliCross by OderWat
...our printer i suggest reading:
http://reprap.org/wiki/triffid_hunter%27s_calibration_guide
http://www.thingiverse.com/thing:52946
thingiverse
free

First Layer Target by OderWat
...still i don't believe much into adjust steps as those are basically a constant for a given design. but that is another topic.
thingiverse
free

Anet A8 Dial Indikator Holder (Snugfit) by OderWat
...pretty easy to get.
i added the source file so you can adjust it to your tastes. be warned: it is not the cleanest design though!
thingiverse
free

Card Clip - Spades by OderWat
... ez-stick hot and it works pretty good. the model stands and stays perfectly in place even with the fairly small contact surface.
A8
turbosquid
$47

Car A8
...
turbosquid
royalty free 3d model car a8 for download as max on turbosquid: 3d models for games, architecture, videos. (1196060)
turbosquid
$50

Audi A8
...yalty free 3d model audi a8 for download as 3dm, obj, and fbx on turbosquid: 3d models for games, architecture, videos. (1580187)
turbosquid
$15

Audi A8
...lty free 3d model audi a8 for download as obj, fbx, and blend on turbosquid: 3d models for games, architecture, videos. (1387519)
turbosquid
$500

Audi A8
... available on turbo squid, the world's leading provider of digital 3d models for visualization, films, television, and games.
3d_export
$5

Audi A8 3D Model
...audi a8 3d model
3dexport
audi a8 cars car
audi a8 3d model ma 20351 3dexport
3d_export
$5

Audi A8 3D Model
...audi a8 3d model
3dexport
3d model of audi a8
audi a8 3d model badyaka 12136 3dexport
3d_ocean
$89

Audi A8 2010
...usiness car car class class f f german german luxury luxury s s s8 s8 sedan sedan vehicle vehicle
new audi a8 2010 detaled model.
turbosquid
$39

A8 2018
...a8 2018 for download as 3ds, obj, wrl, c4d, fbx, dae, and stl on turbosquid: 3d models for games, architecture, videos. (1345349)
turbosquid
free

audi a8 l
...rbosquid
royalty free 3d model audi a8 l for download as obj on turbosquid: 3d models for games, architecture, videos. (1663016)
3d_ocean
$45

Audi A8 restyled
...our door vehicle was created in blender3d 2.62.realistic renderings were created with yafaray 0.1.2 realistic plugin.rendering...
Anet
thingiverse
free

Anet by derbodesign
...anet by derbodesign
thingiverse
logo anet
thingiverse
free

Anet e10 , Anet v1.0 by jonathan_943D
...anet e10 , anet v1.0 by jonathan_943d
thingiverse
soporte de ventilador de 80mm, para controladora anet v1.0
thingiverse
free

Anet A8 Anet AM8 Y belt holder
...anet a8 anet am8 y belt holder
thingiverse
anet a8 anet am8 y belt holder
thingiverse
free

Anet A8 Probe Bracket for anet sensor by chelrix
...anet a8 probe bracket for anet sensor by chelrix
thingiverse
anet a8 probe bracket for anet official sensor and marlin firmware
thingiverse
free

Anet logo by JUST3D_PRNTNG
...anet logo by just3d_prntng
thingiverse
anet logo
thingiverse
free

Fan nozzle for Anet A8 with original Anet levelsensor by peteruhlmann
...et levelsensor by peteruhlmann
thingiverse
here is an improved fan nozzle for the anet a8 with original level sensor from anet.
thingiverse
free

Anet Et4 Box
...anet et4 box
thingiverse
tool box for anet et4
thingiverse
free

Anet Logo by Superflex_Plastic_Fantastic
...anet logo by superflex_plastic_fantastic
thingiverse
anet logo to incorporate into designs.
thingiverse
free

Box for Anet ET4
...box for anet et4
thingiverse
this is a simple box for tool of anet et4
thingiverse
free

Anet V1.0 Board Kühlung (80mm Lüfter) / Anet A8 by MadCre8
...anet v1.0 board kühlung (80mm lüfter) / anet a8 by madcre8
thingiverse
anet v1.0 board kühlung (80mm lüfter) / anet a8
Touch
3ddd
$1

Touch
...touch
3ddd
touch , альфа банк
электронный терминал для очереди
3ddd
$1

GSG / Touch
... ванна
http://www.ceramicagsg.com/sanitaryware-touch/bathtub-touch-free-standing.html
turbosquid
$10

Oculus Touch
...squid
royalty free 3d model oculus touch for download as skp on turbosquid: 3d models for games, architecture, videos. (1462433)
turbosquid
$64

iPod Touch
...ty free 3d model ipod touch for download as 3ds, max, and obj on turbosquid: 3d models for games, architecture, videos. (1299603)
3ddd
$1

iPod Touch 5
...ipod touch 5
3ddd
apple , плеер
модель ipod touch 5
3ddd
$1

Asnaghi "Touch"
...asnaghi "touch"
3ddd
asnaghi , touch
фабрика: asnaghi
модель: touch
3ddd
free

Japanese stone touch
...japanese stone touch
3ddd
фонарь
japanese stone garden touch
японский садовый фонарь
икеокоми-гата
3d_ocean
$15

IPOD TOUCH 5
...apple blender ipad iphone ipod mp3 nano player touch
3d model of ipod touch 5 in 3 colours. available in .3ds, .blend, .obj, .x3d
3d_ocean
$12

iPod touch 5G
...pod jobs nano steve touch
ipod touch 3d model. formats, fbx, obj, max(2010) textures and materials with multiple colors included.
3ddd
$1
HTC Touch HD
...http://www.gsmarena.com/htc_touch_hd-2525.php фото:http://i.smartphone.ua/img/phones/htc-touch-hd/foto_001.jpg
Mount
3d_export
free

mounting bracket
...mounting plate is the portion of a hinge that attaches to the wood. mounting plates can be used indoors, cabinetry and furniture.
turbosquid
$2

MOUNTING
... available on turbo squid, the world's leading provider of digital 3d models for visualization, films, television, and games.
turbosquid
free

Mounts
... available on turbo squid, the world's leading provider of digital 3d models for visualization, films, television, and games.
turbosquid
free

Mount Fuji
...fuji
turbosquid
free 3d model mount fuji for download as obj on turbosquid: 3d models for games, architecture, videos. (1579977)
3d_export
$5

Headphone mount LR
...headphone mount lr
3dexport
headphone mount l+r
turbosquid
$39

Mount rainier
...quid
royalty free 3d model mount rainier for download as fbx on turbosquid: 3d models for games, architecture, videos. (1492586)
turbosquid
$5

pipe mounting
...quid
royalty free 3d model pipe mounting for download as obj on turbosquid: 3d models for games, architecture, videos. (1293744)
turbosquid
$3

Mounting Tires
...uid
royalty free 3d model mounting tires for download as fbx on turbosquid: 3d models for games, architecture, videos. (1708511)
3d_export
$5

Magnetic GoPro Mount
...pro mount
3dexport
cool magnetic mount for gopro. allows you to mount the camera on flat metal surfaces and get exclusive shots.
turbosquid
$5

Stone Mount
...ty free 3d model stone mount for download as ma, obj, and fbx on turbosquid: 3d models for games, architecture, videos. (1370306)