Thingiverse
Amiga 4000 High Density Floppy Drive Face Plate and Button by delsydsoftware
by Thingiverse
Last crawled date: 4 years, 6 months ago
I bought an Amiga 4000 desktop last year which had a few nasty issues, including massive amounts of corrosion, broken traces, etc. In fact, the running count of parts I've replaced currently stands at 19 capacitors, 5 SIMM slots, one Ricoh real time clock chip, one battery, one F245 logic chip, and I just found a cracked solder joint on the Super Buster Rev 11 chip (This is as of March 2018...the list may get longer in the future). The -least- of my problems when I bought this A4000 was the missing floppy face plate and button on the high-density floppy drive.
I had mistakenly believed that I could swap in the face plate from a dead FG-357 floppy drive, which is PC-compatible and much easier to acquire. I found a nice looking one with dead electronics and ordered it for cheap. When it arrived, I immediately realized that the Amiga version of the high density drive (F-357 A) is about 50 percent taller than the FG-357. The Amiga high density version of the drive commands STUPIDLY high prices. I couldn't just buy a junk drive just for the face plate. So, that's how this project started.
This is not an exact match for the original, since I don't have an original face plate to work from. I know that the original had a rectangular light pipe for the indicator LED, but I opted to just have a hole instead. The hole engages with the LED perfectly, so it looks completely natural. The front proportions are roughly based on my FG-357 face plate. Note that this design doesn't include a spring-loaded front door. I didn't bother with this detail, since the parts required need to have pretty small plastic hinge pins, and making strong and reliable tiny pins with FDM is just not really viable.
Both the face plate and button are made to be a press fit. I did have to use an exacto knife to slightly trim the tab on the floppy button which fits into the eject bar on the floppy. I know from doing several prototypes that if the button tab is a bit loose, a drop of super glue will hold it in without damaging the drive.
I would suggest assembling it in the following order:
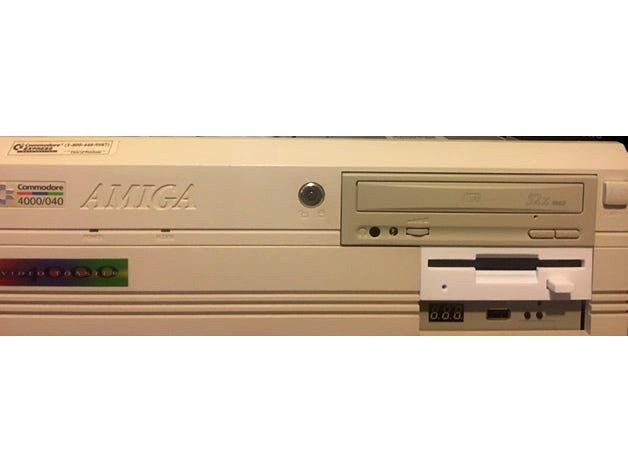
Attach the button first. See the pic above to see how a properly-seated button looks.
Hang a sacrificial floppy disk halfway out of the drive, to help align the face plate
Slowly push the face plate into place, being careful to align the notch at the top of the drive with the notch on the top of the face plate. The long tabs on the sides of the face plate slide down to the screw mounts on either side of the drive. Since the screw mounts stick out a bit, you may need to use a screw driver to gently bend the tabs until they slide over the screw mounts. Once that is done, you should be able to push the face plate completely onto the drive.
Screw the floppy drive back onto the Amiga drive bay, being careful to make sure that the drive screws engage the holes in the plastic tabs. You should now have a totally rejuvenated floppy drive!
I used Hatchbox White PLA for the this print. You'll want to print this at .1 resolution with supports (no raft), as there is a tiny part of the front plate which needs support. It should also be printed at 100% infill. If you have your print height aligned perfectly, it's barely obvious that it's a printed part unless you look at it very closely. The white color stands out like a sore thumb on my 4000, since I have never bothered to Retrobright it. I'm fine with that, as it has an original Commodore Express service label on it, which I'd rather keep for the novelty factor.
I had mistakenly believed that I could swap in the face plate from a dead FG-357 floppy drive, which is PC-compatible and much easier to acquire. I found a nice looking one with dead electronics and ordered it for cheap. When it arrived, I immediately realized that the Amiga version of the high density drive (F-357 A) is about 50 percent taller than the FG-357. The Amiga high density version of the drive commands STUPIDLY high prices. I couldn't just buy a junk drive just for the face plate. So, that's how this project started.
This is not an exact match for the original, since I don't have an original face plate to work from. I know that the original had a rectangular light pipe for the indicator LED, but I opted to just have a hole instead. The hole engages with the LED perfectly, so it looks completely natural. The front proportions are roughly based on my FG-357 face plate. Note that this design doesn't include a spring-loaded front door. I didn't bother with this detail, since the parts required need to have pretty small plastic hinge pins, and making strong and reliable tiny pins with FDM is just not really viable.
Both the face plate and button are made to be a press fit. I did have to use an exacto knife to slightly trim the tab on the floppy button which fits into the eject bar on the floppy. I know from doing several prototypes that if the button tab is a bit loose, a drop of super glue will hold it in without damaging the drive.
I would suggest assembling it in the following order:
Attach the button first. See the pic above to see how a properly-seated button looks.
Hang a sacrificial floppy disk halfway out of the drive, to help align the face plate
Slowly push the face plate into place, being careful to align the notch at the top of the drive with the notch on the top of the face plate. The long tabs on the sides of the face plate slide down to the screw mounts on either side of the drive. Since the screw mounts stick out a bit, you may need to use a screw driver to gently bend the tabs until they slide over the screw mounts. Once that is done, you should be able to push the face plate completely onto the drive.
Screw the floppy drive back onto the Amiga drive bay, being careful to make sure that the drive screws engage the holes in the plastic tabs. You should now have a totally rejuvenated floppy drive!
I used Hatchbox White PLA for the this print. You'll want to print this at .1 resolution with supports (no raft), as there is a tiny part of the front plate which needs support. It should also be printed at 100% infill. If you have your print height aligned perfectly, it's barely obvious that it's a printed part unless you look at it very closely. The white color stands out like a sore thumb on my 4000, since I have never bothered to Retrobright it. I'm fine with that, as it has an original Commodore Express service label on it, which I'd rather keep for the novelty factor.