Thingiverse

Amadon's Prusa i3 - Wilson hybrid complete printer by Amadon
by Thingiverse
Last crawled date: 3 years ago
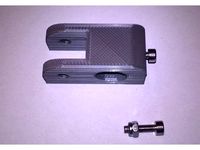
EDIT 6/6/16 Added new version of the idlers for the chimera/cyclops extruder. These new idlers have support for the bearings on both sides so it can't bend over and lose clamping pressure on the filament.
There's a 0.4mm thick support material built in that you must cut out. No support needed from your slicer. Use a washer on BOTH sides of the roller bearing. Low profile nut of course. The flat side of the idlers should face towards the motors. Slightly raised sides towards the center. Put the nut on the motor side.
EDIT: I reduced the size of the holes for the smooth and threaded rods in the Y ends so they would fit more snugly but not too small that you can't put the rods through them without filing them. 1-22-16
EDIT2: I added an XL frame in the remix list that I'll be working on fitting the parts to. Check out that design when looking into making this printer. I have not checked to see what does and does not fit it yet, and may modify it, but it's a start.
Original text:
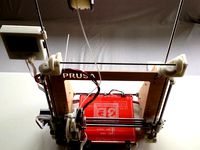
I have uploaded the Sketchup file of the complete printer to help with assembly and any questions you may have. If that's not enough please comment and I'll help you out!
This printer is based on parts from my now-defunct diytechshop i3XL. The company went out of business and left no template online for the frame. You can use a standard i3 frame, just make sure you print the right z motor and rod holders, and rear supports. They are all labelled.
This design is for a 9"x12"x~7.5" print volume.
You can make a smaller standard i3 print bed and frame if you like.
I have included all the files for both a cyclops/chimera dual extruder and an E3D V6 single extruder. If a part isn't labelled for the single extruder in the filename it's either part of the printer itself, or the dual extruder. If this doesn't make sense just ask and I'll explain.
The single extruder's instructions can be found here: http://www.thingiverse.com/thing:760444
The dual extruders instructions are in this description. I also have just the dual extruder listed separately here: http://www.thingiverse.com/thing:1143466
The PTFE tubes in my print of the dual extruder are 47mm long, but when you first assemble it, cut the two PTFE tubes to about 50mm long and try to put the cold end on. If they are too long trim off about 1mm and try again. Repeat until your PTFE tubes are exactly the right length so they are snug but still let the holes on the back of your cold end match up with the printed extruder body. TIP: Don't make the PTFE TOO snug. If you do, the part that contacts at the bottom of the PTFE tube is resting on a U shaped reduction in diameter. This part gets hot. If your PTFE is too long it'll soften and try to squeeze down into that U shape and get smaller. This will cause the inside of the bottom of the PTFE to be smaller than your filament and it will bind. MAKE SURE THE PTFE IS EXACTLY THE RIGHT LENGTH. I had mine a little too long, by about a mm, and ended up having to heat my hot end hot enough to somewhat liquify the PTFE, and push my filament through by hand until I had extruded the PTFE that was touching my filament and causing it to bind. Big pain in the butt. So make sure your PTFE is not so long that you have to apply a lot of pressure to make the screw holes match up. Either that, or just put it all together with the heat brakes not inserted all the way and then move them up. Then level them.
This design includes hardware for a complete printer. The axis' have built in opto endstop mounts. Of course you have to get opto endstops shaped like the ones I have. Where the beam U is on the end facing the long way. You'll see what I mean in the pictures.
You can get endstops like this here: http://ow.ly/US8qY
I checked the dimensions of this compared to the most common i3 Rework build on here and the parts should be compatible. At least the distance between the Z threaded and smooth rods are. I used this Thing as a reference: http://www.thingiverse.com/thing:858449
I have included the Z rod/motor holders from this i3 rework in my model, unaltered.
I have uploaded Z rod holders and rear supports that have the standard i3 screw spacing so if you buy a pre-cut i3 frame those are the ones that will fit. They all have "classic i3" in the filename.
It uses one 608ZZ roller bearing for the X and Y idler, like this eBay auction: http://ow.ly/US8uu
Put a washer on either side of the bearing to act as belt guides. http://ow.ly/US8yz
The difference between the two X carriages is minor. The Chimera one has easier access to the upper rear grub screws on in the Chimera cold end and also allows you to slide the lower bearings out of the way to get to the lower grub screws. Just slide the bearings all the way towards the center once you have both nozzles exactly the same height and have tightened the grub screws again. It should hold the bearings in place just fine. Mine does.
Parts for extruder assembly:
2 10mm M5 screws: http://www.mcmaster.com/#93070a121/=wnovg7
2 low profile M5 nuts: http://www.mcmaster.com/#90695a037/=wnndyn
2 5x10x4 ball bearings: http://www.amazon.com/Bearing-5x10x4-Shielded-Miniature-Bearings/dp/B002BBGE56
2 Washers between the idler and the 5x10x4 bearings. http://www.mcmaster.com/#93475a230/=109ocpw
If you don't use these washers your bearings won't spin. You will have to drill the washers out to 5mm I.D.
2 M4 screws for the idlers: http://www.mcmaster.com/#93070a109/=wnnqj3
2 M4 nuts for the idlers: http://www.mcmaster.com/#90725a010/=wnosvm
2 MK8 drive gears which can be found all over the place online. For example here: http://ow.ly/WSGDD
Cut some M3 threaded rod and make 3 lengths that are 120mm long. These will mount the motors to the whole thing. This threaded rod goes all the way through both motors and the extruder body. Put nuts on one end, and washers and nuts on the other. It's easier if you drill out the threads from your stepper motors and secures tighter. Theoretically you don't have to do this but I have not tried it and it might be loose.
M3 threaded rod: http://www.mcmaster.com/#98861a040/=10mqo2f
2 springs for the idelers: http://www.mcmaster.com/#94125k658/=yy1s7h
You will have to trim the springs shorter and use trial and error to get the length just right for tension. They should be just long enough so with filament fed into the extruder you have to apply slight pressure to get the M4 screws to begin threading into the nuts.
You will probably need a couple washers on the M4 screws to keep the springs from slipping past the screw heads. The same washers you used on the idler bearings will work.
General instructions"
The belt idlers for the X and Y axis use an m8 nut and bolt.
25mm bolt x2: http://www.mcmaster.com/#90327a158/=10mqn3u
M8 nut x2: http://www.mcmaster.com/#90592a022/=10mqmmo
The Z bearings inside the ends on the X axis are tightened using three 10mm m3 screws and nuts each.
The X axis motor is held on by three 15mm m3 screws.
The Y axis motor is held on by three 10mm m3 screws.
The Z bottom rod holders are attached with 3 15mm m3 screws and nuts each.
The Z top rod holders are held attached by 3 10mm m3 screws and nuts each.
The Z opto endstop mount is attached with one 20mm m3 screw and nut.
The Z motors are attached with 3 10mm m3 screws each.
The X and Z opto endstops are attached with 1 8mm m3 screw and nut each.
The Y opto endstop is attached with 1 10mm m3 screw and nut.
All smooth rods are 8mm.
Z axis threaded rods are 5mm: http://www.mcmaster.com/#94185a584/=10mqpg4
Of course you can make your Y axis whatever length you want, but my Y smooth rods are 520.7mm long and my Y threaded rods are 536.7mm long. You will need 8 m8 nuts to attach the Y axis ends to the threaded rods and 4 m8 nuts and lock washers placed on either side of the frame to firmly hold the base of the frame in place, attached to the Y threaded rods.
The m8 threaded rods that support the frame vertically in the back should be at least 340mm long. The are held on by 3 m8 nuts. One in the top and one on either side of the hole in the frame supports. So 6 in total.
The two upper frame support rod fasteners are held in place by 1 30mm m8 screw and nut each.
The Y belt holder uses 3 10mm m3 screws and nuts.
The Y bearing holders use 3 8mm m3 screws and nuts each (x4)
The Z beam breaker holder uses 1 15mm m3 screw and nut to attach to the X motor end..
The Z beam breaker attaches to the Z beam breaker holder using 2 25mm m3 screws and nuts. This length may vary depending on how far away you place the Z opto endstop on the smooth rod. I actually only needed 15mm m3 screws.
The X beam breaker holder uses one small pointed screw and no nut. I don't know the exact screw size but it's ~4mm dia. It has to be short enough to not pass all the way through the X idler end into where the X smooth rods sit.
My X smooth rods are 392mm long.
The X idler bearing holder is attached with one 40mm long m3 screw and 3 m3 nuts. One nut goes inside the bearing holder, one nut is used to adjust tension on the belt by placing it outside the endcap and screwing it towards or away from the printer, and the third nut holds the second nut in place. If this doesn't make sense please message me and I'll help you out.
The other two holes in the X end cap are also for belt tensioning, but may not be necessary. If used they use 1 ~30mm long m3 screw and nut and apply pressure to the ends of your smooth rods to create tension. I do not use them myself.
The RAMPS mount is held on by 4 8mm m3 screws and nuts.
The RAMPS itself is held on by self threading (pointed) screws ~4mm dia. and ~10mm long. I may edit the screw holes here to use m3 nuts and bolts soon.
The two frame supports, in addition to sharing the screws that mount the Z lower rod holders, use 3 10mm m3 screws and nuts for the second set of holes each.
The 4 bed leveling thumb screws us 1 30mm m3 screw and nut each (x4). You will need 4 more of the same springs the extruder idlers use for the bed leveling screws, so 6 in total.
The Y opto beam breaker screw to the bottom of your print bed assembly using 2 8mm m3 screws and nuts.
My print bed is 9" x 12". It uses two sheets of aluminum. The bottom one is 2mm thick and the top is 3mm thick, approx. I used some half inch square stock in a # configuration to reinforce the bed. You can order that here: http://www.mcmaster.com/#6546k49/=10b60qk
I then put a print bed heater on top of that and the glass from a 9x12 picture frame on top of the heater. Works great!
I cannot find a template for my laser cut aluminum frame online anywhere, because it's from an i3XL design by Diytechshop, which has since gone out of business. http://ow.ly/W7B0n
It's larger than the standard i3 frame, but these parts will all work on a regular i3, your X and Z rods will just be shorter. I will be making my own template based on my printer frame once I take my printer apart to install all these new parts. Then I can accurately get all of the dimensions and will upload the template here.
You can download my configuration.h here: http://pastebin.com/4izq94YL
It's configured to use a Chimera, so if you have a Cyclops just change (#define EXTRUDERS) to 1.
I gave my printer the custom name "augmentation" so it'd say "augmentation ready" when it was ready to print. You can change this to whatever you like.
I believe I listed all the screws and such but if I missed anything let me know! Thanks and enjoy!
EDIT: Added access holes for the mounting screws for the Chimera/Cyclops in the X carriage. This way if they come loose you don't have to disassemble anything to tighten them again.https://www.youtube.com/watch?v=T9Ya5-5jXGc
There's a 0.4mm thick support material built in that you must cut out. No support needed from your slicer. Use a washer on BOTH sides of the roller bearing. Low profile nut of course. The flat side of the idlers should face towards the motors. Slightly raised sides towards the center. Put the nut on the motor side.
EDIT: I reduced the size of the holes for the smooth and threaded rods in the Y ends so they would fit more snugly but not too small that you can't put the rods through them without filing them. 1-22-16
EDIT2: I added an XL frame in the remix list that I'll be working on fitting the parts to. Check out that design when looking into making this printer. I have not checked to see what does and does not fit it yet, and may modify it, but it's a start.
Original text:
I have uploaded the Sketchup file of the complete printer to help with assembly and any questions you may have. If that's not enough please comment and I'll help you out!
This printer is based on parts from my now-defunct diytechshop i3XL. The company went out of business and left no template online for the frame. You can use a standard i3 frame, just make sure you print the right z motor and rod holders, and rear supports. They are all labelled.
This design is for a 9"x12"x~7.5" print volume.
You can make a smaller standard i3 print bed and frame if you like.
I have included all the files for both a cyclops/chimera dual extruder and an E3D V6 single extruder. If a part isn't labelled for the single extruder in the filename it's either part of the printer itself, or the dual extruder. If this doesn't make sense just ask and I'll explain.
The single extruder's instructions can be found here: http://www.thingiverse.com/thing:760444
The dual extruders instructions are in this description. I also have just the dual extruder listed separately here: http://www.thingiverse.com/thing:1143466
The PTFE tubes in my print of the dual extruder are 47mm long, but when you first assemble it, cut the two PTFE tubes to about 50mm long and try to put the cold end on. If they are too long trim off about 1mm and try again. Repeat until your PTFE tubes are exactly the right length so they are snug but still let the holes on the back of your cold end match up with the printed extruder body. TIP: Don't make the PTFE TOO snug. If you do, the part that contacts at the bottom of the PTFE tube is resting on a U shaped reduction in diameter. This part gets hot. If your PTFE is too long it'll soften and try to squeeze down into that U shape and get smaller. This will cause the inside of the bottom of the PTFE to be smaller than your filament and it will bind. MAKE SURE THE PTFE IS EXACTLY THE RIGHT LENGTH. I had mine a little too long, by about a mm, and ended up having to heat my hot end hot enough to somewhat liquify the PTFE, and push my filament through by hand until I had extruded the PTFE that was touching my filament and causing it to bind. Big pain in the butt. So make sure your PTFE is not so long that you have to apply a lot of pressure to make the screw holes match up. Either that, or just put it all together with the heat brakes not inserted all the way and then move them up. Then level them.
This design includes hardware for a complete printer. The axis' have built in opto endstop mounts. Of course you have to get opto endstops shaped like the ones I have. Where the beam U is on the end facing the long way. You'll see what I mean in the pictures.
You can get endstops like this here: http://ow.ly/US8qY
I checked the dimensions of this compared to the most common i3 Rework build on here and the parts should be compatible. At least the distance between the Z threaded and smooth rods are. I used this Thing as a reference: http://www.thingiverse.com/thing:858449
I have included the Z rod/motor holders from this i3 rework in my model, unaltered.
I have uploaded Z rod holders and rear supports that have the standard i3 screw spacing so if you buy a pre-cut i3 frame those are the ones that will fit. They all have "classic i3" in the filename.
It uses one 608ZZ roller bearing for the X and Y idler, like this eBay auction: http://ow.ly/US8uu
Put a washer on either side of the bearing to act as belt guides. http://ow.ly/US8yz
The difference between the two X carriages is minor. The Chimera one has easier access to the upper rear grub screws on in the Chimera cold end and also allows you to slide the lower bearings out of the way to get to the lower grub screws. Just slide the bearings all the way towards the center once you have both nozzles exactly the same height and have tightened the grub screws again. It should hold the bearings in place just fine. Mine does.
Parts for extruder assembly:
2 10mm M5 screws: http://www.mcmaster.com/#93070a121/=wnovg7
2 low profile M5 nuts: http://www.mcmaster.com/#90695a037/=wnndyn
2 5x10x4 ball bearings: http://www.amazon.com/Bearing-5x10x4-Shielded-Miniature-Bearings/dp/B002BBGE56
2 Washers between the idler and the 5x10x4 bearings. http://www.mcmaster.com/#93475a230/=109ocpw
If you don't use these washers your bearings won't spin. You will have to drill the washers out to 5mm I.D.
2 M4 screws for the idlers: http://www.mcmaster.com/#93070a109/=wnnqj3
2 M4 nuts for the idlers: http://www.mcmaster.com/#90725a010/=wnosvm
2 MK8 drive gears which can be found all over the place online. For example here: http://ow.ly/WSGDD
Cut some M3 threaded rod and make 3 lengths that are 120mm long. These will mount the motors to the whole thing. This threaded rod goes all the way through both motors and the extruder body. Put nuts on one end, and washers and nuts on the other. It's easier if you drill out the threads from your stepper motors and secures tighter. Theoretically you don't have to do this but I have not tried it and it might be loose.
M3 threaded rod: http://www.mcmaster.com/#98861a040/=10mqo2f
2 springs for the idelers: http://www.mcmaster.com/#94125k658/=yy1s7h
You will have to trim the springs shorter and use trial and error to get the length just right for tension. They should be just long enough so with filament fed into the extruder you have to apply slight pressure to get the M4 screws to begin threading into the nuts.
You will probably need a couple washers on the M4 screws to keep the springs from slipping past the screw heads. The same washers you used on the idler bearings will work.
General instructions"
The belt idlers for the X and Y axis use an m8 nut and bolt.
25mm bolt x2: http://www.mcmaster.com/#90327a158/=10mqn3u
M8 nut x2: http://www.mcmaster.com/#90592a022/=10mqmmo
The Z bearings inside the ends on the X axis are tightened using three 10mm m3 screws and nuts each.
The X axis motor is held on by three 15mm m3 screws.
The Y axis motor is held on by three 10mm m3 screws.
The Z bottom rod holders are attached with 3 15mm m3 screws and nuts each.
The Z top rod holders are held attached by 3 10mm m3 screws and nuts each.
The Z opto endstop mount is attached with one 20mm m3 screw and nut.
The Z motors are attached with 3 10mm m3 screws each.
The X and Z opto endstops are attached with 1 8mm m3 screw and nut each.
The Y opto endstop is attached with 1 10mm m3 screw and nut.
All smooth rods are 8mm.
Z axis threaded rods are 5mm: http://www.mcmaster.com/#94185a584/=10mqpg4
Of course you can make your Y axis whatever length you want, but my Y smooth rods are 520.7mm long and my Y threaded rods are 536.7mm long. You will need 8 m8 nuts to attach the Y axis ends to the threaded rods and 4 m8 nuts and lock washers placed on either side of the frame to firmly hold the base of the frame in place, attached to the Y threaded rods.
The m8 threaded rods that support the frame vertically in the back should be at least 340mm long. The are held on by 3 m8 nuts. One in the top and one on either side of the hole in the frame supports. So 6 in total.
The two upper frame support rod fasteners are held in place by 1 30mm m8 screw and nut each.
The Y belt holder uses 3 10mm m3 screws and nuts.
The Y bearing holders use 3 8mm m3 screws and nuts each (x4)
The Z beam breaker holder uses 1 15mm m3 screw and nut to attach to the X motor end..
The Z beam breaker attaches to the Z beam breaker holder using 2 25mm m3 screws and nuts. This length may vary depending on how far away you place the Z opto endstop on the smooth rod. I actually only needed 15mm m3 screws.
The X beam breaker holder uses one small pointed screw and no nut. I don't know the exact screw size but it's ~4mm dia. It has to be short enough to not pass all the way through the X idler end into where the X smooth rods sit.
My X smooth rods are 392mm long.
The X idler bearing holder is attached with one 40mm long m3 screw and 3 m3 nuts. One nut goes inside the bearing holder, one nut is used to adjust tension on the belt by placing it outside the endcap and screwing it towards or away from the printer, and the third nut holds the second nut in place. If this doesn't make sense please message me and I'll help you out.
The other two holes in the X end cap are also for belt tensioning, but may not be necessary. If used they use 1 ~30mm long m3 screw and nut and apply pressure to the ends of your smooth rods to create tension. I do not use them myself.
The RAMPS mount is held on by 4 8mm m3 screws and nuts.
The RAMPS itself is held on by self threading (pointed) screws ~4mm dia. and ~10mm long. I may edit the screw holes here to use m3 nuts and bolts soon.
The two frame supports, in addition to sharing the screws that mount the Z lower rod holders, use 3 10mm m3 screws and nuts for the second set of holes each.
The 4 bed leveling thumb screws us 1 30mm m3 screw and nut each (x4). You will need 4 more of the same springs the extruder idlers use for the bed leveling screws, so 6 in total.
The Y opto beam breaker screw to the bottom of your print bed assembly using 2 8mm m3 screws and nuts.
My print bed is 9" x 12". It uses two sheets of aluminum. The bottom one is 2mm thick and the top is 3mm thick, approx. I used some half inch square stock in a # configuration to reinforce the bed. You can order that here: http://www.mcmaster.com/#6546k49/=10b60qk
I then put a print bed heater on top of that and the glass from a 9x12 picture frame on top of the heater. Works great!
I cannot find a template for my laser cut aluminum frame online anywhere, because it's from an i3XL design by Diytechshop, which has since gone out of business. http://ow.ly/W7B0n
It's larger than the standard i3 frame, but these parts will all work on a regular i3, your X and Z rods will just be shorter. I will be making my own template based on my printer frame once I take my printer apart to install all these new parts. Then I can accurately get all of the dimensions and will upload the template here.
You can download my configuration.h here: http://pastebin.com/4izq94YL
It's configured to use a Chimera, so if you have a Cyclops just change (#define EXTRUDERS) to 1.
I gave my printer the custom name "augmentation" so it'd say "augmentation ready" when it was ready to print. You can change this to whatever you like.
I believe I listed all the screws and such but if I missed anything let me know! Thanks and enjoy!
EDIT: Added access holes for the mounting screws for the Chimera/Cyclops in the X carriage. This way if they come loose you don't have to disassemble anything to tighten them again.https://www.youtube.com/watch?v=T9Ya5-5jXGc
Similar models
thingiverse
free

Supports for Prusa i3 aluminium frame by Jkk79
...ell me if there's some options you'd like to see added to the customizer.
or if there's something that behaves silly.
thingiverse
free
Prusa_I3_MK2_Y_Belt_Idler_Tensioner by Andison
... and washers.
the idler is designed in a way that it does not impact heat bed movement or minimize printing area respectively.
thingiverse
free

M8 Thread Rod Led Nut Holder by rtistique
...nut for the rod. slide the nut into the slot and watch your printer go.
note: you made need longer m3 screws to use this holder.
thingiverse
free
One Z-Motor / Filament holder solution for Prusa i3 Rework by WieMi
...t)
360mm m8 threaded rod (middle)
2x 380mm m8 threaded rod (right)
11x m3 nut
8x m3 - 8mm grub screw
8x m8 nut
5x 688zz bearing
thingiverse
free

Strong Spool Holder for Prusa i3 Single Frame by derethor
... rod to keep the ptfe tube close to the printer.
you need 4 608 bearings, 8 wahsers, 8 nuts m8, and two small rods m8 threaded.
thingiverse
free

E3D V6 Single Direct Drive System by Amadon
...9mm outer diameter so i had to widen the inside diameter of the washer with a dremel. http://www.mcmaster.com/#93475a230/=wnnbco
thingiverse
free

Dual 608 bearing Y idler for Prusa i3 with 10mm threaded rod by Tech2C
...-slightly reduced the bearing rim.
you will need:
1x m8x30mm cap screw
1x m8 nut
2x 608 bearings
2x m4x20mm cap screws
2x m4 nuts
thingiverse
free

Z-End M3 Prusa i3 by protagonist
... it to the z bearing holder of my prusa i3. hope somebody can use it, too. i had to heat the m3 screw to get it in and move snug.
thingiverse
free

Amadon's Cyclops and Chimera Direct Drive Version 3 by Amadon
...y if they come loose you don't have to disassemble anything to tighten them again.https://www.youtube.com/watch?v=t9ya5-5jxgc
thingiverse
free

Z Axis Nut Mount 8mm Traped Nut by Nitrogen777
...uld use stainless steel threaded rod and a steel nut.
this will stop the two binding also the nut will wear not the threaded rod.
Amadon
thingiverse
free

Amadon's Double Bowden Direct Drive Extruder 1.75mm filament by Amadon
...e flat side of the idlers should face towards the motors. slightly raised sides towards the front. put the nut on the motor side.
thingiverse
free

2040 Extrusion Coupler by Amadon
...ed 24 of each.
i added a 0.5mm gap all the way around the inside to compensate for printers printing inside dimensions too small.
thingiverse
free

Extruder Body for Amadon's Cyclops and Chimera Direct Drive by cerebrate
...to hold a bltouch bed leveling sensor.
for all other details and instructions, please see the original and details given therein.
thingiverse
free

X Axis Leveling tool Lengthened and cleaned up by Amadon
...so cleaned up the profile a bit and widened the arc that rests on the y rods by 0.2mm and shaped it so it should lock into place.
thingiverse
free
Amadon's Cyclops and Chimera Direct Drive Version 3 by Amadon
...y if they come loose you don't have to disassemble anything to tighten them again.https://www.youtube.com/watch?v=t9ya5-5jxgc
thingiverse
free

Z endstop Prusa I3 by gestras
...i3. reduce to fit with e3d chimera mount on amadon#39;s cyclops and chimera direct drive version...
thingiverse
free

Modified dual extruder X-carriage for Direct-drive hinged extruder for E3D/J-Head hot-end (Prusa i3) by Amadon
...gher to save print height and extended the frame for them. i also added a fourth bearing spot for a theoretically smoother ride.
thingiverse
free
E3D V6 Single Direct Drive System by Amadon
...9mm outer diameter so i had to widen the inside diameter of the washer with a dremel. http://www.mcmaster.com/#93475a230/=wnnbco
thingiverse
free

D-Bot CoreXY Printer with Extra Large 17"X17" Build Plate by Amadon
...omment i will probably miss it or not see it for a long time, so message me. or look me up on facebook. my name is amadon faul.
Wilson
turbosquid
$10

Wilson
...ree 3d model wilson for download as 3ds, ige, obj, x, and stl on turbosquid: 3d models for games, architecture, videos. (1232930)
turbosquid
$15

Wilson Football
...lty free 3d model wilson football for download as obj and fbx on turbosquid: 3d models for games, architecture, videos. (1690907)
3ddd
$1

Scandinavian Style Wilson Sideboard
... комод
wilson комод, скандинавский стиль
в архиве файл макс 2014+fbx+obj
библиотека материалов
3d_export
$18

Basketball Wilson 3D Model
...onship sports game play hobbies outdoor indoor wilson orange black words
basketball wilson 3d model waldemaraksjon 96439 3dexport
turbosquid
$45

Wilson tennis racket
... available on turbo squid, the world's leading provider of digital 3d models for visualization, films, television, and games.
turbosquid
$45

Sofa Chester wilson
... available on turbo squid, the world's leading provider of digital 3d models for visualization, films, television, and games.
turbosquid
$26

Tennis ball Wilson
... available on turbo squid, the world's leading provider of digital 3d models for visualization, films, television, and games.
3ddd
$1

Ulivi Salotti Wilson
...ulivi salotti wilson
3ddd
ulivi salotti
кресло уливизалотти
3ddd
$1

Idea Wilson
...венге;
и в 8 вариантах цветовой палитры: шафрановый, бирюзовый, коралловый, сапфировый, графитовый, молочный, мятный и сливочный.
3ddd
$1

Тарелки Donna Wilson
...ые текстуры, для большей красоты =)
p.s. тарелкам надо добавить 2-3 iterations в subdivision surface (в свойствах editable poly).
Hybrid
3d_export
$10
hybrid watch
...hybrid watch
3dexport
turbosquid
$5

Hybrid Scope
...ree 3d model hybrid scope for download as blend, fbx, and obj on turbosquid: 3d models for games, architecture, videos. (1533651)
turbosquid
$39
Robot Hybrid
... 3d model robot hybrid for download as max, obj, fbx, and dae on turbosquid: 3d models for games, architecture, videos. (1373779)
turbosquid
$199

Hybrid Car
... available on turbo squid, the world's leading provider of digital 3d models for visualization, films, television, and games.
archive3d
free

Hybrid 3D Model
...id 3d model
archive3d
aircraft
hybrid 6 - 3d model (*.gsm+*.3ds) for interior 3d visualization.
3d_export
$25

Honda insight hybrid 3D Model
...t hybrid 3d model
3dexport
honda insight-hybrid car vehicle insight hybrid
honda insight hybrid 3d model artline3d 26442 3dexport
3d_export
$45

Hybrid ce456 3D Model
...hybrid ce456 3d model
3dexport
alien robot 3d hybrid terminator code red flying camera
hybrid ce456 3d model dan3d 84278 3dexport
3ddd
$1

Hybrid Task Floor Light
...ight up your room in style with this contemporary hybrid task floor lamp, a great accessory for adding a fresh touch to the home.
turbosquid
$6

Hybrid drone car
...
royalty free 3d model hybrid drone car for download as blend on turbosquid: 3d models for games, architecture, videos. (1602619)
turbosquid
$5

AK12 with hybrid sight
...alty free 3d model ak12 with hybrid sight for download as skp on turbosquid: 3d models for games, architecture, videos. (1261141)
I3
3d_export
$10

suv i3
...suv i3
3dexport
suv i3 2013 series
3d_ocean
$89

BMW i3 2012
...y, in real units of measurement, qualitatively and maximally close to the original. model formats: - *.max (3ds max 2008 scanl...
cg_studio
$99

BMW i3 20143d model
...
cgstudio
.3ds .c4d .fbx .lwo .max .obj - bmw i3 2014 3d model, royalty free license available, instant download after purchase.
cg_studio
$99

BMW i3 20123d model
...tudio
.3ds .c4d .fbx .lwo .max .mb .obj - bmw i3 2012 3d model, royalty free license available, instant download after purchase.
cg_studio
$99

BMW i3 20143d model
...tudio
.3ds .c4d .fbx .lwo .max .mb .obj - bmw i3 2014 3d model, royalty free license available, instant download after purchase.
humster3d
$75

3D model of BMW i3 2014
...
buy a detailed 3d model of bmw i3 2014 in various file formats. all our 3d models were created maximally close to the original.
humster3d
$40

3D model of Kitchen Set I3
...uy a detailed 3d model of kitchen set i3 in various file formats. all our 3d models were created maximally close to the original.
3d_ocean
$30

Kitchen set i3
...ensils oven plates shelves sink table ware
kitchen set i3 include 3d models: cooker, oven, sink, cupboards, table, chair, plates.
3d_ocean
$89

BMW i3 2014
...y, in real units of measurement, qualitatively and maximally close to the original. model formats: - *.max (3ds max 2008 scanl...
cg_studio
$99

BMW i3 Concept 20113d model
...i3
.3ds .c4d .fbx .lwo .max .obj - bmw i3 concept 2011 3d model, royalty free license available, instant download after purchase.
Prusa
turbosquid
$2

Frame Filament Guide Clip-On for Prusa Mk3
...rame filament guide clip-on for prusa mk3 for download as stl on turbosquid: 3d models for games, architecture, videos. (1634730)
3d_export
free

prusa i3 mk3s laser mount for opt lasers
...to learn more about the blue laser technology that conceived the cutting and engraving laser heads from opt lasers, please visit:
turbosquid
free

Prusa small printer adapter holder
...er for download as ipt, skp, dwg, dxf, fbx, ige, obj, and stl on turbosquid: 3d models for games, architecture, videos. (1642936)
3d_export
$30

geisha by jonathan adler
...** i did a 3d printing test in the prusa software, you can find it among the attached images.<br>exchange:<br>.blend...
thingiverse
free

Prusa without Prusa (rc2) by madless
...prusa without prusa (rc2) by madless
thingiverse
just the main part of prusa rc2 faceshield, without writing.
enjoy :)
thingiverse
free

Prusa by acejbc
...prusa by acejbc
thingiverse
prusa knob info
m3 8mm screw
thingiverse
free

Prusa house
...prusa house
thingiverse
how prusa house could look like...
thingiverse
free

Prusa Mk2 "Fake Prusa" LCD cover by anraf1001
...r by anraf1001
thingiverse
version of prusa's lcd cover with "fake prusa" instead of "original prusa"
thingiverse
free

Prusa stabilizator by gutiueugen
...prusa stabilizator by gutiueugen
thingiverse
prusa stabilizator
thingiverse
free

Keychain Prusa by rbarbalho
...keychain prusa by rbarbalho
thingiverse
keychain with text prusa.
Complete
turbosquid
$35

complete plan
...quid
royalty free 3d model complete plan for download as max on turbosquid: 3d models for games, architecture, videos. (1221693)
turbosquid
$10
COMPLETE WASHROOM
...
royalty free 3d model complete washroom for download as max on turbosquid: 3d models for games, architecture, videos. (1413853)
turbosquid
$1

Complete Office
...id
royalty free 3d model complete office for download as max on turbosquid: 3d models for games, architecture, videos. (1323641)
vizpark
$509

VP COMPLETE
...e is the ultimate collection of 3d archviz assets, including 900 3d models, 50 hdris, 100 tileable textures and pattern software.
turbosquid
$15
excercise complete
... available on turbo squid, the world's leading provider of digital 3d models for visualization, films, television, and games.
turbosquid
$1
complete cabinet
... available on turbo squid, the world's leading provider of digital 3d models for visualization, films, television, and games.
turbosquid
free

complete Desk.lwo
... available on turbo squid, the world's leading provider of digital 3d models for visualization, films, television, and games.
3d_export
$5

Complete Wall Pack
...complete wall pack
3dexport
a complete set of 14 walls
3d_ocean
$12

Complete Model
... any other purpose. model includes, tree, street light, bench with urn, horse model. total poly and verts are 282,036 and 334,...
turbosquid
$80

sasuke complete susanoo
...oyalty free 3d model sasuke complete susanoo for download as on turbosquid: 3d models for games, architecture, videos. (1693376)
Printer
archibase_planet
free

Printer
...inter
archibase planet
printer laser printer pc equipment
printer n120614 - 3d model (*.gsm+*.3ds) for interior 3d visualization.
archibase_planet
free

Printer
...rchibase planet
laser printer office equipment computer equipment
printer - 3d model (*.gsm+*.3ds) for interior 3d visualization.
turbosquid
$100

Printer
...er
turbosquid
royalty free 3d model printer for download as on turbosquid: 3d models for games, architecture, videos. (1487819)
turbosquid
$3

Printer
...turbosquid
royalty free 3d model printer for download as max on turbosquid: 3d models for games, architecture, videos. (1670230)
turbosquid
$1

printer
...turbosquid
royalty free 3d model printer for download as max on turbosquid: 3d models for games, architecture, videos. (1595546)
turbosquid
$1

printer
...turbosquid
royalty free 3d model printer for download as max on turbosquid: 3d models for games, architecture, videos. (1595105)
turbosquid
$10

Printer
...id
royalty free 3d model printer for download as max and 3dm on turbosquid: 3d models for games, architecture, videos. (1607146)
turbosquid
$7

Printer
...royalty free 3d model printer for download as ma, ma, and obj on turbosquid: 3d models for games, architecture, videos. (1644580)
turbosquid
$30

Printer
... available on turbo squid, the world's leading provider of digital 3d models for visualization, films, television, and games.
turbosquid
$20

Printer
... available on turbo squid, the world's leading provider of digital 3d models for visualization, films, television, and games.