Thingiverse
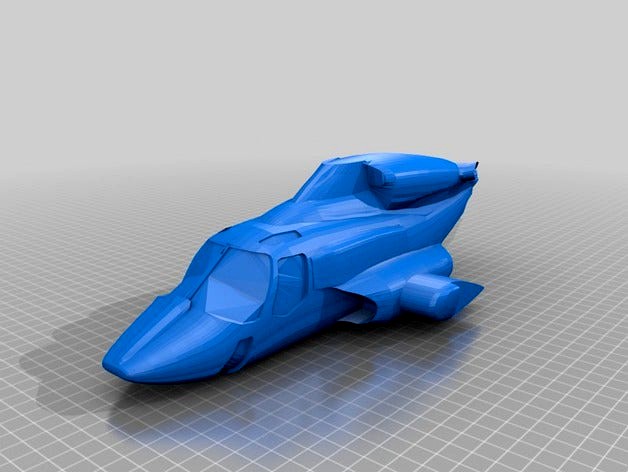
Airwolf V2 for 250 sized RC Heli by scousethief
by Thingiverse
Last crawled date: 3 years ago
Firstly i give full credits to user Marten from whom i pinched this model from.
https://3dwarehouse.sketchup.com/model/1c76ab323298a4176f0b1d884aa8c15c/Airwolf-v20
V2 , chopped and cleaned quite a bit, the original had a few areas that needed cleaning up , for a computerized illustration it wasnt a problem but for an actual 3d real-world model it needed some serious hitting with a hammer to try and get everything to print as it should.
The windows are meant to be cut out and i will upload the "plug"s you will use to make the inserts by using heat to shrink an old coke bottle over a mold.
There are of course extra bits , the weapon pods and turbine details will be uploaded shortly and anything else that goes along with it.
I am trying to find a good configuration of parts so that this can be printed in vase mode and then glued together to create the overall Airwolf aesthetic. The front piece can be printed in vase mode as is but the two central halves have issues at the front of the turbine intakes and the heavy curve around the weapons pod, this is obviously cured when not in vase mode by adding supports and extra perimeters.
What I need to learn : I need a print mode that will print a single walled shell that has a honeycomb backing to a defineable depth, IE a single perimeter with a variable depth support. I know using simplify I can change the infill % through layering in defined splits to allow me to change the infill and perimeters across sections of the model but I haven't figured out how to make the infill work the way that I want it to.
Things for V3 : adapt fuselage to include mounts to hold the servo's, main shaft and various other parts negating the need for the 250 carbon frame
Similar models
thingiverse
free

A4/V2 Rocket single-perimeter by mrjoso
... original model was modified to be printed in single-perimeter spiral vase mode.
scale and cut the model according to your needs.
thingiverse
free

Dice Tower for Vase Mode
...is a solid! you will need to print it without infill and top layers to work. i designed it to be printed in "vase mode"
grabcad
free

Case for wire cutters 5" Llaoa Tools la117130
...case for wire cutters 5" llaoa tools la117130
grabcad
print in vase mode. one perimeter without infill.
thingiverse
free

Fancy vase by ethicalfive
... or with other slicers.
you need to set "merge all outlines into a single solid model" for it to print in in vase mode.
thingiverse
free

Pen Holder Organizer (vase Mode) by Edison13
...to print as low temp as you can.
v2
v4
is originally designed for 0.4 nozzle and going around inside to create ribs for strength
thingiverse
free

Simple Vase by Shapescribe
... vase by shapescribe
thingiverse
a simple, elegant vase design. i printed it in spiral vase mode, (single thickness, no infill).
thingiverse
free

Wind Turbine (Vase mode) by jotalamp
... 3 hours. turbine is almost maximum sized what can be printed in 200mm x 200mm x 200mm build volume.
https://youtu.be/7n6xpreua30
thingiverse
free

Twisted vase.
...irst layer and top solid infill can be set to 0.5mm)
3 bottom layers
0 top layers
0% infill
no supports
or print it in vase mode.
thingiverse
free

Vase by rivel
...vase by rivel
thingiverse
print model in "vase mode", zero top layer and only one perimeter shell.
thingiverse
free

predator clip on tray - vase mode print by hhafq
...t in vase mode
simple clip-on tray - expend to the depth desired, print in vase mode (cura: "spiralize outer contour")
Scousethief
thingiverse
free

Modified target with animals by scousethief
...modified target with animals by scousethief
thingiverse
remixed the targets for a shorter base and slot in targets
thingiverse
free

Parkzone F27 C motor mount and fin by scousethief
...f27 c motor mount and fin by scousethief
thingiverse
basic parts for the parkzone f27c
motor mounts
vertical stab
cockpit covers
thingiverse
free

V-tail , 1105 motors etc by scousethief
...ngiverse
a hack-it job adding 1105 brushless motor bolt spacing to the original v-tail.
all credits go to the original designer.
thingiverse
free

Airwolf fuselage for 250 size heli by scousethief
...roficient and hopefully give a little back to the community.
**10/12/2018 added photo's as you can see it prints beautifully
thingiverse
free

Little Bird MH-6 for 250 size RC Heli by scousethief
...if you try to fly with them , well , you wont get very far.
i did not print skids but i have included them.
windows will be next.
Airwolf
turbosquid
$20

airwolf
... available on turbo squid, the world's leading provider of digital 3d models for visualization, films, television, and games.
3d_export
$39

Airwolf 3D Model
...d model
3dexport
tomysss airwolf helicopter military 3ds max 3d studio v-ray plane engine
airwolf 3d model tomysss 31313 3dexport
turbosquid
$13

Airwolf HD Universal Spool Holder
... available on turbo squid, the world's leading provider of digital 3d models for visualization, films, television, and games.
cg_studio
$45

Bell 222 Helicopter V23d model
...bell 222 helicopter v23d model cgstudio aircraft helicopter airwolf bell 222 rotor vehicle air choper low poly lowpoly...
cg_studio
$45

Bell 222 Helicopter V63d model
...bell 222 helicopter v63d model cgstudio aircraft helicopter airwolf bell 222 rotor vehicle air choper low poly lowpoly...
thingiverse
free

Airwolf by renehasp
...ed this in blender and printed it out on our anet a8. love the quality.. i am going to paint in later on and share the results..
thingiverse
free

Airwolf 3D Printer Model by ReginaFabricam
...airwolf 3d printer model by reginafabricam
thingiverse
this is a model of the airwolf axiom 3d printer
3dcadbrowser
free

Airwolf Helicopter
...ion show.this 3d object can be downloaded in .max, .obj, .3ds, .fbx, .dxf, .lwo, .stl, .wrl, .ma, .dae, .x and .asc file formats.
thingiverse
free

Airwolf HD Universal Spool Holder by contmanger
...he airwolf hd 3d printer, this spool holder is for filament spools with a minimum 35mm center hole and maximum diameter of 202mm.
thingiverse
free

LED mod for AirWolf 3D printer **Budaschnozzle by tmorris9
...verse
ring light mount for airwolf 3d printer. should also work with others that have a 50mm hole spacing for the budaschnozzle.
Heli
turbosquid
$1

Future heli
...osquid
royalty free 3d model future heli for download as max on turbosquid: 3d models for games, architecture, videos. (1549103)
turbosquid
$10

HELI.3DS
... available on turbo squid, the world's leading provider of digital 3d models for visualization, films, television, and games.
turbosquid
$10

heli blade
... model heli blade for download as 3ds, max, obj, fbx, and stl on turbosquid: 3d models for games, architecture, videos. (1437245)
turbosquid
$2

Cartoon Heli
... available on turbo squid, the world's leading provider of digital 3d models for visualization, films, television, and games.
3d_export
$10

Lego Technic Heli and Pickup 3D Model
...model
3dexport
lego model technic toys crane car vehicle pneumatic
lego technic heli and pickup 3d model jarhead88 15381 3dexport
3d_export
$10

Helix Heli Hoverbike
...-km/hour • polycounts: vertices: 12.7k, triangles: 24k • textures: pbr textures • files format: fbx,obj. • textures format: jpeg
3d_ocean
$15

Low Poly Micro Heli
... need to run on mobile devices or browsers. the compact proportions make it easy to read its shape even at a distances which m...
3d_ocean
$25

Eurocopter Colibri EC-120B helicopter
...libri ec-120b civil helicopter.model created with blender3d 2.76 version.renderings in my image previews were created with ble...
3d_ocean
$15

Civil helicopter
...icopters. doors,propellers and sleds are separated from main body. no need for textures for this model. it was created with bl...
3d_export
$13
Mil Mi28 3D Model
...mil mi28 3d model 3dexport mi-28 russian heli military mil mi28 3d model alex121 33571...
250
design_connected
$27

Arch 250
...arch 250
designconnected
mdf italia arch 250 computer generated 3d model. designed by massaud, jean-marie.
3d_export
$5

ferrari 250 california
...ferrari 250 california
3dexport
1957 ferrari 250 california
turbosquid
free

FAB 250
... available on turbo squid, the world's leading provider of digital 3d models for visualization, films, television, and games.
3d_export
$10

Ferrari 250 Testa Rossa 250 1957
... the front suspension is made and there is an engine under the hood. sculpting and textures were used in the study of the chairs.
design_connected
$29

Amouage Sofa 250
...amouage sofa 250
designconnected
busnelli amouage sofa 250 computer generated 3d model. designed by lagravinese, castello.
design_connected
$27

John-John 250
...john-john 250
designconnected
john-john 250 computer generated 3d model. designed by massaud, jean-marie.
design_connected
$22

Airport Sofa 250
...airport sofa 250
designconnected
poliform airport sofa 250 computer generated 3d model. designed by navone, paola.
3d_export
$20

ferrari 250 gto 1962
...ferrari 250 gto 1962
3dexport
ferrari 250 gto 1962
3d_export
$20

ferrari 250 gt california
...ferrari 250 gt california
3dexport
ferrari 250 gt california
turbosquid
$1

Female 250, scan
...can
turbosquid
royalty free 3d model 250 for download as obj on turbosquid: 3d models for games, architecture, videos. (1242260)
Rc
3ddd
$1
RC Helicopter
...rc helicopter
3ddd
вертолет
mini rc helicopter
93.329 polys
3d_export
$7
rc helicopter model
...rc helicopter model
3dexport
rc helicopter model
3d_ocean
$25
RC F1
...rc f1
3docean
auto car control f1 formula race rc remote speed
remote control f1 car
turbosquid
$10
rc plane
...lane
turbosquid
free 3d model rc plane for download as blend on turbosquid: 3d models for games, architecture, videos. (1295828)
turbosquid
$100
RC Helicopter
...free 3d model rc helicopter for download as 3ds, max, and obj on turbosquid: 3d models for games, architecture, videos. (1298511)
turbosquid
$59
Drone with RC
...3d model drone with rc for download as 3ds, max, obj, and fbx on turbosquid: 3d models for games, architecture, videos. (1363601)
turbosquid
$75
RC buggy
... available on turbo squid, the world's leading provider of digital 3d models for visualization, films, television, and games.
turbosquid
$39

RC Plane001
... available on turbo squid, the world's leading provider of digital 3d models for visualization, films, television, and games.
turbosquid
$30
RC Jet
... available on turbo squid, the world's leading provider of digital 3d models for visualization, films, television, and games.
turbosquid
$30
Rc airplane
... available on turbo squid, the world's leading provider of digital 3d models for visualization, films, television, and games.
V2
3d_export
free

Lamp v2
...lamp v2
3dexport
lamp v2 with solar panel
3d_export
$5

hammerhead v2
...hammerhead v2
3dexport
razer hammerhead v2 headphones, modeled in cinema 4d, render in corona
3d_export
$5

manometer v2
...manometer v2
3dexport
3d_export
$5

potato v2
...potato v2
3dexport
turbosquid
$52

Lifebuoys v2
...squid
royalty free 3d model lifebuoys v2 for download as fbx on turbosquid: 3d models for games, architecture, videos. (1560870)
turbosquid
$2

Mask v2
...turbosquid
royalty free 3d model mask v2 for download as stl on turbosquid: 3d models for games, architecture, videos. (1527741)
turbosquid
free

Flashlight V2
...d
free 3d model flashlight v2 for download as , obj, and fbx on turbosquid: 3d models for games, architecture, videos. (1663559)
turbosquid
$29

Thanos v2
...
royalty free 3d model thanos v2 for download as ztl and obj on turbosquid: 3d models for games, architecture, videos. (1651077)
turbosquid
$29

Titan v2
...d
royalty free 3d model titan v2 for download as ztl and obj on turbosquid: 3d models for games, architecture, videos. (1540228)
turbosquid
$29

Frieza v2
...
royalty free 3d model frieza v2 for download as ztl and obj on turbosquid: 3d models for games, architecture, videos. (1701238)
Sized
3d_export
$7
shoes size from 5 inch size to 11 inch
...shoes size from 5 inch size to 11 inch
3dexport
shoes design women model sizing from 5 inch to 11 inch
turbosquid
$15

Closet-small size
...
royalty free 3d model closet-small size for download as max on turbosquid: 3d models for games, architecture, videos. (1186088)
turbosquid
$5
Full size Futon
...id
royalty free 3d model full size futon for download as max on turbosquid: 3d models for games, architecture, videos. (1339638)
turbosquid
$4

mid size sword
...d
royalty free 3d model mid size sword for download as blend on turbosquid: 3d models for games, architecture, videos. (1160246)
turbosquid
$3

Mid size hammer
...
royalty free 3d model mid size hammer for download as blend on turbosquid: 3d models for games, architecture, videos. (1160647)
turbosquid
$19
Beaker 3 Sizes
...yalty free 3d model beaker 3 sizes for download as ma and obj on turbosquid: 3d models for games, architecture, videos. (1645955)
turbosquid
$20
Full Sized Bed
...d model full sized bed for download as max, 3ds, fbx, and obj on turbosquid: 3d models for games, architecture, videos. (1547542)
turbosquid
$45
King Size Bed
... available on turbo squid, the world's leading provider of digital 3d models for visualization, films, television, and games.
turbosquid
$15

Queen size bed
... available on turbo squid, the world's leading provider of digital 3d models for visualization, films, television, and games.
turbosquid
$14

Bed - Full Size
... available on turbo squid, the world's leading provider of digital 3d models for visualization, films, television, and games.