Thingiverse
Aerator Washing Station for Elegoo Mars
by Thingiverse
Last crawled date: 4 years, 2 months ago
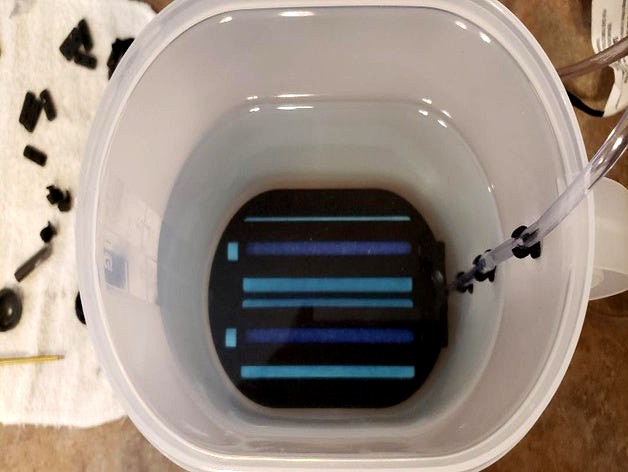
This is a simple DIY Washing Station to be used with the Elegoo Mars mSLA Printer. This will allow the Print Plate to be removed from the printer and placed directly into the Washing Station without having to first remove the print.
Everything to make this can be FDM printed, purchased from Walmart and any Ace Hardware or True Value Hardware store.
Here is a list of required items...
Sterilite 1 Gal Pitcher - #1472788
https://www.walmart.com/ip/Sterilite-1-Gal-Pitcher-Blue-Sky-Available-in-Case-of-6-or-Single-Unit/38473196
Aqua Culture Aquarium Bubble Stone, 5-Inch - #554059900 X2
https://www.walmart.com/ip/Aqua-Culture-Aquarium-Bubble-Stone-5-Inch/10532628?selected=true
Aqua Culture Aquarium T-Way Connector Valve - #875234
https://www.walmart.com/ip/Aqua-Culture-Aquarium-T-Way-Connector-Valve/10536139?selected=true
Aqua Culture 25' Standard Airline Tubing, 25', 7.62 M - #554059897
https://www.walmart.com/ip/Aqua-Culture-25-Standard-Airline-Tubing-25-7-62-M/25998401
Tetra Whisper Air Pump for Aquariums 10 to 30 Gallons, Quiet - #562883831
https://www.walmart.com/ip/Tetra-Whisper-Air-Pump-for-Aquariums-10-to-30-Gallons-Quiet/10291813
M6x5 Set Screw - available from hardware store or a spare may be in the spares bag
15 Minute Epoxy - any brand
CA / Superglue - any brand
To Assemble:
Print all the pieces, you will need 3 of the Hose Guides and 2 of the Bubble Covers.
Epoxy the Bubble Stones into the Washing Station Base so they are both facing the same way.
Connect a Coupler to each side of the "T" connector, then connect to the end of the Bubble Stones, they will be a snug fit. Make sure the "T" connecter is facing straight up.
Once connected, use CA / Superglue to cover the connection points.
Snap the Bubble Covers on the Bubble Stones. They are a snug fit and no need to use glue.
Epoxy the assembled Base into the bottom of the container, make sure the "T" connector is on the same side as the containers handle.
Epoxy the 3 Hose Guides to the inside of the container, on the same side the handle is, in the center, spaced evenly.
Allow ample time for the epoxy to set.
Cut a piece of the Air Tube to be long enough to connect to the "T" connector inside the container and enough to come back out and reach the Air Pump, making sure to leave some slack.
Connect one end of the Air Tube to the "T" connector, then pinch the Air Tube to get it into the Hose Guides, then connect the other end to the Air Pump.
Connect the Mounting Plate to the Washing Station Lid (above or below depending on the print size, this is adjustable, best to start from below) and use the M6x5 Set Screw to secure in place. Make sure the bracket is in the correct orientation.
Place the Printers Build Plate on the bracket and put the lid on the container. Fill the container with enough DA or IPA so that it covers the build plate by about 5-10mm.
To Use:
Once the print has completed, remove the Build Plate from the printer and tilt to an angle to allow excess resin to drip away.
Place the Build Plate onto the bracket and snug.
Place the lid on the container, this will submerge the print into the Washing Station. If the build plate doe not have 5-10mm of DA or IPA above the build plate, add more.
Plug in the Air Pump and allow 10-15 minutes of run time. Also, place the cap on the lid that allows the build plate to be in place.
Unplug the Air Pump, remove the cap and remove the lid with Build Plate. Remove the Build Plate and rinse in fresh / clean DA or IPA and set aside to dry.
At this time, the print can be removed from the build plate and the lid and other cap can be placed on the Washing Station when not in use.
*** Depending on the print, more wash time may be required
Similar models
thingiverse
free

Spirulina Cultivation Tools - Tube Connector + Secchi Ruler by spirulinasociety
...lture concentration, an indicator for the harvest.
learn more: https://youtu.be/lbvjzba0b_e
website: https://spirulinasociety.org
thingiverse
free

Czech airlift tube for aquarium by leving
... water it with some addition of tap water safe before placing into aquarium, to reduce the copper possibly harming invertebrates.
thingiverse
free

Air cooler for Delta printer by ken1sand
...nects as a fan to the system.
good luck with your project.
the system have for me made warp free prints with all tested plastics.
thingiverse
free

Airbrush Wash Station by unraze
...t bracket is a little tight and will likely need some sanding.
attach parts to desk using glue or 1" double sided adhesive.
grabcad
free

10 gal Ant Formicarium
...ovide air. 100% unescapable formicarium. use 1/2" tubing to run water down to the bottom of the tank for humidity control.
thingiverse
free

MSLA Soda Can Washing Station
... way to add a rim, lid, and ladle to a standard usa soda can to use with ipa when cleaning prints from an msla or sla 3d printer.
thingiverse
free

Tube connector Ø4mm O/D by Bixx
...tube connector ø4mm o/d by bixx
thingiverse
connects ø4mm tube together for use with resin pump.
printed on my d7
thingiverse
free

Water Trap by walter
...rinted it with an approximately 0.55mm extrusion width.
printer:
-- eustathios
filament:
-- atomic filament transparent green pla
thingiverse
free

Formlabs Form2 Washing machine gasket by jasonalday
...ins and then my form2 build platform and printed part is clean and ready for removal.
video example: https://youtu.be/fqcvqngkbgi
thingiverse
free

Square tube connectors by NothingComplicated
...an either epoxy or screw the pieces to the tubing. print with a material, number of perimeters and infill that meets your needs.
Aerator
turbosquid
$10

Aeration Pump
... available on turbo squid, the world's leading provider of digital 3d models for visualization, films, television, and games.
turbosquid
$8
Aeration Nozzles
... available on turbo squid, the world's leading provider of digital 3d models for visualization, films, television, and games.
3d_ocean
$4

Aerated Concrete
...ing is seamless, as you can see in the preview. the largest images are 2048×2048 pixels. also included are 1024, 512 and 256 p...
3d_export
$20

Machine cutting of aerated concrete 3D Model
...газобетона производство machine сutting of aerated concrete
machine cutting of aerated concrete 3d model plunger90 84083 3dexport
3d_export
$5

kwc eve lever mixer pull out aerator covered
...tor covered polys: 2.224 verts: 2.240 render: v-ray 3.2 - corona 3.0 formats: 3ds max 2013, obj uv mapped: yes units: centimeters
3ddd
free

TRES_FLAT
...3ddd tres , flat washbasin single lever mixer, with aerator ...
archibase_planet
free
Vent
...vent
archibase planet
aeration venting home equipment
diffuser vent - 3d model for interior 3d visualization.
archive3d
free

Vent 3D Model
...chive3d
aeration venting home equipment
diffuser vent - 3d model for interior 3d visualization.
3d_export
$100

Treatment plant 3D Model
...lant sedimentation tank wastewater industrial filtration anaerobic aeration water
treatment plant 3d model tartino 20509 3dexport
3d_ocean
$5

Binic Table Lamp
...orld of the sea and the shape recalls windsocks — aeration systems on boats. these shapes evoke other figures: a loudspeaker, ...
Elegoo
3d_export
free

baby yoda cinco de mayo
...together to make a nice holiday print for my elegoo mars resin printer. my friends seem to love it....
3d_export
$8

Ken Kaneki - tokyo ghoul
...to take down enemies.<br>i printed it personally with my elegoo saturn at 50 microns ... a...
thingiverse
free

Porte clef Elegoo / Elegoo Keychain by Blink60
...porte clef elegoo / elegoo keychain by blink60
thingiverse
perfectly join my saturn's usb key.
thingiverse
free

Asas Elegoo by Nandito
...asas elegoo by nandito
thingiverse
asa para tapas de la linea elegoo resina
thingiverse
free

Elegoo Mars Tankstop
...oo mars tankstop
thingiverse
-elegoo mars tankstop-
i designed this to make it easier to
replace the tank in the right position.
thingiverse
free

Elegoo Mercury support by RoadArk
...elegoo mercury support by roadark
thingiverse
wall support for elegoo mercury
thingiverse
free

Molette M10 for Elegoo Mars
...molette m10 for elegoo mars
thingiverse
molette m10 for elegoo mars
thingiverse
free

Elegoo Mars Test Rook
...elegoo mars test rook
thingiverse
this is the elegoo test print for anyone interested.
thingiverse
free

Elegoo Display Ersatzstift by oobdoo
...elegoo display ersatzstift by oobdoo
thingiverse
ein ersatzstift für das elegoo display.
thingiverse
free

Manopola coperchio Elegoo Mars
...manopola coperchio elegoo mars
thingiverse
stampata con elegoo mars altezza layer 0.05 resina nera
Washing
3d_export
free

washing
...washing
3dexport
washing
archibase_planet
free

Wash-basin
...wash-basin
archibase planet
wash-basin wash-bowl wash basin sink
wash-basin - 3d model (*.3ds) for interior 3d visualization.
archibase_planet
free

Wash-basin
...ase planet
wash-basin sink wash basin wash-bowl sanitary engineering
wash-basin - 3d model (*.3ds) for interior 3d visualization.
archibase_planet
free

Wash-basin
...archibase planet
wash stand wash-stand wash-hand-stand
wash-basin n121208 - 3d model (*.gsm+*.3ds) for interior 3d visualization.
archibase_planet
free

Wash-basin
...wash-basin archibase planet washing stand wash-stand wash-hand-stand wash-basin n200209 - 3d model (*.gsm+*.3ds)...
3ddd
free

wash
...wash
3ddd
archibase_planet
free

Wash-basin
...wash-basin archibase planet washing stand wash-stand wash-basin sink n120411 - 3d model (*.3ds)...
archibase_planet
free

Wash-basin
...wash-basin
archibase planet
wash stand wash-basin washbowl
wash-basin - 3d model (*.gsm+*.3ds) for interior 3d visualization.
archibase_planet
free

Wash-basin
...wash-basin archibase planet washing stand wash-stand wash-basin sink markotrevi n160411 - 3d model...
archibase_planet
free

Wash-stand
...sh-stand
archibase planet
wash-stand wash-hand-stand wash-basin
washbasin - 3d model (*.gsm+*.3ds) for interior 3d visualization.
Mars
3d_ocean
$10

Mars
...tar stars system universal way world
this is the mars with atmosphere. the textures file including 4 maps. thank you for looking.
turbosquid
$2

MARS
...
turbosquid
royalty free 3d model mars for download as blend on turbosquid: 3d models for games, architecture, videos. (1170651)
3ddd
free

ClassiCon Mars
...classicon mars
3ddd
classicon , mars
стул mars от classicon.
3ds max 2011 + fbx. vray.
turbosquid
$12

Mars
...id
royalty free 3d model mars for download as blend and gltf on turbosquid: 3d models for games, architecture, videos. (1659040)
turbosquid
$1

the mars
...oyalty free 3d model the mars for download as blend and blend on turbosquid: 3d models for games, architecture, videos. (1704346)
turbosquid
free

mars
...squid
royalty free 3d model mars for download as max and obj on turbosquid: 3d models for games, architecture, videos. (1355198)
turbosquid
$59

Mars
...
royalty free 3d model mars for download as max, obj, and fbx on turbosquid: 3d models for games, architecture, videos. (1259238)
turbosquid
$12

Mars
...lty free 3d model mars for download as 3ds, max, obj, and fbx on turbosquid: 3d models for games, architecture, videos. (1152228)
turbosquid
$5

Mars
...y free 3d model mars for download as obj, fbx, blend, and dae on turbosquid: 3d models for games, architecture, videos. (1292956)
3d_export
free

mars landscape
...mars landscape
3dexport
mars landscape made with word machine.
Station
3d_export
$5
station
...station
3dexport
station
archibase_planet
free
Station
...station
archibase planet
railroad station railway station bay
railway station n160707 - 3d model for interior 3d visualization.
archibase_planet
free
Station
...station
archibase planet
intercom station equipment
intercom station - 3d model for interior 3d visualization.
archibase_planet
free
Station
...station
archibase planet
station
station n260108 - 3d model (*.gsm+*.3ds) for interior 3d visualization.
3d_export
$5
Station
...station
3dexport
low poly bus station
archibase_planet
free
Station
...station
archibase planet
building station construction
station n170708 - 3d model(*.gsm+*.3ds) for interior 3d visualization.
archibase_planet
free

Station
...station
archibase planet
bus station bus stop
station 1 - 3d model (*.gsm+*.3ds) for interior 3d visualization.
archibase_planet
free
Station
...station
archibase planet
bus station bus stop
station 2 - 3d model (*.gsm+*.3ds) for interior 3d visualization.
archibase_planet
free

Station
...station
archibase planet
bus station bus stop
station 3 - 3d model (*.gsm+*.3ds) for interior 3d visualization.
3d_ocean
$19
Space station
...space station
3docean
space station
space station