Thingiverse
Adafruit Joy Bonnet Docking 3.5" HDMI screen by TronicGr
by Thingiverse
Last crawled date: 3 years ago
Announcement:
I launched a Kickstarter for one of my other projects, check it out here:https://www.kickstarter.com/projects/1096461972/6dof-electronic-interface-for-motion-simulator-pla
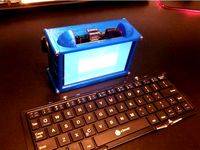
The new Joy Bonnet makes it very easy to convert the Raspberry Pi Zero W to a portable retro gaming pocket device. Well not so portable. You still need power and HDMI connection and a TV. In a few words still needs some cables attached on the device. Then, try playing for long time those low resolution Snes games on 65 inch TV screen... I mean looks good, but those huge pixels!
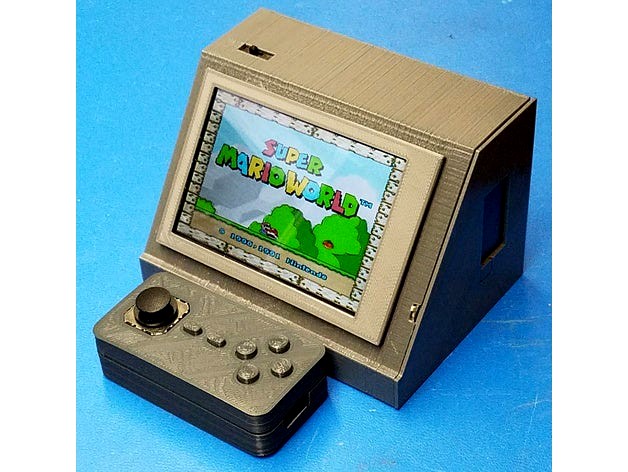
I like to have the Adafruit Joy Bonnet for playing on large TV screen to show off old games but not leave it hooked up there and perhaps use a smaller screen for it. I didn't want to modify anything so it would be easy to switch between the two. So... I designed a mini portable Docking Screen for it, that is battery powered.
The Docking Screen supports all HDMI resolutions so no need for modifications in the Config.txt for the resolution and has stereo audio via the HDMI cable. It provides the power to the Raspberry Pi Zero and breaks out the USB port for attaching external USB Joypad controller or USB hub.
The docking is done via normal mini USB cables and Mini HDMI adapter that are fixed on the front of the Docking screen. When it docks it kinda looks like a mini bar top arcade machine.
EDIT adding a one piece cover for protecting the Joy Bonnet. :)EDIT2 Added screen cover to be glued on the front panel.
Video in action:https://www.youtube.com/watch?v=8kw8AQ4HKGQhttps://www.youtube.com/watch?v=R-IWIv_ZS6s
Also if you boot the screen before the raspberry you get much more clear and geometrically correct display. This can be done with two power switches, or simple reboot the Raspberry to get full HD HDMI resolution detected.https://www.youtube.com/watch?v=3PI04kHax0w
Parts used:
-Adafruit Joy Bonnet for Raspberry Pi: https://www.adafruit.com/product/3464
-Raspberry Pi Zero W: https://www.adafruit.com/product/3400
-Lithium Ion Battery Pack - 3.7V 4400mAh: https://www.adafruit.com/product/354
-Mini HDMI Plug to Standard HDMI Jack Adapter: https://www.adafruit.com/product/2819
-USB OTG Host Cable - MicroB OTG male to A female: https://www.adafruit.com/product/1099
-HDMI Female to Female Coupler
-3.5” HDMI Touch Screen LCD Display+clear case for Raspberry Pi 2 3 1080P:http://www.ebay.com/itm/351953813537?_trksid=p2057872.m2749.l2649&ssPageName=STRK%3AMEBIDX%3AIT
-ESUMIC® L2go 3.5mm Mini Portable Stereo Speaker: http://www.ebay.com/itm/ESUMIC-L2go-3-5mm-Mini-Portable-Stereo-Speaker-for-iPod-iPhone-MP3-MP4-Pla-/142323776753?hash=item2123287cf1:g:dYcAAOSwol5Y1Fv1
-GERI Dual USB 5V 1A 2A Mobile Power Charger Power Board Module 3.7V to 5V Booster Converter with LCD Display:https://www.amazon.com/gp/aw/d/B00VDP94QM/ref=mp_s_a_1_fkmr3_1?ie=UTF8&qid=1492897696&sr=8-1-fkmr3&pi=AC_SX236_SY340_QL65&keywords=SMAKN®+5V+2A+Dual+USB+LCD+all-in-one+Boost+Lithium
I removed the stereo speakers and amplifier from its case and connected them directly on the audio output of the HDMI screen and used double side tape to mount them on it. Also used a small switch to enable the power to the audio amplifier so I can turn off if needed. Audio level is set within Retropie. Other than that, look at the photos where all the parts are go, its very easy to put this together, with minimal soldering.
UPDATE* Fixed a little bit the dimensions and tolerances to reduce filing down for fit. This is Version 15 files.
Thanks
Thanos
I launched a Kickstarter for one of my other projects, check it out here:https://www.kickstarter.com/projects/1096461972/6dof-electronic-interface-for-motion-simulator-pla
The new Joy Bonnet makes it very easy to convert the Raspberry Pi Zero W to a portable retro gaming pocket device. Well not so portable. You still need power and HDMI connection and a TV. In a few words still needs some cables attached on the device. Then, try playing for long time those low resolution Snes games on 65 inch TV screen... I mean looks good, but those huge pixels!
I like to have the Adafruit Joy Bonnet for playing on large TV screen to show off old games but not leave it hooked up there and perhaps use a smaller screen for it. I didn't want to modify anything so it would be easy to switch between the two. So... I designed a mini portable Docking Screen for it, that is battery powered.
The Docking Screen supports all HDMI resolutions so no need for modifications in the Config.txt for the resolution and has stereo audio via the HDMI cable. It provides the power to the Raspberry Pi Zero and breaks out the USB port for attaching external USB Joypad controller or USB hub.
The docking is done via normal mini USB cables and Mini HDMI adapter that are fixed on the front of the Docking screen. When it docks it kinda looks like a mini bar top arcade machine.
EDIT adding a one piece cover for protecting the Joy Bonnet. :)EDIT2 Added screen cover to be glued on the front panel.
Video in action:https://www.youtube.com/watch?v=8kw8AQ4HKGQhttps://www.youtube.com/watch?v=R-IWIv_ZS6s
Also if you boot the screen before the raspberry you get much more clear and geometrically correct display. This can be done with two power switches, or simple reboot the Raspberry to get full HD HDMI resolution detected.https://www.youtube.com/watch?v=3PI04kHax0w
Parts used:
-Adafruit Joy Bonnet for Raspberry Pi: https://www.adafruit.com/product/3464
-Raspberry Pi Zero W: https://www.adafruit.com/product/3400
-Lithium Ion Battery Pack - 3.7V 4400mAh: https://www.adafruit.com/product/354
-Mini HDMI Plug to Standard HDMI Jack Adapter: https://www.adafruit.com/product/2819
-USB OTG Host Cable - MicroB OTG male to A female: https://www.adafruit.com/product/1099
-HDMI Female to Female Coupler
-3.5” HDMI Touch Screen LCD Display+clear case for Raspberry Pi 2 3 1080P:http://www.ebay.com/itm/351953813537?_trksid=p2057872.m2749.l2649&ssPageName=STRK%3AMEBIDX%3AIT
-ESUMIC® L2go 3.5mm Mini Portable Stereo Speaker: http://www.ebay.com/itm/ESUMIC-L2go-3-5mm-Mini-Portable-Stereo-Speaker-for-iPod-iPhone-MP3-MP4-Pla-/142323776753?hash=item2123287cf1:g:dYcAAOSwol5Y1Fv1
-GERI Dual USB 5V 1A 2A Mobile Power Charger Power Board Module 3.7V to 5V Booster Converter with LCD Display:https://www.amazon.com/gp/aw/d/B00VDP94QM/ref=mp_s_a_1_fkmr3_1?ie=UTF8&qid=1492897696&sr=8-1-fkmr3&pi=AC_SX236_SY340_QL65&keywords=SMAKN®+5V+2A+Dual+USB+LCD+all-in-one+Boost+Lithium
I removed the stereo speakers and amplifier from its case and connected them directly on the audio output of the HDMI screen and used double side tape to mount them on it. Also used a small switch to enable the power to the audio amplifier so I can turn off if needed. Audio level is set within Retropie. Other than that, look at the photos where all the parts are go, its very easy to put this together, with minimal soldering.
UPDATE* Fixed a little bit the dimensions and tolerances to reduce filing down for fit. This is Version 15 files.
Thanks
Thanos
Similar models
cults
free

Case for Adafruit Joy Bonnet - Raspberry Pi Zero W
...- raspberry pi zero w
cults
case for adafruit joy bonnet - raspberry pi zero w
case for adafruit joy bonnet - raspberry pi zero w
thingiverse
free

Raspberry Pi Airplay BoomBox by adafruit
...t/3412
youtubes: https://www.youtube.com/watch?v=xgrkqubzj5o
learning guide: https://learn.adafruit.com/boomy-pi-airplay/overview
thingiverse
free

7" Raspberry Pi Standalone Console by pyrohmstr
...#39;s just plug and play!
the plan is to eventually turn this into a fully handheld and portable n64 system. stay tuned for that.
cults
free

Raspberry Pi Airplay BoomBox
.../3412
youtubes: https://www.youtube.com/watch?v=xgrkqubzj5o
learning guide: https://learn.adafruit.com/boomy-pi-airplay/overview
thingiverse
free

Raspberry Pi Zero W + Adafruit Joy Bonnet Case by TinWhiskerz
...re details about this design and build can be found on my blog here:https://tinwhiskerz.com/2017/08/01/pi-zero-w-joy-bonnet-case/
thingiverse
free

Raspberry Pi Zero Smartwatch Case by brendenderp
...cal inventor
https://m.youtube.com/channel/ucgfroldwv5nk6sldqhpubba
build to use this screenhttps://www.adafruit.com/product/912
thingiverse
free

Raspberry Pi Zero With Camera and Envirophat Case by nerdymark
...t/3099
pimoroni envirophat: https://www.adafruit.com/product/3194
this can be a nature camera, pet monitor, security camera, etc.
thingiverse
free

PortablePi by jet_
... time yet to souder the wires. it might be complicated. i also don't know if the battery will not get too hot inside the box.
thingiverse
free

Pirakeet - Raspberry Pi Zero Handheld Retro Game Console by Ampersands
...es an stl for a blank rear half so you can add your name or whatever to it instead of the logo, and a basic clip on screen cover.
thingiverse
free
Raspberry PI 3 case with LCD & Battery by katascope
...ww.amazon.com/gp/product/b01n7andlc
keyboard : https://www.amazon.com/iclever-portable-keyboard-bluetooth-wireless/dp/b00ywljnpq/
Tronicgr
thingiverse
free

AMC1280USB Computer Bay enclosure case by TronicGr
...the project here:https://www.kickstarter.com/projects/1096461972/6dof-electronic-interface-for-motion-simulator-pla
thanks
thanos
thingiverse
free

AMC-AASD15A v1.4 remote panel enclosure v2 by TronicGr
...ube.com/watch?v=pyco6_lhtlm
the controller is available on https://www.thanos-motion.com/products/thanos-amc-controller-rgb-v1-4/
thingiverse
free

AEAT-6012 SSI Mounting tools by TronicGr
... action here:https://youtu.be/fhoxj7uboti
to make the gearbox run smooth use a drill...https://youtu.be/zicoyu9wtt8
thanks
thanos
thingiverse
free

AMC1280USB Snug Case and Encoder Knob by TronicGr
...alls.
more information about the device that this case hosts here: http://motionsim.freeforums.net/http://motionsim.blogspot.com/
thingiverse
free

String Potentiometer fixed dimensions by TronicGr
... action:https://youtu.be/3mmjfbpjwkc
a new video with better print and some tips here: https://youtu.be/nsgg6o2hfr4
thanks
thanos
thingiverse
free

Frappe Maker for instant coffee by TronicGr
...motor current. 2.5a or 3a recommended.
additionally install a switch and a power jack to easy plug the power to the frappe maker.
thingiverse
free

Pac man clock case remix by TronicGr
...hanks adafruit for the feature!https://blog.adafruit.com/2017/03/23/pac-man-clock-case-remix-3dprinting-3dthursday/
thanks
thanos
thingiverse
free

Mini Force Feedback Momo Steering wheel by TronicGr
...ect drive servomotor, head here for more information: https://www.thanos-motion.com/products/thanos-tdd-controller/
thanks
thanos
thingiverse
free

estop AMC-AASD15A by kylian0087
...made this e-stop for the amc-aasd15a servo controller from https://www.thingiverse.com/tronicgr the e-stop is made with multi material printers in...
Bonnet
turbosquid
$27

Bonnet
... available on turbo squid, the world's leading provider of digital 3d models for visualization, films, television, and games.
design_connected
$29

Bonnet Grand Sofa
...bonnet grand sofa
designconnected
adea bonnet grand sofa computer generated 3d model. designed by broberg & ridderstråle.
design_connected
$18

Bonnet Club Chair
...bonnet club chair
designconnected
adea bonnet club chair computer generated 3d model. designed by broberg & ridderstråle.
3d_export
$10

bonnet club chair
...5.15 x 781.75 x 940.65 polys: 44454 xform: yes box trick: yes model parts: 3 render: v-ray, corona formats: 3ds max 2013 fbx, obj
3d_export
$99

Rene Bonnet Le Mans 3D Model
...e bonnet db lemans sport 3d model 1962 1964 old antique convertible cabrio
rene bonnet le mans 3d model desmonster 88120 3dexport
3d_export
$20

bonnet hat
...ormal<br>- roughness<br>2048x2048 png texture<br>1,166 poly<br>1,255 vert<br>in subdivision level 0
3d_export
$99

Rene Bonnet Le Mans Grand Luxe 3D Model
...rt 3d model 1966 1964 old antique convertible cabrio grand luxe
rene bonnet le mans grand luxe 3d model desmonster 90798 3dexport
3d_export
$20

pink bonnet hat
...ormal<br>- roughness<br>2048x2048 png texture<br>1,608 poly<br>1,667 vert<br>in subdivision level 0
3d_ocean
$1

Mercedes/Mercedes-Benz Badge
...mercedes/mercedes-benz badge 3docean badge benz bonnet cars emblem hood logo mercedes mercedes-benz this is a...
3ddd
$1

West Indian war bonnet
...врага, оружие, лошадь.
модель low poly - вкладка turbosmooth развернута.
маска - 3d max, ретопология zbrush.
развертка uvlayout.
Hdmi
3ddd
$1
HDMI-Кабель
... cable , кабель
высоко детализированный hdmi кабель с настроенными материалами для vray.
turbosquid
$1

vga to hdmi
...royalty free 3d model vga to hdmi for download as c4d and fbx on turbosquid: 3d models for games, architecture, videos. (1520819)
turbosquid
$2
HDMI wire
... 3d model hdmi wire for download as wire, wire, fbx, and wire on turbosquid: 3d models for games, architecture, videos. (1644937)
turbosquid
$9

HDMI Cable
... available on turbo squid, the world's leading provider of digital 3d models for visualization, films, television, and games.
turbosquid
free
HDMI cable
... available on turbo squid, the world's leading provider of digital 3d models for visualization, films, television, and games.
3ddd
$1
Набор кабелей, hdmi и тюльпаны
... провод , тюльпан
набор кабелей, hdmi и тюльпаны
turbosquid
$2

hdmi plug female
...
royalty free 3d model hdmi plug female for download as blend on turbosquid: 3d models for games, architecture, videos. (1629465)
turbosquid
$1

HDMI Connector Scaled
...ee 3d model hdmi connector scaled for download as obj and c4d on turbosquid: 3d models for games, architecture, videos. (1491827)
3d_export
$10

monitor black-gray
...3dexport 3d model of a computer monitor with an hdmi ...
3ddd
$1
DELL U2410
...lcd 24 ultrasharp u2410 [ips, 1920x1200, 800001, 178гор178вер, dvi, hdmi pip, cardreader,...
Joy
3d_export
$5

joy
...joy
3dexport
joy 3d model good quality for animation
design_connected
$16

Joy
...y
designconnected
photo-realistic 3d models of the joy chair from sollos for 3d architectural and interior design presentations.
turbosquid
$35

Joy
...d
royalty free 3d model joy for download as ma, obj, and fbx on turbosquid: 3d models for games, architecture, videos. (1145529)
3ddd
$1

MIsa Joy
...misa joy
3ddd
philippe starck
misa joy - дизайн philippe starck (2014)
design_connected
$18

Joy Armchair
...joy armchair
designconnected
sollos joy armchair computer generated 3d model. designed by almeida, jader.
design_connected
$18

Joy Lounge
...joy lounge
designconnected
sollos joy lounge computer generated 3d model. designed by almeida, jader.
3ddd
free

Revox Joy
...vox joy и revox cd плеер отличается современной конструкцией из стекла и алюминия, и великолепным звучанием.
www.alef-elektro.ru
turbosquid
$18

Chair Joy
...rbosquid
royalty free 3d model chair joy for download as max on turbosquid: 3d models for games, architecture, videos. (1436903)
turbosquid
$50

JOY Interior
... free 3d model joy interior for download as max, obj, and fbx on turbosquid: 3d models for games, architecture, videos. (1279224)
turbosquid
$30

KOLEKCIJA JOY
...free 3d model kolekcija joy for download as max, obj, and fbx on turbosquid: 3d models for games, architecture, videos. (1278892)
Adafruit
turbosquid
$1

LIS3DH and Adafruit Feather M0 Bluefruit LE and Adalogger FeatherWing - RTC + SD
...ruit le and adalogger featherwing - rtc + sd for download as on turbosquid: 3d models for games, architecture, videos. (1403993)
thingiverse
free

Adafruit Resistor Helper by adafruit
... matthew borgatti: http://har.ms/
creative commons attribution, share-alike
all text above must be included in any redistribution
thingiverse
free

Adafruit Tree Topper by adafruit
...s a neopixel strip and is powered by gemma.
follow the complete guide on:http://learn.adafruit.com/gemma-3d-printed-tree-topper
thingiverse
free

Adafruit Proto Plate for Beagle Bone by adafruit
... burgess for adafruit industries.
creative commons attribution, share-alike all text above must be included in any redistribution
thingiverse
free

IoT Gmailbox by adafruit
...uit.com/product/2821
submicro servohttps://www.adafruit.com/product/2201
visit the adafruit shop online - http://www.adafruit.com
thingiverse
free

Adafruit Fona CAD Model by adafruit
...sed from solid works library. created using eagleup for google sketch up. dxf file included for converting into other 3d formats.
thingiverse
free

Adafruit Bone Box - Enclosure for Beagle Bone by adafruit
... burgess for adafruit industries.
creative commons attribution, share-alike all text above must be included in any redistribution
thingiverse
free

Adafruit ESP8266 Feather by tankapotamus
...adafruit esp8266 feather by tankapotamus
thingiverse
adafruit esp8266 feather.
thingiverse
free

Adafruit BNO055 Housing by ftc9881
...adafruit bno055 housing by ftc9881
thingiverse
this is a simple housing for the adafruit bno055 imu.
thingiverse
free

IoT Printer Enclosure by adafruit
...dafruit industries.
creative commons, attribution & share-alike license
all text above must be included in any redistribution
Docking
design_connected
$20
Docks
...docks
designconnected
gandia blasco docks computer generated 3d model. designed by romero vallejo.
turbosquid
$5

Dock
...squid
royalty free 3d model dock for download as 3ds and fbx on turbosquid: 3d models for games, architecture, videos. (1159328)
turbosquid
$20

Dock
... available on turbo squid, the world's leading provider of digital 3d models for visualization, films, television, and games.
turbosquid
$10
Dock
... available on turbo squid, the world's leading provider of digital 3d models for visualization, films, television, and games.
turbosquid
$10

Dock
... available on turbo squid, the world's leading provider of digital 3d models for visualization, films, television, and games.
turbosquid
$2
dock
... available on turbo squid, the world's leading provider of digital 3d models for visualization, films, television, and games.
3d_export
$65

dock
...dock
3dexport
simple rendering of the scene file
design_connected
$16

Dry-Dock
...dry-dock
designconnected
restoration hardware dry-dock computer generated 3d model.
3d_ocean
$6
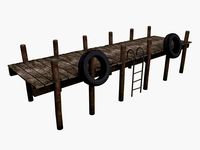
The Boat Dock
...s you see are separate, so you can remove the tyres and ladder and extend out the main section of the dock to make a long section
3ddd
$1
Bjorn Meier docks
... docks , модульный
bjorn meier docks
vray+corona
Screen
archibase_planet
free
Screen
...screen radiator screen radiator enclosure lattice
screen radiator n120315 - 3d model (*.gsm+*.3ds) for interior 3d visualization.
archibase_planet
free

Screen
...screen
archibase planet
screen group display
movie screen - 3d model for interior 3d visualization.
3ddd
$1
Screen
...screen
3ddd
screen
modern dressing wall partition
3d_ocean
$15

HP Screen
...test hp screen. it is has different object, so you can use it as a wall mounted screen or a stand on table. hope you all like it.
3d_export
$10
Accessories screen LCD screen 3D Model
...d screen 3d model
3dexport
accessories screen lcd 3d model interior
accessories screen lcd screen 3d model sunupcg 17831 3dexport
turbosquid
$25
SCREEN
... available on turbo squid, the world's leading provider of digital 3d models for visualization, films, television, and games.
turbosquid
$2
Screen
... available on turbo squid, the world's leading provider of digital 3d models for visualization, films, television, and games.
3d_export
$10
Screen metal screen microwave 3D Model
...ave 3d model
3dexport
screen metal microwave oven 3d model interior
screen metal screen microwave 3d model sunupcg 17847 3dexport
3d_ocean
$5
Projector Screen
...hat have presentations. the projector screen consists of an alluminum structure that holds the canvas up. this model can be us...
archive3d
free
Screen 3D Model
...rchive3d
screen folding screen
screen n020811 - 3d model (*.3ds) for interior 3d visualization.
5
turbosquid
$6

Rock 5-5
...urbosquid
royalty free 3d model rock 5-5 for download as obj on turbosquid: 3d models for games, architecture, videos. (1639063)
3d_export
$5

hinge 5
...hinge 5
3dexport
hinge 5
turbosquid
$10

A-5
... available on turbo squid, the world's leading provider of digital 3d models for visualization, films, television, and games.
turbosquid
$2

A-5
... available on turbo squid, the world's leading provider of digital 3d models for visualization, films, television, and games.
turbosquid
$12

Calligraphic Digit 5 Number 5
...hic digit 5 number 5 for download as max, obj, fbx, and blend on turbosquid: 3d models for games, architecture, videos. (1389333)
3ddd
$1

5 роз
...5 роз
3ddd
5 роз в стеклянной вазе
design_connected
$11

iPhone 5
...iphone 5
designconnected
apple iphone 5 computer generated 3d model.
3ddd
$1

Lola 5
...lola 5
3ddd
miniforms
lola 5 miniforms 300*65*134
3ddd
$1

Nexus 5
...dd
nexus , phone , телефон
google nexus 5 phone
3d_ocean
$15

iPhone 5
...iphone 5
3docean
3d 4d apple cinema iphone model modeling phone screen texture
iphone 5 3d model and texture realistic iphone 5.
3
turbosquid
$10

Mountain Bike 3 -3 of 3
...model mountain bike 3 (#3 of 3) for download as fbx and blend on turbosquid: 3d models for games, architecture, videos. (1438752)
turbosquid
$6

Rock 3-3
...urbosquid
royalty free 3d model rock 3-3 for download as obj on turbosquid: 3d models for games, architecture, videos. (1628065)
turbosquid
$29

Books 150 pieces 3-3-3
...books 150 pieces 3-3-3 for download as max, obj, fbx, and stl on turbosquid: 3d models for games, architecture, videos. (1384033)
turbosquid
$3

Genesis 3 Clothing 3
... available on turbo squid, the world's leading provider of digital 3d models for visualization, films, television, and games.
3d_export
$5

hinge 3
...hinge 3
3dexport
hinge 3
3ddd
$1

Розетка 3
...розетка 3
3ddd
розетка
розетка 3
turbosquid
$50

is-3
... available on turbo squid, the world's leading provider of digital 3d models for visualization, films, television, and games.
turbosquid
$10

Mountain Bike 3 -2 of 3
...model mountain bike 3 (#2 of 3) for download as fbx and blend on turbosquid: 3d models for games, architecture, videos. (1438750)
turbosquid
$10

Mountain Bike 1 -3 of 3
...model mountain bike 1 (#3 of 3) for download as fbx and blend on turbosquid: 3d models for games, architecture, videos. (1438743)
3d_export
$5

3 CATS
...3 cats
3dexport
3 cats pen holder