Thingiverse

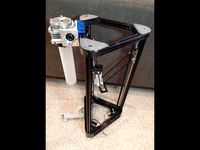
Acrow prop Vive lighthouse mounting system by PhobosIndustries
by Thingiverse
Last crawled date: 3 years ago
This is a non destructive acrow prop based mounting system for the HTC Vice lighthouses. I wanted a method to quickly set up and take down the lighthouses without having to install fixings in different environments. My design is a remix of the great idea by cmooney91 (https://www.thingiverse.com/thing:1793515). I liked the wedge based quick change system, and wanted to incorporate it into my prop design.
The basic idea is that pressure is applied between the floor and ceiling to hold the fixture in place. The props use a telescopic design, where the excess of the upper stage is kept inside the lower stage. This allows for a use with various ceiling heights. The pipe is just standard PVC electrical conduit, 25mm and 20mm, each cut to a length of 1800mm.
The floor foot (25mm) has a 10mm thick rubber pad screwed to the bottom. The rubber is drilled and tapped to accept M3 machine screws from the top, so that only the rubber makes contact with the floor. Similarly the ceiling foot (20mm) has 10mm thick self adhesive polyethylene foam attached to it to prevent markings. This was picked up at the local hardware store. Each foot has horizontal holes to fit the conduit in place, and these are need to be tapped for M5. The conduit is inserted into each foot and fixed in place with M5 x 10mm machine screws. Anything will work pretty well here, even if you want to screw into the conduit to fix it. Additionally there are holes in the feet for cable ties in case that suits your setup better.
I have made some handles to accept M6 hex head bolts (30mm) so that installing and changing can be done without tools. Each prop uses 4 of these cranks. The design has a thin layer to support the hex slot, and this needs to be drilled out before the bolt can slide through. It was put there to eliminate the need for supports during printing. The inserts are made to fit snugly over the bolt, but I needed to clean up the edges of the hex holes so that they would fit easily.
Next the screwed adjuster needs to be assembled. The large nut has both left and right hand threads to match the 20mm and 25mm parts, so keep the arrow facing up towards the 20mm half. Thread these all the way to the centre. The 20mm side needs to be tapped to accept the M6 bolts with handles, and the 25mm side to accept M5 x 10mm screws. Slide the 25mm conduit into place and tighten. Before inserting the 20mm conduit we need to slide on the lighthouse mount.
The lighthouse mount is held in place with more of the M6 hand cranks, so those holes need to be tapped to M6 as well. Slide the bracket onto the 20mm conduit and then place the whole length into the screwed adjuster. The 20mm conduit fits nicely inside the 25mm.
Now the whole strut can be roughly installed where you need it, tightening the hand cranks to get the 20mm side locked in position. Finally the extra pressure can be applied by turning the centre nut. The holes in the nut are ready for more M6 screws if you need to fix it in place, but haven't needed to do this. I did notice that the more pressure you apply, the bendier the conduits became. It doesn't seem to need much tension to hold it tightly in place though.
The lighthouse puck needs to be fixed to the back of the Vive lighthouse bracket, and for this I have included two versions. The hex model can accept an M5 nyloc nut, the round model fits an M5 socket cap machine screw. I have made the puck a bit deeper compared to the original so the nut or socket cap screw could fit without fouling. This also makes it incompatible with the original design by cmooney91. I used a pair of M5 x 10mm socket cap machine screws.
Finally slide the lighthouse puck and lighthouse into the slot and you're good to go.
I printed this on a Prusa i3 MK2S in white eSun PETG, 0.2mm layer height, 3 walls, 5% infill and no support.
The parts I used per prop:
M3 x 10mm button head machine screw (x4)
M5 x 10mm button head machine screw (x6)
M5 x 10mm socket cap machine screw (x2)
M5 nyloc nut (x2)
M5 washer (x2)
M6 x 30mm hex head bolt (x4)
20mm electrical PVC conduit (1x 4m length)
25mm electrical PVC conduit (1x 4m length)
10mm x 75mm x 75mm polyethylene strip (self adhesive)
10mm x 75mm x 75mm rubber sheet
I have included the source file from Fusion 360 in case anybody wants to change dimensions to suit the materials available to them. If you do make changes I would encourage you to share your design to help others as well.
Similar models
thingiverse
free

Conduit Pipe Camera Tripod (Extendable)
...time.
please feel free to record yourself doing these steps to help improve this guide.
you can contact me on 1997corry@gmail.com
cg_trader
$3

Screws with nuts
...h nuts m5, m6, m8, m10 screw nuts tool bolt nut thread wrench screwdriver hole fixing twine industrial machine industrial machine
thingiverse
free

Open OX CNC Dual Belt Clamp for Y-axis by OBC
... 15mm low profile hex bolts
2 - m5 x 25mm hex bolts
2- m5 lock nuts
note: you must tap the extrusion to fit this to your machine.
thingiverse
free

GoPro 25mm Conduit Pole Mount by paulwilliamss
...o suit gopro hand screw. can be glued but preferably bolted to the conduit. m5 nut required or gopro nut. quite strong. enjoy! :)
thingiverse
free

Sony FS5 Grip Relocator by AltoScroll
...s on printer accuracy)
a lanc extension cable. smallrig makes one that works great.
gently tap the bolts in place with a hammer.
thingiverse
free

Griffschraube handle screw for M6 Mutter nut
...ndle screw for m6 mutter nut
thingiverse
hand screw for m6 (10x10mm) nut/bolt
what you need is a m6 nut or m6 a hex bolt 10x10mm
grabcad
free

M5 Hex Bolts 0.8mm Thread 20-40mm
...m5 hex bolts 0.8mm thread 20-40mm
grabcad
m5 x 20mm
m5 x 25mm
m5 x 30mm
m5 x 35mm
m5 x 40mm
thingiverse
free

M6 bolt knob by thingivinz
...m6 bolt knob by thingivinz
thingiverse
knob for m6 bolt or nuts.
scaled the original from b_emme3d up to fit 10mm hex.
thingiverse
free

Tap-O-Mat - M3/M4/M5/M6 Thread Cutter/Tap to Drill-Bit Adapter by mariust
... or petg.
screws i used:
2x m5x16 with a hex-head
2x m5 wing nuts
optional but recommended to fix the clamps:
2x m3x8 countersunk
thingiverse
free
Gearbox Hanger for 20mm Extrusions
...o the gearbox before assembling to the extrusion. if done in the opposite order, it will be impossible to place the top m6 screw.
Acrow
grabcad
free

BT30 spindle inside contour.
...contour. grabcad bt30 spindle inside contour using data from acrow manufacturer of petal clamps. there are a few dimensions...
3dwarehouse
free

Andamio Acrow
...andamio acrow
3dwarehouse
vista andamio fachada con acrow
3dwarehouse
free

Simple Acrow Prop
...el of an acrow prop without collar and pin details. feel free to edit and add details! #acrow #building #construction #prop #site
3dwarehouse
free

Panel Acrow
...panel acrow
3dwarehouse
encofrado #panel #saul
3dwarehouse
free

puntal acrow 700XS
...puntal acrow 700xs
3dwarehouse
tornapunta o puntal
3dwarehouse
free

diagonal vertical de acrow 700XS
...diagonal vertical de acrow 700xs
3dwarehouse
diagonal vertical éstándar
3dwarehouse
free

Unidad de piso epoxica
...unidad de piso epoxica 3dwarehouse piso de acrow panel...
3dwarehouse
free

Formwork for Retaining Walls
...formwork for retaining walls 3dwarehouse formwork for retaining walls. #acrow #concrete_retaining_walls #formwork #majid36livecouk...
3dwarehouse
free

Construction of Retaining Wall
...construction of retaining wall 3dwarehouse construction of retaining wall. #acrow #concrete_walls #formwork #majidmaclcouk #reinforcement #retaining_walls...
Vive
turbosquid
$40

HTC vive headset
...model htc vive headset for download as 3ds, max, obj, and fbx on turbosquid: 3d models for games, architecture, videos. (1174451)
turbosquid
$19
HTC Vive Lighthouse
... available on turbo squid, the world's leading provider of digital 3d models for visualization, films, television, and games.
turbosquid
$19

Natuzzi Re-Vive
... available on turbo squid, the world's leading provider of digital 3d models for visualization, films, television, and games.
turbosquid
$69

HTC Vive VR headset
... 3d model htc vive for download as ma, max, obj, fbx, and dae on turbosquid: 3d models for games, architecture, videos. (1242503)
turbosquid
$23
E3D -HTC Vive Tracker
...model e3d -htc vive tracker for download as max, obj, and c4d on turbosquid: 3d models for games, architecture, videos. (1190728)
turbosquid
$14
HTC Vive Joystick Rose
...htc vive joystick rose for download as max, 3ds, fbx, and obj on turbosquid: 3d models for games, architecture, videos. (1520802)
turbosquid
$14
HTC Vive Joystick Blue
...htc vive joystick blue for download as max, 3ds, fbx, and obj on turbosquid: 3d models for games, architecture, videos. (1520789)
turbosquid
$24

Loreal Elseve Shampoo Color Vive 400ml
...el loreal elseve shampoo color vive 400ml for download as max on turbosquid: 3d models for games, architecture, videos. (1400713)
3d_export
$15

VR HTC VIVE COSMOS GEAR REPAIR
... vive cosmos gear repair mechanical element for restoring the helmet mount stl format: rar archive print nylon or abs layer 0,1mm
3ddd
$1
плитка Vives - Special Pieces Titan
...литки.
ссылка на производителя:http://www.vivesceramica.com/en/products/floor-tiles/porcelain-clay/serie.html?sid=521
Lighthouse
3d_export
free

lighthouse
...lighthouse
3dexport
lighthouse
3d_export
$5

Lighthouse
...lighthouse
3dexport
image of an island with a lighthouse.
3d_export
$5

lighthouse
...lighthouse
3dexport
low poly lighthouse tower.
3d_export
free

lighthouse
...lighthouse
3dexport
building lighthouse for your project<br>4k texture
design_connected
$11

Lighthouse
...lighthouse
designconnected
established & sons lighthouse computer generated 3d model. designed by bouroullec, erwan.
3d_export
free

lighthouse on the islands
...lighthouse on the islands
3dexport
lighthouse on the islands
turbosquid
$34

Lighthouse
...bosquid
royalty free 3d model lighthouse for download as max on turbosquid: 3d models for games, architecture, videos. (1188357)
turbosquid
free

Lighthouse
...bosquid
royalty free 3d model lighthouse for download as upk on turbosquid: 3d models for games, architecture, videos. (1194918)
turbosquid
$5

Lighthouse
...oyalty free 3d model lighthouse for download as blend and obj on turbosquid: 3d models for games, architecture, videos. (1604302)
turbosquid
$5

lighthouse
...
royalty free 3d model lighthouse for download as obj and fbx on turbosquid: 3d models for games, architecture, videos. (1683838)
Prop
3ddd
$1

Props
...props
3ddd
props
3d_ocean
$10
Props
...ject you need this props design this 6 taype for props to get your design perfect and nice file include : 1 max 2 obj 3 3ds 4 zip
turbosquid
$15
Props
...s
turbosquid
royalty free 3d model props for download as max on turbosquid: 3d models for games, architecture, videos. (1249032)
turbosquid
$1

PROPS
...d model props for download as unitypackage, obj, fbx, and tga on turbosquid: 3d models for games, architecture, videos. (1627660)
turbosquid
$5
props
... available on turbo squid, the world's leading provider of digital 3d models for visualization, films, television, and games.
turbosquid
free
PROP
... available on turbo squid, the world's leading provider of digital 3d models for visualization, films, television, and games.
3ddd
$1
kids props
...kids props
3ddd
декоративный набор
kids props
3d_ocean
$8
Street props
...l barrier prop roads street street prop
street props game models barrel barrier roads aircos jerrycan models fbx obj and max file
turbosquid
$39
Apocalyptic Props
...uid
royalty free 3d model apocalyptic props for download as on turbosquid: 3d models for games, architecture, videos. (1380028)
turbosquid
$1
Bunker props
...rbosquid
royalty free 3d model bunker props for download as on turbosquid: 3d models for games, architecture, videos. (1196014)
System
archibase_planet
free

System
...m
archibase planet
fire alarm system fire alarm box
security light system - 3d model (*.gsm+*.3ds) for interior 3d visualization.
archibase_planet
free

Spider system
...stem spider glass system
spider system to fix glass stefano galli n050912 - 3d model (*.gsm+*.3ds) for interior 3d visualization.
3ddd
$1

Euforia System
...euforia system
3ddd
euforia
euforia system
3d_export
$50

Roof system Truss system 3D Model
...oof system truss system 3d model
3dexport
roof system truss truss stage
roof system truss system 3d model aleksbel 38970 3dexport
3ddd
$1

DVD System
...dvd system
3ddd
dvd , schneider
dvd system
design_connected
free

Seating system
...seating system
designconnected
free 3d model of seating system
3d_export
$5

solar system
...solar system
3dexport
solar system in c4d, with 8k nasa textures
3ddd
$1

Quanta System
...quanta system
3ddd
медицина
quanta system.
лазерное оборудование для медицинских центров
3d_export
$15

solar system
...nd the other the sun, the earth and the moon, the latter has an animation with camera movement included, the files are in spanish
3d_export
$14

missile system
...missile system
3dexport
Mounting
3d_export
free

mounting bracket
...mounting plate is the portion of a hinge that attaches to the wood. mounting plates can be used indoors, cabinetry and furniture.
turbosquid
$2

MOUNTING
... available on turbo squid, the world's leading provider of digital 3d models for visualization, films, television, and games.
turbosquid
free

Mounts
... available on turbo squid, the world's leading provider of digital 3d models for visualization, films, television, and games.
turbosquid
free

Mount Fuji
...fuji
turbosquid
free 3d model mount fuji for download as obj on turbosquid: 3d models for games, architecture, videos. (1579977)
3d_export
$5

Headphone mount LR
...headphone mount lr
3dexport
headphone mount l+r
turbosquid
$39

Mount rainier
...quid
royalty free 3d model mount rainier for download as fbx on turbosquid: 3d models for games, architecture, videos. (1492586)
turbosquid
$5

pipe mounting
...quid
royalty free 3d model pipe mounting for download as obj on turbosquid: 3d models for games, architecture, videos. (1293744)
turbosquid
$3

Mounting Tires
...uid
royalty free 3d model mounting tires for download as fbx on turbosquid: 3d models for games, architecture, videos. (1708511)
3d_export
$5

Magnetic GoPro Mount
...pro mount
3dexport
cool magnetic mount for gopro. allows you to mount the camera on flat metal surfaces and get exclusive shots.
turbosquid
$5

Stone Mount
...ty free 3d model stone mount for download as ma, obj, and fbx on turbosquid: 3d models for games, architecture, videos. (1370306)