Thingiverse

AC PrintrBot LC v2 X Bridge To Bridge Support by AlexC-Makerologist
by Thingiverse
Last crawled date: 3 years ago
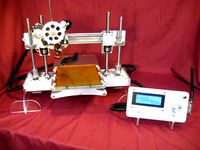
I was finding myself having to re-tighten the X belt quite frequently on my PrintrBot LC v2, I tried upgrading to a higher quality belt with less stretch, but that only helped a little,. After looking at the design of the two bridges, I realized that mechanically what you have here is a compression bow since the belt is off set from the carriage rods. In this you have two problems, one the bot is made of wood, wood warps even when not under tension, and I could see it with the naked eye, a definite bowing of the two bridges. The second problem this generates is that the movement of the X carriage itself is tugging on the "bow" ends whenever acceleration happens along the "string"(belt) of the bow. This tugs back and forth on the two "bow" ends during printing causing little variances in the warp of the two bridges towards the belt especially at higher movement speeds. (grab a bow and pull on the string along the strings length and watch one end of the bow bend toward the center of the string and the other end of the bow loosen a bit and "de-flex" this is happening a little every time the print head accelerates,. Causing what I can only think to describe as a warble in the print finish especially at corners where acceleration shifts.
I neglected to research otherwise I would have noted that others had made various widgets to tackle this, and a chat with a local printer expert let me know that the original PrinterBot had a wood plank to help fight the bow,. (No idea why they decided to remove it in the LC, it's quite needed). Regardless I had already started working on my solution to the problem and wanted to finish what I had started.
So while this is by no means an original fix it's my take on the fix,.
Four parts (two printed):
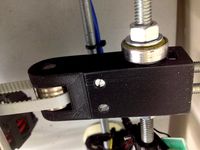
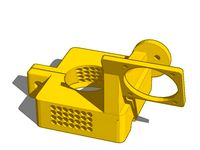
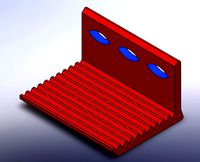
The shoulder: Mounts behind the right bridge, Requires a 1 inch 6-32 screw, and a 6-32 square nut, 4 1.25 inch 6-32 screws (you will need to be able to cut/grind one of them to be flush with the nut), and 4 6-32 bolts. For strength & rigidity I recommend 2-3 parameters with 2 top 2 bottom solid layers. PLA is strong enough, though ABS would likely be better.
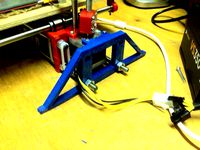
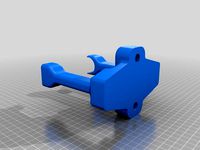
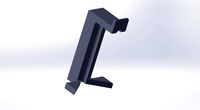
The Claw: Snaps in around the X motor, can be left loose, but there are also holes in the design to tighten the ends of the claw together with a zip tie if you wish. Two walls in all directions is plenty strong on this part.
The Rod: this can be just about any 1/4 inch diameter rod material, aluminum, carbon fiber, fiberglass, etc,. Though I would caution against wood for hopefully obvious reasons, of course wood would still be better than nothing. I choose 1/4 carbon fiber rod as its strong, light, ridged, and at my hobby shop 1/4 is the cheapest size in the ball park of what I was looking for.
The Mini Nuts: because the X belt tension thumb screws take up some space behind the right bridge when the carriage is all the way to the right and the "Shoulder" takes up some of this space you may need to change the wooden thumb screws to smaller profile plastic ones (also provided),. Though this is a good thing for another reason at least on the LC, move your carriage all the way to the left,. Look at the bottom of the bottom most thumb screw,. It's likely rubbing on the belt,.. bad,. These new mini nuts solve both problems. They will work with the stock hardware, though I suggest adding rubber washers just under the new mini nuts to keep them from loosening on their own from back and forth vibration.
You will have to disassemble a portion of your right bridge to install the shoulder, though I found it fairly easy to do especially with a power screw driver. The screw sticking out of the back of the bridge that's towards the top and closest to the extruder will need to be made flush with its nut to not impact the movement of the carriage. Do cut this prior to installation as the dremmel will heat the bolt plenty hot enough to scotch/damage wood.
The claw just uses compression to be held in place,. Push it on from the side of the motor, it should flex just enough and then snap on. Be careful of the wires that may be just under the motor.
Push the 1/4 inch rod though the shoulder hole then into the claw hole.
Add the square nut and 6-32 bolt to the shoulder.
Now I am playing with different ways of installing this, but so far, I have found that if I loosen up the belt, loosen up the two bridge plates that hold the big X rods in place, and then try to balance everything out with a caliper I can then tighten down the X rods, tighten down the new shoulder bolt while gently pushing the carbon rod towards the motor just a hair. And then last, tighten the belt, things get really, really smooth all of a sudden.
At this time I have chosen not to epoxy the new support rod at the motor claw, and iv also not zip tied the motor claw, though the holes are there to do that if you wish. So far this loose but linearly firm system is working wonders on my print quality. Though I am considering putting some kind of foam or thin padding between the motor and claw as there is a new harmonic signature coming out of the hollow carbon fiber rod,. For now im finding it somewhat novel to have this new noise, down the line ill likely remove it by lessening the possible vibrations from the loose claw either by zip tie or padding.
WARNING: I have not tested the Shoulder with the old wooden thumb screws, I fixed the belt rubbing first then designed the shoulder, I tried to give as much room as possible for the original bulky thumb screws, but I have not yet confirmed that they would not hit something on the shoulder if the carriage was all the way to the right (please let me know the results if you test this).
If your dialed in right, both printable parts should print just fine without support, even with the shoulder having a fairly large bridge to do (see photos)..
I neglected to research otherwise I would have noted that others had made various widgets to tackle this, and a chat with a local printer expert let me know that the original PrinterBot had a wood plank to help fight the bow,. (No idea why they decided to remove it in the LC, it's quite needed). Regardless I had already started working on my solution to the problem and wanted to finish what I had started.
So while this is by no means an original fix it's my take on the fix,.
Four parts (two printed):
The shoulder: Mounts behind the right bridge, Requires a 1 inch 6-32 screw, and a 6-32 square nut, 4 1.25 inch 6-32 screws (you will need to be able to cut/grind one of them to be flush with the nut), and 4 6-32 bolts. For strength & rigidity I recommend 2-3 parameters with 2 top 2 bottom solid layers. PLA is strong enough, though ABS would likely be better.
The Claw: Snaps in around the X motor, can be left loose, but there are also holes in the design to tighten the ends of the claw together with a zip tie if you wish. Two walls in all directions is plenty strong on this part.
The Rod: this can be just about any 1/4 inch diameter rod material, aluminum, carbon fiber, fiberglass, etc,. Though I would caution against wood for hopefully obvious reasons, of course wood would still be better than nothing. I choose 1/4 carbon fiber rod as its strong, light, ridged, and at my hobby shop 1/4 is the cheapest size in the ball park of what I was looking for.
The Mini Nuts: because the X belt tension thumb screws take up some space behind the right bridge when the carriage is all the way to the right and the "Shoulder" takes up some of this space you may need to change the wooden thumb screws to smaller profile plastic ones (also provided),. Though this is a good thing for another reason at least on the LC, move your carriage all the way to the left,. Look at the bottom of the bottom most thumb screw,. It's likely rubbing on the belt,.. bad,. These new mini nuts solve both problems. They will work with the stock hardware, though I suggest adding rubber washers just under the new mini nuts to keep them from loosening on their own from back and forth vibration.
You will have to disassemble a portion of your right bridge to install the shoulder, though I found it fairly easy to do especially with a power screw driver. The screw sticking out of the back of the bridge that's towards the top and closest to the extruder will need to be made flush with its nut to not impact the movement of the carriage. Do cut this prior to installation as the dremmel will heat the bolt plenty hot enough to scotch/damage wood.
The claw just uses compression to be held in place,. Push it on from the side of the motor, it should flex just enough and then snap on. Be careful of the wires that may be just under the motor.
Push the 1/4 inch rod though the shoulder hole then into the claw hole.
Add the square nut and 6-32 bolt to the shoulder.
Now I am playing with different ways of installing this, but so far, I have found that if I loosen up the belt, loosen up the two bridge plates that hold the big X rods in place, and then try to balance everything out with a caliper I can then tighten down the X rods, tighten down the new shoulder bolt while gently pushing the carbon rod towards the motor just a hair. And then last, tighten the belt, things get really, really smooth all of a sudden.
At this time I have chosen not to epoxy the new support rod at the motor claw, and iv also not zip tied the motor claw, though the holes are there to do that if you wish. So far this loose but linearly firm system is working wonders on my print quality. Though I am considering putting some kind of foam or thin padding between the motor and claw as there is a new harmonic signature coming out of the hollow carbon fiber rod,. For now im finding it somewhat novel to have this new noise, down the line ill likely remove it by lessening the possible vibrations from the loose claw either by zip tie or padding.
WARNING: I have not tested the Shoulder with the old wooden thumb screws, I fixed the belt rubbing first then designed the shoulder, I tried to give as much room as possible for the original bulky thumb screws, but I have not yet confirmed that they would not hit something on the shoulder if the carriage was all the way to the right (please let me know the results if you test this).
If your dialed in right, both printable parts should print just fine without support, even with the shoulder having a fairly large bridge to do (see photos)..
Similar models
3dwarehouse
free

Diddley Bow
...uner/tightener. #bo_diddley #bow #bridge #diddley #guitar #instrument #jar #nails #nut #single #slide #spoon #string #wedge #wood
thingiverse
free

Rostock Carriage Igus/Traxxas - Alternative mounting by zeus
...he belt is tighten properly, it will pull the screws outwards a bit and loosening itself, even with washers and if screwed tight!
thingiverse
free

Solidoodle Replacement Extruder Thumb nut by Wompus
...e one of the screws from the y-motor, place it in your drill and go at the nut a couple of times. it should loosen up right away.
thingiverse
free

Replicator X Belt tension tool by Roboduck
...the motor and adjust the thumb screws until the desired tension has been achieved. tighten your motor screws and remove the tool.
thingiverse
free
Belt Tensioner - Idle Pulley for Prusa Mendel I2 by Chris918
... old 608 bearing idler on the frame's threaded rod. it is acting as a washer on one side between the nut and the tensioner ;)
thingiverse
free

New Y clamp for hypercube evo (tension release) by zjxlsti
... am talking about, and confident about your x gantry set up (both x rods tightened so no force is transferred to your y bearings)
thingiverse
free

TronXY X8 X Carriage Belt Tension Mod by duodreamer
...rriage, plus two long m3 screws with nuts. can also use a smaller (625) bearing if you want and if your belt needs the clearance.
thingiverse
free

Da Vinci Y-Axis Carriage by mfink70
.... pictures are shown above.
added an additional version (motor side y-carriage) with hole to access rear upper motor mount screw.
thingiverse
free

P3Steel Y carriage belt holder by kaspars
...tion enabled)
30% rectilinear infill
update:
added v2 version with a cutout, if you have a y carriage with two center bed screws.
thingiverse
free

Sidewinder X1 Y Belt Tensioner by cybrstorm
...crews use the same thread size, so are interchangeable if you like one over the other.
please feel free to remix and make better!
Makerologist
thingiverse
free

Makerologist Roboderby (donkey car mods) by AlexC-Makerologist
...esigned to hold the car up during calibration (designed for 2.7mm door skin).
http://www.makerologist.comhttps://www.myopen3d.com
thingiverse
free

50mm Fan Guard by AlexC-Makerologist
...thing:33779 + i added a dome over the motor center to smooth out the air flow a tiny bit, not that it matters much at this scale.
thingiverse
free

PrintrBot Power Tower Bearing Fastener by AlexC-Makerologist
...dirty modification of "
printrbot spool coaster bearing fastener" to make the clip work with the printrbot power tower.
thingiverse
free

Snap-together Cam Set for Strandbeest by AlexC-Makerologist
...his will help with the camshaft rigidity by reducing flex, which in turn makes the walker's movement more precise and smooth.
thingiverse
free

AC Twist On Cable Loops For 20mm Extrusion by AlexC-Makerologist
... (on 20 mm extrusion), and unlike zip ties these are re-usable!
print with 2-3 perimeters for best strength.
4 sizes included
thingiverse
free

AC PrintrBot LC v2 40mm Fan Mount by AlexC-Makerologist
...ent 40 mm fans, so i made this plate to have the correct holes for a 40 mm fan.
1 perimeter and 20% infill is more than enough.
thingiverse
free

Needle File Handle w/ Thumb Set Screw by AlexC-Makerologist
...for large hands. (no, its not parametric anymore, just expand the hole a tiny bit with a hot drill bit, if the files wont go in.)
thingiverse
free

AC Stack-On 17 Storage Box Removeable Divider by AlexC-Makerologist
... i have made temp dividers out of anything from cardboard to aluminum, but finally now the simplest solution, just print more! =)
thingiverse
free

Printrbot LC v2 Extruder Tension Plate With Nut-Lock by AlexC-Makerologist
...umber of tools needed to service the machine to a minimal. all i did was cut the part in half. but i like it allot more this way.
thingiverse
free

AC T-Nut Slider - 20mm Extrusion by AlexC-Makerologist
... did try more complicated handles, longer sticks, etc, they just get in the way. the k.i.s.s. mantra works very well here. enjoy!
Alexc
thingiverse
free
50mm Fan Guard by AlexC-Makerologist
...thing:33779 + i added a dome over the motor center to smooth out the air flow a tiny bit, not that it matters much at this scale.
thingiverse
free
PrintrBot Power Tower Bearing Fastener by AlexC-Makerologist
...dirty modification of "
printrbot spool coaster bearing fastener" to make the clip work with the printrbot power tower.
thingiverse
free
Snap-together Cam Set for Strandbeest by AlexC-Makerologist
...his will help with the camshaft rigidity by reducing flex, which in turn makes the walker's movement more precise and smooth.
thingiverse
free
AC Twist On Cable Loops For 20mm Extrusion by AlexC-Makerologist
... (on 20 mm extrusion), and unlike zip ties these are re-usable!
print with 2-3 perimeters for best strength.
4 sizes included
thingiverse
free
AC PrintrBot LC v2 40mm Fan Mount by AlexC-Makerologist
...ent 40 mm fans, so i made this plate to have the correct holes for a 40 mm fan.
1 perimeter and 20% infill is more than enough.
thingiverse
free
Needle File Handle w/ Thumb Set Screw by AlexC-Makerologist
...for large hands. (no, its not parametric anymore, just expand the hole a tiny bit with a hot drill bit, if the files wont go in.)
thingiverse
free
AC Stack-On 17 Storage Box Removeable Divider by AlexC-Makerologist
... i have made temp dividers out of anything from cardboard to aluminum, but finally now the simplest solution, just print more! =)
thingiverse
free
AC T-Nut Slider - 20mm Extrusion by AlexC-Makerologist
... did try more complicated handles, longer sticks, etc, they just get in the way. the k.i.s.s. mantra works very well here. enjoy!
thingiverse
free
Printrbot LC v2 Extruder Tension Plate With Nut-Lock by AlexC-Makerologist
...umber of tools needed to service the machine to a minimal. all i did was cut the part in half. but i like it allot more this way.
thingiverse
free

MO3D Octagonal Candle Holder by AlexC-Makerologist
...yopen3d!
https://www.myopen3d.comhttps://www.facebook.com/myopen3dhttps://www.instagram.com/myopen3d/https://twitter.com/myopen3d
Lc
3ddd
$1

LC ARMCHAIR
... , armchair , leather
very nice armchair design
design_connected
$25

LC 5
...lc 5
designconnected
lc 5 computer generated 3d model. designed by le corbusier.
design_connected
$16

LC Shutters
...lc shutters
designconnected
louis poulsen lc shutters computer generated 3d model. designed by campbell, louise.
turbosquid
$29

LOMO LC-A
...rbosquid
royalty free 3d model lomo lc-a for download as c4d on turbosquid: 3d models for games, architecture, videos. (1222522)
3d_ocean
$89

Lexus LF-LC 2012
...y, in real units of measurement, qualitatively and maximally close to the original. model formats: - *.max (3ds max 2008 scanl...
3d_export
$99

Lexus LF LC 2012 3D Model
...f lc 2012 2013 2014 2015 sport car sportcar super racing 2-door roadster coupe
lexus lf lc 2012 3d model humster3d 55384 3dexport
3ddd
$1

Siemens LC 968 BA 90 BK
...siemens lc 968 ba 90 bk
3ddd
siemens , вытяжка
вытяжка siemens lc 968 ba 90 bk.
3ddd
$1

пуф LC Cassina
...пуф lc cassina
3ddd
cassina , пуф
http://cassina.com/en/collection/chairs/lc7
turbosquid
$20

Furninova Sofa Harmony Night Lc
...l furninova sofa harmony night lc for download as max and obj on turbosquid: 3d models for games, architecture, videos. (1603969)
cg_studio
$149

USS Independence LCS-13d model
....3ds .c4d .fbx .lwo .max .obj - uss independence lcs-1 3d model, royalty free license available, instant download after purchase.
Printrbot
thingiverse
free

printrbot gasket by Usernameunavailible
...printrbot gasket by usernameunavailible
thingiverse
a part for printrbots
thingiverse
free
Printrbot Aluminum by Chris_the_Carpenter
...printrbot aluminum by chris_the_carpenter
thingiverse
a redesign of the awesome printrbot, in aluminum.
thingiverse
free
PrintrBot keychain by SuperMaku
...printrbot keychain by supermaku
thingiverse
printrbot keychain. may need to be scaled up.
thingiverse
free
Printrbot foot by aliekens
...printrbot foot by aliekens
thingiverse
add wider feet to a printrbot for improved stability.
thingiverse
free
Printrbot to CNC by mmrrsiam
...printrbot to cnc by mmrrsiam
thingiverse
make your printrbot also a small cnc machine....
thingiverse
free

Printrbot Keychain by jackbivona
...printrbot keychain by jackbivona
thingiverse
printrbot keychain for all you pb customers out there
thingiverse
free

Printrbot+ Nutkeepr by DonaldJ
...printrbot+ nutkeepr by donaldj
thingiverse
clip to retain nut on z-axis threaded rod of printrbot+
thingiverse
free

PrintrBot Tool Caddy by spr_consulting
...printrbot tool caddy by spr_consulting
thingiverse
printrbot tool caddy.
thingiverse
free
Printrbot Sensor Wrench by spr_consulting
...printrbot sensor wrench by spr_consulting
thingiverse
curvaceous printrbot sensor wrench.
thingiverse
free
Spool Holder for Printrbot by doubleAdoubleU
...spool holder for printrbot by doubleadoubleu
thingiverse
spool holder for a printrbot simple metal
Ac
3d_export
$59

AC Ace 3D Model
...ac ace 3d model
3dexport
car classic ac ace british roadster
ac ace 3d model desmonster 41277 3dexport
turbosquid
$9

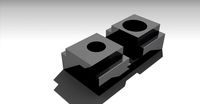
Ace(ACE) black coin
...royalty free 3d model ace(ace) black coin for download as max on turbosquid: 3d models for games, architecture, videos. (1593428)
design_connected
$18

Ace soft
...ace soft
designconnected
viccarbe habitat ace soft computer generated 3d model. designed by massaud, jean-marie.
turbosquid
$240

AC 130
...
turbosquid
royalty free 3d model ac 130 for download as fbx on turbosquid: 3d models for games, architecture, videos. (1366260)
turbosquid
$5

AC PLUG
...rbosquid
royalty free 3d model ac plug for download as sldas on turbosquid: 3d models for games, architecture, videos. (1199446)
turbosquid
$2

ac 02
...2
turbosquid
free 3d model ac 02 for download as 3ds and obj on turbosquid: 3d models for games, architecture, videos. (1710322)
turbosquid
$1

AC Socket
...osquid
royalty free 3d model ac socket for download as blend on turbosquid: 3d models for games, architecture, videos. (1562405)
turbosquid
$30

Motor AC
...d
royalty free 3d model motor ac for download as ipt and iam on turbosquid: 3d models for games, architecture, videos. (1361968)
turbosquid
$2

AC unit
...
royalty free 3d model ac unit for download as fbx and blend on turbosquid: 3d models for games, architecture, videos. (1487700)
3ddd
$1

AC SPLIT
...ac split
3ddd
3dmax / vray
Bridge
3d_export
free
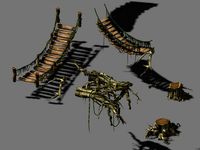
bridge and destroyed bridge
...bridge and destroyed bridge
3dexport
bridge and destroyed bridge
3d_ocean
$19
Bridge
...bridge
3docean
3d bridge building
3d bridge
archibase_planet
free

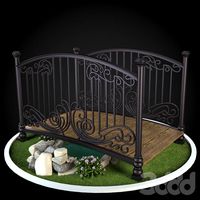
Bridge
...bridge
archibase planet
bridge foot-bridge construction
bridge n130715 - 3d model (*.gsm+*.3ds) for exterior 3d visualization.
3ddd
free
The Bridge
...the bridge
3ddd
мост
the bridge
3d_ocean
$7
Bridge
...bridge
3docean
bridge low polygon medi evil bridge old bridge
2048 * texture obj, fbx and blend format. game ready model.
archibase_planet
free
Bridge
...net
bridge foot-bridge construction
bridge ponte de tijolos n250515 - 3d model (*.gsm+*.3ds+*.max) for exterior 3d visualization.
3d_export
$18
arch bridge-bridge-stairs
...arch bridge-bridge-stairs
3dexport
arch bridge-bridge-stairs<br>3ds max 2015
3d_export
$5

bridge
...bridge
3dexport
bridge - 3d model ( gsm : 3ds )
3d_export
$5

bridge
...bridge
3dexport
wood bridge all textures in 4k
3ddd
$1
Bridge
...bridge
3ddd
bridge , мост
мост для экстерьера
V2
3d_export
free

Lamp v2
...lamp v2
3dexport
lamp v2 with solar panel
3d_export
$5

hammerhead v2
...hammerhead v2
3dexport
razer hammerhead v2 headphones, modeled in cinema 4d, render in corona
3d_export
$5

manometer v2
...manometer v2
3dexport
3d_export
$5

potato v2
...potato v2
3dexport
turbosquid
$52

Lifebuoys v2
...squid
royalty free 3d model lifebuoys v2 for download as fbx on turbosquid: 3d models for games, architecture, videos. (1560870)
turbosquid
$2

Mask v2
...turbosquid
royalty free 3d model mask v2 for download as stl on turbosquid: 3d models for games, architecture, videos. (1527741)
turbosquid
free

Flashlight V2
...d
free 3d model flashlight v2 for download as , obj, and fbx on turbosquid: 3d models for games, architecture, videos. (1663559)
turbosquid
$29

Thanos v2
...
royalty free 3d model thanos v2 for download as ztl and obj on turbosquid: 3d models for games, architecture, videos. (1651077)
turbosquid
$29

Titan v2
...d
royalty free 3d model titan v2 for download as ztl and obj on turbosquid: 3d models for games, architecture, videos. (1540228)
turbosquid
$29

Frieza v2
...
royalty free 3d model frieza v2 for download as ztl and obj on turbosquid: 3d models for games, architecture, videos. (1701238)
Support
turbosquid
$5
Support
... available on turbo squid, the world's leading provider of digital 3d models for visualization, films, television, and games.
3d_export
$8
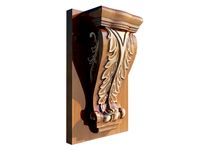
Support 3D Model
...support 3d model
3dexport
support cantilever console
support 3d model tasal 73900 3dexport
3d_export
$5
phone support
...phone support
3dexport
phone
turbosquid
$12
Support bars
...squid
royalty free 3d model support bars for download as max on turbosquid: 3d models for games, architecture, videos. (1411542)
turbosquid
$8

support weights
...id
royalty free 3d model support weights for download as max on turbosquid: 3d models for games, architecture, videos. (1411538)
turbosquid
$2

Support for flowers
...royalty free 3d model support for flowers for download as max on turbosquid: 3d models for games, architecture, videos. (1463543)
turbosquid
$2
headphone support
...royalty free 3d model headphone support for download as sldpr on turbosquid: 3d models for games, architecture, videos. (1357583)
turbosquid
$14

Flower Support
...alty free 3d model flower support for download as max and obj on turbosquid: 3d models for games, architecture, videos. (1497066)
turbosquid
$5
serum support
...yalty free 3d model serum support for download as c4d and obj on turbosquid: 3d models for games, architecture, videos. (1551267)
3d_export
$10
spyro joystick support
...spyro joystick support
3dexport
joystick support of spyro dragon