Thingiverse
A5-1Z/2Z XL by Bbaxter18
by Thingiverse
Last crawled date: 2 years, 12 months ago
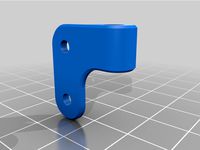
ive included the X endstop and Y endstop files. the X endstop is designed for a bowden style carriage with a small contact point on the lower left hand screw on the carriage itself. you will ned to design this until i can remake my file of one. more or less a 5mm spacer. please use electrical tape to cover the back side of the (all) endstop, shorting one will destroy your arduino mega (ask me how i know). the x endstop is held in place by two of the motor mount screws so the endstop itself sits over one of them, if your pulley sticks out of the gantry you may need to modify and remove material from the edge. the Y endstop is held in place by the screw that holds the Y drive lid. i am still working on a proper z endstop servo apparatus but hopefully one will be up shortly. it may be a remix of the bowden carriage that i am using but generic none the less. any ideas, questions or comments, leave them for me.
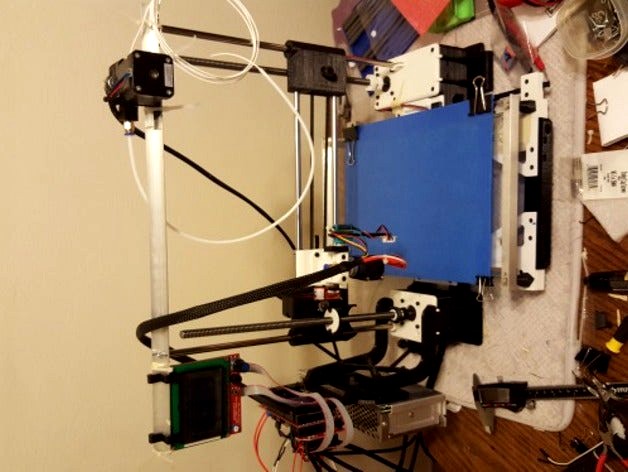
Nearly there
So as you can see from the new picture, it is almost there. I will be uploading endstops Brackets for all axis and A Modified Truss to accept the 12864 display and the NEMA 17 For the bowden configuration. I plan on making this an auto leveling machine so expect to see a servo driven Z endstop as well as a standard post mount. The spool mount included with the original design should work really well in this configuration. I will link the couplers i used as well for the 3/8 rod(multiple options with the design). Any questions or feedback, leave a comment or message me.
Another UPDATE
I've split and added the 2Z housing as a male and female puzzle cut, in case you have lost a fair amount of area on your print bed. I have a new belt keeper in the works for use with an opened GT2 belt on the One/Two/Three up X carriage. Keep an eye on my designs, Should be up soon.
UPDATE
I've added files for the Bed X Support(Male/Female) so it can be printed in halves that snap together with a puzzle cut, If either of them warp, it may make them a tighter fit, Sanding may help. If this happens get them as close to flush as you can, then use your stove top and heat water up to about 140~ degrees F. once warm and slightly flexible, move it to a flat surface like glass and hold it flat until it cools.
This will help Solve the upgraded gantry issue. My bed is also trimmed down by another 15mm for the time being do to a makeshift belt tensioner. They fit easily, If i rotate them by 30 degrees in the Z axis. Let me know how it goes.
This is also a makeshift way to get it done. While I suggest super glue or friction welding when you assemble it, i can say that the pieces slip together and mate extremely well. Also like i said, makeshift, If you are completing this mod, Print a single piece one once you have the opportunity.
These parts allow for the Base to be extended By 40mm In the X Axis, and the Bed to be extended by 40mm for use with 330mm rods.
All are printable on the TwoUP, but you may have Trouble printing the BED X SUPPORT if you have an upgraded gantry.
You will still need all of the other files from the original builds (http://www.thingiverse.com/thing:844471 , http://www.thingiverse.com/proto-plastik/designs). These should also be compatible with the 2Z edition that he has released(http://www.thingiverse.com/thing:1078143).
Leave a comment with questions, or feedback. These were Modified with Tinkercad.
Similar models
thingiverse
free
Anycubic I3 Z-Carriage upgrade by Deadsnale
...work well.
if you have any questions please let me know in the comments. if you print them and please let me know how they work.
thingiverse
free

X-endstop after X and Z-axis MGN12H upgrade by siegfriedestrada
...using the single extruder stock carriage. so i decided to design one using sketchup. installed and working fine on my unit. :)
thingiverse
free

QU-BD Bowden X Carriage for E3D V6 w/ X Endstop by zcubed
...e itself. you can easily add an x endstop with the bracket and adjuster.
metal holder:http://www.amazon.com/gp/product/b00g9fqytg
thingiverse
free
X1 Filament Relocator for X-Axis Belt Tensioner by thebeline
...t twisted filament from getting between the gantry and sensor, which is bad).
use the rg gantry support
profit!
no supports. g2g
thingiverse
free

Smooth X-Axis Makerbot Endstop Modfication by GrkMangas
...ase of the carriage was made bigger to allow for the endstops to be triggered. this allows for more types of endstops to be used.
thingiverse
free

Vulcanus V2 Mod by kubus_p
...per part of the carriage holds well hence it stays like it is. if someone have experienced also problems with it leave a comment.
thingiverse
free

Prusa i3 adjustable Z-end-stop - mounts on X carriage by tnever
...adjustable z endstop works and wanted one that was similary easy to use, accessible and simple. it mounts on...
thingiverse
free

Mini V Gantry adapter for E3D V6 Bowden MODULAR X Carriage V4 by rAthus
...'s original design is outdated and won't work with recent versions of the sensor, print that bracket or that one instead!
thingiverse
free

Adjustable Z Axis Endstop by PDMarc
...home z axis.
design
i have uploaded the freecad design that i made, so you can remix it even more.
i hope it is useful for you!
thingiverse
free

Wanhao i3 Standalone Z-stop extender (Fully 3D printed) by xtchronosage
...arance, scale it up/down by 5%. this extender will give you 3-6mm additional clearance. re-level your hot bed after installation.
Bbaxter18
thingiverse
free

8x12x38mm bushing by Bbaxter18
...e
for testing purposes, in conjunction with the a5-2z.
it will help to clean the inside of this bushing with a 5/16th drill bit.
thingiverse
free

Tapered F4 Frame Slider by Bbaxter18
...
added a taper inside of the slider to allow for simpler printing without support, rotate object upside-down for continuous print
thingiverse
free

Tinkerboard With ASUS and ROG logo platform by Bbaxter18
...tform. decided to spruce it up a bit with an rog logo. i wish the logo could be visible from the top, so that may be coming next.
thingiverse
free

Split HMD wall mount for HTC VIVE by Bbaxter18
...ngiverse
needed a smaller version of this to fit my print bed. cut it in tinkercad. have printed it yet, so leave some feedback.
thingiverse
free

Kanger Nebox Filling Station or stand by Bbaxter18
...k a fall. i left the mouth piece receptacle open for easy cleaning in case of a overfill. it can also be used as a desktop stand.
thingiverse
free

Tap Handle by Bbaxter18
...n using 2 m5x25 socket head screws, face the v cuts towards each other and thread the bolts into the inserts from opposite sides.
thingiverse
free

Magpul M-lok System Components by Bbaxter18
...used the 5 slot as a template to cut a majority of the work away. thanks user ripper121. http://www.thingiverse.com/thing:1827154
thingiverse
free

One/Two/ThreeUP X Belt retrofit by Bbaxter18
...pdated to v3. also, i noticed that if you use too long of a screw in the mount, it will catch the edge of the belt as it travels.
1Z
3d_export
$20

AH 1Z viper 3D Model
...3dexport
ah 1z viper helicopter army vehicle war air gun nextgen aircraft game lowpoly
ah 1z viper 3d model potyek 27371 3dexport
3d_export
$15

Bell AH-1Z Viper
...l huey family, is also called "zulu cobra", based on the military phonetic alphabet pronunciation of its variant letter
3ddd
free

Eago AM 152 JDTS-1Z 180x82см
... ванна , джакузи
ванна eago am 152 jdts-1z 180x82см
cg_studio
$79

AH-1Z Super Cobra Attack Helicopter3d model
...x .obj .xsi .c4d - ah-1z super cobra attack helicopter 3d model, royalty free license available, instant download after purchase.
3d_export
$299

Bell AH-1Z Viper Attack Helicopter 3D Model
...ell ah-1z viper attack helicopter 3d model download .c4d .max .obj .fbx .ma .lwo .3ds .3dm .stl jonathanvardstedt 108852 3dexport
3d_export
$29

bell ah 1z viper fighter helicopter
...gt;royalty free 3d models<br>4k textures exported in rar<br>pbr textures<br>texturing done in substance painter
3d_export
$20

Viper AH1 3D Model
...viper ah1 3d model 3dexport ah 1z viper helicopter army vehicle war air gun nextgen aircraft...
3d_export
$99

Skoda Octavia combi 2005 3D Model
...skoda octavia combi 2005 3d model 3dexport skoda octavia 1z combi tour 2004 2005 2006 2007 2008 2009 2010...
3d_export
$99

Skoda Octavia liftback 2005 3D Model
...skoda octavia liftback 2005 3d model 3dexport skoda octavia 1z liftback tour 2004 2005 2006 2007 2008 2009 2010...
3d_export
$99

Skoda Octavia RS liftback 2005 3D Model
...octavia rs liftback 2005 3d model 3dexport skoda octavia 1z rs sport liftback tour 2004 2005 2006 2007 2008...
2Z
3ddd
free

Kuppersbusch UWK 8200-0-2Z Wine Cabinet
... холодильник
kuppersbusch uwk8200-0-2z wine cabinet 3d model
polys: 54405; verts: 57623
винный шкаф, винный холодильник
3d_export
$10

Kuppersbusch UWK 8200-0-2Z Electric Wine Cabinet 3D Model
...ic appliances furnishings kitchen refrigerator
kuppersbusch uwk 8200-0-2z electric wine cabinet 3d model genkot27 100318 3dexport
3d_ocean
$15

Electric Wine Cabinet Kuppersbusch UWK 8200-0-2Z
...lectric wine cabinet kuppersbusch uwk 8200-0-2z 3d models v-ray materials renderer includes files: 3dsmax2010; fbx; obj; textures
3dfindit
free

RPE-2Z
...rpe-2z
3dfind.it
catalog: a&t
3dfindit
free

RSM口-2Z
...rsm口-2z
3dfind.it
catalog: a&t
3dfindit
free

RSF口-2Z
...rsf口-2z
3dfind.it
catalog: a&t
3dfindit
free

JR口-2Z
...jr口-2z
3dfind.it
catalog: a&t
3dfindit
free

JRM口-2Z
...jrm口-2z
3dfind.it
catalog: a&t
3dfindit
free

R口-2Z
...r口-2z
3dfind.it
catalog: a&t
3dfindit
free

RM口-2Z
...rm口-2z
3dfind.it
catalog: a&t
A5
turbosquid
$50

A5
... available on turbo squid, the world's leading provider of digital 3d models for visualization, films, television, and games.
3ddd
$1

Slipper Bath A5
...slipper bath a5
3ddd
toto
slipper bath a5
3ddd
$1

Slipper Bath A5
...slipper bath a5
3ddd
toto , ванна
slipper bath a5
turbosquid
$130

A5 Coupé
...urbosquid
royalty free 3d model a5 coupé for download as max on turbosquid: 3d models for games, architecture, videos. (1689937)
turbosquid
$29

Audi A5
... available on turbo squid, the world's leading provider of digital 3d models for visualization, films, television, and games.
turbosquid
free

Audi A5
... available on turbo squid, the world's leading provider of digital 3d models for visualization, films, television, and games.
3d_ocean
$89

Audi A5 Convertible
...erman german interior interior luxury luxury sport sport vehicle vehicle
audi a5 convertible – high detailed model with interior.
3d_export
$50

Audi A5 3D Model
...audi a5 3d model
3dexport
audi a5 s5 sline
audi a5 3d model teduk 33305 3dexport
3d_ocean
$89

Audi A5 Coupe
...iled germany germany hight hight luxury luxury photorealistic photorealistic sedan sedan
audi a5 coupe 2010 hight detailed model.
3ddd
free

Masiero ve942/a5
...masiero ve942/a5
3ddd
masiero , ottocento
бра masiero ve942/a5
l 45 cm
h 40 cm
Xl
turbosquid
$33

Nokia XL and XL Dual Orange
... available on turbo squid, the world's leading provider of digital 3d models for visualization, films, television, and games.
turbosquid
$29

Nokia XL and XL Dual Yellow
... available on turbo squid, the world's leading provider of digital 3d models for visualization, films, television, and games.
turbosquid
$29

Nokia XL and XL Dual Cyan
... available on turbo squid, the world's leading provider of digital 3d models for visualization, films, television, and games.
turbosquid
$29

Nokia XL and XL Dual Black
... available on turbo squid, the world's leading provider of digital 3d models for visualization, films, television, and games.
design_connected
$13

Diana XL
...diana xl
designconnected
delightfull diana xl computer generated 3d model.
3ddd
$1
модель XL
...модель xl
3ddd
sklo+glas , дверь
стеклянные двери фирмы sklo+glas , модель xl
turbosquid
$69

Nokia XL and XL Dual All Color
... available on turbo squid, the world's leading provider of digital 3d models for visualization, films, television, and games.
turbosquid
$33

Nokia XL and XL Dual Bright Green
... available on turbo squid, the world's leading provider of digital 3d models for visualization, films, television, and games.
3ddd
$1

Oslo XL LB
...oslo xl lb
3ddd
камин , oslo
камин oslo xl lb
3ddd
$1
BAY XL
... giulio marelli
giulio marelli italia. bay xl.
диван, дизайн studio crgm в тканевом исполнении.
длина: 2.55