Thingiverse
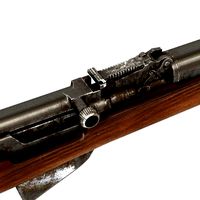
A cylinder for magazine for Air Arms S200 or CZ 200 air rifle
by Thingiverse
Last crawled date: 4 years, 2 months ago
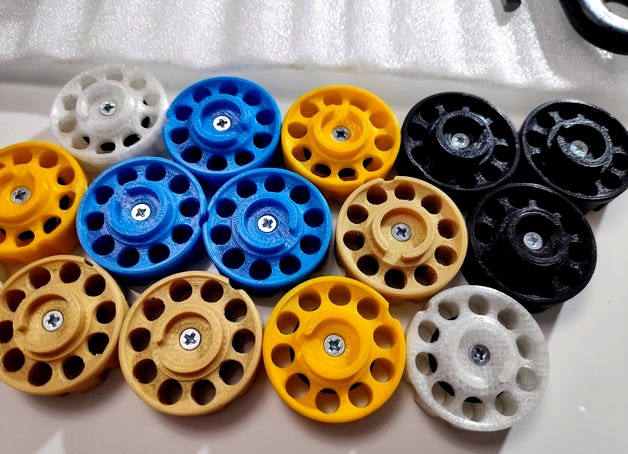
A cylinder for magazine for Air Arms S200 air rifle, which also fits CZ 200.
The plastic version of cylinder is much better because with the stock aluminium cylinder you will wear out the plastic body of magazine much faster.
The cylinder consists of two parts which can be fixed by screw and nut, so you don't need to glue both parts. You'll need the M2.5 x 10mm flat head screw and M2.5 nut.
I used the O-ring 13 x 3mm which is different from the original one (12 x 3.5mm). They have the same outer diameter (19mm) but smaller ring height (difference is 0.5) make the ring be more softer and it reduces the pressure amount you need to apply to move the push rod. The bullets stay in their position just as well as before. I tested on different sizes and shapes, all went well.
Also mine cylinder is a little bit bigger in diameter than the original one I have because it sits better in the magazine. I'm talking about 30.25mm diameter instead of 29.66mm. Don't worry, it works fine even in cold weather, I tested it at -20 Celsius.
I tried to print with 0.4 nozzle and 0.2mm layer and the quality was the same, I mean I haven't noticed the difference in how the pellets went from the cylinder into the barrel.
Instead I would recommend to decrease the printing speed to get better quality. I printed at 15mm/second.
Some note about the screw:
Ideally we need the 9mm length but there is no such screw on a market. We have 8mm or 10mm. 10 works fine, don't worry, it fits, but if you want perfect look you might want to sandpaper it to 9.5mm which is quite enough.
If your printer prints with bigger size or smaller, there is a chance you can resize the model in slicer in X/Y plane by 0.5-1% without touching the Z axis.
If you need to make better holes for pellets then use the 5.2mm drill.
More photos and video: https://photos.app.goo.gl/YT6UbgmzyWhWtEg18
Link to the design: https://a360.co/2pm8wAf
Update: I've added a version which has 3 locking pins instead of 2.
Update (4 Dec 2019): I've added "v3" version after I changed the o-ring on the push rod (it has 3 x 1mm size) and found out that I can't longer go through the pellet channels with the new o-ring. I happened because my old ro-ing was slightly smaller due to it's age (almost 7 years), and the new one appeared bigger. I tried to make the channels diameter bigger (+0.2mm), but it appeared that the surface of the channels must be very smooth (the FFF printer can't get on this level). I decided to take a 5.3mm drill bit and drill the channels to this diameter. The surface became smoother and roughly equals to original channel diameter. To be precise with original you need to find 5.26mm drill bit. Also I had to use the original O-ring (12 x 3.5mm) because with more space my 13 x 3mm ring can't hold the pellet steady anymore. Also it's a good idea to lubricate the channels with some grease. Also, you can make the channel ever bigger in diameter (5.4mm) to avoid grease and polishing the channel surface, but it adds more space and pellet might go out from the channel.
Also this version was re-designed to make the channels "solid".
Similar models
thingiverse
free

Air Arms S200 .177 Magazine V2 by Hadgee
...ss with the new magazine working and cycling after minimal clean up.
it is safe to print and will work, it also cleans up easier.
thingiverse
free

Generic Cylinder Generator by amthe
...e
you can make cylinders here. it's honest work.
this was made because i needed a cylinder for the open air purifier project
thingiverse
free

Air Arms S200 .177 Magazine by Hadgee
... here. to be honest check out my v2 external 'o' ring magazine it is better design for cleaning supports and works great.
thingiverse
free

Drill chuck key holder by winand
...e screw to let the key click in its place. work beautifully!
i also made a universal version you could mount virtually anywhere
thingiverse
free

Spare part of Pot lid holder by Milhause
...ead down.
resolution 0,2
infill 20%
diameter hole is 9mm,
if you need a larger diameter, use a drill if you need wiader drill it.
grabcad
free

Transfer port for Weihrauch HW45 air gun
...ith a 3.5mm hole, an one with original 3mm if someone doesn't want to drill in the air cylinder, that hole is 3mm and angled.
thingiverse
free

Pellet Gun Suppressor by Teubert1162
...r barrel. may need to run a drill bit through it to make sure there's enough clearance for the pellet. customize as you wish.
thingiverse
free

Customizable cylinder by painteddigital
... also use openscad to customize the file.
about openscad
free modeler that runs a script to generate stlshttp://www.openscad.org/
grabcad
free

Pellet_Press_kit
...pellet_press_kit
grabcad
a simple pellet press kit for making 25mm diameter cylinder pellets.
cg_trader
$25

MAGAZINE 12 | 3D
...i, magazine 12 round for airgun marauder chamber, dimension of pellet in diameter 5,5 mm. now you can make it diy by 3d printing.
S200
turbosquid
$20

ACER NEOTOUCH S200
... available on turbo squid, the world's leading provider of digital 3d models for visualization, films, television, and games.
turbosquid
$20

Synesso S200 Espresso Machine
...del synesso s200 espresso machine for download as max and fbx on turbosquid: 3d models for games, architecture, videos. (1456543)
humster3d
$75

3D model of Toyota Crown Royal Saloon (S200) 2010
...of toyota crown royal saloon (s200) 2010 in various file formats. all our 3d models were created maximally close to the original.
3d_ocean
$89

Toyota Crown Royal Saloon (S200) 2010
...y, in real units of measurement, qualitatively and maximally close to the original. model formats: - *.max (3ds max 2008 scanl...
3d_export
$99

Toyota Crown Royal Saloon S200 2010 3D Model
... wheel base 2002 2012 2013 2014 minivan van mpv us american
toyota crown royal saloon s200 2010 3d model humster3d 63717 3dexport
3ddd
free

Люстра MAYTONI SPIKE
...maytoni spike 3ddd maytoni хрустальная потолочная люстра maytoni spike (s200pt60-n). материал основания: металл материал плафона: хрусталь размеры (высота), мм:...
3dfindit
free

S55720-S200
...s55720-s200
3dfind.it
catalog: siemens building technologies eu
thingiverse
free

JVC HA-S200 Speaker ring by nakwada
...jvc ha-s200 speaker ring by nakwada
thingiverse
a replacement part for the jvc ha-s200 heaphones
thingiverse
free

Air Arms S200 .22 Magazine by Hadgee
...air arms s200 .22 magazine by hadgee
thingiverse
same as air arms .177 magazine v2 but in .22.
thingiverse
free

NAD S200 Hi-Fi Amplifier Main Power Button Replacement by Non-ICE
...0 hi-fi amplifier main power button replacement by non-ice
thingiverse
replacement powerbutton for the nad s200 hi-fi amplifier.
Cz
turbosquid
$148

CZ-11
...1
turbosquid
royalty free 3d model cz-11 for download as max on turbosquid: 3d models for games, architecture, videos. (1662373)
turbosquid
$30

Cz 75
...squid
royalty free 3d model cz 75 for download as ma and obj on turbosquid: 3d models for games, architecture, videos. (1193409)
turbosquid
$4

CZ-550
... available on turbo squid, the world's leading provider of digital 3d models for visualization, films, television, and games.
turbosquid
$1

CZ 75B
... available on turbo squid, the world's leading provider of digital 3d models for visualization, films, television, and games.
turbosquid
$1

CZ Pistol
... available on turbo squid, the world's leading provider of digital 3d models for visualization, films, television, and games.
turbosquid
free

CZ 75
... available on turbo squid, the world's leading provider of digital 3d models for visualization, films, television, and games.
3d_export
free

cz upgrade
...cz upgrade
3dexport
https://www.buymeacoffee.com/mestrezen3d https://linktr.ee/mestrezen3
3d_export
$5

CZ 100 3D Model
...cz 100 3d model
3dexport
cz 100 3d model term!x 993 3dexport
3d_export
$59

CZ 75 3D Model
...rt
75 automatic bullet cz czech czub gun pistol semi semi-automatic weapon semi-automatic
cz 75 3d model humster3d 90621 3dexport
cg_studio
$20

CZ 40B3d model
... gun pistol handgun game ready gameready
.max - cz 40b 3d model, royalty free license available, instant download after purchase.
Magazine
archibase_planet
free

Magazines
...ibase planet
magazine journal periodical magazines
magazines dual n200111 - 3d model (*.gsm+*.3ds) for interior 3d visualization.
archibase_planet
free
Magazines
...magazines
archibase planet
magazine periodical journal
magazines - 3d model for interior 3d visualization.
3d_ocean
$5
3d magazine
...3d magazine
3docean
3d magazine book journal magazine newspaper
3d magazine model.
turbosquid
$2

magazines
...rbosquid
royalty free 3d model magazines for download as c4d on turbosquid: 3d models for games, architecture, videos. (1264164)
3d_export
$5
Magazine stand
...magazine stand
3dexport
magazine stand
3d_export
$5

magazine stand
...magazine stand
3dexport
magazine stand
3ddd
$1
Stool Magazine
...stool magazine
3ddd
stool magazine дизайнерское кресло
turbosquid
$10

magazine
...3d model magazine for download as max, max, max, fbx, and max on turbosquid: 3d models for games, architecture, videos. (1691943)
turbosquid
$2

Magazine
... available on turbo squid, the world's leading provider of digital 3d models for visualization, films, television, and games.
archive3d
free

Magazines 3D Model
...magazine periodical journal
magazines n160212 - 3d model (*.3ds) for interior 3d visualization.
Rifle
3d_ocean
$9

rifle
...rifle
3docean
gun low poly rifle soldier weapon
rifle model max 2013 and obj 1024×1024 texture lowpoly
turbosquid
$30

Rifle
...le
turbosquid
royalty free 3d model rifle for download as ma on turbosquid: 3d models for games, architecture, videos. (1161496)
turbosquid
$1

rifle
...turbosquid
royalty free 3d model rifle for download as blend on turbosquid: 3d models for games, architecture, videos. (1344661)
3d_export
$5

longfire rifle
...longfire rifle
3dexport
longfire rifle
3d_export
free

butt of the rifle
...butt of the rifle
3dexport
butt of the rifle
3d_export
free

repeater rifle
...repeater rifle
3dexport
repeater rifle
3d_export
$15

Rifle v2
...rifle v2
3dexport
assault rifle, designed for the protection and storming of objects. the rifle has a paralytic function.
turbosquid
$20

Rifle
...quid
royalty free 3d model rifle for download as obj and fbx on turbosquid: 3d models for games, architecture, videos. (1301083)
3d_export
$5
rifle sks
...rifle sks
3dexport
rifle sks simonov
turbosquid
$49

Rifle
...
royalty free 3d model rifle for download as ma, fbx, and obj on turbosquid: 3d models for games, architecture, videos. (1582428)
Cylinder
turbosquid
$1

Piston - Cylinder Cylinder Engine
...nder cylinder engine for download as ige, obj, stl, and sldpr on turbosquid: 3d models for games, architecture, videos. (1235278)
3ddd
$1

sofa cylinder
...sofa cylinder
3ddd
круглый
sofa cylinder
turbosquid
$1

Cylinder Head - Single Cylinder Engine
...ngle cylinder engine for download as ige, obj, stl, and sldpr on turbosquid: 3d models for games, architecture, videos. (1222618)
turbosquid
$16

Cylinder
... available on turbo squid, the world's leading provider of digital 3d models for visualization, films, television, and games.
turbosquid
$10

Cylinder
... available on turbo squid, the world's leading provider of digital 3d models for visualization, films, television, and games.
3d_export
$120

Four cylinder
...four cylinder
3dexport
four cylinder render 3d modelling
3d_export
$5

piston cylinder
...piston cylinder
3dexport
piston cylinder arrangement sketched in solidworks
3ddd
$1

Cylinder Lamp A
...cylinder lamp a
3ddd
cylinder form lamp for loft interior
archive3d
free

Cylinder 3D Model
... model
archive3d
cylinder drum
cylinder - 3d model (*.gsm+*.3ds) for interior 3d visualization.
archive3d
free

Cylinder 3D Model
...odel
archive3d
drum cylinder
cylinder 2 - 3d model (*.gsm+*.3ds) for interior 3d visualization.
200
design_connected
$27

Lifewood 200
...lifewood 200
designconnected
flexform lifewood 200 computer generated 3d model.
design_connected
$27

Nonnamaria 200
...nonnamaria 200
designconnected
flexform nonnamaria 200 computer generated 3d model.
design_connected
free

XZ3 200
...xz3 200
designconnected
free 3d model of xz3 200 by magis designed by van onck, andries & hiroko.
3d_export
$17

Boeing 717-200
...boeing 717-200
3dexport
boeing 717-200
3ddd
free

Possoni /200 / 25
...possoni /200 / 25
3ddd
possoni
possoni/200/25
turbosquid
$10

Set-200
...yalty free 3d model set-200 for download as max, obj, and fbx on turbosquid: 3d models for games, architecture, videos. (1296305)
3ddd
$1

LG TS-200
...lg ts-200
3ddd
dvd , lg , пульт
lg ts-200
turbosquid
$5

Chair 200
...d model chair 200 for download as max, max, 3ds, fbx, and obj on turbosquid: 3d models for games, architecture, videos. (1647835)
turbosquid
$5

Chair 200
...d model chair 200 for download as max, max, 3ds, fbx, and obj on turbosquid: 3d models for games, architecture, videos. (1648696)
turbosquid
$3

200 Euro
... available on turbo squid, the world's leading provider of digital 3d models for visualization, films, television, and games.
Arms
archibase_planet
free

Arm
...ase planet
arm hand right hand skeleton
arm human skeleton right arm n030515 - 3d model (*.gsm+*.3ds+*.max) for 3d visualization.
3ddd
$1

arm chair
...arm chair
3ddd
arm chair , пуф
arm chair
turbosquid
$5
arm
...arm
turbosquid
royalty free 3d model arm for download as obj on turbosquid: 3d models for games, architecture, videos. (1306158)
turbosquid
free

Arm
...arm
turbosquid
free 3d model arm for download as obj and fbx on turbosquid: 3d models for games, architecture, videos. (1346955)
turbosquid
$29

Arm
...osquid
royalty free 3d model arm for download as obj and fbx on turbosquid: 3d models for games, architecture, videos. (1382436)
3d_export
$5

coat of arms
...coat of arms
3dexport
coat of arms
3ddd
$1

ARM SOFA
...arm sofa
3ddd
arm sofa
3ddd
$1

Arm chair
...arm chair
3ddd
arm chair
3ddd
$1

Arm chair
...arm chair
3ddd
угловое
arm chair
3ddd
$1
ARM CHAIR
...arm chair
3ddd
arm chair clothes
Air
3ddd
$1
Calligaris air
...calligaris air
3ddd
air , calligaris
cтул calligaris air
3ddd
$1

Air freshener
...air freshener
3ddd
air freshener , освежитель
air freshener
design_connected
$16

Air
...air
designconnected
flexform air lounge chairs computer generated 3d model. designed by antonio citterio.
turbosquid
$250

Heat pump air air
... available on turbo squid, the world's leading provider of digital 3d models for visualization, films, television, and games.
3d_export
$5
air
...air
3dexport
3ddd
$1
Кухня AIR
...кухня air
3ddd
air , мария
кухня air фабрики "мария"
3ddd
$1
Лампа AIR
...лампа air
3ddd
boconcept , air
настольная лампа air, boconcept. в50½xø32см
3d_export
$40
air deflector
...air deflector
3dexport
air deflector
3d_export
$15

air purifier
...air purifier
3dexport
air purifier
3d_export
$5

macbook air
...macbook air
3dexport
macbook air