Thingiverse
7" Touchscreen with Keyboard Rugged Raspberry Pi Tablet by morganlowe
by Thingiverse
Last crawled date: 4 years ago
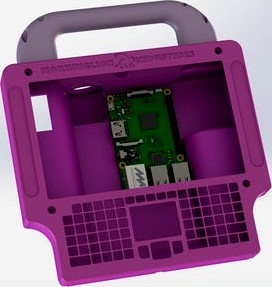
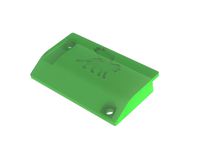
This is a mod of my Rasptop 2.0 Laptop to create a pretty rugged mildly water resistant if built correctly tablet computer.
It uses a lot of the same parts as the Rasptop 2.0 including the 7.2 volt 2s battery system.
It features Raspberry Pi 3+ compatibility including the Pi4.
The frame is mostly 5mm thick walls for strength and durability. I printed mine in PLA which is plenty strong and slightly flexible which helps but of course ABS would be the most hard core for this.
BOM:
Your favorite Raspberry Pi form factor computer.
2S charger 9-15v input
2S Balance and Protection Board
DC to DC Buck Converter 5amps
2S Charger Indicator
9 volt 5amp Power Supply, using 9v instead of 12v greatly reduces heat in the charger circuit
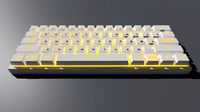
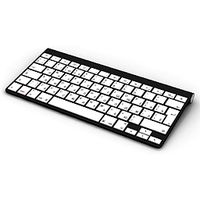
Keyboard
DC Jack with cover
16MM Waterproof Button
7" Capacitive Touch Screen @ 1024x600px
Waterproof USB 2.0 There is the same in USB 3 for RPI4 use.
USB Power Bank for the batteries x 2
Sealing Tape for seams and around screen
Short USB Type A Cable
Wiring:
Starting with the batteries I wired them each with a length of 20ga silicone wire then on the balance board you connect positive from one cell and negative from the other to the B+ and B+ tabs on the balance board. The leftover positive and negative wire both go to the BM pad together making a series connection.
The P+ from the balance board then go to the switch. The P- goes right to the converter board input. At the power board input also wire in the battery meter. The P+ and P-are also where the positive and negative from the charger board attach so it can charge with the switch off. I used 24GA wire from the charger to the cells. I also used 24gs from the DC barrel jack to the charger board.
Be sure to set the voltage before connecting anything to the DC to DC converter!
No more than 5.2 volts. Set to 5.1 volts!
When assembling use sealing tape on the seams between the case halve and around the screen.
it is currently a work in progress as I have not yet assembled mine!
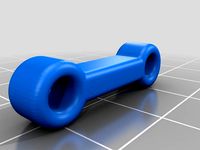
I made keyboard clips, these glue in with superglue to hold the keyboard in place.
Thank you!
It uses a lot of the same parts as the Rasptop 2.0 including the 7.2 volt 2s battery system.
It features Raspberry Pi 3+ compatibility including the Pi4.
The frame is mostly 5mm thick walls for strength and durability. I printed mine in PLA which is plenty strong and slightly flexible which helps but of course ABS would be the most hard core for this.
BOM:
Your favorite Raspberry Pi form factor computer.
2S charger 9-15v input
2S Balance and Protection Board
DC to DC Buck Converter 5amps
2S Charger Indicator
9 volt 5amp Power Supply, using 9v instead of 12v greatly reduces heat in the charger circuit
Keyboard
DC Jack with cover
16MM Waterproof Button
7" Capacitive Touch Screen @ 1024x600px
Waterproof USB 2.0 There is the same in USB 3 for RPI4 use.
USB Power Bank for the batteries x 2
Sealing Tape for seams and around screen
Short USB Type A Cable
Wiring:
Starting with the batteries I wired them each with a length of 20ga silicone wire then on the balance board you connect positive from one cell and negative from the other to the B+ and B+ tabs on the balance board. The leftover positive and negative wire both go to the BM pad together making a series connection.
The P+ from the balance board then go to the switch. The P- goes right to the converter board input. At the power board input also wire in the battery meter. The P+ and P-are also where the positive and negative from the charger board attach so it can charge with the switch off. I used 24GA wire from the charger to the cells. I also used 24gs from the DC barrel jack to the charger board.
Be sure to set the voltage before connecting anything to the DC to DC converter!
No more than 5.2 volts. Set to 5.1 volts!
When assembling use sealing tape on the seams between the case halve and around the screen.
it is currently a work in progress as I have not yet assembled mine!
I made keyboard clips, these glue in with superglue to hold the keyboard in place.
Thank you!
Similar models
thingiverse
free

"Wireless Bladeless Fan" - Powered by USB-C + 2x18650 Batteries by b_cfm
...s battery holder
2s battery indicator
usb-c connector
on/off switch
turn it over and it becomes a great fume extractor :)
enjoy !
grabcad
free

Mount for Raspberry Pi 3B (+ other parts) onto TalentCell Battery
...ul lx-16a control board, drok 10a dc to dc converter onto talentcell battery yb1203000-usb. mount currently lacks mounting holes.
thingiverse
free

DJI FPV Video Out Monitor by shnlls_fpv
...ition for the on/off switch and the usb otg output in the backplate.
if you have any suggestions or questions please let me know!
thingiverse
free

Rasptop 2.0 The Better Raspberry Pi 7" Laptop *Source Files Included* *UPDATED a lot* by morganlowe
...ort right up near the top and 2 micro usb ports. these seem to be common on amazon right now. use the high wire parts for these.
thingiverse
free

USB Quick Charge 2008 Chevy Silverado 2500HD
...ectly. i was able to slide the boards in from the back side and hot glue from the bottom the fit was snug on the charger boards.
thingiverse
free

Dual 18650 charger by RGN01
...4057-lithium-battery-1-a-led-charging-board-reverse-connect-protect/32368102064.html and the dc socket is ebay item 321179995395.
thingiverse
free

Baofeng UV-B6 UV-B5 battery by ThunderVG
.../item/2pcs-boosting-converter-power-supply-module-step-up-converter-dc-dc-voltage-regulator-adjustable-pcb-board/32821976125.html
thingiverse
free

Raspberry Pi power supply for fischertechnik by harbaum
...r adapter case uses a ubuquitous lm2596 based dc-dc converter board to power a raspberry pi from fischertechnik compatible 9v dc.
thingiverse
free

Remixed Left Case by pigaro
.... i had the opposite problem on the right side case. the screws protruded too far, so i made some cylinders to offset the screws.
thingiverse
free

Tamiya Power Plug to Raspberry Pi Power Connection by matt5sean3
...lator's output, connect the grounds together, and connect the battery's positive side to the power regulator's input.
Morganlowe
thingiverse
free

AM8 - 3DLS Gantry Position Tool by morganlowe
...am8 - 3dls gantry position tool by morganlowe
thingiverse
just a simple thing to set where the gantry should go!
thingiverse
free
Edge Clamp Spool Holder by morganlowe
...ng. a spool holder to clamp on the edge of a desk or table. all 3d printed. fits all the spools i have ever encountered.
thanks!
thingiverse
free
Filler Jig for KING Joints by morganlowe
... joints for the larger king pre-rolls.
print upright with support everywhere on the funnel side, no support needed on the poker.
thingiverse
free
Bolt Shaped Drip Tip! by morganlowe
...eaded bolt with m12x1.25 threads for your e-cig!
see it printed here: https://youtu.be/poxalukhzve
enjoy, don't get screwed!
thingiverse
free

Drawing stand for Surface Pro by morganlowe
...ng. made it for my artist friend and he's loving it. uses 14 6mmx2mm round rubber feet. 10 on top 4 on the bottom.
thank you
thingiverse
free
Panasonic Toughbook CF-U1 HDD Cover by morganlowe
...s is a cover without a caddy for the cf-u1 ssd mod
just made and tested it with my mk2 cf-u1. fits and seals properly.
thank you!
thingiverse
free
Bowden Tube Bone by morganlowe
...ides snug over the tubes and just keeps them from going nuts. i might be the only person ever to need this but here it is!
enjoy!
thingiverse
free
Trowel for 50mm Concrete Curb by morganlowe
...ts in 2 parts with 3.8mm plastite screws. kinda niche but who knows, maybe you can use it! source files included, solidworks 2017
thingiverse
free

Spark Plug Inspired Drip Tip by morganlowe
...y universal. the outside hex is 19mm and it's 20mm tall without the tank nipple. it uses a 1x7mm o ring. print with support!
thingiverse
free
Spark Plug Inspired Drip Tip Tall Version by morganlowe
...:3013945
i found these print really well upside down with no support and a nice brim to stick it down. they are very thin walled.
Touchscreen
3d_ocean
$10

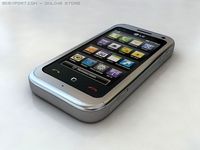
Touchscreen Phone
...r stand alone renderings. the button as well as speaker on the front are modelled for added realism and depth for those tight ...
turbosquid
$2
Touchscreen Kiosk
... available on turbo squid, the world's leading provider of digital 3d models for visualization, films, television, and games.
3d_export
$35
TF 700 Tablet PC 10 in touchscreen 3D Model
...export
universal tablet pc 10 in touchscreen android notebook
tf 700 tablet pc 10 in touchscreen 3d model plasticv 80776 3dexport
3d_ocean
$10
Sleek Touchscreen Smart Phone
... of multi-touch smart phone designs. the small details such as the buttons, camera lens, speaker and other components have bee...
3ddd
$1
Celular Samsung
...3ddd телефон , samsung samsung s5230 mid level full touchscreen ...
3d_export
$30
LG arena 3D Model
...arena 3d model 3dexport lg km900 arena phone mobile touchscreen lg arena 3d model s.e.3ddd 26566...
3d_export
$30
SONY Xperia Tablet 3D Model
...xperia tablet 3d model 3dexport sony xperia tablet android touchscreen sony xperia tablet 3d model barbarosa222 58716...
3d_export
$15
Iphone Black 3D Model
...black 3d model 3dexport phone electronics iphone cellphone smartphone touchscreen touch screen iphone black 3d model ryleyswan 81168...
3d_export
$40
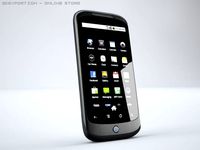
Google Nexus One 3D Model
...3d model 3dexport google nexus one phone mobile cellular touchscreen google nexus one 3d model h1studio 21421...
3d_export
$45
HTC Flyer Tablet 3D Model
...htc flyer tablet 3d model 3dexport touchscreen tablet htc 3d model 3ds max phone htc flyer...
Tablet
3d_export
free

tablet
...tablet
3dexport
tablet
3d_ocean
$5

Tablets
...
3docean
blister blistered capsules doc doctor medicine pills plastic tablets
blistered tablets with predetermined breaking point
3d_ocean
$15

Tablet
...t
3docean
android computer flat ipad lcd mobile pad pc screen tab tablet
a simple tablet computer facecount: 830 subsurfed: 53000
3d_ocean
$5

Tablets
...tablets
3docean
blister capsules doc doctor medicine pills tablets
tablest in a blister
design_connected
$16

Tablet
...tablet
designconnected
arflex international spa tablet computer generated 3d model. designed by koivisto, eero.
turbosquid
$22

Tablet
...
turbosquid
royalty free 3d model tablet for download as obj on turbosquid: 3d models for games, architecture, videos. (1307115)
turbosquid
$20

tablet
...lty free 3d model tablet for download as ma, ma, fbx, and obj on turbosquid: 3d models for games, architecture, videos. (1698161)
turbosquid
$5

Tablet
...y free 3d model tablet for download as 3ds, max, obj, and fbx on turbosquid: 3d models for games, architecture, videos. (1466146)
turbosquid
$70

tablet
... available on turbo squid, the world's leading provider of digital 3d models for visualization, films, television, and games.
turbosquid
$49

Be Tablet
... available on turbo squid, the world's leading provider of digital 3d models for visualization, films, television, and games.
Keyboard
3d_ocean
$9
Keyboard
...odels computer electronics keyboard peripheral / part
computer keyboard 3d models. it’s computer keyboard. render ready keyboard.
archibase_planet
free
Keyboard
...keyboard
archibase planet
input keyboard keyboard office equipment
pro keyboard - 3d model for interior 3d visualization
3d_export
$5
keyboard
...keyboard
3dexport
computer keyboard
3d_export
$11
Keyboard
...keyboard
3dexport
gaming keyboard with backlight 1:1
3d_export
free
keyboard
...keyboard
3dexport
keyboard blender stl obj fbx
archibase_planet
free
Keyboard
...keyboard
archibase planet
keyboard pc equipment
keyboard apple n130315 - 3d model (*.gsm+*.3ds) for interior 3d visualization.
3d_export
free
keyboard gaming
...keyboard gaming
3dexport
keyboard gaming include: 1 x keyboard gaming.blend 3 x keyboard gaming.png
archibase_planet
free
Keyboard
...keyboard
archibase planet
keyboar pc equipment
keyboard - 3d model (*.gsm+*.3ds) for interior 3d visualization.
3d_ocean
$9

keyboard USB
...models computer electronics keyboard peripheral / part
keyboard for computer 3d models. high detailed model of computer keyboard.
turbosquid
$24

Keyboard
...urbosquid
royalty free 3d model keyboard for download as max on turbosquid: 3d models for games, architecture, videos. (1710291)
Raspberry
3d_export
free

raspberry
...raspberry
3dexport
3d model of a raspberry. i tried to make it realistic.
turbosquid
$27

Raspberries
...y free 3d model raspberries for download as max, obj, and stl on turbosquid: 3d models for games, architecture, videos. (1354176)
3d_export
$5

raspberry pi
...raspberry pi
3dexport
carcasa para la raspberry pi
turbosquid
$99

Raspberry
... available on turbo squid, the world's leading provider of digital 3d models for visualization, films, television, and games.
turbosquid
$10

raspberries
... available on turbo squid, the world's leading provider of digital 3d models for visualization, films, television, and games.
archive3d
free

Raspberries 3D Model
...raspberries 3d model archive3d raspberries raspberry raspberries n300911 - 3d model (*.3ds) for interior 3d...
3d_export
$5

raspberry fruit
...raspberry fruit
3dexport
3d_export
$5

raspberry
...y different sizes. their color ranges from light burgundy to pink. there are formats: obj, 3ds, blend, dae, fbx, mtl.<br>:)
evermotion
$12

raspberries 23 am130
...evermotion raspberries 23 am130 evermotion key 23 food fruit raspberry fruits am130 raspberries highly detailed 3d model of raspberries...
turbosquid
$59

Raspberry collection
...ree 3d model raspberry collection for download as 3ds and max on turbosquid: 3d models for games, architecture, videos. (1159260)
Rugged
3d_export
$8

rugs
...rugs
3dexport
rugs
3ddd
$1

design rug Redeploy Rug
...design rug redeploy rug
3ddd
ковер
design rug redeploy rug
3ddd
$1

rug
...rug
3ddd
ковер , круглый
rug
size: 160sm
design_connected
$16

Hugo Rug
...hugo rug
designconnected
exquisite rugs hugo rug computer generated 3d model.
turbosquid
$1

Rug
...rug
turbosquid
royalty free 3d model rug for download as max on turbosquid: 3d models for games, architecture, videos. (1335343)
3ddd
$1

Capel Rugs
...19 текстур (750х1200px)
collection rugs capel rugs
collection of multi-colored rugs
in the archives of 119 textures (750х1200px)
3ddd
free

Amara Rug, Collection - Tibetan Rugs
...an rugs
3ddd
ковер
сборник ковров amara rug, коллекция - tibetan rugs
в архиве 10 ковров + 50 текстур хорошего качества (670х950)
3ddd
$1

Leather Rug
...leather rug
3ddd
ковер
leather rug
3ddd
$1

RUG _dc_rockwell_platinum
...rug _dc_rockwell_platinum
3ddd
ковер
rug _dc_rockwell_platinum
3ddd
$1

Patchwork Rug
...patchwork rug
3ddd
ковер
patchwork rug
Pi
design_connected
$11

Pi
...pi
designconnected
ligne roset pi chairs computer generated 3d model. designed by thibault desombre.
3d_export
$5
raspberry pi
...raspberry pi
3dexport
carcasa para la raspberry pi
turbosquid
$18

pied
... available on turbo squid, the world's leading provider of digital 3d models for visualization, films, television, and games.
3ddd
$1

Emme pi light
...emme pi light
3ddd
emme pi light
люста emme pi light
3ddd
$1

Emme pi light
...emme pi light
3ddd
emme pi light
бра классическое emme pi light
3ddd
$1

Emme Pi Light
...emme pi light
3ddd
emme pi light
3ddd
$1

Emme Pi Light
...emme pi light
3ddd
emme pi light
design_connected
$16

Pi-Air
...pi-air
designconnected
living divani pi-air lounge chairs computer generated 3d model. designed by harry & camila.
3d_ocean
$15

Manneken Pis
...picting a naked little boy urinating into a fountain’s basin. (wikipedia) the model was sculpted in blender 2.70a rendered wit...
3ddd
$1

Emme pi light
...emme pi light
3ddd
emme pi light
люстра классическая фирма: emme pi light
артикул: 3595/5/cot/12/wh
7
design_connected
$16
No 7
...no 7
designconnected
sibast no 7 computer generated 3d model. designed by sibast, helge.
3ddd
$1
Team 7
...team 7
3ddd
team 7
моделилось с кталога team 7
3d_export
$5
hinge 7
...hinge 7
3dexport
hinge 7
turbosquid
$9

IS-7
... available on turbo squid, the world's leading provider of digital 3d models for visualization, films, television, and games.
turbosquid
$12

Calligraphic Digit 7 Number 7
...hic digit 7 number 7 for download as max, obj, fbx, and blend on turbosquid: 3d models for games, architecture, videos. (1389338)
3ddd
free
team 7
...team 7
3ddd
team 7
стол фабрики team 7.
типы размеров /900,1000/x/1750,2000,2250/x/750/
раздвигается +600 или +1200
3ddd
$1

PLANTS 7
...plants 7
3ddd
цветы , горшок
plants 7.. hope u all enjoying the series
3ddd
$1

Pillows #7
...pillows #7
3ddd
подушка , pillows
pillows #7
3ds max 2011,fbx + textures
design_connected
$11
Domino 7
...domino 7
designconnected
zanotta domino 7 computer generated 3d model. designed by progetti, emaf.
3d_ocean
$18
7-11 house
...7-11 house
3docean
7-11 norway oslo
7-11 building in oslo.