Thingiverse
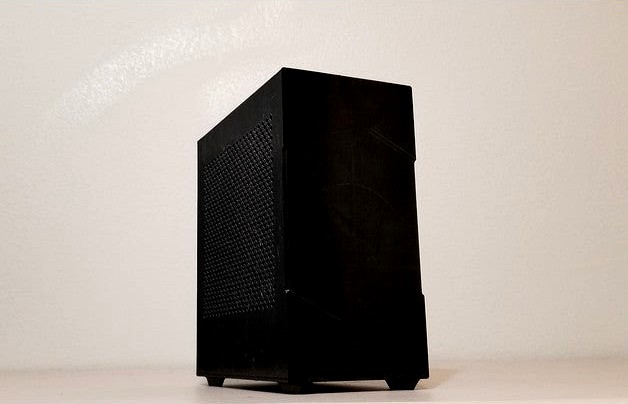
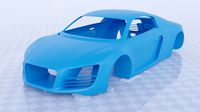
4.7L Mini ITX case, easily printable (2 major pieces), sandwich layout, no extra thread inserts, standoffs or feet required by ecor
by Thingiverse
Last crawled date: 3 years, 3 months ago
Overview
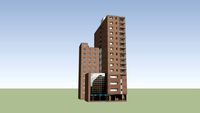
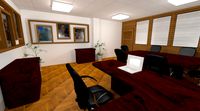
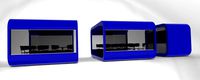
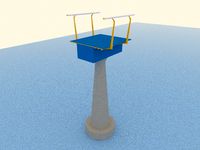
The idea behind this case is to be simple to print in terms of setup, required parts; and designed from scratch with 3d printing in mind versus taking an existing sheet metal case and cloning it.
I took inspiration for the assembly from the ASRock Deskmini series, and the k39 case for the layout and feel (although at a higher volume). Internal volume is about 4.7L
I print relatively slow (35-50mm/s) and use 1.75mm filament, so with my estimated price of ~$28 (high side) per kg of PETG filament
Spine: 170g, $5, 1 day to print
Case: 390g, $11, 2 days to print
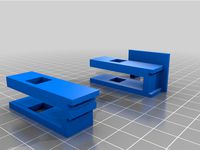
GPU support: 5g, $0.15, 30 minutes to print
Not taking labor, parts or electricity into account, you'll pay around $16 for a mini itx case ( plus riser, I know)
Printable area required:
235x110mm for the maximum bed dimensions and ~200mm in height
All the fastener threads can be made with a metal screw (M3 and M4), no need to tap or weld thread inserts, just be careful when threading, and assembling it.
Before you start
Given that this is plastic, you'll need to keep some things in mind before printing and assembling it:
It will flex a little bit, but not enough to wobble when fully assembled and printed correctly
It won't feel like higher end aluminium cases because it's plastic
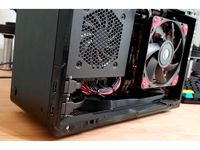
You'll need to do a good job cleaning up all the orifices and vents before screwing anything onto it, I didn't do great job (see pics) because I'm lazy, but also this is not my main computer, so I don't mind the extra micro strings
It will be more sensitive to overtorquing the fasteners than metal cases, so BE EXTRA careful or risk losing your threads
You'll need to have your printer properly dialed up for tall and long structures which means:
Proper dimensional calibration (failure to do this will result in poor assembly)
Proper flow calibration (over extrusion won't only affect appearance, it will also affect height and the nozzle may touch at the higher layers, which will deform it)
Proper bed leveling (large area is more sensitive to bad leveling)
Just the right bed adhesion (be careful of too much bed adhesion given the big area touching the bed)
Proper first layer height and bed texture/quality when printing the case, as the face of it will reflect your bed surface and first layer quality. Mine didn't came out great because of that, but yours can.
A printer that doesn't wobble/vibrate (tall structures may suffer from vibration, particularly the spine which needs to be somewhat straight and thin)
Print orientations
Case orientation: front face down (open cube at the top)
Spine orientation: back face down (IO shield down, tall-thin structure at the top)
GPU bracket: back face down
No supports
Material
Minimum material:
PETG.. particularly DO NOT PRINT SPINE IN PLA!!, the case MAY be more lenient, but I can't recommend it
Let me repeat that for you: DO NOT PRINT THE SPINE IN PLA
Be prepared to clean up a lot of strings (PETG) :)
Requirements
You'll need fasteners (M3 and M4, be very careful with torque), a PCI riser 200mm in cable length, 300 mm total (I tried only 1 but others may be compatible),
a CPU cooler with a max 38mm in height, a GPU that is at most 185mm in length (with a PSU with thin wires or ~175 for bulky wire ones), a Flex ATX PSU, and a MiniITX Motherboard.
This case supports 1 external SSD that is at most 9.5mm in thickness or you can always switch to M.2. I only tested a motherboard with an M.2 on the front, unfortunately the riser MAY interfere with one in the back depending on its position.
Stuff I used
Fasteners:
Set of M3-M5 flat head hex (look better, but you have to be cautious with torquing)https://amzn.to/33jtiRJ
...OR...
M3:https://amzn.to/3l1wN5m
M4 nylon:https://amzn.to/39inUC0
GPU Riser:
Phanteks "300mm" (end to end, cable is 200mm) 180 Degree riserhttps://amzn.to/2V0kSKB
Power Button:
Generic push button with 2 pin 0.1" connector (custom made, link is button only)https://amzn.to/3fDmNOo
If you drill a 12mm hole through the thin wall of the button it will fithttps://amzn.to/37avcVR
.. or similar ~12mm diameter buttons
GPU (max clearance: 2 slots, ~175mm for PSUs with thick wires, ~185mm for modular/thin wire PSUs), I used a GTX 1650:https://amzn.to/3l1x9ZK
PSU (thick and not very flexible cables, this is the worst case scenario IMO and works):
SilverStone, 350 Watt Flex ATXhttps://amzn.to/37ckwWD
CPU:
AMD Ryzen 3100https://amzn.to/3nVLyIK
CPU Cooler (clearance is about 38mm.. not great, I know):
Noctua NH-L9a AM4https://amzn.to/37avgF5
Motherboard:
B520https://amzn.to/3652GWs
Others
Filament:
SUNLU PETG (orange/black combo)https://amzn.to/3m85Iif
Exacto knife for cleaning extra materialhttps://amzn.to/3mc06Ui
My printer is a CR10 V2 and it's able to print the case:https://amzn.to/2V3RQcS
How to assemble/build
Clean up all the stringing and residue from all holes, particularly the ones that require threads
(don't tap, because in my experience this makes the thread too loose in PETG and the hole too wide) Thread the 3 holes in the case (M3), the 2 holes for the riser (M3), the 4 holes for the motherboard (M4) and the one for the GPU bracket (M4), this last one may require a nut given that sometimes one may want to overtighten it trying to secure the GPU, but it may not be necessary if you're careful. Use metal bolts for this, and do it slowly. M3 holes should be ~2.8-2.9 mm in diameter, M4 ones should be ~3.7-3.9mm and you should be ok, if it's less, try to make it the proper diameter, if it's more, you're kinda screwed, try filling up the wholes with baking soda and crazy glue, and redrilling/threading/tapping (never tried this, but it may work). You DON"T need to thread the PSU holes, the hard drive holes, the power button hole. These rely on the component's thread.
Install riser, try to bend it as compact as possible, route it through the back of the motherboard
Install IO shield
Install motherboard with everything attached to it, except cables, this will give rigidity to the spine
Install the GPU and its external bracket to secure it
Install PSU (BUT DON'T LIFT THE ASSEMBLY YET OR YOU RISK DAMAGING IT)
Install your SSD/HDD
Route all the cables to their destinations and bundle the rest at the "front" of the case, try to make it as compact as possible while leaving about 3-4 mm at the very front for the assembly to go into the case
Tie the bundle of cables to the spine tightly too, so that this gives rigidity to the spine/psu assembly
If you have a modular cable PSU, secure it through the back with a zip tie into the spine/assembly, so that it doesn't move from the back.
Insert the whole spine assembly into the case, making sure the top center rail/guide is aligned
Flip the case face side down, so that the spine assembly goes in easier
Make sure the spine is aligned with the "bottom" (in this orientation) "sockets" and push gently from the middle/top (in this orientation) spine, so that it goes all the way in. Depending on your printer tolerances, it may be more or less tight, but if everything lines up it should be no problem.
Fasten the 3 screws at the "top" (in this orientation) once the spine is flush with the case
The idea behind this case is to be simple to print in terms of setup, required parts; and designed from scratch with 3d printing in mind versus taking an existing sheet metal case and cloning it.
I took inspiration for the assembly from the ASRock Deskmini series, and the k39 case for the layout and feel (although at a higher volume). Internal volume is about 4.7L
I print relatively slow (35-50mm/s) and use 1.75mm filament, so with my estimated price of ~$28 (high side) per kg of PETG filament
Spine: 170g, $5, 1 day to print
Case: 390g, $11, 2 days to print
GPU support: 5g, $0.15, 30 minutes to print
Not taking labor, parts or electricity into account, you'll pay around $16 for a mini itx case ( plus riser, I know)
Printable area required:
235x110mm for the maximum bed dimensions and ~200mm in height
All the fastener threads can be made with a metal screw (M3 and M4), no need to tap or weld thread inserts, just be careful when threading, and assembling it.
Before you start
Given that this is plastic, you'll need to keep some things in mind before printing and assembling it:
It will flex a little bit, but not enough to wobble when fully assembled and printed correctly
It won't feel like higher end aluminium cases because it's plastic
You'll need to do a good job cleaning up all the orifices and vents before screwing anything onto it, I didn't do great job (see pics) because I'm lazy, but also this is not my main computer, so I don't mind the extra micro strings
It will be more sensitive to overtorquing the fasteners than metal cases, so BE EXTRA careful or risk losing your threads
You'll need to have your printer properly dialed up for tall and long structures which means:
Proper dimensional calibration (failure to do this will result in poor assembly)
Proper flow calibration (over extrusion won't only affect appearance, it will also affect height and the nozzle may touch at the higher layers, which will deform it)
Proper bed leveling (large area is more sensitive to bad leveling)
Just the right bed adhesion (be careful of too much bed adhesion given the big area touching the bed)
Proper first layer height and bed texture/quality when printing the case, as the face of it will reflect your bed surface and first layer quality. Mine didn't came out great because of that, but yours can.
A printer that doesn't wobble/vibrate (tall structures may suffer from vibration, particularly the spine which needs to be somewhat straight and thin)
Print orientations
Case orientation: front face down (open cube at the top)
Spine orientation: back face down (IO shield down, tall-thin structure at the top)
GPU bracket: back face down
No supports
Material
Minimum material:
PETG.. particularly DO NOT PRINT SPINE IN PLA!!, the case MAY be more lenient, but I can't recommend it
Let me repeat that for you: DO NOT PRINT THE SPINE IN PLA
Be prepared to clean up a lot of strings (PETG) :)
Requirements
You'll need fasteners (M3 and M4, be very careful with torque), a PCI riser 200mm in cable length, 300 mm total (I tried only 1 but others may be compatible),
a CPU cooler with a max 38mm in height, a GPU that is at most 185mm in length (with a PSU with thin wires or ~175 for bulky wire ones), a Flex ATX PSU, and a MiniITX Motherboard.
This case supports 1 external SSD that is at most 9.5mm in thickness or you can always switch to M.2. I only tested a motherboard with an M.2 on the front, unfortunately the riser MAY interfere with one in the back depending on its position.
Stuff I used
Fasteners:
Set of M3-M5 flat head hex (look better, but you have to be cautious with torquing)https://amzn.to/33jtiRJ
...OR...
M3:https://amzn.to/3l1wN5m
M4 nylon:https://amzn.to/39inUC0
GPU Riser:
Phanteks "300mm" (end to end, cable is 200mm) 180 Degree riserhttps://amzn.to/2V0kSKB
Power Button:
Generic push button with 2 pin 0.1" connector (custom made, link is button only)https://amzn.to/3fDmNOo
If you drill a 12mm hole through the thin wall of the button it will fithttps://amzn.to/37avcVR
.. or similar ~12mm diameter buttons
GPU (max clearance: 2 slots, ~175mm for PSUs with thick wires, ~185mm for modular/thin wire PSUs), I used a GTX 1650:https://amzn.to/3l1x9ZK
PSU (thick and not very flexible cables, this is the worst case scenario IMO and works):
SilverStone, 350 Watt Flex ATXhttps://amzn.to/37ckwWD
CPU:
AMD Ryzen 3100https://amzn.to/3nVLyIK
CPU Cooler (clearance is about 38mm.. not great, I know):
Noctua NH-L9a AM4https://amzn.to/37avgF5
Motherboard:
B520https://amzn.to/3652GWs
Others
Filament:
SUNLU PETG (orange/black combo)https://amzn.to/3m85Iif
Exacto knife for cleaning extra materialhttps://amzn.to/3mc06Ui
My printer is a CR10 V2 and it's able to print the case:https://amzn.to/2V3RQcS
How to assemble/build
Clean up all the stringing and residue from all holes, particularly the ones that require threads
(don't tap, because in my experience this makes the thread too loose in PETG and the hole too wide) Thread the 3 holes in the case (M3), the 2 holes for the riser (M3), the 4 holes for the motherboard (M4) and the one for the GPU bracket (M4), this last one may require a nut given that sometimes one may want to overtighten it trying to secure the GPU, but it may not be necessary if you're careful. Use metal bolts for this, and do it slowly. M3 holes should be ~2.8-2.9 mm in diameter, M4 ones should be ~3.7-3.9mm and you should be ok, if it's less, try to make it the proper diameter, if it's more, you're kinda screwed, try filling up the wholes with baking soda and crazy glue, and redrilling/threading/tapping (never tried this, but it may work). You DON"T need to thread the PSU holes, the hard drive holes, the power button hole. These rely on the component's thread.
Install riser, try to bend it as compact as possible, route it through the back of the motherboard
Install IO shield
Install motherboard with everything attached to it, except cables, this will give rigidity to the spine
Install the GPU and its external bracket to secure it
Install PSU (BUT DON'T LIFT THE ASSEMBLY YET OR YOU RISK DAMAGING IT)
Install your SSD/HDD
Route all the cables to their destinations and bundle the rest at the "front" of the case, try to make it as compact as possible while leaving about 3-4 mm at the very front for the assembly to go into the case
Tie the bundle of cables to the spine tightly too, so that this gives rigidity to the spine/psu assembly
If you have a modular cable PSU, secure it through the back with a zip tie into the spine/assembly, so that it doesn't move from the back.
Insert the whole spine assembly into the case, making sure the top center rail/guide is aligned
Flip the case face side down, so that the spine assembly goes in easier
Make sure the spine is aligned with the "bottom" (in this orientation) "sockets" and push gently from the middle/top (in this orientation) spine, so that it goes all the way in. Depending on your printer tolerances, it may be more or less tight, but if everything lines up it should be no problem.
Fasten the 3 screws at the "top" (in this orientation) once the spine is flush with the case
Similar models
thingiverse
free
NR200 PSU lift mod by pebst
...ng off and potentially hitting the motherboard.
the rectangle fixture is optional.
petg recommended for higher material strength.
3dwarehouse
free

Mining Rig
...at genesis mining youtube video. i got psu, gpu, motherboard and risers from warehouse. #miner #rig #gpu #motherboard #psu #riser
thingiverse
free

SSD mount for PCIE risers by somefreak
...oles (if there is none there already)
use 6 hdd screws to attach the mount to the case.
run your cables and plug in your cards :)
thingiverse
free

Slotted Meshify C PSU Shroud Plate by tactical-puke
...he slots to your cable routing needs
printed in pla with the standard cura settings. print with the top down on the build plate.
thingiverse
free

ASUS TUF Gaming GT501 GPU Riser Cover by kidnotorius
.../38tjleo
you should be able to use your slicing software to scale it to your specific needs if your set up is a little different.
thingiverse
free

Hyde, a DIY 3D-printable case by skiphix
...washers
angled ac psu cable
16mm anti vandal momentary button with thread length >= 12mm, pinheader cables, solder, heatshrink
thingiverse
free

Phonon Case - 5.6L APU Case by Makaba
...rews (6-32 thread) for fixing the psu. https://amzn.to/3ln17in
4 motherboard screws. https://amzn.to/3n58yo6
1 16mm power switch.
thingiverse
free

Small and stack miniITX Case by Ren_Dev
...stall "down_case" to "base_case"
install 4x"pad" to "base_case" or "down_case"
thingiverse
free

3D PCI-e Graphics Card GPU Stand by Daox
...02mm apart. i used 'asiahorse 180 degree riser extension cable' from amazon.
uses computer case screws for all hardware.
thingiverse
free

Basic Motherboard Stand - ATX Compatible by jeezy0025
...
2 longs & 1 short
the holes are not threaded but are made small enough to "thread" normal motherboard screws into.
Ecor
turbosquid
$9

ecoreal estate black coin
...y free 3d model ecoreal estate black coin for download as max on turbosquid: 3d models for games, architecture, videos. (1457749)
turbosquid
$9

ecoreal estate gold coin
...ty free 3d model ecoreal estate gold coin for download as max on turbosquid: 3d models for games, architecture, videos. (1457747)
thingiverse
free
Dan A4 SFX (V4+) +16mm side spacer with 2x USB-A by ecor
...he insert if there are requests (maybe just 1 usb?, maybe a blank for mods?, maybe a reset button?), let me know in the comments.
thingiverse
free

Dan A4 SFX (V4+) CPU & GPU Spacer (+16mm) for coolers up to 64mm or extra GPU clearance by ecor
...s that 0.2mm gap. if your gap is larger than 0.2mm, calibrate your printer.
update 2020-08-21
added gpu side for +16mm clearance.
cg_trader
$2

ecorative Stucco 355 - 8K Shader
...k shader
cg trader
ecorative stucco 355 - 8k shader 3d plaster gypsum, available in max, fbx, mat, ready for 3d animation and ot
cg_trader
$3

decorative set 13
...ooks, cup, glasses,...
polys:207436
vertx: 226419
version: 2016
format: max, obj
thank you for choosing my model!
enjoy your use!
cg_trader
$35

Small flowerpot 3 | 3D
...cacti bonsai flowerpot vase house decor artchallenge plant plants ecortion dae flower vase flowers vase flower vase house plant...
cults
free
Customizable Origami Elephant
...geometric geometrical home_decor jewelry lowpoly low_poly necklace origami pendant wall_decortion this is a customizable 2d origami art of a...
3dwarehouse
free
Edificio Ecor VI
...edificio ecor vi
3dwarehouse
edificio ecor vi
7L
turbosquid
$10

Lucente Amak 7L Suspension Light / Chandelier
...ion light / chandelier for download as 3ds, max, obj, and fbx on turbosquid: 3d models for games, architecture, videos. (1212167)
3ddd
$1

Ledc c4 L7
...ledc c4 l7 3ddd leds c4 люстра leds c4 7l niagara...
3dfindit
free

RR-7L-3S-240G
...rr-7l-3s-240g
3dfind.it
catalog: usbfirewire
3dfindit
free

RR-7L-7F-05G
...rr-7l-7f-05g
3dfind.it
catalog: usbfirewire
3dfindit
free

RR-7L-7F-12G
...rr-7l-7f-12g
3dfind.it
catalog: usbfirewire
3dfindit
free

RR-7L-7F-24G
...rr-7l-7f-24g
3dfind.it
catalog: usbfirewire
3dfindit
free

RR-7L-3S-24G
...rr-7l-3s-24g
3dfind.it
catalog: usbfirewire
3dfindit
free

RR-7L-3S-72G
...rr-7l-3s-72g
3dfind.it
catalog: usbfirewire
3dfindit
free

RR-7L-3S-12G
...rr-7l-3s-12g
3dfind.it
catalog: usbfirewire
thingiverse
free

Canon NB-7L AC power adapter Powershot G10 etc by oregondesign
... bend them to secure, solder on your power supply. two screws to secure the back, but could be taped/glued if you'd rather.
Itx
3d_export
$56

teenage engineering computer 1 mini itx pc chassis
... get the best results in blender. no extra plugins are required for this model. lights and cameras are not included in the scene.
cg_studio
$9

Mini Computer3d model
...hardware harddisk desktop peripheral component leopard tiger snow small mini-itx pc design .3ds .xsi .obj .max .ma .lxo .lwo...
3d_export
$9

Mini Computer 3D Model
...hardware harddisk desktop peripheral component leopard tiger snow small mini-itx pc design maya supply 3ds max mini computer 3d...
thingiverse
free

ITX by irr1449
...itx by irr1449
thingiverse
itx case
thingiverse
free

Mini-ITX to Nano ITX adapter
...mini-itx to nano itx adapter
thingiverse
this is an adapter to put a nanoitx board in a miniitx case.
3dfindit
free

PICO-ITX
...pico-itx
3dfind.it
catalog: winsystems
3dfindit
free

NANO-ITX
...nano-itx
3dfind.it
catalog: winsystems
thingiverse
free

ITX computer case by hlmjjj1994
...itx computer case by hlmjjj1994
thingiverse
for itx mb only
thingiverse
free

Xbox-ITX
...originally went, mount the mini-itx motherboard on the original xbox mounting holes, and use the original power hole on the case.
thingiverse
free

thin ITX model by Goatee
...thin itx model by goatee
thingiverse
thin itx boards rough model
Standoffs
cg_studio
$30

AGM-154A Joint Standoff Weapon3d model
...
.3ds .c4d .lwo .max - agm-154a joint standoff weapon 3d model, royalty free license available, instant download after purchase.
3d_export
$5

smoke from standoff 2
...m uv.<br>texturs – substanse painter.<br>render - substanse painter iray.<br>model for octane render, unreal 4.
cg_studio
$89

Aim-9M3d model
... radar aim9 aim-9
.3ds .c4d .lw .ma .max .obj - aim-9m 3d model, royalty free license available, instant download after purchase.
3d_export
$60

northrop grumman b-2 spirit
...nuclear bombs. the b-2 is the only acknowledged aircraft that can carry large air-to-surface standoff in a stealth configuration.
3d_export
$15

nimrod anti tank missile
...gt;maps include; base, normal, height, rough, and metal.<br>nose glass is 512 x 512<br>https://stgbooks.blogspot.com/
thingiverse
free

20x20 standoff
...20x20 standoff
thingiverse
standoff for 8mm linear rails.
standoff distance 20mm
thingiverse
free

Standoff by charlespax
...standoff by charlespax
thingiverse
this is a standoff created to hold up a friend's monitor.
thingiverse
free

Standoff Holder by jfaller
...standoff holder by jfaller
thingiverse
holder for for m3x6 standoff.
thingiverse
free

Commodore 64 Standoffs
...odore 64. cut off old standoffs, sand smooth then attach these standoffs with epoxy. be sure to align with the holes in the case.
thingiverse
free

BTS7960 Standoff by AlbaTito
...bts7960 standoff by albatito
thingiverse
standoff for bts7960. m3 hardware
Sandwich
turbosquid
free

Sandwich
...turbosquid
royalty free 3d model sandwich for download as ma on turbosquid: 3d models for games, architecture, videos. (1281718)
3d_ocean
$4

Sandwiches
...ndwiches for your interior scene. model made in 3ds max 2014. render: corona renderer. also included .3ds .fbx .obj files. enjoy!
turbosquid
$25

Sandwich
... available on turbo squid, the world's leading provider of digital 3d models for visualization, films, television, and games.
turbosquid
$15

Sandwich
... available on turbo squid, the world's leading provider of digital 3d models for visualization, films, television, and games.
turbosquid
$15

sandwich
... available on turbo squid, the world's leading provider of digital 3d models for visualization, films, television, and games.
3d_ocean
$19

Sandwiches
...k vray
3d model of two sandwiches in kaiser roll – one is half eaten. 3d scanned from real product. placed on square white plate.
3d_ocean
$19

Sandwiches
...ay
3d model of two sandwiches with fried chicken – one is half eaten. 3d scanned from real product. placed on square white plate.
3d_ocean
$9

Hotdog Sandwich
...hotdog sandwich
3docean
3d model cinema 4d food hotdog sandwich
hotdog sandwich 3d model created in cinema 4d r15
3d_export
$5

SANDWICH
... simple materials are used. the topology of the objects is correct. includes: 127774 polygons; 64070 peaks formats: blender; rar.
3d_export
$5

sandwich
... ray, therefore its lighting is quite professional, it can be used as a complement in a kitchen space, or as a simple decoration.
Major
design_connected
$16

Major majbi-a
...major majbi-a
designconnected
sitia major majbi-a computer generated 3d model. designed by dorigo, florenzo.
design_connected
$16

Major majai-a
...major majai-a
designconnected
sitia major majai-a computer generated 3d model. designed by dorigo, florenzo.
3d_ocean
$16

Marshall Headphones Major
...marshall headphones major
3docean
headphones major marshall
marshall headphones major
turbosquid
$25

Major balustrade
... available on turbo squid, the world's leading provider of digital 3d models for visualization, films, television, and games.
design_connected
$16

Major majbi-h
...major majbi-h
designconnected
sitia major majbi-h computer generated 3d model. designed by dorigo, florenzo.
design_connected
$16

Major majbi-d
...major majbi-d
designconnected
sitia major majbi-d computer generated 3d model. designed by dorigo, florenzo.
design_connected
$16

Major majbi-c
...major majbi-c
designconnected
sitia major majbi-c computer generated 3d model. designed by dorigo, florenzo.
design_connected
$16

Major majai-d
...major majai-d
designconnected
sitia major majai-d computer generated 3d model. designed by dorigo, florenzo.
design_connected
$16

Major majbi-b
...major majbi-b
designconnected
sitia major majbi-b computer generated 3d model. designed by dorigo, florenzo.
design_connected
$16

Major majai-c
...major majai-c
designconnected
sitia major majai-c computer generated 3d model. designed by dorigo, florenzo.
Layout
turbosquid
$30
Layout exhibition
...
royalty free 3d model layout exhibition for download as max on turbosquid: 3d models for games, architecture, videos. (1577107)
turbosquid
$40
food court layout
...
royalty free 3d model food court layout for download as max on turbosquid: 3d models for games, architecture, videos. (1582200)
turbosquid
$20
Layout star decor
...
royalty free 3d model layout star decor for download as max on turbosquid: 3d models for games, architecture, videos. (1576183)
turbosquid
$1

Simple Mug For Layout
... 3d model simple mug for layout for download as fbx and blend on turbosquid: 3d models for games, architecture, videos. (1332065)
turbosquid
$40
Office Layout Design
... available on turbo squid, the world's leading provider of digital 3d models for visualization, films, television, and games.
turbosquid
$15
Cafe design layout
... available on turbo squid, the world's leading provider of digital 3d models for visualization, films, television, and games.
turbosquid
$5

Pyramids of Giza - Layout
... available on turbo squid, the world's leading provider of digital 3d models for visualization, films, television, and games.
turbosquid
$125
BIG VILLA HOME LAYOUT
...yalty free 3d model big villa home layout for download as skp on turbosquid: 3d models for games, architecture, videos. (1259969)
turbosquid
$90
iconic commercial buildings layout
... model iconic commercial buildings layout for download as skp on turbosquid: 3d models for games, architecture, videos. (1260664)
3ddd
$1
LAYOUT ISOLAGIORNO Easy mono sofa
... isolagiorno , easy
upholstered 3 seater sofa
dimensions: 230cm lenght
Feet
3d_export
$30
Legs and feet High feet 3D Model
...t high feet 3d model
3dexport
feet shoes sandal barefoot leg women
legs and feet high feet 3d model adrianaamerina 96817 3dexport
3ddd
$1
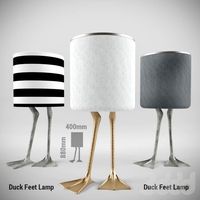
DUCK FEET LAMP
...duck feet lamp
3ddd
утка
duck feet lamp
turbosquid
$19
Feets 01
...3d model feets 01 for download as max, max, max, fbx, and obj on turbosquid: 3d models for games, architecture, videos. (1624047)
turbosquid
$2
Robo3D Feet
... available on turbo squid, the world's leading provider of digital 3d models for visualization, films, television, and games.
turbosquid
free

Hands and Feet
... available on turbo squid, the world's leading provider of digital 3d models for visualization, films, television, and games.
turbosquid
free

Feet study
... available on turbo squid, the world's leading provider of digital 3d models for visualization, films, television, and games.
turbosquid
$9

Female Feet 01
...oyalty free 3d model feet 01 for download as ma, obj, and fbx on turbosquid: 3d models for games, architecture, videos. (1446069)
turbosquid
$15

Viabizzuno Big Feet
... available on turbo squid, the world's leading provider of digital 3d models for visualization, films, television, and games.
turbosquid
$10

Male Legs and Feet
... available on turbo squid, the world's leading provider of digital 3d models for visualization, films, television, and games.
turbosquid
free

container 20 feet
... available on turbo squid, the world's leading provider of digital 3d models for visualization, films, television, and games.
Extra
3d_export
$17

Extra 300
...extra 300
3dexport
extra 300
3ddd
$1

Fidel extra
...fidel extra
3ddd
новый стиль
новый стиль - fidel extra
3ddd
$1

RAPSODY extra
...rapsody extra
3ddd
новый стиль
новый стиль - rapsody extra
3ddd
$1

Столик Extra
...столик extra
3ddd
giannini
столик extra от giannini, италия.
3ddd
free

Extra Long
...ики fantoni, италия. имеет подсветку ( зеленая или белая). передняя панель выполнена из аккустических панелей.
текстуры в архиве.
3ddd
$1
Grammer / Extra
...ло , стул
офисное кресло extra фирмы grammer office. подробнее на www.grammer-office.com
3ddd
$1

Hennesy Paradis Extra
... алкоголь , коньяк
бутылка коньяка hennesy paradis extra
design_connected
$9
Extra Chair Leather
...xtra chair leather
designconnected
cappellini extra chair leather chairs computer generated 3d model. designed by fabien baron.
turbosquid
$30

Extra Beetle Lowpolys
...d model extra beetle lowpolys 3d for download as unitypackage on turbosquid: 3d models for games, architecture, videos. (1483177)
3ddd
$1

NADIR extra CF LB
...nadir extra cf lb
3ddd
новый стиль
новый стиль - nadir extra cf lb
Inserts
turbosquid
$10
insert a bracelet
... 3d model the link element insert for download as max and max on turbosquid: 3d models for games, architecture, videos. (1609593)
turbosquid
$56

Threaded Inserts
... available on turbo squid, the world's leading provider of digital 3d models for visualization, films, television, and games.
turbosquid
$10

Insert for eggs
... available on turbo squid, the world's leading provider of digital 3d models for visualization, films, television, and games.
3d_export
$14
drawing of needle inserting machine
...lectronic manufacturers use pin machines to help customers to insert needles, so as to obtain processing costs and obtain wealth.
turbosquid
$5
IKEA Insert drawers
... available on turbo squid, the world's leading provider of digital 3d models for visualization, films, television, and games.
turbosquid
$5

IKEA insert with door
... available on turbo squid, the world's leading provider of digital 3d models for visualization, films, television, and games.
3d_export
$5
Siemsn EQ 6 Inlet insert
...placed there without any problems. the insert is then straight for normal cups and a square insert can be removed for large cups.
turbosquid
$25
eagle insert on leather or rubber
...eagle insert on leather or rubber for download as obj and stl on turbosquid: 3d models for games, architecture, videos. (1342476)
turbosquid
$14

sofa with pillows and decorative inserts
... available on turbo squid, the world's leading provider of digital 3d models for visualization, films, television, and games.
turbosquid
$5
metal insert for earring rings
...for earring rings for download as 3dm, 3dm, obj, pdf, and stl on turbosquid: 3d models for games, architecture, videos. (1569103)
Thread
3d_export
$5

threaded handle
...threaded handle
3dexport
threaded handle
turbosquid
free

threaded
... available on turbo squid, the world's leading provider of digital 3d models for visualization, films, television, and games.
3d_ocean
$5
Tangle of thread
... tangle thread triangles – 36 in one strand in scene 300 thread includes materials includes 3 colors tangle thread in psd for ...
3d_export
$5
threaded lock handle
...threaded lock handle
3dexport
threaded lock handle
3d_export
$5
threaded machine handle
...threaded machine handle
3dexport
threaded machine handle
3d_export
$5
threaded door knob
...threaded door knob
3dexport
threaded door knob
3d_export
$5
threaded rope ring
...threaded rope ring
3dexport
threaded rope ring
3d_export
$5

threaded door knob
...threaded door knob
3dexport
threaded door knob
turbosquid
$56
Threaded Inserts
... available on turbo squid, the world's leading provider of digital 3d models for visualization, films, television, and games.
turbosquid
$10
Thread Lamp
... available on turbo squid, the world's leading provider of digital 3d models for visualization, films, television, and games.
Mini
turbosquid
$10

Mini Mini Luceplan
...
royalty free 3d model mini mini luceplan for download as max on turbosquid: 3d models for games, architecture, videos. (1227359)
3d_ocean
$39

Mini Cooper
...mini cooper
3docean
cabrioler cooper mini
mini cooper cabrioler
3d_export
$30

Mini lathe
...mini lathe
3dexport
mini lathe
3d_export
$5

mini mouse
...mini mouse
3dexport
mini mouse
3d_export
$5

mini house
...mini house
3dexport
mini house
3d_export
free

Mini Mecha
...mini mecha
3dexport
concept of mini mecha
3d_ocean
$20

Mini Gun
...mini gun
3docean
gatling gun gun machine gun mini gun weapon
model of a mini gatling gun.
3ddd
free

Herve mini
... кофейный , herve
http://www.mobiliavenanti.it/ru/products/hervè-mini
3d_export
$5

mini wall
...mini wall
3dexport
mini wall for living room
3d_export
$5

mini bank
...mini bank
3dexport
mini bank 3d model
Easily
3d_export
$5

red flower modeling by blender
...the texture and material of the object can be easily customized in shader view blender and it is easily...
3d_export
$5

curtain modeling by blender
...object is created in blender. this curtain can be easily customized using textures and materials.<br>in blender shader, you can...
3d_export
$7
studio fabric sofa
...studio fabric sofa 3dexport you can easily change the...
3d_export
$5

Cup
...cup 3dexport blue mug, it can also be easily repainted in any...
3d_export
$5
domilli sketchup house plan
...domilli sketchup house plan 3dexport easily editable house plan for students as well as...
3d_export
$40
wood cutting and shredding machine
...wood cutting and shredding machine 3dexport it can easily shred woods up to 20 cm...
3d_export
$29

Pilot Helmet
...ready to use pilot helmet, which can be imported easily and used in...
3d_export
$15

crown splash
...file in the animated .alembic format that you can easily open in any 3d application, cinema 4d, houdini, 3dmax,...
3d_export
$16
womennp2maxfbxobjmb
...womennp2maxfbxobjmb 3dexport polygonal model of a girl.<br>you can easily snap a skeleton for...
3d_export
$7
sofa furniture l
...l 3dexport all components are separate and can be easily changed in volume. materials in the folder are...
Required
turbosquid
$5

Snow chains required
... available on turbo squid, the world's leading provider of digital 3d models for visualization, films, television, and games.
3d_export
free
cold coffee
...cold coffee 3dexport cold coffee can. any required modifications will be done at...
3d_export
free

Game console
...game console
3dexport
this is a model of a game console that does not require any plug-ins.
3d_export
$5
plummer block
...model of plummer block assembly where seven parts are required to assemble...
3ddd
$1

white table (wood)
...white table (wood) 3ddd обеденный tension mod required fbx and obj included high...
3ddd
$1

Fine Art Lamps 420840 Portobello
...portobello 3ddd fine art lamps no third party plugin required ...
3d_export
$7

kitchenware
...kitchen utensils includes all small electrical appliances that are required for interior...
3d_export
$5

star ball
...sizes. small, medium and original size. adhesive may be required ...
3d_export
$5
shock absorber
...absorber can also provide .stp or .iges format if required ...
3ddd
free

Moon Charme
...3ddd дверная ручка , ручка no third party plugin required hi detailed 3d...
Case
3d_export
$1

case
...case
3dexport
case
archibase_planet
free

Case
...case
archibase planet
showcase show-case glass case
glass-case + cakes - 3d model for interior 3d visualization.
archibase_planet
free

Case
...case
archibase planet
showcase show-case glass case
glass-case for chips - 3d model for interior 3d visualization.
archibase_planet
free

Case
...case
archibase planet
case shelving drawer
case - 3d model for interior 3d visualization.
archibase_planet
free

Case
...case
archibase planet
case rack locker
case - 3d model for interior 3d visualization.
archibase_planet
free

Case
...case
archibase planet
case drawer kitchen furniture
case - 3d model for interior 3d visualization.
archibase_planet
free

Case
...case
archibase planet
case cupboard shelving
glass case - 3d model for interior 3d visualization.
archibase_planet
free

Case
...case
archibase planet
case handbag suitcase
case - 3d model (*.gsm+*.3ds) for interior 3d visualization.
archibase_planet
free

Case
...case
archibase planet
case suitcase
case 5 - 3d model (*.gsm+*.3ds) for interior 3d visualization.
archibase_planet
free

Case
...case
archibase planet
locker case dresser
case - 3d model (*.gsm+*.3ds) for interior 3d visualization.
Pieces
archibase_planet
free

Piece
...piece
archibase planet
sand-box playground
piece 8 - 3d model (*.gsm+*.3ds) for interior 3d visualization.
archibase_planet
free

Piece
...piece
archibase planet
smithy forge farriery
piece 12 - 3d model (*.gsm+*.3ds) for interior 3d visualization.
turbosquid
$7

piece
...turbosquid
royalty free 3d model piece for download as sldpr on turbosquid: 3d models for games, architecture, videos. (1407696)
archibase_planet
free
Piece
...piece
archibase planet
merry-go-round roundabout carrousel
piece 5 - 3d model (*.gsm+*.3ds) for interior 3d visualization.
3d_export
free

Lego piece
...lego piece
3dexport
lego piece<br>.stl
turbosquid
free

Chess Pieces
...es
turbosquid
free 3d model chess pieces for download as fbx on turbosquid: 3d models for games, architecture, videos. (1502330)
turbosquid
$5
Skywalk Piece
...quid
royalty free 3d model skywalk piece for download as max on turbosquid: 3d models for games, architecture, videos. (1422588)
turbosquid
$1
chess pieces
...squid
royalty free 3d model chess pieces for download as obj on turbosquid: 3d models for games, architecture, videos. (1562332)
turbosquid
$1
chess piece
...osquid
royalty free 3d model chess piece for download as fbx on turbosquid: 3d models for games, architecture, videos. (1369649)
turbosquid
free

Chess Pieces
...uid
royalty free 3d model chess pieces for download as blend on turbosquid: 3d models for games, architecture, videos. (1323069)
Printable
turbosquid
$5
printable giraffe
...uid
royalty free 3d model printable giraffe for download as on turbosquid: 3d models for games, architecture, videos. (1504825)
3d_export
$2
printable audi car
...printable audi car
3dexport
printable audi car
turbosquid
$23

Printable Statue
...ty free 3d model printable statue for download as obj and stl on turbosquid: 3d models for games, architecture, videos. (1415137)
turbosquid
$1

heart printable
...y free 3d model heart printable for download as stl and sldpr on turbosquid: 3d models for games, architecture, videos. (1209566)
turbosquid
$1
Printable Hook
...
royalty free 3d model 3d printable hook for download as stl on turbosquid: 3d models for games, architecture, videos. (1413683)
turbosquid
$30
Printable support
... model 3d printable support for download as max, 3ds, and stl on turbosquid: 3d models for games, architecture, videos. (1689342)
turbosquid
$24

Printable Dolphin
...el printable dolphin for download as , dae, fbx, obj, and stl on turbosquid: 3d models for games, architecture, videos. (1602353)
turbosquid
$7

Printable Mug
...e 3d model 3d printable mug for download as obj, fbx, and stl on turbosquid: 3d models for games, architecture, videos. (1496940)
turbosquid
$40

Printable cottage
... available on turbo squid, the world's leading provider of digital 3d models for visualization, films, television, and games.
turbosquid
$4
Printable dice
... available on turbo squid, the world's leading provider of digital 3d models for visualization, films, television, and games.
4
turbosquid
$9

Office Chair 4-4
... available on turbo squid, the world's leading provider of digital 3d models for visualization, films, television, and games.
3d_export
$5

doors- 4
...doors- 4
3dexport
doors 4
3d_export
$5

hinge 4
...hinge 4
3dexport
hinge 4
3ddd
$1

Штора №4
...штора №4
3ddd
штора №4
3d_export
free

playstation 4
...playstation 4
3dexport
playstation 4
3ddd
$1

nexus 4
...nexus 4
3ddd
lg , телефон
nexus 4
3ddd
$1

4 Poufs
...4 poufs
3ddd
пуф
4 soft poufs
turbosquid
$12

Calligraphic Digit 4 Number 4
...hic digit 4 number 4 for download as max, obj, fbx, and blend on turbosquid: 3d models for games, architecture, videos. (1389332)
3ddd
$1

Dauphin 4+
...dauphin 4+
3ddd
кресло
dauphin 4+ конференц кресло
3ddd
$1
iPhone 4
...
3ddd
apple , iphone , телефон
модель iphone 4.
2
design_connected
$11

No 2
...no 2
designconnected
sibast no 2 computer generated 3d model. designed by sibast, helge.
turbosquid
$99

Smilodon 2 Pose 2
... available on turbo squid, the world's leading provider of digital 3d models for visualization, films, television, and games.
turbosquid
$20

Barrel Barricade 2-2
... available on turbo squid, the world's leading provider of digital 3d models for visualization, films, television, and games.
turbosquid
$6

Wall Trophy (2) (2)
... available on turbo squid, the world's leading provider of digital 3d models for visualization, films, television, and games.
turbosquid
free

Tire label 2 of 2
... available on turbo squid, the world's leading provider of digital 3d models for visualization, films, television, and games.
3ddd
$1

Кровать, 2 тумбочки, 2 светильника
...кровать, 2 тумбочки, 2 светильника
3ddd
кровать, 2 тумбочки, 2 светильника
нормальное качество
формат 3ds max
без текстур
3ddd
free

Кровать, 2 тумбочки, 2 светильника
...кровать, 2 тумбочки, 2 светильника
3ddd
кровать, 2 тумбочки, 2 светильника
нормальное качество
формат 3ds max
без текстур
turbosquid
$19
Loft wooden square box chandelier (2) (2) (2)
... available on turbo squid, the world's leading provider of digital 3d models for visualization, films, television, and games.
3ddd
$1
ALPEREN-2
...alperen-2
3ddd
комод , alperen-2
комод с зеркалом alperen-2
design_connected
$27
Confluences 2 2-Seater Sofa
... 2-seater sofa
designconnected
ligne roset confluences 2 2-seater sofa computer generated 3d model. designed by nigro, philippe.