Thingiverse

4:1 Planetary Extruder
by Thingiverse
Last crawled date: 4 years, 2 months ago
https://youtu.be/dIwERQjJ0wIIf you like to help out with R&D filament to support my procrastination from study and be my first ever patron :-)https://www.patreon.com/dynagen/
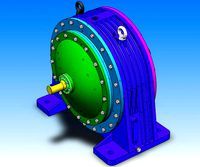
4:1 Planetary Herringbone Gearbox
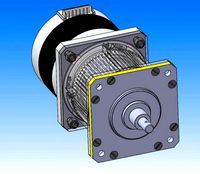
Gearset can be used without included extruder
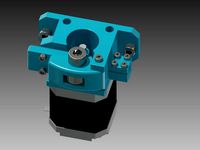
Dual lever arm Extruder - only 11mm thick
Suitable for flexible filaments & easy loadingAmplifies spring pressure
Standard/Mk8 aluminium lever style extruders (supplied with most things) are around 1.6x
Rough calcs on this design is around 7x spring pressure. Doesn't deform filament as pressure is exerted on both gear and support bearing, with moving filament position preventing the filament being bent into the drive gear
Herringbone gears in a planetary gearbox output 4:1 ratio
Sun:14T Planet:14T Ring:42T
Input = Sun
Output = Planetary Carrier
Parts Required:Gearbox
1 @ ID8mm Filament Drive Gear
2 @ MR105 bearings
Choose either
1 @ 608 / 688 / MR128 Bearing (print suited bracket included. MR128 smallest)
3 @ M3 nuts
3 @ M3 x 20mm
2 @ M3 x 25mm
*2 @ M3 x 31mm + thickness of (mount +extruder) see below for length with included extruder
Extruder
1 @ 686 bearing
*2 @ M3 x 42mm + thickness of mount
2 @ PC4-M6 hose fitting
1 @ 8mm x 20mm spring (found in most stock extruders)
Printing Notes
Select tolerance to suit your printer.
"Tol00" < 0.1mm
"Tol01" 0.1 - 0.2mm (to be added)
"Tol02" > 0.2 (to be added)
Print SunGear & PlanetPlateTop to gauge tolerance requirements
Must use BearingBracket if only using gearset
Tolerances can be interchanged to suit. 0.1mm differences
All items have 0.4mm chamfers on lower edge so there is low concern of 'elephant foot' causing tolerance issues
LAYER HEIGHT
0.1mm or lower
INFILL
Print All items at 100% infill, fill small gaps, etc
RingGear & BearingBracket may be printed at 20% infill
SUPPORT
Only use support on; PlanetPlateTop, BearingBracket, ExtruderHead
Installation
-Check;
planet gears rotate on PlanetPlateBase. Should be a tiny amount of resistance.
SunGear is tight on motor shaft
Filament drive gear is snug on PlanetPlateTop
If too tight or too much slop, print different tolerance part. Tolerances interchangeable.
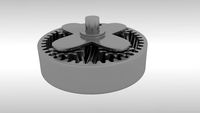
-Place Planet and Sun gears upside down(from printed orientation) on a flat surface and arrange into planetary gear design.
-Insert PlanetPlateBase into all 3 gears simultaneously. This can be lifted from the table with the sun gear captured in the centre
-Use 20mm screws to pull nuts into place. Should be flush or very close
-Place PlanetPlateTop onto gearset and install all 3@M3 x 20mm screws
-Place RingGear with "DYN" onto stepper motor
-Take note of SunGear hole orientaction and push gearset onto stepper motor shaft until fully engages RingGear
-Place RingGear_MIR onto gearset. Align writing and notch in side. If not aligned, reset again
-Insert 1 or 2 @ M3 x 25mm screws in diagonally opposed holes. These are not critical. Please consider if they will interfere with the extruder head and the desired final orientation of the motor connector
NotesEdit 13/10/19
BearingBracket_608 replaced. Incorrectly set bearing width to 6mm. Corrected to 7mm.
Additional 1mm spacer provided.
If the extruder is mated directly to the Planetary Gearset, use the spacer between to prevent extruder pins falling into gears.
Some stepper motors do not have the flat shaft far enough down to accommodate the SunGear. Spacers can be used to resolve.Edit 14/10/19
Updated ExtruderHead to suit 8mm x 20mm spring
Added additional 06.Spacer_1mm to sit under extruder head. Old spacer still included to suit under planetary gearbox if needed
4:1 Planetary Herringbone Gearbox
Gearset can be used without included extruder
Dual lever arm Extruder - only 11mm thick
Suitable for flexible filaments & easy loadingAmplifies spring pressure
Standard/Mk8 aluminium lever style extruders (supplied with most things) are around 1.6x
Rough calcs on this design is around 7x spring pressure. Doesn't deform filament as pressure is exerted on both gear and support bearing, with moving filament position preventing the filament being bent into the drive gear
Herringbone gears in a planetary gearbox output 4:1 ratio
Sun:14T Planet:14T Ring:42T
Input = Sun
Output = Planetary Carrier
Parts Required:Gearbox
1 @ ID8mm Filament Drive Gear
2 @ MR105 bearings
Choose either
1 @ 608 / 688 / MR128 Bearing (print suited bracket included. MR128 smallest)
3 @ M3 nuts
3 @ M3 x 20mm
2 @ M3 x 25mm
*2 @ M3 x 31mm + thickness of (mount +extruder) see below for length with included extruder
Extruder
1 @ 686 bearing
*2 @ M3 x 42mm + thickness of mount
2 @ PC4-M6 hose fitting
1 @ 8mm x 20mm spring (found in most stock extruders)
Printing Notes
Select tolerance to suit your printer.
"Tol00" < 0.1mm
"Tol01" 0.1 - 0.2mm (to be added)
"Tol02" > 0.2 (to be added)
Print SunGear & PlanetPlateTop to gauge tolerance requirements
Must use BearingBracket if only using gearset
Tolerances can be interchanged to suit. 0.1mm differences
All items have 0.4mm chamfers on lower edge so there is low concern of 'elephant foot' causing tolerance issues
LAYER HEIGHT
0.1mm or lower
INFILL
Print All items at 100% infill, fill small gaps, etc
RingGear & BearingBracket may be printed at 20% infill
SUPPORT
Only use support on; PlanetPlateTop, BearingBracket, ExtruderHead
Installation
-Check;
planet gears rotate on PlanetPlateBase. Should be a tiny amount of resistance.
SunGear is tight on motor shaft
Filament drive gear is snug on PlanetPlateTop
If too tight or too much slop, print different tolerance part. Tolerances interchangeable.
-Place Planet and Sun gears upside down(from printed orientation) on a flat surface and arrange into planetary gear design.
-Insert PlanetPlateBase into all 3 gears simultaneously. This can be lifted from the table with the sun gear captured in the centre
-Use 20mm screws to pull nuts into place. Should be flush or very close
-Place PlanetPlateTop onto gearset and install all 3@M3 x 20mm screws
-Place RingGear with "DYN" onto stepper motor
-Take note of SunGear hole orientaction and push gearset onto stepper motor shaft until fully engages RingGear
-Place RingGear_MIR onto gearset. Align writing and notch in side. If not aligned, reset again
-Insert 1 or 2 @ M3 x 25mm screws in diagonally opposed holes. These are not critical. Please consider if they will interfere with the extruder head and the desired final orientation of the motor connector
NotesEdit 13/10/19
BearingBracket_608 replaced. Incorrectly set bearing width to 6mm. Corrected to 7mm.
Additional 1mm spacer provided.
If the extruder is mated directly to the Planetary Gearset, use the spacer between to prevent extruder pins falling into gears.
Some stepper motors do not have the flat shaft far enough down to accommodate the SunGear. Spacers can be used to resolve.Edit 14/10/19
Updated ExtruderHead to suit 8mm x 20mm spring
Added additional 06.Spacer_1mm to sit under extruder head. Old spacer still included to suit under planetary gearbox if needed
Similar models
thingiverse
free

Planetary Gearset by Watsicus
...and a ring gear. in this case there are 3 planet gears.
a major application of planetary gearsets are in automatic transmissions.
thingiverse
free

Compact Bowden Extruder by CaseyJohnson
...der arm
2 m3 x 25mm machine screw if you do not use springs on the extruder arm
1 m6 hex nut
1 bowden push fitting with m6 thread
thingiverse
free

EXTRUDER Planetary NEMA 17 Mk7 by Gudrimelis
...rangement. screw placement strengthens the gear axles.
1 x bolt m5
1 x pulley mk7
1 x 623zz bearing
2 x 605zz bearing
1 x bolt m3
thingiverse
free

Cetus spring loaded extruder (TPU purposed) by baltazed
...#39;t use this extruder to print pla or petg because the stock extruder is better for this job but both can provide good results.
thingiverse
free

~600:1 planetary gearbox
...tary gears facing the center.
4) take sun gear_2 and push it in from the bottom.
5) put on the backplate and install the bearing.
thingiverse
free

Differential Planetary Gearset by emmett
...nt to print than the last version, and the only assembly required is placing the output ring onto the upper planets of the input.
grabcad
free

5:1 planetary gearbox with nema 17
...ma 17
grabcad
5:1 planetary gearbox with nema 17
with m3 brass insert nut
support bearings in carrier, planet gear and sun gear.
thingiverse
free

Rusa bowden extruder gear by urusa
...tes the m5 bolts.
the shaft is fixed to the motor rotation.
secure the mk7 extrusion gear to the m5 bolts.
the gear ratio is 1/3.
thingiverse
free

planetary gearbox smasher thing
...em and install them onto the shafts of the 2 gearboxes.
10) put the other 2 drive gears in place and install the drive gear case.
thingiverse
free
Rackprint Bowden Extruder by Alex_RP
...x m3 screw ~20mm and nuts
2x m3 screw 15mm
bearing 608zz
mk8 drive gear
2x spring ~20mm with ~3mm inner diameter
Planetary
3d_export
$7

planetary gearbox
...planetary gearbox
3dexport
planetary gearbox
3d_export
$12

planetary rover
...planetary rover
3dexport
low poly, game ready, planetary rover.<br>the model is rigged but not animated.
3d_export
$5
nw planetary reducer
...nw planetary reducer
3dexport
nw planetary reducer
turbosquid
$4

planetary gearbox
...royalty free 3d model planetary gearbox for download as blend on turbosquid: 3d models for games, architecture, videos. (1423384)
3d_ocean
$3

Planetary gears
...al applied and is ready to import and render in both all(blend/fbx/obj). there are two models, one of which is the exploded mo...
3d_export
$5
three stage planetary gearbox
...three stage planetary gearbox
3dexport
three stage planetary gearbox
3d_export
$15
Planetary gears 3D Model
...box automatic manual car engine power drive differential sprocket mechanical
planetary gears 3d model dragosburian 81058 3dexport
3d_export
free

tinket planetary transmission
...tinket planetary transmission
3dexport
3d_export
$30

Planetary system 3D Model
...planetary system 3d model
3dexport
planets sol system
planetary system 3d model psicore 64545 3dexport
turbosquid
$10

Planetary Pendant Lamp set
...free 3d model planetary pendant lamp set for download as max on turbosquid: 3d models for games, architecture, videos. (1475423)
Extruder
3ddd
$1

Extruded Chair
...extruded chair
3ddd
extruded , tom dixon
inspired by tom dixon extruded chair
turbosquid
$15

Extruded Table
... extruded table for download as blend, dae, fbx, obj, and stl on turbosquid: 3d models for games, architecture, videos. (1634137)
turbosquid
$2

3D Printer Extruder
...d
royalty free 3d model 3d printer extruder for download as on turbosquid: 3d models for games, architecture, videos. (1537359)
turbosquid
$1

Zombie extruded text
...oyalty free 3d model zombie extruded text for download as obj on turbosquid: 3d models for games, architecture, videos. (1322198)
turbosquid
$4

Extruder conical screw
...el extruder conical screw for download as sldpr, ige, and stl on turbosquid: 3d models for games, architecture, videos. (1524433)
turbosquid
$50

3d PRINTER - Extruder
... available on turbo squid, the world's leading provider of digital 3d models for visualization, films, television, and games.
turbosquid
$15

Extruded Table 2
...xtruded table 2 for download as blend, dae, fbx, obj, and stl on turbosquid: 3d models for games, architecture, videos. (1621846)
turbosquid
$10

Maya Extrude Tool
... available on turbo squid, the world's leading provider of digital 3d models for visualization, films, television, and games.
3d_export
$5

world earth extrude map
...world earth extrude map
3dexport
3ddd
$1

Simply Elegant Extruded Tree Coffee Table Design
...ble by link studios. the silhouette of a tree is visible at one angle, extruded from the surface to create the support structure.
4
turbosquid
$9

Office Chair 4-4
... available on turbo squid, the world's leading provider of digital 3d models for visualization, films, television, and games.
3d_export
$5

doors- 4
...doors- 4
3dexport
doors 4
3d_export
$5

hinge 4
...hinge 4
3dexport
hinge 4
3ddd
$1

Штора №4
...штора №4
3ddd
штора №4
3d_export
free

playstation 4
...playstation 4
3dexport
playstation 4
turbosquid
$1

re 4-4 electric locomotive
... free 3d model re 4 4 electric locomotive for download as obj on turbosquid: 3d models for games, architecture, videos. (1707845)
3ddd
$1

nexus 4
...nexus 4
3ddd
lg , телефон
nexus 4
3ddd
$1

4 Poufs
...4 poufs
3ddd
пуф
4 soft poufs
turbosquid
$12

Calligraphic Digit 4 Number 4
...hic digit 4 number 4 for download as max, obj, fbx, and blend on turbosquid: 3d models for games, architecture, videos. (1389332)
3ddd
$1

Dauphin 4+
...dauphin 4+
3ddd
кресло
dauphin 4+ конференц кресло
1
turbosquid
$69

armchairs(1)(1)
... available on turbo squid, the world's leading provider of digital 3d models for visualization, films, television, and games.
turbosquid
$15

ring 1+1
... available on turbo squid, the world's leading provider of digital 3d models for visualization, films, television, and games.
turbosquid
$10

chair(1)(1)
... available on turbo squid, the world's leading provider of digital 3d models for visualization, films, television, and games.
turbosquid
$8

Chair(1)(1)
... available on turbo squid, the world's leading provider of digital 3d models for visualization, films, television, and games.
turbosquid
$2

RING 1(1)
... available on turbo squid, the world's leading provider of digital 3d models for visualization, films, television, and games.
turbosquid
$1

house 1(1)
... available on turbo squid, the world's leading provider of digital 3d models for visualization, films, television, and games.
turbosquid
$1

Table 1(1)
... available on turbo squid, the world's leading provider of digital 3d models for visualization, films, television, and games.
turbosquid
$59

Formula 1(1)
...lty free 3d model formula 1 for download as max, fbx, and obj on turbosquid: 3d models for games, architecture, videos. (1567088)
design_connected
$11

No 1
...no 1
designconnected
sibast no 1 computer generated 3d model. designed by sibast, helge.
turbosquid
$2

desert house(1)(1)
...3d model desert house(1)(1) for download as 3ds, max, and obj on turbosquid: 3d models for games, architecture, videos. (1055095)