Thingiverse
3rd Rail CoreXY by LordKyleOfEarth
by Thingiverse
Last crawled date: 4 years, 4 months ago
(TL;DR This is a coreXY conversion for the FlSun Cube, but it works for scratch build printers that use 2020 extrusion and MGN12 rails. It assumes that you have a Z axis setup that you already like.)
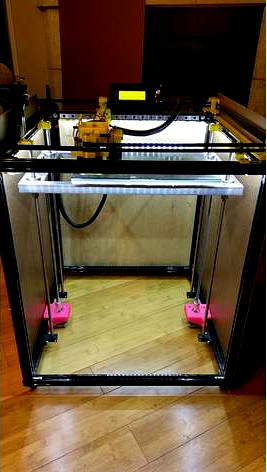
After a year of trying, I was never able to get my FlSun Cube to print as good as I wanted. Despite costing more, it was consistently giving me worse prints than my abused Wanhao Duplicator i3--mostly due to having very not-straight 8mm rods. Also, lets face it, the stock gantry configuration is really inefficient and weighs in at a whopping THREE POUNDS. There had to be a better way.
3rd Rail is my attempt to find that better way. I dropped the 8mm rods in favor of MGN12 rails and changed the complicated kinematic arrangement out for a more elegant CoreXY arrangement. The nice thing about the rails is that they are pretty resistant to racking, so you can get by with similar quality choices as the stock printer.
This is based upon the 5rails build, but has been customized to work with the frame and Z axis arrangement from the FlSun Cube. I added extra ease space for the belts (my Chineseum belts were thicker than expected) and modified the X to Y brackets to give full access to the stock Cube build plate. Compact 8mm rod holders are used at the top, to give full range of motion (they are friction fit and meant to hold the rods in place. Use the stock holders at the bottom to make it secure.) The Unimount replaces the idler mounts from 5rails with a taller and ambidextrous version. For whatever reason, my belt path was substantially taller than the stock 5rails mounts allowed for. I also added a bit more belt ease space.
In the end, I have a full 310*310mm build plate with a 430mm maximum Z height. This arrangement weighs about 1lb less than the stock gantry arrangement. That XY range may be reduced, depending on what hotend and part cooler you choose. I am currently working on a fang style that should clear everything (check back for updates).
All of the YELLOW parts were printed for this project and should be linked here. If something is missing, please let me know. The probe mount works with the stock inductive probe and takes the place of the 2nd hotend on the carriage. If you do the 12v power mod for the probe, it will work fine with a glass bed (as seen in the pictures). If you want a BLTouch mount, please buy me one and I'll gladly draft it ;)
If you want to follow this conversion, you will need to buy 3x 400mm MGN12 rails, 5m of belting, 1x 450mm length of 2020 extrusion, 20x F695ZZ flanged bearings, and a hand full of fasteners (I will confirm the sizes and update this list).
After 7 months of heavy use, the only real issue I have encountered is that I am seeing accelerated belt wear, especially at the X-to-Y mounts. I suspect that part of this is due to fact that my cheap aliexpress belt is not actually straight (you can see the deflection if you lay it flat.) But part of it is possibly minor flexing in the mounts.I am figuring that I will need to replace the belt at a 10-12 month interval. Given how cheap belts are, I am okay with this.
You also might notice a strange ripple artifact on surfaces (especially curved ones). I tracked it down to minor deflections in the hotend caused by the belt teeth passing over the smooth pulleys. This was resolved by flipping the belts so that the smooth faces were against the pulleys whenever possible.
EDIT
The MK2 carriage is designed to hold a V6 hotend and align it closer to the rail than the 5rail carriage. The Drop V6 mount sits lower than the previous generic bowden mount as well. This combination should clear the Z mounts if you choose to set them inside the frame.
The probe multi-mount will set the stock inductive probe a bit lower than before (to match the lower hotend mount) and also adds in side bracing for a more secure fit. The holes in the side are there for attaching future accessories (a part fan, perhaps?). I purposely made the holes a bit small so that they can be drilled out to accommodate various screw sizes.
EDIT 2
The v6 Winged Mount is the latest (and probably final) version of the hotend mount. It has a single inset hole for mounting a BLTouch (or clone) as well as two 40mm slots that accept 4010 blower fans. The two fans will press-fit into the winged mount and remain secure (or you can add tape if desired). Use the "Modded Air Guide" on each fan to direct airflow. You can use bolts, if desired, but I just used a section of foil tape. With regards to the probe, I used a single bolt with multiple hexnuts to set the height (it is adjustable, in the event that you need that feature. Be sure to make things snug and/or use something to lock the position or the probe can slowly lower over time.)
This configuration clears in-set Z rods, gives access to the FULL build plate, and can bridge 100mm spans without issue.