Thingiverse
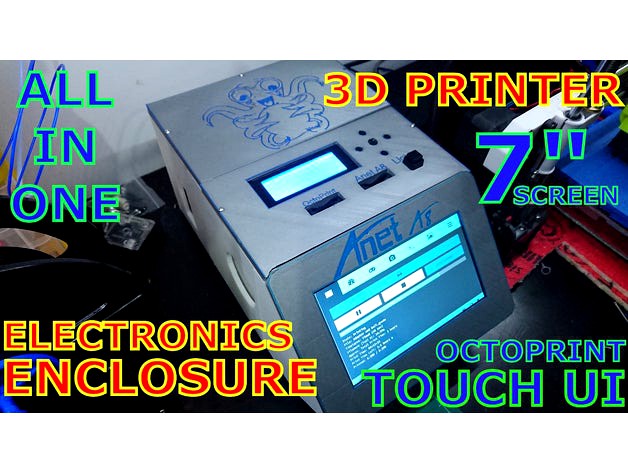
3D Printer Electronics Enclosure - Touch Screen, Mainboard, MOSFET, PSU, Raspberry, Fan. by IIZEROXII
by Thingiverse
Last crawled date: 3 years ago
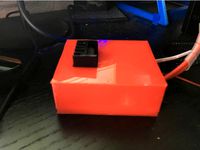
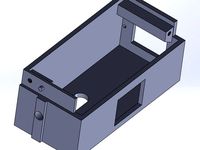
This is an electronics box/enclosure witch also has a touch screen for octoprint.
Designed for Anet A8 But should be able to suit most printers.
If you make one I would really like to see it.
https://youtu.be/R3kEV1rvICQ
ATX PSU Remix:https://www.thingiverse.com/thing:2829053
No Touch Screen Remix:https://www.thingiverse.com/thing:2829157
RepRap Full Graphic Smart Controller Remix:https://www.thingiverse.com/thing:2857158
Camera mount I use:https://www.thingiverse.com/thing:2008595
also made another axis for that mount for the mount:https://www.thingiverse.com/thing:2755684
UPDATE: 05/05/2018
Adde Atroprint Back lid.https://www.thingiverse.com/thing:2894255
UPDATE:02/03/2018
Added "f3d" & "iges" files for those of you who wish to modify for them selves.
If you add support for other boards, screens or anything else and want to share it let me know and i can add to this thing for everyone.
UPDATE:01/02/2018
Added a lid that supports the Anet A6 12864 LCD.
This is currently unverified as I do not have this screen to test it. Will update once someone has printed it.
(This does not have outline feature)
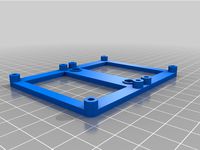
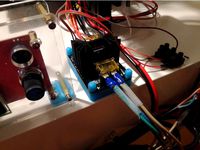
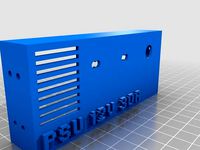
Electronic Mounting Points for:
Anet A8 main board.
Anet A8 Original Screen and controls.
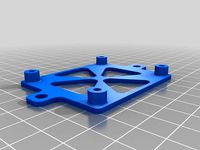
2 MOSFET's.
Upgraded 30 amp Power Supply AND the original Anet A8 PSU (Original only uses 1 screw on top but can drill holes if want more secure mounting).
2 Slots for SD cards for Anet and Raspberry via microSD to SD extensions. I use SD cards because they are just easier to handle.
Light switch.
80mm Cooling fan.
7" Touch Screen.
Parts used in my build:
7 inch HD Touch Screen Display LCD 1024x600 HDMI Module Kit Set For Raspberry BS:https://www.ebay.com/itm/New-7-Capacitive-Touch-Screen-LCD-Display-IPS-1024x600-HDMI-For-Raspberry-Pi-/381182253906
30 Amp 12 Volt DC 13.8V Regulated Switching Power Supply:https://www.ebay.com.au/itm/LETOUR-12V-30A-DC-Power-Supply-360W-AC-110V-220V-Converter-DC-12Volt-30Amp-360Wa/332577891025?hash=item4d6f2fe2d1:g:qFsAAOSwIa9anwo2
IEC Fuse Chassis Male Power Plug with Switch:https://www.ebay.com.au/itm/NEW-IEC-Fuse-Chassis-Male-Power-Plug-with-Switch-PP4003/252985807193?epid=904172097&hash=item3ae7211159:g:JAcAAOSw62VZxPNQ
Raspberry Pi 3 Model B - Premium NOOBS Pack:https://www.ebay.com.au/itm/Raspberry-Pi-3-Model-B-Premium-NOOBS-Pack-16GB-USB-Switch-2-5A-Power-Supply/201385350646?hash=item2ee38095f6:g:yJUAAOSwLEtYlUV6
M3 M4 M5 Hex Socket Screws Set (Only uses M3 ans M4 for PSU)https://www.ebay.com.au/itm/440pc-M3-M4-M5-Hex-Socket-Screws-Set-Stainless-Steel-Screws-and-Nuts-Repair-Tool/292191840569?hash=item4407fda939:g:FP4AAOSwTLxZhZLo
0.5m USB 2.0 A To RIGHT ANGLE MICRO B (Power for screen from Raspberry + it's the touch input):https://www.ebay.com.au/itm/0-5m-USB-2-0-A-To-RIGHT-ANGLE-MICRO-B-Data-Charging-Cable-50cm-Lead-007239/382268609416?epid=1630600552&hash=item5900fc1388:g:n94AAOSw-jFaHdPI
50cm USB A to B CABLE - Printer Scanner Cord (50cm seems to be the smallest cables go):https://www.ebay.com.au/itm/50cm-USB-A-to-B-CABLE-Printer-Scanner-Cord-Lead-Wire-Modem-USB-2-0-NEW-Short-/322968937423?
50cm HDMI CABLE (50cm seems to be the smallest cables go)https://www.ebay.com.au/itm/Premium-50cm-HDMI-Cable-Ultra-HD-4K-2160p-1080p-3D-High-Speed-Ethernet-ARC-HEC/112200848129?hash=item1a1fb11301:m:m3padqnjX2-TgGidintUHhA
HDMI Right Angle Male To Female 90-180 Degree (This is required because the space to plug into the screen is tight so the plastic case on this adapter needed to be removed to fit. I then covered it in heat shrink tubing.https://www.ebay.com.au/itm/HDMI-Right-Angle-Male-To-Female-90-180-Degree-Adapter-Cable-Lead-Connector-BDAU/362151940118?epid=2251233935&hash=item5451f01016:g:SSQAAOSwAO9ZSdwh
PUSH ON PUSH OFF BUTTON SQUARE:https://www.ebay.com.au/itm/2X-SPST-PUSH-ON-PUSH-OFF-BUTTON-SQUARE-SWITCH-BLACK/282348515537?hash=item41bd4870d1:g:1bkAAOSwCU1Y304D
SD to Micro SD Card Extension Cable Extender Adapter x2:https://www.ebay.com.au/itm/SD-to-Micro-SD-Card-Extension-Cable-Extender-Adapter-SDHC-For-Car-GPS-TV-CN-48cm/131978779662?epid=503010732&hash=item1eba8c5c0e:g:N2EAAOSw609Z32Jq
Any 80mm Fan.
Building:
Not that much to it really.
Infill and layer height are all up to the person printing.
All parts are laid out the way I printed them, feel free to position how you want.
All parts are able to fit on a 220x220 build plate.
Print out main body parts, glue or plastic weld together or how ever you want to join them.
The Lid and Front Panel parts get screwed on.
Outline effect.
If it's to confusing you don't have to do it just ignore all the FIRST LAYER ONLY files.
To get the outline of the Octoprint logo and edges in a different color print the part with the "First Layer Only" first don't remove from build plate then print the whole piece on top of it.
Same go's with the Anet logo.
Raspberry mounts on the under side of the back lid.
Octoprint with Touch UI set up:
I followed this guide to get all working:https://github.com/BillyBlaze/OctoPrint-TouchUI/wiki/Setup:-Boot-to-Browser-(Jessie-Full)
Designed for Anet A8 But should be able to suit most printers.
If you make one I would really like to see it.
https://youtu.be/R3kEV1rvICQ
ATX PSU Remix:https://www.thingiverse.com/thing:2829053
No Touch Screen Remix:https://www.thingiverse.com/thing:2829157
RepRap Full Graphic Smart Controller Remix:https://www.thingiverse.com/thing:2857158
Camera mount I use:https://www.thingiverse.com/thing:2008595
also made another axis for that mount for the mount:https://www.thingiverse.com/thing:2755684
UPDATE: 05/05/2018
Adde Atroprint Back lid.https://www.thingiverse.com/thing:2894255
UPDATE:02/03/2018
Added "f3d" & "iges" files for those of you who wish to modify for them selves.
If you add support for other boards, screens or anything else and want to share it let me know and i can add to this thing for everyone.
UPDATE:01/02/2018
Added a lid that supports the Anet A6 12864 LCD.
This is currently unverified as I do not have this screen to test it. Will update once someone has printed it.
(This does not have outline feature)
Electronic Mounting Points for:
Anet A8 main board.
Anet A8 Original Screen and controls.
2 MOSFET's.
Upgraded 30 amp Power Supply AND the original Anet A8 PSU (Original only uses 1 screw on top but can drill holes if want more secure mounting).
2 Slots for SD cards for Anet and Raspberry via microSD to SD extensions. I use SD cards because they are just easier to handle.
Light switch.
80mm Cooling fan.
7" Touch Screen.
Parts used in my build:
7 inch HD Touch Screen Display LCD 1024x600 HDMI Module Kit Set For Raspberry BS:https://www.ebay.com/itm/New-7-Capacitive-Touch-Screen-LCD-Display-IPS-1024x600-HDMI-For-Raspberry-Pi-/381182253906
30 Amp 12 Volt DC 13.8V Regulated Switching Power Supply:https://www.ebay.com.au/itm/LETOUR-12V-30A-DC-Power-Supply-360W-AC-110V-220V-Converter-DC-12Volt-30Amp-360Wa/332577891025?hash=item4d6f2fe2d1:g:qFsAAOSwIa9anwo2
IEC Fuse Chassis Male Power Plug with Switch:https://www.ebay.com.au/itm/NEW-IEC-Fuse-Chassis-Male-Power-Plug-with-Switch-PP4003/252985807193?epid=904172097&hash=item3ae7211159:g:JAcAAOSw62VZxPNQ
Raspberry Pi 3 Model B - Premium NOOBS Pack:https://www.ebay.com.au/itm/Raspberry-Pi-3-Model-B-Premium-NOOBS-Pack-16GB-USB-Switch-2-5A-Power-Supply/201385350646?hash=item2ee38095f6:g:yJUAAOSwLEtYlUV6
M3 M4 M5 Hex Socket Screws Set (Only uses M3 ans M4 for PSU)https://www.ebay.com.au/itm/440pc-M3-M4-M5-Hex-Socket-Screws-Set-Stainless-Steel-Screws-and-Nuts-Repair-Tool/292191840569?hash=item4407fda939:g:FP4AAOSwTLxZhZLo
0.5m USB 2.0 A To RIGHT ANGLE MICRO B (Power for screen from Raspberry + it's the touch input):https://www.ebay.com.au/itm/0-5m-USB-2-0-A-To-RIGHT-ANGLE-MICRO-B-Data-Charging-Cable-50cm-Lead-007239/382268609416?epid=1630600552&hash=item5900fc1388:g:n94AAOSw-jFaHdPI
50cm USB A to B CABLE - Printer Scanner Cord (50cm seems to be the smallest cables go):https://www.ebay.com.au/itm/50cm-USB-A-to-B-CABLE-Printer-Scanner-Cord-Lead-Wire-Modem-USB-2-0-NEW-Short-/322968937423?
50cm HDMI CABLE (50cm seems to be the smallest cables go)https://www.ebay.com.au/itm/Premium-50cm-HDMI-Cable-Ultra-HD-4K-2160p-1080p-3D-High-Speed-Ethernet-ARC-HEC/112200848129?hash=item1a1fb11301:m:m3padqnjX2-TgGidintUHhA
HDMI Right Angle Male To Female 90-180 Degree (This is required because the space to plug into the screen is tight so the plastic case on this adapter needed to be removed to fit. I then covered it in heat shrink tubing.https://www.ebay.com.au/itm/HDMI-Right-Angle-Male-To-Female-90-180-Degree-Adapter-Cable-Lead-Connector-BDAU/362151940118?epid=2251233935&hash=item5451f01016:g:SSQAAOSwAO9ZSdwh
PUSH ON PUSH OFF BUTTON SQUARE:https://www.ebay.com.au/itm/2X-SPST-PUSH-ON-PUSH-OFF-BUTTON-SQUARE-SWITCH-BLACK/282348515537?hash=item41bd4870d1:g:1bkAAOSwCU1Y304D
SD to Micro SD Card Extension Cable Extender Adapter x2:https://www.ebay.com.au/itm/SD-to-Micro-SD-Card-Extension-Cable-Extender-Adapter-SDHC-For-Car-GPS-TV-CN-48cm/131978779662?epid=503010732&hash=item1eba8c5c0e:g:N2EAAOSw609Z32Jq
Any 80mm Fan.
Building:
Not that much to it really.
Infill and layer height are all up to the person printing.
All parts are laid out the way I printed them, feel free to position how you want.
All parts are able to fit on a 220x220 build plate.
Print out main body parts, glue or plastic weld together or how ever you want to join them.
The Lid and Front Panel parts get screwed on.
Outline effect.
If it's to confusing you don't have to do it just ignore all the FIRST LAYER ONLY files.
To get the outline of the Octoprint logo and edges in a different color print the part with the "First Layer Only" first don't remove from build plate then print the whole piece on top of it.
Same go's with the Anet logo.
Raspberry mounts on the under side of the back lid.
Octoprint with Touch UI set up:
I followed this guide to get all working:https://github.com/BillyBlaze/OctoPrint-TouchUI/wiki/Setup:-Boot-to-Browser-(Jessie-Full)
Similar models
thingiverse
free

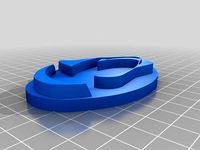
Anet A8 SD card reader holder by Foxbiker
...giverse
tf micro sd to sd extension cable adapter holder for anet a8. modified design:https://www.thingiverse.com/thing:2706637
thingiverse
free

Anet A8 Power Cover with USB-Power by fishtown
...anapi.http://www.ebay.de/itm/dc-dc-9v-12v-24v-to-5v-usb-step-down-step-up-power-supply-module-d-/371386554328?var=&hash=item0
thingiverse
free

Anet A8 dual round power switch (21mm) PSU bracket by porlock
...anet a8 dual round power switch (21mm) psu bracket by porlock
thingiverse
anet a8 round 21mm dual power switch psu bracket
thingiverse
free

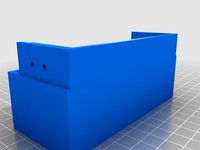
No Touch Screen Remix by IIZEROXII
...e: https://www.thingiverse.com/thing:2748195
this will also work with the atx psu case: https://www.thingiverse.com/thing:2829053
thingiverse
free

Desktop Synergy - Fingerprint+Power+SD+USB by DROUGA
...r=&hash=item2cadcb4b86:m:mwp5ul8mimdc0rwrpebeixq
tools:
soldering iron
desoldering pump
hot glue gun
wire cutters
crimp tool
thingiverse
free

Fallout Mini Nuke with a Countdown Timer by jangy
...-digital-touch-screen-kitchen-timer-black-/361128002478?pt=lh_defaultdomain_0&hash=item5414e803ae
polder touch screen timer
thingiverse
free

Anet A8 30A PSU cover with power switch by Kotvic
...giverse.com/thing:2504619).
this thing works nicely with my psu cover with 120mm fan (https://www.thingiverse.com/thing:3020005).
thingiverse
free

Anet A8 JoyNano Power Supply Mount & Stand by pshankland
...tp://www.thingiverse.com/thing:2000523
x axis stepper motor cable hole & switch hole:http://www.thingiverse.com/thing:1474108
thingiverse
free

Power Raspberry Pi from PSU & power printer on/off from OctoPrint by Roowan
...des and 2 screw holes.
links to components used (amazon):xt60 y splitter24v to usb 5v step down module5v one channel relay module
thingiverse
free

Anet A8 with BTT GTR V1.0 and 2 mosfets by Bauschlumpf
...ttps://www.thingiverse.com/thing:2251940 (anet a8 rear extension for larger heatbed) and a usb cable with 90 degree b connector.
Iizeroxii
thingiverse
free

Square Reader Holder by IIZEROXII
...square reader holder by iizeroxii
thingiverse
this is a holder for the tap and pay device square.
thingiverse
free

Astrprint Logo back lid. by IIZEROXII
...astrprint logo back lid. by iizeroxii
thingiverse
an astroprint logo back lid.
thingiverse
free

Open Closed Entrance Sign by IIZEROXII
...open closed entrance sign by iizeroxii
thingiverse
a sign i made for my partner business.
thingiverse
free

Belt Holder For New Carriage by IIZEROXII
...r new carriage by iizeroxii
thingiverse
i remixed this to go with a carriage i remixed.https://www.thingiverse.com/thing:2605660
thingiverse
free

Arrow Mount For Cross Bow by IIZEROXII
... mount for cross bow by iizeroxii
thingiverse
made new arrows.
made a mounting for the arrows.
added mounting holes to the body.
thingiverse
free

Another Axis For Camera Mount by IIZEROXII
... mount by iizeroxii
thingiverse
i added another rotation point to this mount to get the camera more centered on the build plate.
thingiverse
free

Arduino Mega 2560 Remix by IIZEROXII
...erse
took out the anet main board mount for arduino mega 2560
the rest of the box here:https://www.thingiverse.com/thing:2748195
thingiverse
free

ATX PSU Remix by IIZEROXII
...s://www.thingiverse.com/thing:2748195
can also print this with out the touch screen mod:https://www.thingiverse.com/thing:2829157
thingiverse
free

Astro Print Back Lid Remix by IIZEROXII
...remix by iizeroxii
thingiverse
just the astro print logo if you want it.
fo this thing:https://www.thingiverse.com/thing:2748195
thingiverse
free

Remix of Adjustable Anet A8 Sensor Mount by IIZEROXII
...ble anet a8 sensor mount by iizeroxii
thingiverse
i remixed this for another carriage.https://www.thingiverse.com/thing:2605660
Mainboard
turbosquid
$1

Mainboard
... available on turbo squid, the world's leading provider of digital 3d models for visualization, films, television, and games.
turbosquid
$20

mainboard/video card
... available on turbo squid, the world's leading provider of digital 3d models for visualization, films, television, and games.
turbosquid
$9

White mainboard cube
... available on turbo squid, the world's leading provider of digital 3d models for visualization, films, television, and games.
3d_ocean
$3

Controller TQFP144
...chip circuid controller cpu dil dip gpu integrated layouot mainboard mcu mhz microchip package pin plastic platine processor qfp...
thingiverse
free

ASRock A300 mainboard
...ingiverse
asrock a300 mainboard
measurement accuracy ~ 0,5mm
2 files, one only mainboard, and second - mainboard with components
thingiverse
free

Mainboard holder for TEVO Tarantula (MKS Mainboard ) by faststorm
..., i've done this and have a big advantage, you can mount on enclosure wall / bottom or you can direct on the 3d printer frame
thingiverse
free

Mainboard Lüfter Wanhao D6 by MarkBayle
...mainboard lüfter wanhao d6 by markbayle
thingiverse
better cooling for mainboard
thingiverse
free

Tronxy X5 Mainboard Fanduct
...tronxy x5 mainboard fanduct
thingiverse
put this on the fan of yor tronxy mainboard and it will be some db quiter than before.
thingiverse
free

Kossel Mainboard Top Mount by geniusdesign
...kossel mainboard top mount by geniusdesign
thingiverse
kossel mainboard top mount
thingiverse
free

CNC engraver mainboard holder by bashkirtsevich
...cnc engraver mainboard holder by bashkirtsevich
thingiverse
holder for cnc engraver mainboard.
Mosfet
3d_export
$5

IC SMD Package TO263
...used for different types of semiconductors, such as transistor, mosfet voltage regulators and etcetra. a surface mount device for...
thingiverse
free
Support Mosfet
...support mosfet
thingiverse
support mosfet
remplissage 20%
thingiverse
free

i3 MOSFET Holder / i3 MOSFET Halter by JMDesigns
...i3 mosfet holder / i3 mosfet halter by jmdesigns
thingiverse
i3 mosfet holder / i3 mosfet halter
thingiverse
free
MOSFET Holder / MOSFET Halter 20x20 Extrusion by JMDesigns
...mosfet holder / mosfet halter 20x20 extrusion by jmdesigns
thingiverse
mosfet holder / mosfet halter 20x20 extrusion
thingiverse
free

TO-220 MOSFET Holder
...to-220 mosfet holder
thingiverse
this will hold 3x to-220 mosfets. the mosfets will snap into place.
free3d
free

MOSFET
...mosfet
free3d
metal oxide semiconductor field effect transistor
thingiverse
free
Double Mosfet Holder for Lerdge Mosfet Board by LorDXEO
... board by lordxeo
thingiverse
dual mosfet holder for lergde mosfet modules.
holes for m3 screws, you can also use brass inserts.
thingiverse
free
MOSFET Case by Nbbwarhammer
...mosfet case by nbbwarhammer
thingiverse
a case for mosfet.
thingiverse
free
MOSFET Support
...
2 3mm screws
design
i have uploaded the freecad design that i made, so you can remix it and mod it.
i hope it is useful for you!
thingiverse
free
mosfet holders by paulsonia
...mosfet holders by paulsonia
thingiverse
two mosfet holders
Psu
3d_ocean
$17

Computer Case
...3docean atx case computer corsair full game gaming pc psu full tower-like computer case model with 113946...
cg_studio
$9

Power Supply Unit PSU3d model
...d .fbx .lwo .ma .max .obj .xsi - power supply unit psu 3d model, royalty free license available, instant download after purchase.
thingiverse
free
PSU cover for 12v 30A PSU by Salti
...
cover for the "dangerous" end of a standard led psu
230v input, 2 x 12v outputs
supports psu width 11cm and height 5cm
thingiverse
free

psu holder by sta8atos
...psu holder by sta8atos
thingiverse
psu holder
thingiverse
free
psu stamp by astorck
...psu stamp by astorck
thingiverse
psu stamp
thingiverse
free
PSU Cover by Shojo
...psu cover by shojo
thingiverse
psu cover
thingiverse
free
PSU cover by chroja
...psu cover by chroja
thingiverse
psu cover
thingiverse
free

PSU Cover for 9,9 cm PSU Anet A8 by Wolverine_DH
...a8 by wolverine_dh
thingiverse
psu cover for 9.9sm psu optimal high for anet a8 screw holes, more side holes for diffrend psus.
thingiverse
free

Anet A8 PSU Fan (2017 PSU)
...coarse threaded fan screws. additionally 2 x m3x8mm machine screws needed to attach fan mount to psu. do not use long than 8mm.
thingiverse
free

SFX PSU to ATX PSU adapter by Kanashii
... atx format adapter so i made my own adapter. better use hard plastic to stick psu to pc's case without breaking the adapter.
Raspberry
3d_export
free

raspberry
...raspberry
3dexport
3d model of a raspberry. i tried to make it realistic.
turbosquid
$27

Raspberries
...y free 3d model raspberries for download as max, obj, and stl on turbosquid: 3d models for games, architecture, videos. (1354176)
turbosquid
$14

Raspberries
...y free 3d model raspberries for download as max, obj, and fbx on turbosquid: 3d models for games, architecture, videos. (1364663)
3d_export
$5

raspberry pi
...raspberry pi
3dexport
carcasa para la raspberry pi
turbosquid
$99

Raspberry
... available on turbo squid, the world's leading provider of digital 3d models for visualization, films, television, and games.
turbosquid
$10

raspberries
... available on turbo squid, the world's leading provider of digital 3d models for visualization, films, television, and games.
archive3d
free

Raspberries 3D Model
...raspberries 3d model archive3d raspberries raspberry raspberries n300911 - 3d model (*.3ds) for interior 3d...
3d_export
$5

raspberry fruit
...raspberry fruit
3dexport
3d_export
$5

raspberry
...y different sizes. their color ranges from light burgundy to pink. there are formats: obj, 3ds, blend, dae, fbx, mtl.<br>:)
evermotion
$12

raspberries 23 am130
...evermotion raspberries 23 am130 evermotion key 23 food fruit raspberry fruits am130 raspberries highly detailed 3d model of raspberries...
Enclosure
3d_export
free

electrical enclosure
...l enclosure where electrical devices like (relays, contactors, busbars ) are kept in order to protect from hazardous environment.
turbosquid
$100

GPU Enclosure
...yalty free 3d model gpu enclosure for download as obj and stl on turbosquid: 3d models for games, architecture, videos. (1381061)
3d_export
$5

Electrical Enclosure
...ed. also has tower lights attaced on the top.<br>file format that are available:<br>.step<br>.obj<br>.stl
archive3d
free

Enclosure 3D Model
...closure 3d model
archive3d
shower enclosure-acquarius- 3d model for interior 3d visualization.
archive3d
free

Enclosure 3D Model
...enclosure 3d model
archive3d
shower enclosure-omega- 3d model for interior 3d visualization.
archive3d
free

Enclosure 3D Model
...enclosure 3d model
archive3d
shower enclosure-vega - 3d model for interior 3d visualization.
archive3d
free

Enclosure 3D Model
...enclosure 3d model
archive3d
shower enclosure-zenith - 3d model for interior 3d visualization.
turbosquid
$20

shower enclosure
... available on turbo squid, the world's leading provider of digital 3d models for visualization, films, television, and games.
turbosquid
$14

Dumpster Enclosure
... available on turbo squid, the world's leading provider of digital 3d models for visualization, films, television, and games.
turbosquid
$25

3d printer enclosure
... model 3d printer enclosure for download as ipt, skp, and fbx on turbosquid: 3d models for games, architecture, videos. (1634310)
Touch
3ddd
$1

Touch
...touch
3ddd
touch , альфа банк
электронный терминал для очереди
3ddd
$1

GSG / Touch
... ванна
http://www.ceramicagsg.com/sanitaryware-touch/bathtub-touch-free-standing.html
turbosquid
$10

Oculus Touch
...squid
royalty free 3d model oculus touch for download as skp on turbosquid: 3d models for games, architecture, videos. (1462433)
turbosquid
$64

iPod Touch
...ty free 3d model ipod touch for download as 3ds, max, and obj on turbosquid: 3d models for games, architecture, videos. (1299603)
3ddd
$1

iPod Touch 5
...ipod touch 5
3ddd
apple , плеер
модель ipod touch 5
3ddd
$1

Asnaghi "Touch"
...asnaghi "touch"
3ddd
asnaghi , touch
фабрика: asnaghi
модель: touch
3ddd
free
Japanese stone touch
...japanese stone touch
3ddd
фонарь
japanese stone garden touch
японский садовый фонарь
икеокоми-гата
3d_ocean
$15

IPOD TOUCH 5
...apple blender ipad iphone ipod mp3 nano player touch
3d model of ipod touch 5 in 3 colours. available in .3ds, .blend, .obj, .x3d
3d_ocean
$12

iPod touch 5G
...pod jobs nano steve touch
ipod touch 3d model. formats, fbx, obj, max(2010) textures and materials with multiple colors included.
3ddd
$1
HTC Touch HD
...http://www.gsmarena.com/htc_touch_hd-2525.php фото:http://i.smartphone.ua/img/phones/htc-touch-hd/foto_001.jpg
Screen
archibase_planet
free
Screen
...screen radiator screen radiator enclosure lattice
screen radiator n120315 - 3d model (*.gsm+*.3ds) for interior 3d visualization.
archibase_planet
free

Screen
...screen
archibase planet
screen group display
movie screen - 3d model for interior 3d visualization.
3ddd
$1
Screen
...screen
3ddd
screen
modern dressing wall partition
3d_ocean
$15

HP Screen
...test hp screen. it is has different object, so you can use it as a wall mounted screen or a stand on table. hope you all like it.
3d_export
$10
Accessories screen LCD screen 3D Model
...d screen 3d model
3dexport
accessories screen lcd 3d model interior
accessories screen lcd screen 3d model sunupcg 17831 3dexport
turbosquid
$25
SCREEN
... available on turbo squid, the world's leading provider of digital 3d models for visualization, films, television, and games.
turbosquid
$2
Screen
... available on turbo squid, the world's leading provider of digital 3d models for visualization, films, television, and games.
3d_export
$10
Screen metal screen microwave 3D Model
...ave 3d model
3dexport
screen metal microwave oven 3d model interior
screen metal screen microwave 3d model sunupcg 17847 3dexport
3d_ocean
$5
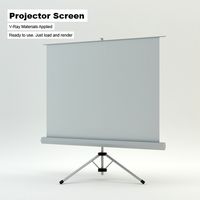
Projector Screen
...hat have presentations. the projector screen consists of an alluminum structure that holds the canvas up. this model can be us...
archive3d
free
Screen 3D Model
...rchive3d
screen folding screen
screen n020811 - 3d model (*.3ds) for interior 3d visualization.
Electronics
turbosquid
$1

electron
...urbosquid
royalty free 3d model electron for download as max on turbosquid: 3d models for games, architecture, videos. (1157488)
turbosquid
$50

electronic
...
royalty free 3d model electronic for download as max and obj on turbosquid: 3d models for games, architecture, videos. (1289427)
turbosquid
$40

Electron
... available on turbo squid, the world's leading provider of digital 3d models for visualization, films, television, and games.
3d_ocean
$8
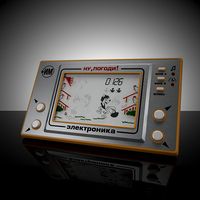
Electronic game
...electronic game
3docean
electronic games nu pogody wait a minute well
electronic game “well, wait a minute”, “nu pogody”
3ddd
$1
Brilux Electronic
...brilux electronic
3ddd
подвес. brilux electronic. польша. материалы настроены.
3d_export
free

electronic shop
...lectronic shop with high quality interior and exterior. it has tvs smartphone play station printer and many more electronic item.
3ddd
$1

Термостаты OJ Electronics
...ермостаты oj electronics
3ddd
oj electronics , термостат
термостаты фирмы oj electronics
3d_export
$8

electron 714
...electron 714
3dexport
game ready model for export to unreal engine soviet tv electron 714 pbr 4k
3ddd
$1

Термостат OJ Electronics
... oj electronics
3ddd
oj electronics , термостат
термостат occ2-1991 фирмы oj electronics
turbosquid
$60
Electronics Stuff
...
royalty free 3d model electronics stuff for download as max on turbosquid: 3d models for games, architecture, videos. (1624680)
Fan
3d_export
$5

fan
...fan
3dexport
fan 3d model, table fan, fan, electric fan, ventilator
archibase_planet
free

Fan
...fan
archibase planet
fan large fan
fan out n260707 - 3d model for interior 3d visualization.
archibase_planet
free

Fan
...fan
archibase planet
fan ceiling fan ventilator
fan stealth n300615 - 3d model (*.gsm+*.3ds) for interior 3d visualization.
3d_export
$15

fan
...fan
3dexport
is an ancient fan
3ddd
$1

Fan-C-Fan by marco gallegos
...n-c-fan by marco gallegos
3ddd
вентилятор , marco gallegos
fan-c-fan by marco gallegos
3d_export
$10

fan
...fan
3dexport
a detailed fan designed for home or space blowing is now available for only 19.99!
turbosquid
$1

Fan
...fan
turbosquid
free 3d model fan for download as on turbosquid: 3d models for games, architecture, videos. (1427865)
turbosquid
$14

Fan
...fan
turbosquid
royalty free 3d model fan for download as on turbosquid: 3d models for games, architecture, videos. (1415642)
3ddd
$1

Светильник Fan
...светильник fan
3ddd
fan , italamp
светильник fan, производитель italamp
turbosquid
$25

Fan
...fan
turbosquid
royalty free 3d model fan for download as c4d on turbosquid: 3d models for games, architecture, videos. (1483246)
Printer
archibase_planet
free

Printer
...inter
archibase planet
printer laser printer pc equipment
printer n120614 - 3d model (*.gsm+*.3ds) for interior 3d visualization.
archibase_planet
free

Printer
...rchibase planet
laser printer office equipment computer equipment
printer - 3d model (*.gsm+*.3ds) for interior 3d visualization.
turbosquid
$100

Printer
...er
turbosquid
royalty free 3d model printer for download as on turbosquid: 3d models for games, architecture, videos. (1487819)
turbosquid
$3

Printer
...turbosquid
royalty free 3d model printer for download as max on turbosquid: 3d models for games, architecture, videos. (1670230)
turbosquid
$1

printer
...turbosquid
royalty free 3d model printer for download as max on turbosquid: 3d models for games, architecture, videos. (1595546)
turbosquid
$1

printer
...turbosquid
royalty free 3d model printer for download as max on turbosquid: 3d models for games, architecture, videos. (1595105)
turbosquid
$10

Printer
...id
royalty free 3d model printer for download as max and 3dm on turbosquid: 3d models for games, architecture, videos. (1607146)
turbosquid
$7

Printer
...royalty free 3d model printer for download as ma, ma, and obj on turbosquid: 3d models for games, architecture, videos. (1644580)
turbosquid
$30

Printer
... available on turbo squid, the world's leading provider of digital 3d models for visualization, films, television, and games.
turbosquid
$20

Printer
... available on turbo squid, the world's leading provider of digital 3d models for visualization, films, television, and games.