Thingiverse
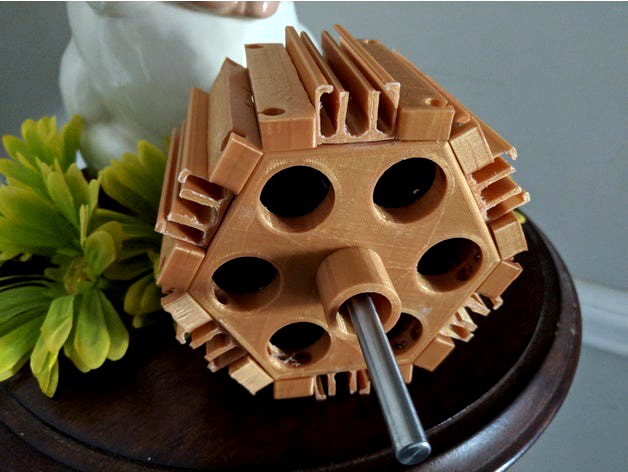
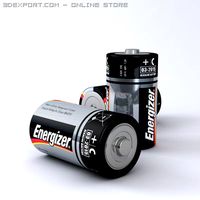
3D Printed Pulse Energizer For Radiant Energy (5.125" Diameter) by Cotton80
by Thingiverse
Last crawled date: 3 years ago
https://www.youtube.com/watch?v=Yi_3kPt-0eY&t=75shttps://www.youtube.com/watch?v=5Z763gdGOG8https://1drv.ms/f/s!Apbifed6cvBmbjLYdzp4fQzMWGA
This video shows running it up to destruction.https://www.youtube.com/watch?v=QPrsLvrOsKw&t=27s
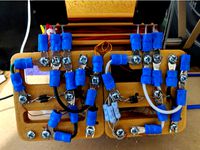
Pulse motors typically do not get hot when wired correctly. They are not to be confused with DC Brushless motors which use advanced circuits to pulse energy through the coils. This pulse motor represents a tool to experiment with. I use the Bedini SSG circuit to pulse this energizer. You can go here: http://www.energyscienceforum.com/forumdisplay.php?f=48 to learn about that technology. It is a simple circuit that most people can learn to put together in a short period of time. This company offers a Bedini SSG Circuit kit that will work with this energizer: http://teslagenx.com/kits/tx-sg4tub.html?category=kits|pcb. You can use other methods to pulse if you desire.
Disclaimer: Build and experiment at your own risk. Catastrophic failure of parts spinning at high speed can cause damage to property, injury, or even death. There is an electrical function with this experimental device. Do not attempt without experience working with electricity. Do not operate around equipment that is sensitive to electromagnetic frequencies.
parts list:
the magnetic wire is your choice
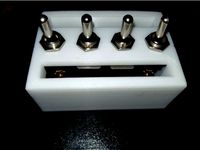
transistor(s): the slots are made to fit the mjl21194g transistor
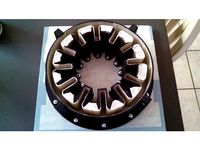
It uses a double stack of the popular sized ceramic magnets (1-7/8" X 7/8" X 3/8") like these :https://www.harborfreight.com/pack-of-2-ceramic-block-magnets-97504.html
all bolts are 6-32. For the inner motor you can use 3/8" length at every point.
for the motor housing you can use 1" to 1.125" at every point
It is important to note here that nonmagnetic hardware (brass, stainless steel, nylon) allows for the best performance.
shaft: 1/2" X at least 6" stainless steel or aluminum
magnet rotor set screw: 6-32 X 5/8" (note: you will need to grind a flat spot on the shaft or drill a hole in it for the set screw)
bearings: It is recommended to use at least ABEC-5 like these: http://www.vxb.com/SR8-2RS-Ceramic-ABEC-5-1-2-x1-1-8-x5-16-inch-p/kit13852.htm I bought and used cheaper bearings for the demonstration model like these: http://www.vxb.com/R8-2RS-Sealed-Bearing-1-2-x1-1-8-x5-16-inch-p/kit7478.htm
I used pla for this motor. It was designed to print .01" larger at each location for the bolts, magnets, and bearings to compensate for shrinkage. print settings where .2mm for layer height, 1.2mm walls, .8mm top and bottom layers and 20% - 30% for the infill.
Three printable part files were added to be able to use 8mm rods and skateboard bearings. These bearings are tried and true: https://bonesbearings.com/bones-reg-swiss-skateboard-bearings-8-pack It is recomended to use at least ABEC-5 bearings and a non-magnetic shaft for optimal performance.
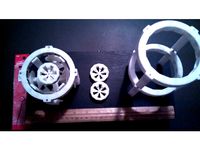
2/24/2018 I added a magnet cover for additional support. This should add some safety when spinning at higher rpm's. A better option would be a fiberglass or carbon fiber layer. This should also be accompanied with 100% infill on the rotor for high speed experiments. Also don't forget to glue your magnets in place. I like Gorilla Glue. It seems to handle shock and vibration the best. Make sure you use water or it won't set properly.
2/25/2018 I added some small panels to help keep the "Window" wire off of the rotor. I recommend using Loctite (5 sec) Super Glue. Just dab a little on each end and attach them to the center.
2/26/2018 added 1/16" shaft spacers which may be needed to provide a snug fit for the rotor between the bearings
3/01/2018 added some slightly more robust parts for those that want to run it up to higher rpm's. The trade off here is stronger parts but more plastic + longer print times. I still recommend printing at higher infills (greater than 30%) and glueing your magnets in place. It is also still recommended to create at least 1.2mm walls. These parts are listed as #1, #2, and #3. They are still interchangeable with the other listed parts. Sorry, these are for 8mm rods and bearings only.
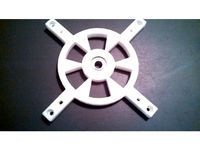
01/16/2019 I added a simple low profile motor mount. You can use this to mount to a project board. It is a minimalistic design so that you can print fast and use for light duty experiments.
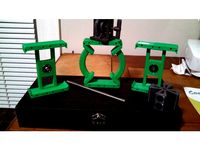
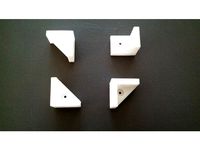
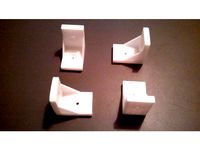
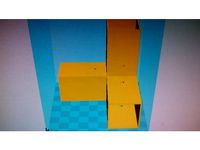
02/07/2019 One of the biggest issues that I have had with this design is keeping the wires from rubbing against the rotor. The wire_protector design is somewhat flimsy. So, I designed a new wire/rotor protector that is more rigid. It will also help better organize and concentrate the magnetic flux and should offer better performance according to the wiring diagram that I have provided. They are made to glue to each side of the motor ribs but I have found that with my prints they actually just snap in place! Pictured in Hatchbox Gold PLA filament.
This video shows running it up to destruction.https://www.youtube.com/watch?v=QPrsLvrOsKw&t=27s
Pulse motors typically do not get hot when wired correctly. They are not to be confused with DC Brushless motors which use advanced circuits to pulse energy through the coils. This pulse motor represents a tool to experiment with. I use the Bedini SSG circuit to pulse this energizer. You can go here: http://www.energyscienceforum.com/forumdisplay.php?f=48 to learn about that technology. It is a simple circuit that most people can learn to put together in a short period of time. This company offers a Bedini SSG Circuit kit that will work with this energizer: http://teslagenx.com/kits/tx-sg4tub.html?category=kits|pcb. You can use other methods to pulse if you desire.
Disclaimer: Build and experiment at your own risk. Catastrophic failure of parts spinning at high speed can cause damage to property, injury, or even death. There is an electrical function with this experimental device. Do not attempt without experience working with electricity. Do not operate around equipment that is sensitive to electromagnetic frequencies.
parts list:
the magnetic wire is your choice
transistor(s): the slots are made to fit the mjl21194g transistor
It uses a double stack of the popular sized ceramic magnets (1-7/8" X 7/8" X 3/8") like these :https://www.harborfreight.com/pack-of-2-ceramic-block-magnets-97504.html
all bolts are 6-32. For the inner motor you can use 3/8" length at every point.
for the motor housing you can use 1" to 1.125" at every point
It is important to note here that nonmagnetic hardware (brass, stainless steel, nylon) allows for the best performance.
shaft: 1/2" X at least 6" stainless steel or aluminum
magnet rotor set screw: 6-32 X 5/8" (note: you will need to grind a flat spot on the shaft or drill a hole in it for the set screw)
bearings: It is recommended to use at least ABEC-5 like these: http://www.vxb.com/SR8-2RS-Ceramic-ABEC-5-1-2-x1-1-8-x5-16-inch-p/kit13852.htm I bought and used cheaper bearings for the demonstration model like these: http://www.vxb.com/R8-2RS-Sealed-Bearing-1-2-x1-1-8-x5-16-inch-p/kit7478.htm
I used pla for this motor. It was designed to print .01" larger at each location for the bolts, magnets, and bearings to compensate for shrinkage. print settings where .2mm for layer height, 1.2mm walls, .8mm top and bottom layers and 20% - 30% for the infill.
Three printable part files were added to be able to use 8mm rods and skateboard bearings. These bearings are tried and true: https://bonesbearings.com/bones-reg-swiss-skateboard-bearings-8-pack It is recomended to use at least ABEC-5 bearings and a non-magnetic shaft for optimal performance.
2/24/2018 I added a magnet cover for additional support. This should add some safety when spinning at higher rpm's. A better option would be a fiberglass or carbon fiber layer. This should also be accompanied with 100% infill on the rotor for high speed experiments. Also don't forget to glue your magnets in place. I like Gorilla Glue. It seems to handle shock and vibration the best. Make sure you use water or it won't set properly.
2/25/2018 I added some small panels to help keep the "Window" wire off of the rotor. I recommend using Loctite (5 sec) Super Glue. Just dab a little on each end and attach them to the center.
2/26/2018 added 1/16" shaft spacers which may be needed to provide a snug fit for the rotor between the bearings
3/01/2018 added some slightly more robust parts for those that want to run it up to higher rpm's. The trade off here is stronger parts but more plastic + longer print times. I still recommend printing at higher infills (greater than 30%) and glueing your magnets in place. It is also still recommended to create at least 1.2mm walls. These parts are listed as #1, #2, and #3. They are still interchangeable with the other listed parts. Sorry, these are for 8mm rods and bearings only.
01/16/2019 I added a simple low profile motor mount. You can use this to mount to a project board. It is a minimalistic design so that you can print fast and use for light duty experiments.
02/07/2019 One of the biggest issues that I have had with this design is keeping the wires from rubbing against the rotor. The wire_protector design is somewhat flimsy. So, I designed a new wire/rotor protector that is more rigid. It will also help better organize and concentrate the magnetic flux and should offer better performance according to the wiring diagram that I have provided. They are made to glue to each side of the motor ribs but I have found that with my prints they actually just snap in place! Pictured in Hatchbox Gold PLA filament.
Similar models
thingiverse
free
Magnet Beam Pulse Motor for Quarter Inch or 8mm Shaft by Cotton80
...his is optional.
the circuit and wire is up to you.
10:24 pm est 02/02/2017: reworked the motor brace to make it easier to print
thingiverse
free
"Little Torquey" High Frequency Pulse Energizer by Cotton80
...pt without experience working with electricity. do not operate around equipment that is sensitive to electromagnetic frequencies.
thingiverse
free
Magnetically Levitated Bedini/Cole Window Pulse Motor by Cotton80
...45
https://www.youtube.com/watch?v=p0tj8u7_qmi
the rotor was redesigned so that the magnets are no longer exposed on the outside.
thingiverse
free

Pulse Motors (Horizontal) for 1/4" or 8mm Shaft by Cotton80
...re. be patient and don't spin too fast as there is a chance that you could yank your wire apart due to the elongated design.
thingiverse
free
Pulse Motor(s) for Zero Back emf Experiment by Cotton80
.... you will need to use support on the coil piece and rotor. with the adapter horizontally stacking multiple motors are possible.
thingiverse
free
Magnetic Suspension Motor/Generator by Cotton80
...xperiment at your own risk. catastrophic failure of parts spinning at high speed can cause damage to property, injury, or death.
thingiverse
free

Bedini-Type 6-Pole Magnet Motor by Syrus54
...the size to fit the application.
item is not for sale, royalty free.
[ do not sell nor re-distribute my work ]
you're welcome
thingiverse
free

Permanent Magnet Motor/Generator Rotor by Cotton80
...e. i like gorilla glue. it seems to handle shock and vibration the best. make sure you use water or it won't set properly.
thingiverse
free
Motor /Generator Stator Casting Mold (7.75" diameter with 12 slots) by Cotton80
...kes m4-.70 x 60 bolts..4 of them)
added stator end caps to hold the wire back..just glue them on with gorilla glue
thingiverse
free

ABHA Torus Pulse Motor by firepinto
...had tried to use a bedini circuit, but had no luck. you can see my final result here: http://www.youtube.com/watch?v=8z7jodtxlz4
Cotton80
thingiverse
free
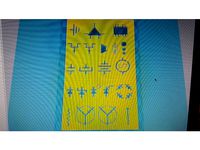
Electronic Symbol Stencils (Basic) by Cotton80
...your pencils. this is two basic stencils to assist with drawing your electronic circuit schematic. they are .8mm thick. enjoy!
thingiverse
free
Bracket 3-Point by Cotton80
... to whatever dimensions you like.
disclaimer: use this part in your build at your own risk. load test have not been performed.
thingiverse
free
Toggle Switch Mounts (2 or 4) by Cotton80
... in one side for wire access.
also not pictured is 4 mounting holes for 6-32 bolts. they will need to be at least 1.5" long.
thingiverse
free
Bracket 90 Degree L by Cotton80
...able tops, securing chair seats
disclaimer: use this part in your creation at your own risk. load test have not been performed.
thingiverse
free
Bedini SSG Solderless Circuit by Cotton80
...elp reduce print time and still remains functional.
i also added a stencil for those who may want to put your circuit on a board.
thingiverse
free
Coupler for 1" Aluminum Square Tube (3-Way) by Cotton80
... support for the two horizontal tube sections.
disclaimer: use this object at your own risk. load test have not been performed.
thingiverse
free
Bearing Hub for PMSM by Cotton80
...en working with electrical equipment, especially when working with capacitors. do not attempt without good electrical knowledge.
thingiverse
free
Magnet Stator for a Mini Windmill Style Generator by Cotton80
...ill bit through the piece to ensure a good fit.
this thing can be scaled up to 200% to fit a 1/2" shaft and 1" magnets.
thingiverse
free

3/4" Rod Holder by Cotton80
...on top to make a light weight shelf. you can use the keyhole hangers to hang pictures in the open instead of directly on a wall.
thingiverse
free
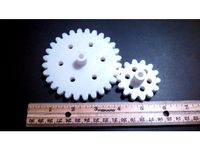
Spur Gears: 1 to 2 Ratio for 1/4" or 8mm shaft by Cotton80
...an easy fit.
the large gear has 28t and the small gear has 14t.
added on 02/05/2017: gears together for 1/4" & 8mm shaft
Energizer
turbosquid
$25
energizer
... available on turbo squid, the world's leading provider of digital 3d models for visualization, films, television, and games.
turbosquid
free
Energizer
... available on turbo squid, the world's leading provider of digital 3d models for visualization, films, television, and games.
turbosquid
$12

Energizer Display Stand
...nergizer display stand for download as max, 3ds, fbx, and obj on turbosquid: 3d models for games, architecture, videos. (1695702)
turbosquid
$5
Energizer 9V Battery
...l energizer 9v battery for download as 3ds, max, obj, and fbx on turbosquid: 3d models for games, architecture, videos. (1296932)
turbosquid
$5
AA Battery Energizer
... available on turbo squid, the world's leading provider of digital 3d models for visualization, films, television, and games.
turbosquid
free
Energizer Battery Charger
... available on turbo squid, the world's leading provider of digital 3d models for visualization, films, television, and games.
3d_export
$25
Energizer D Battery 3D Model
... energy torch poweraa battery amp resistance electricity cell duracell
energizer d battery 3d model 3dillustration 23588 3dexport
3d_export
$25
Energizer AAA Battery 3D Model
...nergy torch poweraa battery amp resistance electricity cell duracell
energizer aaa battery 3d model 3dillustration 23587 3dexport
3d_export
$25
Energizer AA Battery 3D Model
...energy torch poweraa battery amp resistance electricity cell duracell
energizer aa battery 3d model 3dillustration 23586 3dexport
3d_export
$25
Energizer C Battery 3D Model
... energy torch poweraa battery amp resistance electricity cell duracell
energizer c battery 3d model 3dillustration 23589 3dexport
Pulse
turbosquid
$7

pulse oximeter
...uid
royalty free 3d model pulse oximeter for download as max on turbosquid: 3d models for games, architecture, videos. (1668242)
3d_export
$6
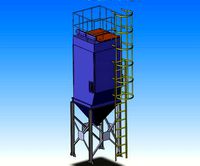
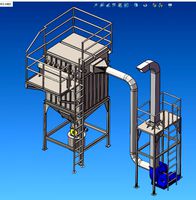
of pulse bag filter
...of pulse bag filter
3dexport
3d model of pulse bag filter
turbosquid
$25

Pulse Cannon
... free 3d model pulse cannon for download as max, fbx, and obj on turbosquid: 3d models for games, architecture, videos. (1559556)
turbosquid
free
pulse canon
... available on turbo squid, the world's leading provider of digital 3d models for visualization, films, television, and games.
3d_ocean
$15

Unmade BED with pulsings
...tal body ,wood base,pulsing elements ,pellows ,unmade bed and all components, all used materials are included sketchup file in...
3d_export
$16
of bag pulse bag filter
...of bag pulse bag filter
3dexport
3d model of bag pulse bag filter
turbosquid
$5

eggy pulse detector
...yalty free 3d model eggy pulse detector for download as sldas on turbosquid: 3d models for games, architecture, videos. (1405234)
3d_export
$10
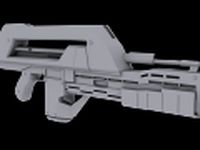
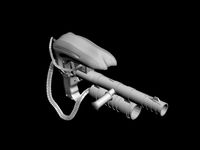
M4A1-Pulse rifle 3D Model
...m4a1-pulse rifle 3d model
3dexport
alien m4a1 pulse pulserifle rifle
m4a1-pulse rifle 3d model slottet 100562 3dexport
turbosquid
$15
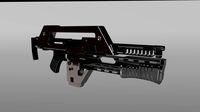
M4 Pulse Rifle
... available on turbo squid, the world's leading provider of digital 3d models for visualization, films, television, and games.
3d_export
$10
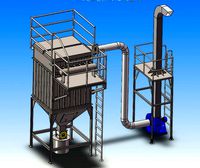
49 bags of pulse bag filter
...49 bags of pulse bag filter
3dexport
49 bags of pulse bag filter
Radiant
3ddd
free

Radiant Screen
...
производитель: baker -http://www.bakerfurniture.com -
модель: radiant screen №8699
размеры: w-1540mm, d-32mm, h-2450mm
3ddd
$1
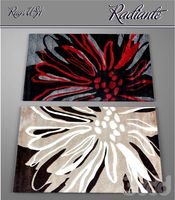
Ковры коллекции Radiante
...ковры коллекции radiante
3ddd
ковер
ковры коллекции radiante - 2 шт
размер: 120 *200см, 200-300см
turbosquid
$40

Radiant shape ring
...squid
royalty free 3d model radiant ring for download as 3dm on turbosquid: 3d models for games, architecture, videos. (1327616)
turbosquid
$29
Radiant Cut Gemstone
... available on turbo squid, the world's leading provider of digital 3d models for visualization, films, television, and games.
3ddd
$1

Мозайка Mosaico+ Dialoghi Radiante
...охранен без сглаживания (иначе объем не проходил.) ... выделить мозайку (шов не выделять) и наложить turbosmooth с 1 интеррацией.
3d_export
$12

radiant floor heating unit
...ed 3d model of floor heating unit equipment with electric boiler about a model: the model includes files: thank you for watching.
3ddd
free

Imperial Court End Table Radiant Chestnut
... imperial court , журнальный
ширина: 67 см
длина: 62 см
высота: 63 см
3ddd
$1
Baker RADIANT DRUM TABLE 8683
...
real sizehttp://www.bakerfurniture.com/baker/1_1_5_0_coll_prod.jsp?brand=baker∏_id=7001150∏_num=8683
3d_export
$6
Table-lamp 3D Model
...model 3dexport table-lamp lamp reading-lamp finding implement findings illuminator radiant illuminant table-lamp 3d model u2501 99552...
3d_ocean
$16
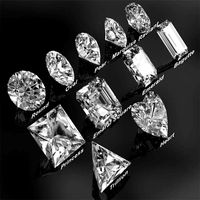
Diamonds all 11 cuts
...square, emerald, princess, pear, oval, heart, bagutte, trillion and radiant when animated gives exact...
125
3d_export
$97

pulsar 125
...pulsar 125
3dexport
pulsar 125 is an indian bike form bajaj automobiles https://youtu.be/kc41gfxkiyk
design_connected
$16
Otto 125
...otto 125
designconnected
gervasoni otto 125 computer generated 3d model. designed by navone, paola.
turbosquid
$15
Cornice 125
...e 3d model cornice 125 for download as max, 3ds, fbx, and obj on turbosquid: 3d models for games, architecture, videos. (1537228)
turbosquid
$9
Office 125
... available on turbo squid, the world's leading provider of digital 3d models for visualization, films, television, and games.
evermotion
$7
railing 125 am79
...key sculptures 125 am79 railing
highly detailed architecture railing with all textures and materials.. evermotion 3d models shop.
evermotion
$120

Archmodels vol. 125
...tailed 3d models of modern seating furniture. collection provides a great variety of chairs and sofas. evermotion 3d models shop.
design_connected
$16

Lifesteel armchair 125
...lifesteel armchair 125
designconnected
flexform lifesteel armchair 125 armchairs computer generated 3d model. designed by n/a.
3d_export
$10

Motorcycle 125
...motorcycle 125
3dexport
this is new model 3d lowpoly ready for game
design_connected
$9

Strips pouf 125
...strips pouf 125
designconnected
arflex international spa strips pouf 125 computer generated 3d model. designed by boeri, cini.
evermotion
$7

chair 125 AM147
...model of chair with textures, shaders and materials. it is ready to use, just put it into your scene.. evermotion 3d models shop.
Energy
3ddd
free
battery energier
...battery energier
3ddd
battery energier , батарейка
battery energier
3ddd
$1
Термостаты ENERGY
... терморегулятор , термостат
термостаты фирмы energy
3d_export
$10

energy capsule
...energy capsule
3dexport
energy capsule
3d_export
$5

energy annon
...energy annon
3dexport
energy cannon
3d_ocean
$6
Energy bulb
...energy bulb
3docean
bulb eco ecological energy bulb lamp light lighting
energy bulb.
3d_ocean
$5

Energy Drink
...energy drink
3docean
biohazard cool drink energy drink fresh ice power soda can
an energy drink can
3d_export
$5

energy drink
...energy drink
3dexport
high poly model of energy drink....
3d_export
$18

boiler-chemical energy-electricity-thermal energy
...iler-chemical energy-electricity-thermal energy
3dexport
boiler-chemical energy-electricity-thermal energy<br>3ds max 2015
3d_export
$6

energy - m14
...rom m14, powered by energy that shoots 10 powerful energy away<br>"take it easy, this will kill you without pain"
3ddd
$1
Jacuzzi Energy
...jacuzzi energy
3ddd
джакузи
белая, прямоугольная акриловая ванна jacuzzi energy 180
Diameter
3d_export
$10
golf ball with std diameter
...golf ball with std diameter
3dexport
this is the golf ball with standard diameter.
turbosquid
$15

Diameter award glass
... available on turbo squid, the world's leading provider of digital 3d models for visualization, films, television, and games.
3d_export
$20
ceiling ng fan 56 in diameter
...ct sheet metal parts ,rubber ring and plastic pp covers designed and manufactured product trustable 100% for manufactured product
3d_export
$5
alloy wheel plug outer diameter 65mm logo bmw
...r 65mm logo bmw
3dexport
alloy wheel plug outer diameter 65mm + logo b.m.w.<br>archives 3 models. logo, stub, logo + stub
3d_export
$5

gear wheel 10 teeth 10cm diameter modul 1cm
...tremely precisely machined tooth base. 10 teeth 10cm diameter 1cm thick modulo 1cm compartiebel with all my gears with modul 1cm!
3d_export
$5
gear wheel 15 teeth 15cm diameter modul 1cm
...xtremely precisely machined tooth base. 15 teeth 15cm diameter 1cm thick modul 1cm compartiebel with all my gears with modul 1cm!
3d_ocean
$8

Wicker Basket Ikea Gaddis (diameter 32)
...mensions: -diameter: 32 cm -height: 22 cm polygons: 7 794 vertices: 7 824 2 textures *.jpg - originally modeled in 3ds max 200...
3d_ocean
$8

Wicker Basket Ikea Gaddis (diameter 50)
...mensions: -diameter: 50 cm -height: 32 cm polygons: 14 588 vertices: 14 644 2 textures *.jpg - originally modeled in 3ds max 2...
cg_studio
$17
Wicker Basket Ikea Gaddis diameter 323d model
....max .fbx .obj - wicker basket ikea gaddis diameter 32 3d model, royalty free license available, instant download after purchase.
cg_studio
$17

Wicker Basket Ikea Gaddis diameter 503d model
....max .fbx .obj - wicker basket ikea gaddis diameter 50 3d model, royalty free license available, instant download after purchase.
5
3d_export
$5

hinge 5
...hinge 5
3dexport
hinge 5
turbosquid
$10

A-5
... available on turbo squid, the world's leading provider of digital 3d models for visualization, films, television, and games.
turbosquid
$2

A-5
... available on turbo squid, the world's leading provider of digital 3d models for visualization, films, television, and games.
turbosquid
$12

Calligraphic Digit 5 Number 5
...hic digit 5 number 5 for download as max, obj, fbx, and blend on turbosquid: 3d models for games, architecture, videos. (1389333)
3ddd
$1

5 роз
...5 роз
3ddd
5 роз в стеклянной вазе
design_connected
$11

iPhone 5
...iphone 5
designconnected
apple iphone 5 computer generated 3d model.
3ddd
$1

Lola 5
...lola 5
3ddd
miniforms
lola 5 miniforms 300*65*134
3ddd
$1

Nexus 5
...dd
nexus , phone , телефон
google nexus 5 phone
3d_ocean
$15

iPhone 5
...iphone 5
3docean
3d 4d apple cinema iphone model modeling phone screen texture
iphone 5 3d model and texture realistic iphone 5.
3d_ocean
$9

chanel 5
...chanel 5
3docean
books chanel
quality models perfum chanel 5 and books.
Printed
design_connected
$27

...print
designconnected
moroso print computer generated 3d model. designed by wanders, marcel.
3ddd
free

Eichholtz Prints
...- eichholtz print central station i
13 - eichholtz print central station ii
14 - eichholtz print marisa
15 - eichholtz print tish
3ddd
$1

Eichholtz Prints
...print abstract - set of 2
10 - eichholtz print orange abstract
11 - eichholtz print buddha right
12 - eichholtz print buddha left
turbosquid
$1

... available on turbo squid, the world's leading provider of digital 3d models for visualization, films, television, and games.
3ddd
free

Eichholtz Prints
...of 4
2 - print dunbar 2 set of 4
3 - print guadeloupe 1 set of 4
4 - print guadeloupe 2 set of 4
5 - print giles
6 - print trett
3ddd
$1

Eichholtz Prints
...nt tutti frutti
3 - eichholtz prints watson - set of 2
4 - eichholtz prints antique nautilus - set of 2
5 - eichholtz print tiara
3d_export
$5

Monster for printing
...monster for printing
3dexport
monster 3d model printing
3ddd
free

printed rug
...printed rug
3ddd
ковер
very creative printed rug
3ddd
free

Eichholtz Prints
...иал: бумага
габариты (вхш): 72 x 62 см
описание: print sweetmeat - постер в деревянной раме.
3 - prints varsity set of 2
арти
3ddd
free

Art Print Posters
...art print posters
3ddd
прованс
art print posters by patrician prints