Thingiverse
3D Printed COVID19 Vaccine – A Kinetic Sculpture by DaveMakesStuff
by Thingiverse
Last crawled date: 3 years ago
Saving lives with 3D printing! See here for video: https://youtu.be/EN9d4pO5XK8
Vaccines prompt an immune response in the body that produces antibodies to fight a specific pathogen.
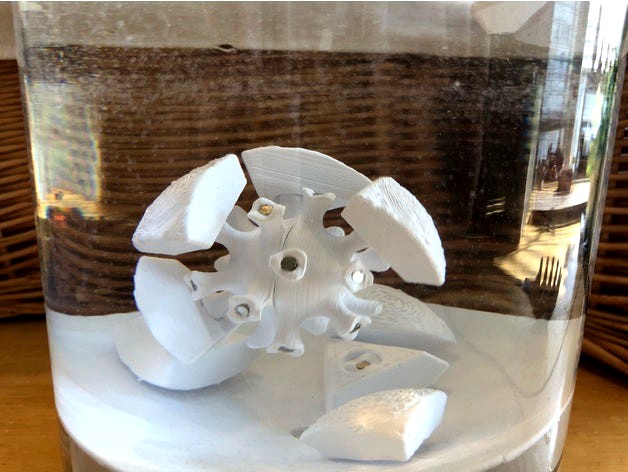
In this kinetic sculpture, a COVID19 virus is attacked and disabled by antibodies. The virus and antibodies are neutrally buoyant, allowing them to spin and move when the surrounding water is agitated.
This COVID19 virus design is based on an icosahedron and so has 20 “protein spikes.” The tips of the protein spikes and the receptor surfaces of the antibodies have contours that force them into proper alignment so that each virus could potentially be surrounded by 20 antibodies. Small magnets attract and hold the antibodies to the virus.
For each COVID19 virus you will need to print two of either “Half COVID” or “Half COVID supports” and one “Connector.” Use a vice and some spacers to press fit the two “Half COVID” pieces together as pictured above. You should not need glue. Be sure that you connect them in the proper alignment.
Print as many of the “Antibody” pieces as you like. Then need to be printed with the receptor surface oriented upwards. I suggest raising them a few millimeters of the print bed with support structures to print. The support structures create a nice rough looking texture that you can just leave as is.
Achieving neutral buoyancy is the tricky part of this print and you can expect to do several trial prints before you get it right. Specific settings will vary according to the set-up and materials you are using. The settings that I use may serve as a start point for you.
I used a .8mm nozzle and three wall layers. I printed the COVID19 virus at 30% grid infill. For the antibody, I suggest thickening the bottom layer to 2.4mm and then trying 50% infill. Thickening the bottom layer makes the antibody float with the receptor facing upwards which increases frequency of connecting with the virus. If your test print floats too much, increase your infill density. If it sinks, decrease your density. Repeat.
The magnets are all 1/8” x 1/16” cylindrical magnets. www.kjmagnetics.com is a good source. Be sure that polarity is oriented so all virus magnets are one way and all antibody magnets are the opposite. I suggest cleaning out the magnet holes with a hand-turned 1/8” drill bit first before inserting magnets. Some magnets may need to be glued; CA glue works well.
The water needs to be agitated in some way for the pieces to move and interact. Stirring works OK, but this pump set up works best: https://www.thingiverse.com/thing:4749176
Vaccines prompt an immune response in the body that produces antibodies to fight a specific pathogen.
In this kinetic sculpture, a COVID19 virus is attacked and disabled by antibodies. The virus and antibodies are neutrally buoyant, allowing them to spin and move when the surrounding water is agitated.
This COVID19 virus design is based on an icosahedron and so has 20 “protein spikes.” The tips of the protein spikes and the receptor surfaces of the antibodies have contours that force them into proper alignment so that each virus could potentially be surrounded by 20 antibodies. Small magnets attract and hold the antibodies to the virus.
For each COVID19 virus you will need to print two of either “Half COVID” or “Half COVID supports” and one “Connector.” Use a vice and some spacers to press fit the two “Half COVID” pieces together as pictured above. You should not need glue. Be sure that you connect them in the proper alignment.
Print as many of the “Antibody” pieces as you like. Then need to be printed with the receptor surface oriented upwards. I suggest raising them a few millimeters of the print bed with support structures to print. The support structures create a nice rough looking texture that you can just leave as is.
Achieving neutral buoyancy is the tricky part of this print and you can expect to do several trial prints before you get it right. Specific settings will vary according to the set-up and materials you are using. The settings that I use may serve as a start point for you.
I used a .8mm nozzle and three wall layers. I printed the COVID19 virus at 30% grid infill. For the antibody, I suggest thickening the bottom layer to 2.4mm and then trying 50% infill. Thickening the bottom layer makes the antibody float with the receptor facing upwards which increases frequency of connecting with the virus. If your test print floats too much, increase your infill density. If it sinks, decrease your density. Repeat.
The magnets are all 1/8” x 1/16” cylindrical magnets. www.kjmagnetics.com is a good source. Be sure that polarity is oriented so all virus magnets are one way and all antibody magnets are the opposite. I suggest cleaning out the magnet holes with a hand-turned 1/8” drill bit first before inserting magnets. Some magnets may need to be glued; CA glue works well.
The water needs to be agitated in some way for the pieces to move and interact. Stirring works OK, but this pump set up works best: https://www.thingiverse.com/thing:4749176
Similar models
thingiverse
free

Badge to support Covid-19 vaccination virus shaped by zac6x9
...badge to support covid-19 vaccination virus shaped by zac6x9
thingiverse
a badge made from the covid-19 fridge magnet
cg_trader
$19

Moderna Covid19 Vaccine
...r coronavirus covid 19 2019 ncov covid19 corona virus medicine drug medication immune dose pharmacy us american injection science
thingiverse
free

COVID-19 (Magnetic)
...cy, just pick your favorite one and print 20 copies.
you can find a plain version here: https://www.thingiverse.com/thing:4193709
cg_trader
$20

COVID-19 Corona virus vaccine
...covid-19 corona virus vaccine
cg trader
covid-19 corona virus vaccine 3d model, available formats max
thingiverse
free

Covid Vaccine Trophy by nescro147
...r covid vaccine. in my print, i dropped the virus-cell through the print bed before slicing to give it a flat surface for gluing.
thingiverse
free

Coronavirus - Covid-19 - Sars-CoV-2 Labeled stand by mgheffel
...ng so i have added a model of just the spike protein to be printed itself and attached later to replace misprinted spike proteins
grabcad
free

Covid 19 spike protein trimer
...ate copies of spike protein. the membrane-embedded part is not a part of this, and i do not think there is a structure of it yet.
cg_trader
$3

Covid19 3D model
...emic health who outbreak infection microbiology infect epidemic pneumonia respiratory newnormal mask science medical medical mask
thingiverse
free

Magnetic Clasp
...part without spikes insert at layer 71 or 14.2mm height. you might need to increase scale by a 1 or 2% to get the magnets to fit.
cg_trader
$15

Stylized box with Covid-19 virus and vaccines
...nes
cg trader
stylized box with the covid-19 virus in a syringe and three types of vaccines, also stylized in a fantastic style.
Davemakesstuff
thingiverse
free

Pointer by DaveMakesStuff
... pointing at things.
sections screw apart for compact storage and transport. rods are 10cm long, print whatever length you need.
thingiverse
free

Gyroid Sculpture with Oval Profile by DaveMakesStuff
...roid/. it can be purchased at: https://www.shapeways.com/designer/davemakesstuff
see here for video: https://youtu.be/wcjtddytqi0
thingiverse
free

Corona Pumpkin by DaveMakesStuff
...#39;ll probably end up with a headache and fever.
here's a better one for printing: https://www.thingiverse.com/thing:4620382
thingiverse
free
Voronoi Rhombic Dodecahedron Sphere by DaveMakesStuff
... in this sphere are centered on the faces of a rhombic dodecahedron. connecting multiple spheres hole-to-hole will tile 3d space.
thingiverse
free

Hextuple Klein Bottle by DaveMakesStuff
...hat it takes a long time to print, the good news is that it prints without supports.
see video here: https://youtu.be/zcb6e3u87qm
thingiverse
free
Golden Rhombohedra by DaveMakesStuff
...
see here for christmas ornament versions: https://www.thingiverse.com/thing:4577036
see video here: https://youtu.be/odaqybfys84
thingiverse
free

Three Voronoi Gyroid Spheres by DaveMakesStuff
...rnal structures and edge boundary. files are provided with and without supports.
see here for video: https://youtu.be/lunhqfodetm
thingiverse
free

Golden Rhombohedra Ornaments by DaveMakesStuff
...s are separate shells that can be removed by your mesh editing software if you wish.
see video here: https://youtu.be/odaqybfys84
thingiverse
free

Coronavirus Tree Topper by DaveMakesStuff
...ole object is also provided for you to print as you wish.
see here for a plain ornament:https://www.thingiverse.com/thing:4321410
thingiverse
free

Boy's Bowl by DaveMakesStuff
...pasta :)
boy's surface on wikipedia:https://en.wikipedia.org/wiki/boy%27s_surface
see video here:https://youtu.be/x6b0zxcwoye
Vaccine
3d_export
$10

coronavirus vaccine
...coronavirus vaccine
3dexport
3d model coronavirus vaccine
3d_export
$10

coronavirus vaccine
...coronavirus vaccine
3dexport
3d model coronavirus vaccine
3d_export
$10

coronavirus vaccine
...coronavirus vaccine
3dexport
3d model coronavirus vaccine
turbosquid
$29

vaccine
... free 3d model vaccine for download as c4d, obj, fbx, and 3ds on turbosquid: 3d models for games, architecture, videos. (1600362)
turbosquid
$15

Vaccine
...ree 3d model vaccine for download as blend, dae, fbx, and obj on turbosquid: 3d models for games, architecture, videos. (1712323)
turbosquid
$11

Vaccine Bottle
...uid
royalty free 3d model vaccine bottle for download as max on turbosquid: 3d models for games, architecture, videos. (1643699)
turbosquid
$10

Covid Vaccine
...id
royalty free 3d model covid vaccine for download as blend on turbosquid: 3d models for games, architecture, videos. (1672737)
turbosquid
$5

Vaccine covid
... free 3d model vaccine covid for download as ma, obj, and fbx on turbosquid: 3d models for games, architecture, videos. (1661871)
turbosquid
$3

The Vaccine Bottle
...e 3d model vaccine bottle for download as blend, obj, and fbx on turbosquid: 3d models for games, architecture, videos. (1713089)
turbosquid
$69

TB Vaccine
... available on turbo squid, the world's leading provider of digital 3d models for visualization, films, television, and games.
Covid19
3d_export
$5

covid19
...covid19
3dexport
covid19 3d model may be necessary for your projects.
3d_export
$5

coronavirus covid19
...coronavirus covid19
3dexport
coronavirus covid19
turbosquid
$4

Covid19
...rbosquid
royalty free 3d model covid19 for download as blend on turbosquid: 3d models for games, architecture, videos. (1586594)
turbosquid
$2

Covid19
...turbosquid
royalty free 3d model covid19 for download as c4d on turbosquid: 3d models for games, architecture, videos. (1534531)
3d_export
$5

covid19
...covid19
3dexport
3d_export
free

covid19
...covid19
3dexport
covid 19 coronavirus 3d design
3d_export
$10

covid19
...1.obj<br>virus 3d 3dmodel medical cov bacteria human sars influenza microscopic medicine cg game corona covid19 viruscorona
turbosquid
$14

coronavirus covid19
...royalty free 3d model coronavirus covid19 for download as max on turbosquid: 3d models for games, architecture, videos. (1524180)
turbosquid
$5

Coronavirus Covid19
...yalty free 3d model coronavirus covid19 for download as blend on turbosquid: 3d models for games, architecture, videos. (1531361)
turbosquid
$5

Covid19 Infected Elf
...
royalty free 3d model covid19 infected elf for download as on turbosquid: 3d models for games, architecture, videos. (1672284)
Kinetic
turbosquid
$5

Kinetic Chandelier
...
royalty free 3d model kinetic chandelier for download as max on turbosquid: 3d models for games, architecture, videos. (1425194)
turbosquid
$7

Interstuhl Kinetic
...3d model interstuhl kinetic for download as max, fbx, and obj on turbosquid: 3d models for games, architecture, videos. (1696800)
3ddd
$1

Arte Espina SPIRIT KINETIC
... spirit kinetic , ковер
arte espina spirit kinetic, ковер
3ddd
$1

Arte Espina Spirit Kinetic
... pixel , ковер
arte espina spirit kinetic
размеры : 2400mm x 1700mm
3ddd
$1

Restoration Hardware Kinetic Narrow Coffee Table
...le
3ddd
кофейный , restoration hardware
restoration hardware kinetic narrow coffee table
3d_export
$5

Road power generator
...road power generator is model to moving vehicle of kinetic energy to electrical energy with the help of mechanical...
3d_export
$15

Newtons Cradle Balance Balls 3D Model
...newtons cradle balance balls 3d model 3dexport newton inertia kinetic cradle science energy executive ball balls apparatus physics newtons...
3d_export
$10

Newtons Cradle 3D Model
...swinging spheres executive ball clicker balls pendulums physics apparatus kinetic energy newtons cradle 3d model firdz3d 75907...
3d_export
$10

Shock Absorber
...out or damp any sudden shock impulse and dissipate kinetic energy (typically heat); usually consists of a combination of...
3d_export
$10

Wind Turbine 3D Model
...3dexport wind turbine green energy renewal power electricity tower kinetic electrical aerofoil powered generator windmill farm hawt horizontal axis...
Sculpture
archibase_planet
free

Sculpture
...sculpture
archibase planet
sculpture hen garden sculpture
sculpture 1 - 3d model (*.gsm+*.3ds) for exterior 3d visualization.
archibase_planet
free

Sculpture
...sculpture
archibase planet
sculpture chicken garden sculpture
sculpture 2 - 3d model (*.gsm+*.3ds) for exterior 3d visualization.
archibase_planet
free

Sculpture
...ture
archibase planet
sculpture rooster garden sculpture cock
sculpture 3 - 3d model (*.gsm+*.3ds) for exterior 3d visualization.
3ddd
$1

SCULPTURE
...sculpture
3ddd
статуэтка
sculpture
3ddd
$1

sculpture
...sculpture
3ddd
девушка , скульптура
sculpture
3ddd
free

Sculpture
...sculpture
3ddd
статуэтка
sculpture 3dmodels
turbosquid
$19

Sculpture Sculpture Venus
... available on turbo squid, the world's leading provider of digital 3d models for visualization, films, television, and games.
3ddd
$1

Sculpture
...sculpture
3ddd
статуэтка
highly shading sculpture
3ddd
$1

Sculpture
...sculpture
3ddd
статуэтка
sculpture 3d model.
archibase_planet
free

Sculpture
...sculpture
archibase planet
sculpture statue statuette
sculpture n070913 - 3d model (*.gsm+*.3ds) for interior 3d visualization.
Printed
design_connected
$27

...print
designconnected
moroso print computer generated 3d model. designed by wanders, marcel.
3ddd
free

Eichholtz Prints
...- eichholtz print central station i
13 - eichholtz print central station ii
14 - eichholtz print marisa
15 - eichholtz print tish
3ddd
$1

Eichholtz Prints
...print abstract - set of 2
10 - eichholtz print orange abstract
11 - eichholtz print buddha right
12 - eichholtz print buddha left
turbosquid
$1

... available on turbo squid, the world's leading provider of digital 3d models for visualization, films, television, and games.
3ddd
free

Eichholtz Prints
...of 4
2 - print dunbar 2 set of 4
3 - print guadeloupe 1 set of 4
4 - print guadeloupe 2 set of 4
5 - print giles
6 - print trett
3ddd
$1

Eichholtz Prints
...nt tutti frutti
3 - eichholtz prints watson - set of 2
4 - eichholtz prints antique nautilus - set of 2
5 - eichholtz print tiara
3d_export
$5

Monster for printing
...monster for printing
3dexport
monster 3d model printing
3ddd
free

printed rug
...printed rug
3ddd
ковер
very creative printed rug
3ddd
free

Eichholtz Prints
...иал: бумага
габариты (вхш): 72 x 62 см
описание: print sweetmeat - постер в деревянной раме.
3 - prints varsity set of 2
арти
3ddd
free

Art Print Posters
...art print posters
3ddd
прованс
art print posters by patrician prints