Thingiverse
$33 Time Lapse 3D Printer Camera by Webweave
by Thingiverse
Last crawled date: 4 years, 7 months ago
I've updated this project with lights, https://www.thingiverse.com/thing:2890942
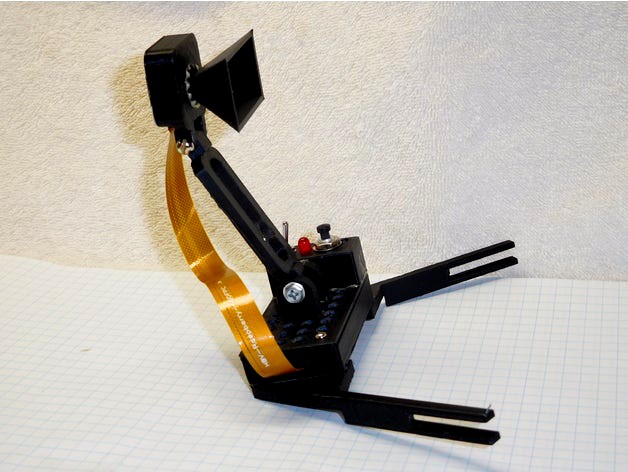
This camera was designed to attach without tools to the 5mm acrylic plate under the heated bed of my DMS DP5 3D printer. If your printer has an acrylic plate under the bed it might fit yours too. There are two sizes of legs, the longer ones allow a paper clamp to secure the legs.
I started with a Pi Zero case and Camera case found here on Thingiverse and modified both to fit my use plus I added my own supports to attach to the base plate. I tried to create enough venting to keep the computer cool while being operated next the heated bed.
The case top and bottom are fastened with 4 - 3mm x 20mm bolts that also protrude through holes in the support brackets that are threaded. The camera is attached with 4mm bolts and nuts at the pivot points. The electrical box, the main pivot mount and the back of the camera are attached with glue compatible with your choice of filament.
The camera hood was added to keep glare from lighting away from the lense. A wrench (designed by Bryson_Jack https://www.thingiverse.com/thing:2241293 ) is included as the Pi Cam focus is set for distance and you'll need to adjust it for close up, a half turn counterclockwise worked fine for me but you'll need to test this.
The electronics used are a Raspberry Pi Zero computer board, a Raspberry Pi camera V2.1, a special camera cable is needed to connect to the Zero, a 32GB micro SD card was used to allow rapid photo shooting and long durations. Some soldering is required to attach the LED and pushbutton to the GPIO pins.
The software was found in an Adafruit tutorial and does exactly what I need and works within my normal workflow. You have to edit a config file with unix compatible tools on the SD card to change the camera settings. These settings control resolution and the photo interval timing among other things and you have to remove the still images off the SD card when you're done. The still images then have to be assembled into a movie, I use iMovie for this but there are easier ways. https://learn.adafruit.com/raspberry-pi-wearable-time-lapse-camera/
The original design of the software was for mobile operation and included a battery, a power supply and a charging circuit for the battery. Since my 3D printer is both stationary and conveniently located next to a power receptacle I chose to power my camera via the built in USB power jack on the PiZero. I had a 2A 5V adapter from a previous project which worked fine. There are many other ways you could power your camera including attaching to the 5v power supply of your 3D printer if you can spare the current.
I normally start a new shoot by adjusting the timing to give me the number of images I need. I calculate this by looking at the estimated print time and comparing with the amount of running time I want in the final movie. To get a movie that runs about 30 seconds for a 4 hour print I look at the frame rate of 30 images per second times 30 seconds produces 900 photos. 4 hr is 14,400 seconds divided by 900 is 16 seconds per shot.
On Pi Day my local computer superstore reduced the Pi Zero to $3.14 but you could only buy one so I bought the original Pi Zero and the Pi Zero W. Good thing too because I couldn't get the software I wanted to run on the W but it ran just fine on the Zero. Maybe I'll fix that later but it changes little on how I'll operate it because the computer I use for video word does not have wifi or bluetooth so I'll save the W for a future project.
Total cost $3.14 for the Pi, $19.95 for the camera, $6.95 for the SD card, $3 for the special cable.
videos in action:https://vimeo.com/265225469https://vimeo.com/265235815https://vimeo.com/265236173https://vimeo.com/265916192