Thingiverse

3:1 Geared Bowden Extruder by FerociousDesigns
by Thingiverse
Last crawled date: 3 years ago
If you have made this thing and find it is useful and or has improved your prints, please consider leaving a tip. Thanks!
Also please consider using my Amazon (<-click here!) link when you buy things from Amazon.co.uk. It costs me a lot in filament to design and perfect these things. All support is very much appreciated!
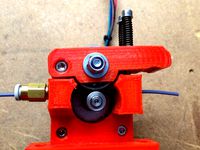
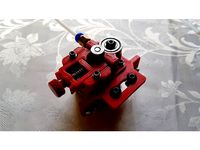
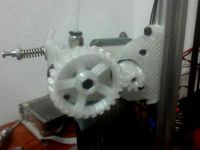
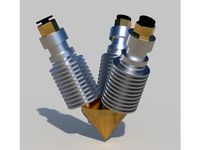
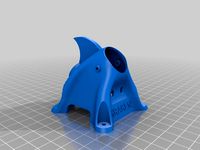
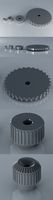
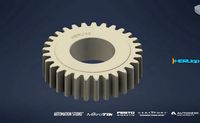
Here is a design I have been working on for a 3:1 geared bowden extruder capable of pushing flexible filament such as TPU.
I printed everything with 25% tetrahedral infill in cura. 4 top/bottom/wall shells. 0.2mm layer height. Some of the fittings are a bit tight and some parts may need some cleaning after printing. Use supports everywhere 10% lines in cura as they are quite easy to remove and help with some parts.
1: Attach the gearbox part to the bowden motor mount (I use: https://www.thingiverse.com/thing:2369063) attached to your frame using either 4xM3x10MM bolts or other suitable bolts.
2: Fit bearings into main body and top cover, they should push all the way in with a little persuasion.
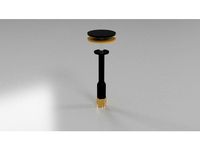
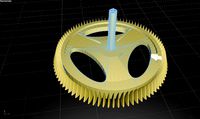
3: Fit M5 bolt into spur gear and push all the way in. Slide one of the washers on after the spur gear.
4: Push M5 bolt with spur gear attached into bearing in main body from rear.
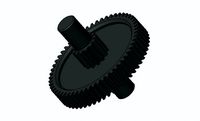
5: Fit Mk7 extruder gear to M5 bolt and line up with filament holes in main body, it can help to mark where this lines up with the holes and file a flat spot for the grub screw but this is not essential.
6: Assemble arm, put M3 nut into hole in handle and thread 20-25mm M3 bolt in to it from the other side. Put other M3 nut into hex hole on adjuster cog and bolt onto the 20-25mm bolt. Push larger bearing onto the stub at the other end of the arm and then push the stub on arm retainer into the top of the bearing.
7: Attach arm bushing to main body with M3x10mm Bolt from rear. You may need to clean this part up a bit so it fits nicely into the hole on the arm. Slide assembled arm onto the bushing once attached and insert spring between the adjuster and hole on the main body.
8: Fit top cover to main body using 4xM3x10mm bolts. Put M5 washer on M5 bolt on top of bearing in top cover then bolt M5 nylock nut onto M5 bolt. Do not overtighten. The bolt should be able to turn freely with no pressure on the arm.
9: Fit assembled extruder to gearbox using 4xM3x10mm bolts, paying attention to the orientation of the push on gear for the stepper motor. It will only run one way. Attach the pneumatic couplings to main body. You may need to use a spanner as they are a tight fit at first.
10: Calibrate extruder steps per mm. Mine is 316.66 for PLA and 327.59 for TPU.
Leave any comments and suggestions in comments section please :)
Required parts:
13x M3x10mm Cap head bolts - 3mm Socket Cap Bolts (20 Pack) M3 x 10mm Socket Cap Head Bolt
1x M3x20 to 25mm Cap head bolt - 3mm Socket Cap Nut & Bolt 4 M3 x 20mm Socket Head Bolts, 4 Nyloc Nuts & 8 Flat Washers.
2x M3 nuts - M3 Full Nut (50 Pack) 3mm A2 Stainless Steel Hex Hexagon Nuts
1x M5x45mm bolt - Pack of 10 STAINLESS STEEL HEX BOLTS – M5 x 45
1x M5 nylock nut - Bolt Base 5mm A2 Stainless Steel Nylon Insert Nyloc M5 X 0.8mm Pitch - 25
2x M5 washers
1x Stock Anet A8 extruder spring. (about 8.5mm diameter and 20mm long) - Amazingdeal 10pcs 3D Printer Extruder Strong Nickelplated Spring
1x Mk7 extruder gear. 13mm tall, 12mm OD, 10.6mm ID, 5mm bore - 2x 3D Printer MK7 Drive Gear Extruder Pulley (5mm shaft/bore)t
2x PC4-M6 pneumatic couplings - TOOGOO(R) 10 Pcs PC4-M6
1x 608 bearing (I used 608-ZZ) - 8 Pack 608 2RS Bearings Double Shielded (Black)
2x 625 bearings (I used 625-2RS) - 10Pcs 625ZZ Metal Shield Ball Bearings 5x16x5mm
https://www.youtube.com/watch?v=BB9uH5Oiohk
Check out these 3D printer support groups on facebook for help with your settings or anything else printing related:3D Printer Support GroupOfficial Anet Group
*** Disclaimer: The links are amazon affiliate links which means I get a small percentage if you use them. It does not increase the price you pay ***
Also please consider using my Amazon (<-click here!) link when you buy things from Amazon.co.uk. It costs me a lot in filament to design and perfect these things. All support is very much appreciated!
Here is a design I have been working on for a 3:1 geared bowden extruder capable of pushing flexible filament such as TPU.
I printed everything with 25% tetrahedral infill in cura. 4 top/bottom/wall shells. 0.2mm layer height. Some of the fittings are a bit tight and some parts may need some cleaning after printing. Use supports everywhere 10% lines in cura as they are quite easy to remove and help with some parts.
1: Attach the gearbox part to the bowden motor mount (I use: https://www.thingiverse.com/thing:2369063) attached to your frame using either 4xM3x10MM bolts or other suitable bolts.
2: Fit bearings into main body and top cover, they should push all the way in with a little persuasion.
3: Fit M5 bolt into spur gear and push all the way in. Slide one of the washers on after the spur gear.
4: Push M5 bolt with spur gear attached into bearing in main body from rear.
5: Fit Mk7 extruder gear to M5 bolt and line up with filament holes in main body, it can help to mark where this lines up with the holes and file a flat spot for the grub screw but this is not essential.
6: Assemble arm, put M3 nut into hole in handle and thread 20-25mm M3 bolt in to it from the other side. Put other M3 nut into hex hole on adjuster cog and bolt onto the 20-25mm bolt. Push larger bearing onto the stub at the other end of the arm and then push the stub on arm retainer into the top of the bearing.
7: Attach arm bushing to main body with M3x10mm Bolt from rear. You may need to clean this part up a bit so it fits nicely into the hole on the arm. Slide assembled arm onto the bushing once attached and insert spring between the adjuster and hole on the main body.
8: Fit top cover to main body using 4xM3x10mm bolts. Put M5 washer on M5 bolt on top of bearing in top cover then bolt M5 nylock nut onto M5 bolt. Do not overtighten. The bolt should be able to turn freely with no pressure on the arm.
9: Fit assembled extruder to gearbox using 4xM3x10mm bolts, paying attention to the orientation of the push on gear for the stepper motor. It will only run one way. Attach the pneumatic couplings to main body. You may need to use a spanner as they are a tight fit at first.
10: Calibrate extruder steps per mm. Mine is 316.66 for PLA and 327.59 for TPU.
Leave any comments and suggestions in comments section please :)
Required parts:
13x M3x10mm Cap head bolts - 3mm Socket Cap Bolts (20 Pack) M3 x 10mm Socket Cap Head Bolt
1x M3x20 to 25mm Cap head bolt - 3mm Socket Cap Nut & Bolt 4 M3 x 20mm Socket Head Bolts, 4 Nyloc Nuts & 8 Flat Washers.
2x M3 nuts - M3 Full Nut (50 Pack) 3mm A2 Stainless Steel Hex Hexagon Nuts
1x M5x45mm bolt - Pack of 10 STAINLESS STEEL HEX BOLTS – M5 x 45
1x M5 nylock nut - Bolt Base 5mm A2 Stainless Steel Nylon Insert Nyloc M5 X 0.8mm Pitch - 25
2x M5 washers
1x Stock Anet A8 extruder spring. (about 8.5mm diameter and 20mm long) - Amazingdeal 10pcs 3D Printer Extruder Strong Nickelplated Spring
1x Mk7 extruder gear. 13mm tall, 12mm OD, 10.6mm ID, 5mm bore - 2x 3D Printer MK7 Drive Gear Extruder Pulley (5mm shaft/bore)t
2x PC4-M6 pneumatic couplings - TOOGOO(R) 10 Pcs PC4-M6
1x 608 bearing (I used 608-ZZ) - 8 Pack 608 2RS Bearings Double Shielded (Black)
2x 625 bearings (I used 625-2RS) - 10Pcs 625ZZ Metal Shield Ball Bearings 5x16x5mm
https://www.youtube.com/watch?v=BB9uH5Oiohk
Check out these 3D printer support groups on facebook for help with your settings or anything else printing related:3D Printer Support GroupOfficial Anet Group
*** Disclaimer: The links are amazon affiliate links which means I get a small percentage if you use them. It does not increase the price you pay ***
Similar models
thingiverse
free

Rusa bowden extruder gear by urusa
...tes the m5 bolts.
the shaft is fixed to the motor rotation.
secure the mk7 extrusion gear to the m5 bolts.
the gear ratio is 1/3.
thingiverse
free
Mini Kossel 1.75mm extruder by wallie
...et head cap screw
2x spring
1x m5 pneumatic straight threaded-to-tube adapter, push in 4 mm 4mm male
tools
m5 manual screw tap
thingiverse
free
Bowden Extruder for 2020 Profile - 1.75 MK7 608zz by Enrike_X5
...around 15mm lenth)
1x nema17 stepper
1x ptfe tube
you may need a tap kit (m5 and m8) to correct the threads, and a 2mm drill bit.
thingiverse
free

Filament holder
...n testing stage.
required parts
8mm shaft
2x fl08 bearings
2x m5 bolts
4x m5 washers
2x m5 nuts
1x m3 bolt
1x m3 washer
1x m3 nut
thingiverse
free
MK8 Gear Extruder for Kossel by Velric
...5 bearings
1x m5x45mm screw (hexhead)
1x m5 presure nut
10x m5
1x m3x20mm screw
1x m3 x50mm screw
2x m3 nuts
1x spring (optional)
thingiverse
free
Dual Extruder by Psycho1981
...ng:
4x allen screw m5
4x square nut m5
4x washer m5
electronic:
-ramps 1.4 board
-atx power supply
-firmware "marlin"
thingiverse
free

Simple, strong, Bowden Extruder by MortarArt
...2 of m5x12+mm bolts for fixing to 2020 extrusion
2 of m5 washers
2 of m5 t-nuts
2 of m3x12+mm bolts for fixing motor
m3x20mm bolt
thingiverse
free
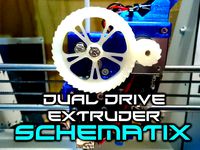
Schematix: Dual Drive Extruder (Fits E3D v6) by Schematix
....d 4mm o.d
springs (some experimentation may be required) however i use the following:
wire diameter: 0.7mm x 6mm o.d x 18mm long
thingiverse
free

Bowden direct drive extruder for MK7 gear by DWONH
...
2 m3x10 bolts
1 m3x15 bolt
1 m3x25 bolt
1 m3 nut
2 m3 washers
8mm~ spring (id: 4mm~)
m5 fitting
print and enjoy!
thingiverse
free

MK7 Geared Extruder by krisdaniels
...for 5mm shaft
608 bearing for the idler
8-9 cm m5 threaded rod
m5 nuts
m3 screws & nuts (various lenghts)
m3 washer
Ferociousdesigns
thingiverse
free

Bong mouthpiece by FerociousDesigns
...bong mouthpiece by ferociousdesigns
thingiverse
it is what it is, i printed it with tpu. fits on an acrylic water pipe :)
thingiverse
free
KTM Keyring by FerociousDesigns
...tm keyring by ferociousdesigns
thingiverse
it is what it is, i will be printing from tpu personally but use whatever you want :)
thingiverse
free

'Shaguar' Keyring by FerociousDesigns
...;shaguar' keyring by ferociousdesigns
thingiverse
it is what it is, i will be printing from tpu but use whatever you want :)
thingiverse
free

Ford RS Keyring by FerociousDesigns
...ford rs keyring by ferociousdesigns
thingiverse
it is what it is, i will be printing from tpu but use whatever you want :)
thingiverse
free

Tiger Racing Keyring by FerociousDesigns
...tiger racing keyring by ferociousdesigns
thingiverse
it is what it is, i will be printing from tpu but use whatever you want :)
thingiverse
free
BL Touch Mockup by FerociousDesigns
... ferociousdesigns
thingiverse
a model for use in making brackets and holders. obviously is not functional!
added fusion 360 file
thingiverse
free
3 Colour Mixing 'Diamond' Hotend Mockup by FerociousDesigns
...#39; hotend mockup by ferociousdesigns
thingiverse
this is wip!
i still need to confirm the cold ends are at the correct angles.
thingiverse
free
BoltRC Kraken Pod - Remix by FerociousDesigns
...he original design.
someone asked me to modify it to allow a bit less camera angle. all i have done is elongated the camera hole.
thingiverse
free
Lumenier Pagoda 2 - Short Version - Mockup by FerociousDesigns
...ousdesigns
thingiverse
created this to help with designing pods for quadcopters.
fusion 360 file included to use in your models.
thingiverse
free
Greek Alphabet - Lowercase by FerociousDesigns
...ts already on thingiverse but none suited what they wanted.
maybe someone else would find them useful, so i have uploaded here :)
Bowden
turbosquid
$199
Vintage Ben Bowden Spacelander bike
... available on turbo squid, the world's leading provider of digital 3d models for visualization, films, television, and games.
3ddd
$1

Manooi Artica
...and pendants in various sizes and forms. suspension: galvanized bowden - dia. 1,5 mm. bulb: max 60 w -...
thingiverse
free
Remix Compact Bowden extruder - m6 bowden couplers and bowden tube pass-through
...ouplers and bowden tube pass-through
thingiverse
remix compact bowden extruder - m6 bowden couplers and bowden tube pass-through
thingiverse
free

Bowden Extruder
...bowden extruder
thingiverse
i have created bowden extruder for flsun delta 3d printer.
thingiverse
free

bowden 3mm by spee_D
...bowden 3mm by spee_d
thingiverse
for bowden 3mm
thingiverse
free
Bowden Tube Cutter
...bowden tube cutter
thingiverse
bowden tube cutter
thingiverse
free
Customizable Bowden Clip
...customizable bowden clip
thingiverse
customizable bowden clip
thingiverse
free
Bowden Oiler by fcheshire
...bowden oiler by fcheshire
thingiverse
inline bowden oiler
thingiverse
free

Bowden adapter by helkaroui
...bowden adapter by helkaroui
thingiverse
this is a fixed bowden adapter
thingiverse
free

Adventure3 Bowden Clip
...adventure3 bowden clip
thingiverse
adventure3 bowden clip
Extruder
3ddd
$1

Extruded Chair
...extruded chair
3ddd
extruded , tom dixon
inspired by tom dixon extruded chair
turbosquid
$15

Extruded Table
... extruded table for download as blend, dae, fbx, obj, and stl on turbosquid: 3d models for games, architecture, videos. (1634137)
turbosquid
$2

3D Printer Extruder
...d
royalty free 3d model 3d printer extruder for download as on turbosquid: 3d models for games, architecture, videos. (1537359)
turbosquid
$1

Zombie extruded text
...oyalty free 3d model zombie extruded text for download as obj on turbosquid: 3d models for games, architecture, videos. (1322198)
turbosquid
$4

Extruder conical screw
...el extruder conical screw for download as sldpr, ige, and stl on turbosquid: 3d models for games, architecture, videos. (1524433)
turbosquid
$50

3d PRINTER - Extruder
... available on turbo squid, the world's leading provider of digital 3d models for visualization, films, television, and games.
turbosquid
$15

Extruded Table 2
...xtruded table 2 for download as blend, dae, fbx, obj, and stl on turbosquid: 3d models for games, architecture, videos. (1621846)
turbosquid
$10

Maya Extrude Tool
... available on turbo squid, the world's leading provider of digital 3d models for visualization, films, television, and games.
3d_export
$5

world earth extrude map
...world earth extrude map
3dexport
3ddd
$1

Simply Elegant Extruded Tree Coffee Table Design
...ble by link studios. the silhouette of a tree is visible at one angle, extruded from the surface to create the support structure.
Geared
3d_ocean
$4
Gears
...gears
3docean
gear gears iron
4 different size of gears
3d_export
$5
gear
...gear
3dexport
gear
3d_export
free
Gears
...gears
3dexport
gears
3d_export
$5
gear
...gear
3dexport
a simple model of gear
3d_export
$5
gear
...gear
3dexport
gear for transmission , case machine
3d_ocean
$3
Gears
...nical parts process steampunk vehicle wheel work
10 different gear models volume 01-10 files: .3ds .c4d .obj note: you need vray
3d_ocean
$1

Spur Gear
...spur gear
3docean
decoration gear
a typical spur gear
3d_ocean
$4
Gear wheels
...gear wheels
3docean
engine engineering gear gears industry machinery mechanical toothwheel wheel
pair of gear wheels : animated.
turbosquid
$9
Gear
...gear
turbosquid
royalty free 3d model gear for download as on turbosquid: 3d models for games, architecture, videos. (1712328)
turbosquid
$2

Gears
...rs
turbosquid
royalty free 3d model gears for download as ma on turbosquid: 3d models for games, architecture, videos. (1166710)
3
turbosquid
$10

Mountain Bike 3 -3 of 3
...model mountain bike 3 (#3 of 3) for download as fbx and blend on turbosquid: 3d models for games, architecture, videos. (1438752)
turbosquid
$6

Rock 3-3
...urbosquid
royalty free 3d model rock 3-3 for download as obj on turbosquid: 3d models for games, architecture, videos. (1628065)
turbosquid
$29

Books 150 pieces 3-3-3
...books 150 pieces 3-3-3 for download as max, obj, fbx, and stl on turbosquid: 3d models for games, architecture, videos. (1384033)
turbosquid
$3

Genesis 3 Clothing 3
... available on turbo squid, the world's leading provider of digital 3d models for visualization, films, television, and games.
3d_export
$5

hinge 3
...hinge 3
3dexport
hinge 3
3ddd
$1

Розетка 3
...розетка 3
3ddd
розетка
розетка 3
turbosquid
$50

is-3
... available on turbo squid, the world's leading provider of digital 3d models for visualization, films, television, and games.
turbosquid
$10

Mountain Bike 3 -2 of 3
...model mountain bike 3 (#2 of 3) for download as fbx and blend on turbosquid: 3d models for games, architecture, videos. (1438750)
turbosquid
$10

Mountain Bike 1 -3 of 3
...model mountain bike 1 (#3 of 3) for download as fbx and blend on turbosquid: 3d models for games, architecture, videos. (1438743)
3d_export
$5

3 CATS
...3 cats
3dexport
3 cats pen holder
1
turbosquid
$69

armchairs(1)(1)
... available on turbo squid, the world's leading provider of digital 3d models for visualization, films, television, and games.
turbosquid
$15

ring 1+1
... available on turbo squid, the world's leading provider of digital 3d models for visualization, films, television, and games.
turbosquid
$10

chair(1)(1)
... available on turbo squid, the world's leading provider of digital 3d models for visualization, films, television, and games.
turbosquid
$8

Chair(1)(1)
... available on turbo squid, the world's leading provider of digital 3d models for visualization, films, television, and games.
turbosquid
$2

RING 1(1)
... available on turbo squid, the world's leading provider of digital 3d models for visualization, films, television, and games.
turbosquid
$1

house 1(1)
... available on turbo squid, the world's leading provider of digital 3d models for visualization, films, television, and games.
turbosquid
$1

Table 1(1)
... available on turbo squid, the world's leading provider of digital 3d models for visualization, films, television, and games.
turbosquid
$59

Formula 1(1)
...lty free 3d model formula 1 for download as max, fbx, and obj on turbosquid: 3d models for games, architecture, videos. (1567088)
design_connected
$11

No 1
...no 1
designconnected
sibast no 1 computer generated 3d model. designed by sibast, helge.
turbosquid
$2

desert house(1)(1)
...3d model desert house(1)(1) for download as 3ds, max, and obj on turbosquid: 3d models for games, architecture, videos. (1055095)