Thingiverse

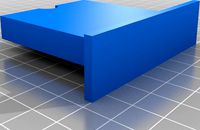
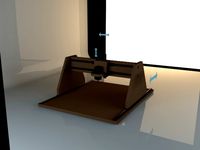
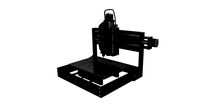
3030 CNC 3018 DIY Rude and Crude Remix
by Thingiverse
Last crawled date: 4 years, 2 months ago
For those who still have eyes to see, to help those who don't.
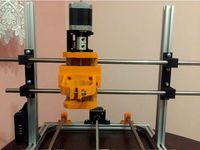
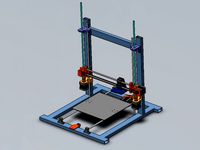
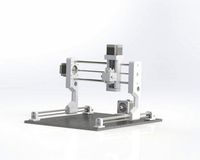
This is the 3030 Remix of shivackt's 3018 DIY CNC machine.
You'll need:
2 x 3030 profile @ 390mm for X frame bits
2 x 3030 profile @ 320mm for Y frame bits
2 x 3030 profile @ 210mm for Z frame vertical bits
2/3 x 3030 profile @ 330mm for Z frame in between horizontal bits (I have taken my middle horizontal piece out as 3030 is a good solid frame so you can also get away with only 2 pieces here)
2 x 400mm x 8mm smooth rods for x axis
2 x 400mm x 8mm smooth rods for y axis
3 x 5mm to 8mm solid couplers
3 x 608 bearings for the ends of the leadscrews
3 x 8mm collars for the bearing ends of the leadscrews
2 x 400mm T8 leadscrews and leadnut (x and y axis)
1 x 135mm T8 leadscrew and leadnut. (Z axis)
12 x 3030 inside corner brackets
1 x 300mm x 180mm x 15mm wooden baseboard
8 x M4 x 6mm Socket Head Screws to lock the smooth rods in place.
8 x M3 x 16mm Socket Head Screws to mount x and y motors.
24 x M6 x 10mm Socket Head Screws to mount the plastic bits.
24 x M6 T-Nuts for 30 profile for the screws above.
And huge dose of patience, seriously.
Of course you may want to get all the other nice goodies from shivackt (who I wish to thank for the 2020 version) but that is entirely up to you. The final versions here have been modified after I printed the original parts but they did not fit well due to shrinkage. I've reprinted all the parts successfully at 2.5 - 3% increase in size for ABS.
UPDATE 14/10/2019
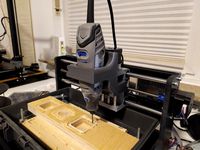
Just got hands on a flexi extension piece for the Tork Craft rotary tool:
http://www.torkcraft.com/index.php?route=product/product&path=818_1227_1228&product_id=17747
Added a Arduino CNC Shield V3.0 running grbl 1.1h firmware fromhttps://github.com/gnea/grbl/releases/tag/v1.1h.20190825
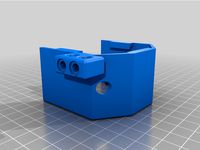
Added:
Spindle collar for flexi extension to fit into z-carriage
Clamps for rotary tool on rear of gantry to save space?
UPDATE 7/11/2019
Added a new leadnut block for the y-axis bed as original was flimsy.
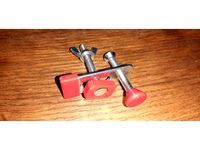
Added crank handle and knob with pin and will test. Shoutout to KCobbler for his knob at https://www.thingiverse.com/thing:1052197
Fixed crank handle and knob.
UPDATE 8/11/2019
Added improved 60x60 corner bracket.
UPDATE 04/02/2020 IMPORTANT
Assembled the x-carriage with LM8UU bearings. Trick to this is to heat up the carriage and slide the x-axis smooth rods into the holes. Then add the bearings from both sides onto the rods. Remember to hold your hand at one end of the rods and turn it to point the rods upwards. Carefully place the lot on a flat surface so that the bearings and the carriage line up and press down on the top bearings until they begin to go in. You shouldn't have too much difficulty in getting the bearings into the holes, but it will become increasingly harder to press down as both sets of bearings slide unto their slots and come to rest. The reason you want the rods installed when you do this is so the little balls inside the bearings don't pop out.
Went through two sets of bearings initially trying the get the bearings into the carriage separately, but you end up screwing up one if not two of the bearings when you put the rods through. In my case, twice it dug out a few balls from the races and the bearings were toast. So I had to change tactic as I don't have a vice to be able to squeeze the bearings in and besides you can't do that with a vice either in my humble opinion. Just be gentle and remember it's plastic.
Had to use the grbl controller to finish off my lazer engraver https://www.thingiverse.com/make:709625 so this thing is on hold until I get a new controller board.
This is the 3030 Remix of shivackt's 3018 DIY CNC machine.
You'll need:
2 x 3030 profile @ 390mm for X frame bits
2 x 3030 profile @ 320mm for Y frame bits
2 x 3030 profile @ 210mm for Z frame vertical bits
2/3 x 3030 profile @ 330mm for Z frame in between horizontal bits (I have taken my middle horizontal piece out as 3030 is a good solid frame so you can also get away with only 2 pieces here)
2 x 400mm x 8mm smooth rods for x axis
2 x 400mm x 8mm smooth rods for y axis
3 x 5mm to 8mm solid couplers
3 x 608 bearings for the ends of the leadscrews
3 x 8mm collars for the bearing ends of the leadscrews
2 x 400mm T8 leadscrews and leadnut (x and y axis)
1 x 135mm T8 leadscrew and leadnut. (Z axis)
12 x 3030 inside corner brackets
1 x 300mm x 180mm x 15mm wooden baseboard
8 x M4 x 6mm Socket Head Screws to lock the smooth rods in place.
8 x M3 x 16mm Socket Head Screws to mount x and y motors.
24 x M6 x 10mm Socket Head Screws to mount the plastic bits.
24 x M6 T-Nuts for 30 profile for the screws above.
And huge dose of patience, seriously.
Of course you may want to get all the other nice goodies from shivackt (who I wish to thank for the 2020 version) but that is entirely up to you. The final versions here have been modified after I printed the original parts but they did not fit well due to shrinkage. I've reprinted all the parts successfully at 2.5 - 3% increase in size for ABS.
UPDATE 14/10/2019
Just got hands on a flexi extension piece for the Tork Craft rotary tool:
http://www.torkcraft.com/index.php?route=product/product&path=818_1227_1228&product_id=17747
Added a Arduino CNC Shield V3.0 running grbl 1.1h firmware fromhttps://github.com/gnea/grbl/releases/tag/v1.1h.20190825
Added:
Spindle collar for flexi extension to fit into z-carriage
Clamps for rotary tool on rear of gantry to save space?
UPDATE 7/11/2019
Added a new leadnut block for the y-axis bed as original was flimsy.
Added crank handle and knob with pin and will test. Shoutout to KCobbler for his knob at https://www.thingiverse.com/thing:1052197
Fixed crank handle and knob.
UPDATE 8/11/2019
Added improved 60x60 corner bracket.
UPDATE 04/02/2020 IMPORTANT
Assembled the x-carriage with LM8UU bearings. Trick to this is to heat up the carriage and slide the x-axis smooth rods into the holes. Then add the bearings from both sides onto the rods. Remember to hold your hand at one end of the rods and turn it to point the rods upwards. Carefully place the lot on a flat surface so that the bearings and the carriage line up and press down on the top bearings until they begin to go in. You shouldn't have too much difficulty in getting the bearings into the holes, but it will become increasingly harder to press down as both sets of bearings slide unto their slots and come to rest. The reason you want the rods installed when you do this is so the little balls inside the bearings don't pop out.
Went through two sets of bearings initially trying the get the bearings into the carriage separately, but you end up screwing up one if not two of the bearings when you put the rods through. In my case, twice it dug out a few balls from the races and the bearings were toast. So I had to change tactic as I don't have a vice to be able to squeeze the bearings in and besides you can't do that with a vice either in my humble opinion. Just be gentle and remember it's plastic.
Had to use the grbl controller to finish off my lazer engraver https://www.thingiverse.com/make:709625 so this thing is on hold until I get a new controller board.
Similar models
thingiverse
free

i3 8mm Leadscrew upgrade Z Axis motor mounts for 42mm high motors by critter42
...on my frame.
also, the smooth rod hole was a little small on the original, so i widened it by .1mm and added an expansion cutout.
thingiverse
free

HyperCube Evolution-Y Carriage fit assistant by vcloud
...se 102mm frame distance, remenber decrease 2mm for z rods, but the original z rods length is still work, just feel not perfect...
thingiverse
free

Anti Z-wobble for HEVO by VAEin3D
...d on 3030 extrusion profiles.
see pictures how to mount it.
enjoy, peter
ps : tested on : https://www.thingiverse.com/make:354798
thingiverse
free

prusa I3 steel x-axle lead screw V5. by newbie71
...ew tr8x2 length 300mm
2 x 608zz bearings
1 x 605zz bearings
4 x m3x6 screw
4 x m3x8 screw
3 x anti backlash nut with tensonspring
thingiverse
free

P3Steel Leadscrew upgrade by piti_rocks
...e printbed to keep tolerances away. you may need to improve the holes for the 8mm rods with a drill.
https://youtu.be/ce1ykdprrjo
thingiverse
free

Geeetech Z axis bearing mount by woody_matt
...zed for the common 608 bearing (8mm id, 22mm od, 7mm thk). the model has 21mm centres between smooth rod hole and leadscrew axis.
thingiverse
free

Universal Z-Axis Bracket for 8mm linear rods for Hypercube Evolution Frame (3030) by ecstrim
...universal z-axis bracket for 8mm linear rods for hypercube evolution frame (3030) by ecstrim
thingiverse
modified for 8mm rods.
thingiverse
free

BockBotV1 by bigramen
...ith 2mm pitch and 1start
bom:https://docs.google.com/spreadsheets/d/1gwe15uqkoj_oohfw0r1cohh6ivw_ngl7iucsy7lvwb8/edit?usp=sharing
thingiverse
free

Hypercube Evolution XY carriage (NO Brass inserts needed and less rod play version) by warham
... just printed. also, if you are good with supports these can be printed upside down to make the bearing half moon print cleaner.
thingiverse
free

original Prusa I3+ Z axis ends for 8mm leadscrew by kubino
... work in progress!
update 20160229:
changed design for easy lm8uu installation
update 20160301:
added v3 for m3 threaded inserts.
Rude
turbosquid
$20

Rude Man
...urbosquid
royalty free 3d model rude man for download as obj on turbosquid: 3d models for games, architecture, videos. (1222371)
3ddd
$1

Бра - Rude Bravo
...бра - rude bravo
3ddd
бра - rude bravo. текстуры прилагаются.
3d_export
$10

old concrete fence low-poly pbr model
...maps 2048 x 2048: -basecolor, -metal, -normal, -occlusion, - rudeess. formats included: .abc, .blend, .dae, .fbx, .glb, .obj, .ply,...
3d_export
$10

old rusty fence low-poly pbr model
...maps 2048 x 2048: -basecolor, -metal, -normal, -occlusion, - rudeess. formats included: .abc, .blend, .dae, .fbx, .glb, .obj, .ply,...
3d_export
$10

old rusty fence low-poly pbr model
...maps 2048 x 2048: -basecolor, -metal, -normal, -occlusion, - rudeess. formats included: .abc, .blend, .dae, .fbx, .glb, .obj, .ply,...
3d_sky
free

Bra-Rude Bravo
...bra-rude bravo
3dsky
bra-rude bravo. textures are attached.
thingiverse
free

Rude Zen Gnome by CaveHermit
...rude zen gnome by cavehermit
thingiverse
rude zen gnome..
thingiverse
free

Rude Stir Sticks by VA3TNE
...rude stir sticks by va3tne
thingiverse
oh! how rude!!!
thingiverse
free

rude zen gnome by Rambo_Tron
...rude zen gnome by rambo_tron
thingiverse
gnome for president
thingiverse
free

Rude gnome by oriface
...rude gnome by oriface
thingiverse
a gnome gives you the bird. unaltered from 3d scan.
3018
3d_export
$5

Cartoon Black Bus Car
...triangulated for the game engine. total number of polygons: 3018 ...
thingiverse
free

CNC 3018 by Assomer
...cnc 3018 by assomer
thingiverse
accessoire pour cnc diy 3018
3dfindit
free
3017, 3018
...3017, 3018
3dfind.it
catalog: 80/20
thingiverse
free
aspiration 3018
...rse
support pour brosse aspiration fraiseuse 3018
la brosse fait 69x43 mm
brosse ancien aspirateur je ne connais plus la marque
thingiverse
free
CNC 3018 rod mount
...cnc 3018 rod mount
thingiverse
rod mount for cnc 3018.
thingiverse
free
Outillage CNC 3018 Pro
...outillage cnc 3018 pro
thingiverse
ranger vos principaux outils cnc 3018 pro
thingiverse
free
CNC 3018 Calibrator by digital_technology_factory
...cnc 3018 calibrator by digital_technology_factory
thingiverse
this is a part to calibrate the rods of the z axis of the cnc 3018
thingiverse
free
CNC 3018 Dremel Mount
...d.com/custlink/vvdv4y6oc6https://amzn.to/2bjkmil
dremel 3000https://amzn.to/36bt4f9
(affiliate links! if you want to support me.)
thingiverse
free
CNC 3018 Clamp protection
...lamp protection
thingiverse
designed to protect the aluminium of the cnc 3018 and protect the wood
with a little power it fits.
thingiverse
free
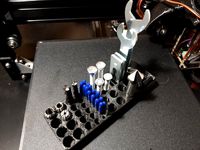
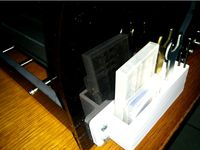
CNC 3018 tools organizer
...cnc 3018 tools organizer
thingiverse
this is a tools organizer for my cnc 3018 that i designed.
feel free to use.
Crude
turbosquid
$15

Parma Shield Crude
...3d model parma shield crude for download as max, obj, and fbx on turbosquid: 3d models for games, architecture, videos. (1420245)
turbosquid
$15

Crude Oil Barrel
... available on turbo squid, the world's leading provider of digital 3d models for visualization, films, television, and games.
3d_export
$15

Crude Oil Barrel 3D Model
...crude oil barrel 3d model
3dexport
crude oil barrel oil drum old
crude oil barrel 3d model blacks3d 62488 3dexport
3d_export
$5

crude iron cage
...into several components, allowing the door to be swung open if desired.<br>fully unwrapped, with one iron texture included.
3d_export
$35

oil tanker
...oil or its products.<br>crude tankers move large quan***ies of crude oil from its production site to refineries. for example,...
3d_export
$30

Gas/oil heat pipeline 3D Model
...gas/oil heat pipeline 3d model 3dexport oil pipeline pipe crude energy alaska iraq saudi barrel business money gas gasoline...
3d_ocean
$19

Tanker
...example of what tankers are designed to carry is: crude oil, petroleum, liquefied natural gas, liquefied petroleum gas, bitumen,...
3d_export
$80

Oil Tanker 3D Model
...tanker 3d model 3dexport oil fuel energy petrol petroleum crude super tanker vlcc oiltanker supertanker ship offshore sea industrial...
3d_export
$25

Panamax oil tanker v1
...vessel designed to carry bulk oil or its products. crude tankers move large quan***ies of crude oil from its...
3d_export
$25

Oil tanker panamax
...vessel designed to carry bulk oil or its products. crude tankers move large quan***ies of crude oil from its...
3030
3ddd
$1

Arte Veneziana 3030
...arte veneziana 3030
3ddd
arte veneziana , 3030
комод arte veneziana 3030
turbosquid
$5

Custom 3030
... available on turbo squid, the world's leading provider of digital 3d models for visualization, films, television, and games.
3ddd
free

Оконая решетка 3030
...оконая решетка 3030
3ddd
ковка , решетка
оконая решетка
3d_export
$20

Chair 3D Model
...chair 3d model 3dexport chair 3d model sem3d 3030 ...
3ddd
$1

Стальные трубчатые радиаторы Arbonia
...20 секций в каждом. модели 3019 (190мм), 3026 (260мм), 3030 (300мм), 3035 (350мм), 3040 (400мм), 3045 (450мм), 3050 (500мм),...
3ddd
free

Callesella Cameretta
...callesella cameretta мебель для детской callesella cameretta, шкаф-кровать-чердак - 30302010*2272 мм. кровать - 880*2010*902 мм. тумбочка ящиками - 500*385*482...
3d_export
$14

Crate Ginger Box Crate Stand
...polycount( crates of ginger and crate stand) - verts: 4106(lod0),3030lod1),1904(lod2),851(lod3). - edges: 11615(lod0),8724(lod1),5363(lod2),2264(lod3). - faces: 7575 (lod0),5760(lod1),3528(lod2),1488(lod3). - tris:...
3d_export
free

dual wheels for tractor t-150k in the collection
...blender 2.8.<br>technical specifications:<br>wheel disk (dw18-24) with a hub - 3030 polygons.<br>two types of connector.<br>agricultural tire (21.3x24) kama fd-14 -...
3d_export
$48

Set of Boxes of Vegetables Crate
...tris: 11054(lod0),6596(lod1),3606(lod2),1494(lod3).<br>polycount( crates of ginger and crate stand)<br>- verts: 4106(lod0),3030lod1),1904(lod2),851(lod3).<br>- edges: 11615(lod0),8724(lod1),5363(lod2),2264(lod3).<br>- faces: 7575 (lod0),5760(lod1),3528(lod2),1488(lod3).<br>- tris: 8072(lod0),5920(lod1),3668(lod2),1554(lod3).<br>polycount( crates of...
3d_export
$43

Medieval Market Stalls Cylindrical Tent Fruits Vegetables
...tris: 11054(lod0),6596(lod1),3606(lod2),1494(lod3).<br>polycount( crates of ginger and crate stand)<br>- verts: 4106(lod0),3030lod1),1904(lod2),851(lod3).<br>- edges: 11615(lod0),8724(lod1),5363(lod2),2264(lod3).<br>- faces: 7575 (lod0),5760(lod1),3528(lod2),1488(lod3).<br>- tris: 8072(lod0),5920(lod1),3668(lod2),1554(lod3).<br>polycount( crates of...
Diy
3d_export
free
DIY 3D Printer
...diy 3d printer
3dexport
diy 3d printer model
turbosquid
$10

Diy tiered
...l diy tiered for download as max, max, max, max, fbx, and obj on turbosquid: 3d models for games, architecture, videos. (1603709)
turbosquid
$3
Diy Desk to Bench
...odel diy desk to bench for download as 3ds, max, obj, and fbx on turbosquid: 3d models for games, architecture, videos. (1506589)
turbosquid
$2

DIY Moon Light
...model diy moon light for download as obj, fbx, blend, and dae on turbosquid: 3d models for games, architecture, videos. (1501170)
3d_export
$8
DIY CNC Router 3D Model
...diy cnc router 3d model
3dexport
cnc; router; diy; homemade
diy cnc router 3d model maikeru86 58463 3dexport
turbosquid
$5

Diy Kitchen Cabinets
...itchen cabinets for download as 3ds, obj, fbx, blend, and dae on turbosquid: 3d models for games, architecture, videos. (1197373)
3d_export
free

Download free Diying Plant 3D Model
...download free diying plant 3d model
3dexport
diying plant blender
diying plant 3d model visitorsama 98607 3dexport
3ddd
$1
DIY coffee table + decor
... рамка для фото
кофейный столик diy 400х350х600(h) мм. моделился по фото. внимание: материалы - corona.
turbosquid
$3
Diy Wire Lamp Shade
...free 3d model diy wire lamp shade for download as 3ds and fbx on turbosquid: 3d models for games, architecture, videos. (1347605)
cg_studio
$12
DIY MONGOLIAN LAMB STOOLS3d model
... hair soft pile white
.max - diy mongolian lamb stools 3d model, royalty free license available, instant download after purchase.
Cnc
3d_export
$35

Cnc
...cnc
3dexport
the cnc machine is unfinished
3d_export
$10
cnc router
...cnc router
3dexport
prototipe cnc router
3d_export
$10

cnc machine
...cnc machine
3dexport
cnc machine model with individual model files with assembly
3d_export
$5
Cnc 3D Model
...cnc 3d model
3dexport
cnc
cnc 3d model csiszar 61289 3dexport
turbosquid
$10

cnc bedroom
...osquid
royalty free 3d model cnc bedroom for download as max on turbosquid: 3d models for games, architecture, videos. (1494981)
turbosquid
$9
cnc(wood)
...rbosquid
royalty free 3d model cnc(wood) for download as max on turbosquid: 3d models for games, architecture, videos. (1189189)
turbosquid
$1

CNC Frame
...rbosquid
royalty free 3d model cnc frame for download as stl on turbosquid: 3d models for games, architecture, videos. (1371706)
turbosquid
free
cnc table
...rbosquid
royalty free 3d model cnc table for download as max on turbosquid: 3d models for games, architecture, videos. (1500926)
turbosquid
$30

CNC Lathe
...
royalty free 3d model cnc lathe for download as max and obj on turbosquid: 3d models for games, architecture, videos. (1284634)
turbosquid
$25
CNC Machine
...
royalty free 3d model cnc machine for download as ma and fbx on turbosquid: 3d models for games, architecture, videos. (1307199)
Remix
turbosquid
$5

MODA Collection Remix Chair
... available on turbo squid, the world's leading provider of digital 3d models for visualization, films, television, and games.
3d_export
$12

remix yamaha rm1x
...remix yamaha rm1x
3dexport
geometry triangles 15.2k vertices 7.6k pbr no textures 1 materials 1 uv layers yes
3d_ocean
$5

Vray fabric Kvadrat remix green - tileable
...th vray and 3dsmax. high-resolution texture images (2000×2000 px) file included: shader vray 2.40 texture image 3ds max 2011 file
turbosquid
$20

Gerrit Rietveld 1938 Zig Zag Chair Remix
... available on turbo squid, the world's leading provider of digital 3d models for visualization, films, television, and games.
3d_export
$10

multicolored remix parametric table furniture
... fbx, obj, mtl, archive with textures. the model has no glitches. render and materials - vray . without using plugins. good use!
3ddd
$1

Barovier&Toso / Manhattan Remix 7192
... 004293-142405
в коллекции есть люстры 7, 9, 12 рожковые. диаметр соответственный 1000, 1250, 1500 мм.
3ddd
$1

Muuto fiber chair
...grey/grey, dusty green/dusty green, nature/oak, natural white/oak upholstery options remix 183/black, remix 133/grey, remix 643/dusty red leather options black...
3ddd
$1

Barovier&Toso 7190-7195
...7190-7195 3ddd barovier&toso потолочнай люстра фабрики barovier&toso;, коллекция manhattan remix артикул 7190-7195. размеры в inches: 39"...
3d_export
$5

3D Locking Handle Weatherproof Storage Box Container
...handle weatherproof storage box container 3dexport new, improved and remixd! no screws required. print-in-place. weatherproof. parametric. 2 parts. easy...
cg_studio
$49

HTC One Mini 2 Amber Gold3d model
...cell phone mobile cellular super lcd touchscreen touch screen remix amber gold .max .obj .mb .lwo .fbx .c4d .3ds...