Thingiverse

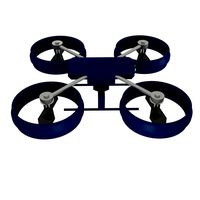
220 Quadcopter with ZMR (250?) arms - 5" props max by nickpgre
by Thingiverse
Last crawled date: 3 years ago
Update: 28th of May 2017
+ New part added "Top Plate V2 - Corrected": I am finalizing this thingy by adding a new frame part I personally like and has managed to withstand severe crashes! There is an indication of the camera angle and will fit foxeer like cameras. With enough slots for cable and components management as well a slot for any additional component. The height of clearance is 24mm.
+ New part added "Battery Holder V3": The model can be sliced with up-to 3 perimeters for additional strength and not intercepting one another
Update: 4th of March 2017
+Added "Basic building requirements" section
+Added "Other notes" section
Update: 5th of March 2017
+Added new camera mount v2: This utilizes bolts with wider head and also will keep the camera at approx. 50 degrees
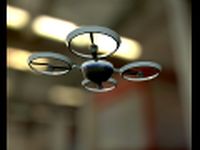
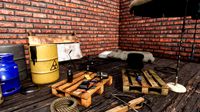
This is my first attempt to create a quadcopter and use the 250-ZMR arms that were laying around and the carbon arms will make it more crash resistant.
It is not a pure X-frame as the distance between arms, on the left and right side, is longer than the horizontal distance from the front and back arms, as an attempt to increase the overall agility for a more aggressive flying.
Basic building requirements:
4x ZMR 250 arm, 3mm thick
4x 35mm long standoffs
The frame will fit any standard sized (30mmx30mm) PDB and FC
Battery can either be mounted on top or at the bottom. The plate holder can be used as a component platform for making some extra space between the middle plate and the rest of the components for a battery strap to pass through
Battery holder will fit a 4s (1550mah) battery
Camera mount will fit a Foxeer 1177
Printing Settings recommendations:
Middle plate: This part will prove how crash resistant the frame is and it should be printed with at least 35% infill, 3 horizontal perimeters and 3 layers for both bottom and top.
Bottom plate: Like the middle plate above this also should be printed with similar settings so the frame to become more rigid.
Plate holder: This part does not need to be as rigid as the above ones. I primarily use it to create a small platform between the middle plate and the components so to make it easier for a battery strap to pass through.
Other Notes:
Regarding the tolerances, all holes will tightly fit 3mm bolts. For both the bottom and top plate, I use plastic washers, 8mm in diameter and 1mm of thickness
In the case of the battery is mounted at the bottom, there shouldn't be any bolts coming in direct contact with the battery for no reason.
Bear in mind that since this is a work in progress, any suggestions are very welcome.
Have fun and happy flying!
+ New part added "Top Plate V2 - Corrected": I am finalizing this thingy by adding a new frame part I personally like and has managed to withstand severe crashes! There is an indication of the camera angle and will fit foxeer like cameras. With enough slots for cable and components management as well a slot for any additional component. The height of clearance is 24mm.
+ New part added "Battery Holder V3": The model can be sliced with up-to 3 perimeters for additional strength and not intercepting one another
Update: 4th of March 2017
+Added "Basic building requirements" section
+Added "Other notes" section
Update: 5th of March 2017
+Added new camera mount v2: This utilizes bolts with wider head and also will keep the camera at approx. 50 degrees
This is my first attempt to create a quadcopter and use the 250-ZMR arms that were laying around and the carbon arms will make it more crash resistant.
It is not a pure X-frame as the distance between arms, on the left and right side, is longer than the horizontal distance from the front and back arms, as an attempt to increase the overall agility for a more aggressive flying.
Basic building requirements:
4x ZMR 250 arm, 3mm thick
4x 35mm long standoffs
The frame will fit any standard sized (30mmx30mm) PDB and FC
Battery can either be mounted on top or at the bottom. The plate holder can be used as a component platform for making some extra space between the middle plate and the rest of the components for a battery strap to pass through
Battery holder will fit a 4s (1550mah) battery
Camera mount will fit a Foxeer 1177
Printing Settings recommendations:
Middle plate: This part will prove how crash resistant the frame is and it should be printed with at least 35% infill, 3 horizontal perimeters and 3 layers for both bottom and top.
Bottom plate: Like the middle plate above this also should be printed with similar settings so the frame to become more rigid.
Plate holder: This part does not need to be as rigid as the above ones. I primarily use it to create a small platform between the middle plate and the components so to make it easier for a battery strap to pass through.
Other Notes:
Regarding the tolerances, all holes will tightly fit 3mm bolts. For both the bottom and top plate, I use plastic washers, 8mm in diameter and 1mm of thickness
In the case of the battery is mounted at the bottom, there shouldn't be any bolts coming in direct contact with the battery for no reason.
Bear in mind that since this is a work in progress, any suggestions are very welcome.
Have fun and happy flying!
Similar models
thingiverse
free

ZMR 250 Quadcopter Battery Holder by adamj623
...top plate slots on zmr 250 from then up and around battery.
capture nuts for 3mm nuts to install easily with only one hex driver.
thingiverse
free

ZMR 250 Fatshark FPV camera mount by histo
...shark encased fpv camera for the front of the zmr 250 quadcopter frame.
update 04/13/15 added 10 degree and 15 degree versions.
thingiverse
free

ZMR 250 Foxeer Monster Mini Pro Cameraholder
...holder
thingiverse
hello everyone,
this is a easy cam holder for a zmr 250 quadcopter for a foxeer monster mini pro 16:9 camera.
thingiverse
free

ZMR 250 quad led light strip holder by stef1
...lates and uses the screws that hold the posts to secure it
there is a slot in the middle to allow the power lead to exit the quad
thingiverse
free

ZMR 250 battery low rider mod by Cruddbucket
...ount your naze32 and wiring between the two bottom plates - allowing the battery to sit lower on the bottom frame for better cog.
thingiverse
free

zmr 250 battery and gopro holder by mhunley123
...holes and battery tie down slots line up exactly to the existing top frame. includes a gopro attachment on the top for a camera.
3dwarehouse
free

Battery Catcher for QAV250 Quadcopter
...r250 or qav250 or qav280 carbon fiber frame (china clone). #250 #280 #battery_servo #flight #fpv #qav #quadcopter #tilt #vtx #zmr
thingiverse
free

ZMR 250 - Battery case and RX slot. by ip3012
...iverse
battery case and crash protector.
can replace the top plate or can be mount on top of it.
rx can be slot in the head.
thingiverse
free

Bolt 210 GoPro / Yi Mount by propwashed
... plate for the yi:http://www.thingiverse.com/thing:1394934
here is a plate for the gopro:http://www.thingiverse.com/thing:1685250
thingiverse
free

ZMR 250 Quadcopter 20MM Spacer by adamj623
...ed for use with 3mm thick arms
3 mounting holes for each arm to free up space on the inside.
pass through on arms for esc wiring.
Nickpgre
thingiverse
free

Plant pot by nickpgre
...plant pot by nickpgre
thingiverse
a simple plant pot, 125mmx115mm
print settings:
3 walls
3 top
3 bottom
25 % infill
thingiverse
free

Minimal FPV Antenna Holder by nickpgre
...minimal fpv antenna holder by nickpgre
thingiverse
simple fpv antenna holders!
thingiverse
free

Soldering Iron tip cleaner - Brilo holder by nickpgre
...ldering iron tip cleaner - brilo holder by nickpgre
thingiverse
a general purpose wire holder for cleaning a soldering iron tip.
thingiverse
free

Prusa's COVID-19 Headband stackable by nickpgre
...kable by nickpgre
thingiverse
this is a modified, stackable version of the prusa's covid-19 headband for the protection mask
thingiverse
free

A Useless Collection - A Pen holder sculpture by nickpgre
...holder sculpture.
update: still a useless pen holder sculpture with its bottom closed
diameter: approx 11.5mm
height: approx 55mm
thingiverse
free

Titan Aero Fan Shroud Minimal by nickpgre
... texasjeep one.
it provides a better air channeling compared to my previous one, based on a modified titan-aero prusa-i3 holder.
thingiverse
free

Filament spool holder for 8mm rod by nickpgre
... 54mm
the white pieces printed while the spool was without the attachments, the black pieces after i installed the spool holders.
thingiverse
free

Minimal Frame Spool Holder for Prusa I3 by nickpgre
...
this is a spool holder which can be attached on the top frame of a prusa i3 printer. the attached file contains only one part.
thingiverse
free

Generic ESC (speedcontroller) protector. Max Width (15.30mm) by nickpgre
...(15.30mm) by nickpgre
thingiverse
this is a compact generic esc protector which can fit any esc with a maximum width of 15.30mm
thingiverse
free

Filament Roll holder for 8mm rod by nickpgre
...ight fit
fyi: the white pieces were printed with the filament roll on the rod, whereas the black pieces printed with the holders!
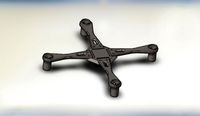
Zmr
turbosquid
$10

Drone ZMR 250 frame print3D
... available on turbo squid, the world's leading provider of digital 3d models for visualization, films, television, and games.
thingiverse
free

Zmr X Frame by zeocool
...zmr x frame by zeocool
thingiverse
zmr makeover
20x20 and 30.5x30.5 fc
zmr armes needed
thingiverse
free

ZMR 250 Frame by aravindprabu
...zmr 250 frame by aravindprabu
thingiverse
zmr 250 quadcopter frame
thingiverse
free

pare choc zmr by crashman74
...pare choc zmr by crashman74
thingiverse
par choc zmr epaisseur 13 mm
thingiverse
free

Bump For ZMR 250 by Frontloop
...bump for zmr 250 by frontloop
thingiverse
bumper x motor zmr 250 fpv race
thingiverse
free

ZMR 180 Side protection by Patato93
...zmr 180 side protection by patato93
thingiverse
zmr protection
thingiverse
free

ZMR 250 Sidecover by norf
...zmr 250 sidecover by norf
thingiverse
sidecovers for your zmr 250 etc. to protect the electronic etc.
thingiverse
free

ZMR 250 frame
...e-take on the zmr frame , has room on side for usb port and room in front for camera ,,, will do a test print of this tomorrow :)
thingiverse
free

ZMR 250 INCASED by rotceh_dnih
...zmr 250 incased by rotceh_dnih
thingiverse
a case for zmr 250 quads with 6mm round standoffs
* good to print :) **
thingiverse
free

ZMR THIN BOTTOM PLATE by moneymike
...zmr thin bottom plate by moneymike
thingiverse
zmr thin bottom plate
Quadcopter
3d_export
$5
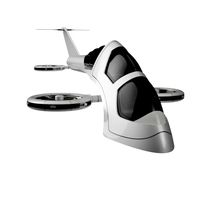
quadcopter
...quadcopter
3dexport
futuristic quadcopter design.<br>original design davidflo 77
turbosquid
$19
quadcopter
...lty free 3d model quadcopter for download as max, ma, and obj on turbosquid: 3d models for games, architecture, videos. (1591426)
turbosquid
$25
QuadCopter
... available on turbo squid, the world's leading provider of digital 3d models for visualization, films, television, and games.
3d_export
$5
Quadcopter 3D Model
...quadcopter 3d model
3dexport
quadcopter studio shaders
quadcopter 3d model vortex333 93968 3dexport
3d_export
$5
Quadcopter 3D Model
...quadcopter 3d model
3dexport
quadcopter aircraft helicopter
quadcopter 3d model greatghost 94019 3dexport
3d_export
$18
passenger quadcopter
... a multicopter is an aircraft built according to a helicopter scheme, with three or more rotors. previews rendered with redshift.
turbosquid
$159
Quadcopter Animated.
... available on turbo squid, the world's leading provider of digital 3d models for visualization, films, television, and games.
turbosquid
$19
Drone Quadcopter
... available on turbo squid, the world's leading provider of digital 3d models for visualization, films, television, and games.
turbosquid
$12
Drone Quadcopter
... available on turbo squid, the world's leading provider of digital 3d models for visualization, films, television, and games.
3d_export
$29

Quadcopter
...
questions about the continuation of the collection or the model can be asked here:<br>https://www.artstation.com/evgen_beg
220
design_connected
$29

Lotus 220
...lotus 220
designconnected
arketipo lotus 220 computer generated 3d model. designed by studiomemo.
design_connected
$11
Hulahoop 220
...hulahoop 220
designconnected
bonaldo hulahoop 220 computer generated 3d model. designed by busana, alessandro .
design_connected
$27

Sayonara 220
...sayonara 220
designconnected
bbb emmebonacina sayonara 220 computer generated 3d model. designed by decursu, giorgio.
design_connected
$20

DS-220
...ds-220
designconnected
de sede ds 220 armchairs computer generated 3d model. designed by de sede design-team.
3ddd
$1
Olympus FE - 220
...olympus fe - 220
3ddd
olympus , фотоаппарат
olympus fe - 220
3ddd
$1

Carpenter 220
...carpenter 220
3ddd
диаметр стола 1,6м
turbosquid
$13

Nokia 220
... available on turbo squid, the world's leading provider of digital 3d models for visualization, films, television, and games.
design_connected
$27

Land Sofa 220
...ignconnected
photo-realistic 3d models of the land sofa 220 from bonaldo for 3d architectural and interior design presentations.
design_connected
$9

Zeus table 220
...us table 220
designconnected
poliform zeus table 220 dining tables computer generated 3d model. designed by vincent van duysen.
turbosquid
$50

Excavator JCB 220
...uid
royalty free 3d model excavator jcb 220 for download as on turbosquid: 3d models for games, architecture, videos. (1304620)
250
design_connected
$27

Arch 250
...arch 250
designconnected
mdf italia arch 250 computer generated 3d model. designed by massaud, jean-marie.
3d_export
$5

ferrari 250 california
...ferrari 250 california
3dexport
1957 ferrari 250 california
turbosquid
free

FAB 250
... available on turbo squid, the world's leading provider of digital 3d models for visualization, films, television, and games.
3d_export
$10

Ferrari 250 Testa Rossa 250 1957
... the front suspension is made and there is an engine under the hood. sculpting and textures were used in the study of the chairs.
design_connected
$29

Amouage Sofa 250
...amouage sofa 250
designconnected
busnelli amouage sofa 250 computer generated 3d model. designed by lagravinese, castello.
design_connected
$27

John-John 250
...john-john 250
designconnected
john-john 250 computer generated 3d model. designed by massaud, jean-marie.
design_connected
$22

Airport Sofa 250
...airport sofa 250
designconnected
poliform airport sofa 250 computer generated 3d model. designed by navone, paola.
3d_export
$20

ferrari 250 gto 1962
...ferrari 250 gto 1962
3dexport
ferrari 250 gto 1962
3d_export
$20

ferrari 250 gt california
...ferrari 250 gt california
3dexport
ferrari 250 gt california
turbosquid
$1

Female 250, scan
...can
turbosquid
royalty free 3d model 250 for download as obj on turbosquid: 3d models for games, architecture, videos. (1242260)
Props
3ddd
$1

Props
...props
3ddd
props
3d_ocean
$10
Props
...ject you need this props design this 6 taype for props to get your design perfect and nice file include : 1 max 2 obj 3 3ds 4 zip
turbosquid
$15
Props
...s
turbosquid
royalty free 3d model props for download as max on turbosquid: 3d models for games, architecture, videos. (1249032)
turbosquid
$1

PROPS
...d model props for download as unitypackage, obj, fbx, and tga on turbosquid: 3d models for games, architecture, videos. (1627660)
turbosquid
$5
props
... available on turbo squid, the world's leading provider of digital 3d models for visualization, films, television, and games.
turbosquid
free
PROP
... available on turbo squid, the world's leading provider of digital 3d models for visualization, films, television, and games.
3ddd
$1

kids props
...kids props
3ddd
декоративный набор
kids props
3d_ocean
$8
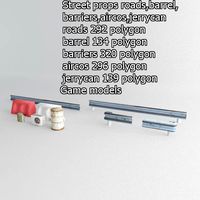
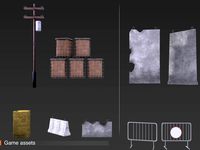
Street props
...l barrier prop roads street street prop
street props game models barrel barrier roads aircos jerrycan models fbx obj and max file
turbosquid
$39
Apocalyptic Props
...uid
royalty free 3d model apocalyptic props for download as on turbosquid: 3d models for games, architecture, videos. (1380028)
turbosquid
$1
Bunker props
...rbosquid
royalty free 3d model bunker props for download as on turbosquid: 3d models for games, architecture, videos. (1196014)
Arms
archibase_planet
free
Arm
...ase planet
arm hand right hand skeleton
arm human skeleton right arm n030515 - 3d model (*.gsm+*.3ds+*.max) for 3d visualization.
3ddd
$1
arm chair
...arm chair
3ddd
arm chair , пуф
arm chair
turbosquid
$5
arm
...arm
turbosquid
royalty free 3d model arm for download as obj on turbosquid: 3d models for games, architecture, videos. (1306158)
turbosquid
free

Arm
...arm
turbosquid
free 3d model arm for download as obj and fbx on turbosquid: 3d models for games, architecture, videos. (1346955)
turbosquid
$29

Arm
...osquid
royalty free 3d model arm for download as obj and fbx on turbosquid: 3d models for games, architecture, videos. (1382436)
3d_export
$5

coat of arms
...coat of arms
3dexport
coat of arms
3ddd
$1
ARM SOFA
...arm sofa
3ddd
arm sofa
3ddd
$1
Arm chair
...arm chair
3ddd
arm chair
3ddd
$1
Arm chair
...arm chair
3ddd
угловое
arm chair
3ddd
$1
ARM CHAIR
...arm chair
3ddd
arm chair clothes
5
turbosquid
$6

Rock 5-5
...urbosquid
royalty free 3d model rock 5-5 for download as obj on turbosquid: 3d models for games, architecture, videos. (1639063)
3d_export
$5

hinge 5
...hinge 5
3dexport
hinge 5
turbosquid
$10

A-5
... available on turbo squid, the world's leading provider of digital 3d models for visualization, films, television, and games.
turbosquid
$2

A-5
... available on turbo squid, the world's leading provider of digital 3d models for visualization, films, television, and games.
turbosquid
$12

Calligraphic Digit 5 Number 5
...hic digit 5 number 5 for download as max, obj, fbx, and blend on turbosquid: 3d models for games, architecture, videos. (1389333)
3ddd
$1

5 роз
...5 роз
3ddd
5 роз в стеклянной вазе
design_connected
$11

iPhone 5
...iphone 5
designconnected
apple iphone 5 computer generated 3d model.
3ddd
$1

Lola 5
...lola 5
3ddd
miniforms
lola 5 miniforms 300*65*134
3ddd
$1

Nexus 5
...dd
nexus , phone , телефон
google nexus 5 phone
3d_ocean
$15

iPhone 5
...iphone 5
3docean
3d 4d apple cinema iphone model modeling phone screen texture
iphone 5 3d model and texture realistic iphone 5.