Thingiverse
2020 power distribution box
by Thingiverse
Last crawled date: 4 years, 2 months ago
Introduction
I have recently built an Anycubic Kossel Linear Plus, and decided that I needed some LEDs to illuminate the print bed (https://www.thingiverse.com/thing:2764599). Unfortunately there are no simple places to get access to 12v, unless I put wires under the Trigorilla's screw terminal block - not a good or safe solution).
My solution
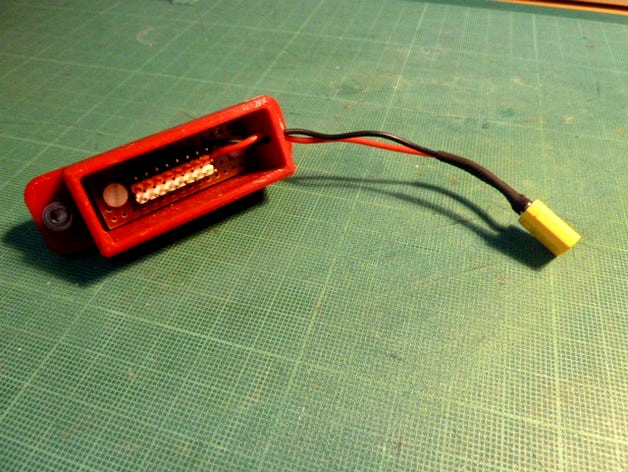
I ended up by designing a small box similar to those I've installed on other printers, but this time a lot tidier and more universal in appeal. This can be fixed to 2020 profile in a convenient place using M3 T-nuts.
This box holds a piece of stripboard/veroboard that is 16 holes along the copper strips and 5 holes across. The board may need a bit of judicious filing along the long edge to make it fit. The circuit board is held in place by two M3 screws (I used short nylon screws) that go into tapped holes. You might to be able to use self-tapping screws of the right size, but I haven't tried that - you will also have to watch out for short-circuits if you use metal screws of any sort.
The board holds three strips of header pins, each 8 pins long, in black, red and white. Only the black and red strips are connected (-ve and +ve) - the third is used so that 3-pin headers can be used, with red to the central connector and black to one side; this means that it is hard to connect the circuit the wrong way around - it either works or it doesn't make a connection. Unless you try really hard to be silly you can not make a reversed connection (but it's not impossible).
PLEASE NOTE: this is only for low-current devices as stripboard has a very low current-carrying capacity. LEDs, small fans, etc, should be fine.
Connecting to 12 volts
I opened up the power supply on my Anycubic Kossel and found that there were 2 unused screw terminals available - very convenient! I crimped 2 fork terminals of the correct size onto some appropriate cable (actually 16A cable for use in car loom wiring), screwed them in place and threaded the cables through the sleeving before closing everything up again.
IMPORTANT: I you are not confident in working with power circuits then find a 12v supply elsewhere and leave the power supply cover untouched. There is mains wiring inside that cover - and obviously the power plug should be out when you do this work!
I would recommend that you fit a polarised 2-way connector just after the sleeving ends; I happened to have a few XT30 connectors so I used them, but any good connector would do the job.
I have recently built an Anycubic Kossel Linear Plus, and decided that I needed some LEDs to illuminate the print bed (https://www.thingiverse.com/thing:2764599). Unfortunately there are no simple places to get access to 12v, unless I put wires under the Trigorilla's screw terminal block - not a good or safe solution).
My solution
I ended up by designing a small box similar to those I've installed on other printers, but this time a lot tidier and more universal in appeal. This can be fixed to 2020 profile in a convenient place using M3 T-nuts.
This box holds a piece of stripboard/veroboard that is 16 holes along the copper strips and 5 holes across. The board may need a bit of judicious filing along the long edge to make it fit. The circuit board is held in place by two M3 screws (I used short nylon screws) that go into tapped holes. You might to be able to use self-tapping screws of the right size, but I haven't tried that - you will also have to watch out for short-circuits if you use metal screws of any sort.
The board holds three strips of header pins, each 8 pins long, in black, red and white. Only the black and red strips are connected (-ve and +ve) - the third is used so that 3-pin headers can be used, with red to the central connector and black to one side; this means that it is hard to connect the circuit the wrong way around - it either works or it doesn't make a connection. Unless you try really hard to be silly you can not make a reversed connection (but it's not impossible).
PLEASE NOTE: this is only for low-current devices as stripboard has a very low current-carrying capacity. LEDs, small fans, etc, should be fine.
Connecting to 12 volts
I opened up the power supply on my Anycubic Kossel and found that there were 2 unused screw terminals available - very convenient! I crimped 2 fork terminals of the correct size onto some appropriate cable (actually 16A cable for use in car loom wiring), screwed them in place and threaded the cables through the sleeving before closing everything up again.
IMPORTANT: I you are not confident in working with power circuits then find a 12v supply elsewhere and leave the power supply cover untouched. There is mains wiring inside that cover - and obviously the power plug should be out when you do this work!
I would recommend that you fit a polarised 2-way connector just after the sleeving ends; I happened to have a few XT30 connectors so I used them, but any good connector would do the job.
Similar models
thingiverse
free

Azteeg X5 (v1.1 with screw terminals) under-bed mount for Mini Kossel by Atomsk
...crew terminals.
i also added holes for the heavy-gauge power and heater wires, and the ribbon-cable connector for a viki panel.
thingiverse
free

12V 360W Power supply cover with banana terminals by MishoIV
...://goo.gl/tqcyis
some wires and wire connectors to connect the banana terminals
this cover was designed to use with rc chargers.
thingiverse
free

Emerson 12V 55A Power Supply (7001484) Bracket by Khepri
... the 12v connections and used 10mm strain reliefs to secure these.
the powerswitch is connected with a 2.5x5 mm dupont connector.
thingiverse
free

12V Aux Power Rail for RAMPS and 2020 Extrusion by gregington
...ale to female dupont connectors.
connect your 12v accessories to the remaining header pins. ensure you have the polarity correct.
thingiverse
free

Terminal Board by itsPark
...o a wall/plate
-screw these banana/ wire screw crimp combo terminals into.
ive used it for on the fly connections to a 12v supply
thingiverse
free

NodeMCU V3 Case (screwless) by gdenicola
...ed up the gap for the usb port
product examples that are working with this model.
psu female connection
nodemcu
3 pin cables
psu
thingiverse
free

HP DPS600PB mount by marcor
...ews, which i believe are m2 or m1.5 screws. i used these female usb connectors. the small screws are from a collection of screws.
grabcad
free

Wire Connection Terminal
...ugh hole version, for a printed circuit board. the terminal is 14,5x14,5mm. with a terminal block screws m5 and a square washers.
thingiverse
free

Anycubic Kossel Power Supply Switch Cover by PoZCon
...ch, like this one on amazon.
i use this cover in combination with the simplified 2020 power supply mount designed by @blakemccoy
thingiverse
free

12V, 3W High Power LED Assembly by logan
...e 3.3/5v i/o lines to make the board controllable.
if there's interest, i can upload cam files for easy submission to itead.
Distribution
turbosquid
$8

Distribution box
...ee 3d model distribution box for download as ma, obj, and fbx on turbosquid: 3d models for games, architecture, videos. (1388096)
3d_export
$5

Distribution of chemical production equipment 3D Model
... chemical production equipment 3d model
3dexport
distribution of chemical production equipment 3d model tiger2802 87767 3dexport
turbosquid
$35

Ancient Chinese Architecture Distribution room 03
...e distribution room 03 for download as 3ds, max, obj, and fbx on turbosquid: 3d models for games, architecture, videos. (1297253)
3d_export
$99

Renault Premium Distribution Refrigerator Truck 20 3D Model
... truck heavy trucks industrial french france
renault premium distribution refrigerator truck 20 3d model humster3d 93765 3dexport
3d_export
$99

Renault Premium Distribution Hybrys Garbage Truck 3D Model
...4 truck heavy trucks industrial french france
renault premium distribution hybrys garbage truck 3d model humster3d 93703 3dexport
3d_export
$99

Renault Premium Distribution Hybrys Box Truck 2011 3D Model
... truck heavy trucks industrial french france
renault premium distribution hybrys box truck 2011 3d model humster3d 93591 3dexport
cg_studio
$99

Renault Premium Distribution Hybrys Box Truck 20113d model
...s - renault premium distribution hybrys box truck 2011 3d model, royalty free license available, instant download after purchase.
humster3d
$75

3D model of Renault Premium Distribution Refrigerator Truck 2011
...ium distribution refrigerator truck 2011 in various file formats. all our 3d models were created maximally close to the original.
humster3d
$75

3D model of Renault Premium Distribution Hybrys Garbage Truck 2011
...m distribution hybrys garbage truck 2011 in various file formats. all our 3d models were created maximally close to the original.
humster3d
$75

3D model of Renault Premium Distribution Hybrys Box Truck 2011
...emium distribution hybrys box truck 2011 in various file formats. all our 3d models were created maximally close to the original.
2020
3d_export
$5

cyberpunk 2020
...cyberpunk 2020
3dexport
cyberpunk 2020
3d_export
$5
monster01 2020
...monster01 2020
3dexport
monster01 2020 dxf file rigged in mixamo.
3d_export
$129

explorer 2020
...explorer 2020
3dexport
3d_export
$5

mug 2020
...mug 2020
3dexport
3d_export
$15

3 rims 2020
...3 rims 2020
3dexport
new rims 2020 from inventor
3d_export
$35

landrover 2020
...landrover 2020
3dexport
turbosquid
$85

Q8 2020
... free 3d model audi q8 2020 for download as max, obj, and fbx on turbosquid: 3d models for games, architecture, videos. (1559582)
turbosquid
$2

city 2020
... available on turbo squid, the world's leading provider of digital 3d models for visualization, films, television, and games.
turbosquid
$10

Hammer 2020
... hammer 2020 for download as c4d, 3ds, dae, fbx, stl, and obj on turbosquid: 3d models for games, architecture, videos. (1632858)
3d_export
$20

chevrolet corvette stingray 2020
...chevrolet corvette stingray 2020
3dexport
chevrolet corvette stingray 2020
Power
turbosquid
$100

power
...ower
turbosquid
royalty free 3d model power for download as on turbosquid: 3d models for games, architecture, videos. (1421990)
3d_export
$5

Power
...power
3dexport
3d_export
$5

power outlets
...power outlets
3dexport
power outlets
3ddd
$1

lion power
...lion power
3ddd
лев , статуя
lion power gold sculpture
3ddd
$1

Sea Power
...
компас , море , часы
часы с компасом sea power
3ddd
free

Meridiani / Power
...power
3ddd
meridiani , круглый
стол power производитель meridiani, диаметр 120,высота 67
3d_export
$5

Power Surge
...power surge
3dexport
the power surge is a all mesh carnival ride to lower in game part count and lag
turbosquid
$8

Airport Ground Power Unit (AXA Power )
... available on turbo squid, the world's leading provider of digital 3d models for visualization, films, television, and games.
turbosquid
$50

Power Houser
...rbosquid
royalty free 3d model power houser for download as on turbosquid: 3d models for games, architecture, videos. (1333800)
3d_export
$5

power outlet
...power outlet
3dexport
power outlet<br>format file maya 2018, 3d max 2017, obj, fbx
Box
archibase_planet
free

Box
...box
archibase planet
box carton cardboard box
box 2 - 3d model (*.3ds) for interior 3d visualization.
archibase_planet
free

Box
...box
archibase planet
carton cardboard box box
box 1 - 3d model (*.3ds) for interior 3d visualization.
3d_export
$6

box
...box
3dexport
box
3d_export
$5

Box
...box
3dexport
box
3d_export
$5

box
...box
3dexport
box
3d_export
$5

box
...box
3dexport
box
archibase_planet
free

Box
...box
archibase planet
box box for paper notebook pencil
box - 3d model (*.gsm+*.3ds) for interior 3d visualization.
archibase_planet
free

Box
...box
archibase planet
box carton cardboard box
box n170111 - 3d model (*.gsm+*.3ds) for interior 3d visualization.
archibase_planet
free

Box
...box
archibase planet
box carton cardboard box
box n050411 - 3d model (*.gsm+*.3ds) for interior 3d visualization.
archibase_planet
free

Boxes
...boxes
archibase planet
boxes box case bin
boxes n281213 - 3d model (*.gsm+*.3ds+*.max) for interior 3d visualization.