Thingiverse

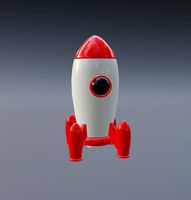
18mm Rocket Kits by Aslansmonkey
by Thingiverse
Last crawled date: 3 years, 1 month ago
I plan to have a "Rocket Day" with some family to recover from the Covid Quarantine days and designed this rocket kit for the event. There are five nose cones and five fin units that can be mixed and matched in however you see fit resulting in 25 different combinations.
To build one of these rockets you will need:
1 of the Fins
1 of the nose cones
1 of the motor retainers
1 of the motor stops
1 BT-50 body tube
1 BT-20 body tube (cut to 90mm)
1 12" parachute
1 18" (or so) piece of 1/8" elastic.
Modelling clay
You can cut the 24mm body tube to the length you want. The White and red rockets in the photo use 9" of tube while the Purple rocket is using 5.5" of scrap tube I had laying around. The longer the body tube the less weight you will have to add to the nose. The standard length of BT-50 tubes is 18", so using 9" tubes you can build two rockets. And since they come multi-packs of 3-6 tubes, it's really easy to assemble a bunch of kits by cutting tubes to length and printing enough parts.
Build Instructions:
After printing and cleaning up the parts, the 90mm of engine tube can be glued into the fin unit with the bottom of the motor tube flush with the threaded end of the fin unit. The motor stop is glued inside the motor tube in such a way that the motor also comes flush with the bottom of the fin unit. The fin unit can then be glued into the bottom of the body tube. I used epoxy for all this.
For the shock cord (Elastic), I used the Estes paper wedge design with the shock cord folded twice in a paper wedge and then glued about 1.5" down inside the top of the body tube. I then used a piece of nomex cloth slid over the shock cord instead of recovery wadding, but you can forgo that and just use wadding like regular small rockets. Tie the shock cord to the nose cone and attach the chute to the nose (or make a loop about 4" down from the nose and attach it there, like I did).
Decorate the body however you like, but I've provided some sample files you can print on label stock (I used vinyl label stock with a glossy finish). You can then cut out the entire piece and wrap the body tube. The lines to the sides of the decals mark 1/4 spacing around the body tube and can be used to align your designs.
You will need to drill a hole in the bottom of the nose and will need to pack in modelling clay to balance the rocket for stability. 3D printed fin units are on the heavy side compared to the regular plastic units that come with some rocket kits, and so it's important to get the rocket balanced.
Balancing:
To balance a rocket, load it like you would for flight with a motor in it. I like to balance it with the largest motor I plan to use, so for these that would be a C6-5. The balance point should be about 1.5", give or take, above the fin unit, so use that as a starting point. Add clay to the nose until it balances there. Tie a 10 foot string to the rocket at this point and, with the rocket still loaded, take it out to a clear area and swing it around your head. A balanced rocket should swing nose first. If it tumbles, experiment with adding weight to the nose until it swings straight.
The attached videos show these flying on an A8-3, a B6-4 and a C6-3. Normally I'd not recommend a C6-3 over a C6-5, however as these rockets need the longer delay. I just didn't happen to have any C6-5s.
Videos of the launches:
Stiletto (A8-3): https://www.youtube.com/watch?v=FJ7HFNuknOA
Ellipsis (B6-4): https://www.youtube.com/watch?v=pr781X4bs-M
Stiletto (C6-3): https://www.youtube.com/watch?v=ov_A_whR3xA
Similar models
thingiverse
free

Model Rocket Kit (nose+body w/ fins) for Engine C6-0 by levincoolxyz
... for body tube w/ motor mount, center rings and fins;
model for quadratic shaped nose cone;
max dimension: ~7" x 7("^2)
thingiverse
free

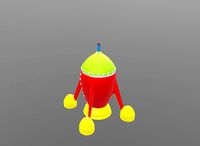
Mini M&M Rocket for 18mm Motors
... launched this on an a8-3 as seen in this video...https://www.youtube.com/watch?v=gjyxiius168
...but it should take up to a c6-7.
thingiverse
free

Alpha 3D Model Rocket by Mr_Disintegrator
...an exact copy of that kit, it is quite similar appearance. you can either print just the nose cone...
thingiverse
free

Model Rocket Kit by ellipticaloptician
...tant material.
here's a video of the rocket blasting into the sky in slow motion: https://www.youtube.com/watch?v=r5lmzhydy4g
thingiverse
free

Customizable Rocket Nose Cone Coupler by artdavis
...hangelog:
2017-05-07: file creation
2017-06-08: added fillet/chamfer feature to bottom of coupler for easier body tube insertion.
thingiverse
free

Rear Eject Bomb Rocket (18mm motors) by Aslansmonkey
...an 18mm design. so here it is. assembly is similar to the 24mm versions so see my things on...
grabcad
free

Nose Cone for Rocket
...nose cone for rocket
grabcad
friction fit for a 54mm body tube. threaded hole for an eye bolt / shock-cord connection.
thingiverse
free

Model Rocket Nose Cones by Aslansmonkey
... was loose in the nose. hence the "tight" versions. just be prepared for the tight versions to possibly be too tight.
thingiverse
free

Model Rocket Fin Can & Nose Cone (BT50) v1 by krusty
... to suit a bt50 body tube - fin can fits an estes 18mm motor.
created in microsoft's 3d builder.
this is my first 3d object!
thingiverse
free

Estes Saros / Nomad Upscale (BT-55) by Leo_N
...leo
note:
these 3d printed parts can also be used to clone the nomad kit:
http://plans.rocketshoppe.com/estes/est1344/est1344.htm
Aslansmonkey
thingiverse
free

Boo Mount by Aslansmonkey
...ly but then i thought "why not make a mount so i can stick it to the wall". so i did.
it now decorates my garage wall.
thingiverse
free

Radial Engine Spinner by Aslansmonkey
...on many radial engine planes from the wwii era and looks good on my p-47. it should also work on the corsair or wild cat planes.
thingiverse
free

8mm Light Bar by Aslansmonkey
...my sculptr delta, i remixed the wanhao one for the sculptr.
this light bar is probably usable on any printer using 8mm round bar.
thingiverse
free

Claymore Hitch Plug XXL by Aslansmonkey
...ted that one so i gave it to him.
i wanted to make another one for my f-150, but it just needed to be bigger! hence, this remix!
thingiverse
free

Extruder LED Strip Mount for Monoprice Maker Select V2 by Aslansmonkey
...rice maker select v2 by aslansmonkey
thingiverse
remixed the original to fit the screw spacing on the monoprice maker select v2.
thingiverse
free

2015 Dalek Split by Aslansmonkey
...t fits up to 125% this way on my monoprice maker select v2.
now if i could just print a full size one i could rule the universe!!
thingiverse
free

Stanley GR25 Glue Gun Stand by Aslansmonkey
...es pivot but doesn't lock in place. on mine it's snug enough that it doesn't freely rotate however, so this is fine.
thingiverse
free

FLSun Effector with built in fan adapter by Aslansmonkey
...nted to use the 40mm fan mod. but it occurred to me i could just combine that fan modification with the base effector, so i did.
thingiverse
free

Delta Effector with integraded fan shroud by Aslansmonkey
...ified the 40mm version to have an integrated fan shroud flush with the bottom of the effector. this is working well on my flsun.
thingiverse
free

Model Rocket Display Bases (With Motor Clip notch) by Aslansmonkey
...ch for the engine hooks. so i modified it. enjoy!
11/19/2019 edit: i needed a 24mm stand for a dynastar snarky, so i made one.
18Mm
3ddd
$1

3D Wall Panels Ripples
...down to suit your requirements. interior base material is 18mm e0 mr mdf or for outdoors, waterproof 18mm thick...
3ddd
$1

3D Wall Panels Reflections
...down to suit your requirements. interior base material is 18mm e0 mr mdf or for outdoors, waterproof 18mm thick...
3d_export
$18

hands ring
...hands ring 3dexport current ring size is 18mm<br>ring rail size is...
3d_export
$10

armchair
...machine height 678mm width 785mm is long 545 plywood 18mm ready for production,solid / surface...
3d_export
$15

rocking chair
...height 901mm. width 990mm. is long 594 mm. plywood 18mm.solid / surface...
3d_export
free

coffee table
...coffee table 3dexport coffee table for cnc machines 18mm plywood. dimensions: height 420mm., length 700mm., width 342mm.. the...
3ddd
$2

3D Wall Panels Scallops
...down to suit your requirements. interior base material is 18mm e0 mr mdf or for outdoors, waterproof 18mm thick...
3ddd
$1

3D Wall Panels Stars
...down to suit your requirements. interior base material is 18mm e0 mr mdf or for outdoors, waterproof 18mm thick...
3d_export
$15

parametric sofa
...machine and visualization without textures. solid modeling. drawing is present.18mm plywood the size 1314mm. 754mm. depth...
3d_export
$11

solitaire ring
...solitaire ring 3dexport current ring size is 18mm<br>ring rail size is 56.5<br>stone size 4.5 mm....
Rocket
3d_export
$5
rocket
...rocket
3dexport
rocket 3d model low poly
3d_export
$5

rocket
...rocket
3dexport
rocket low poly 3d model cartoon
archibase_planet
free

Rocket
...rocket
archibase planet
rocket toy
rocket tintin's n290813 - 3d model (*.gsm+*.3ds+*.max) for interior 3d visualization.
3d_export
$5

Rocket
...rocket
3dexport
the rocket is made from a cylinder made in blender 3.0
turbosquid
$6

Rocket Baby Rocket Stool
...el rocket baby rocket stool for download as max, obj, and fbx on turbosquid: 3d models for games, architecture, videos. (1502645)
turbosquid
$15

rocket
...ket
turbosquid
royalty free 3d model rocket for download as on turbosquid: 3d models for games, architecture, videos. (1340796)
turbosquid
$10
Rocket
...ket
turbosquid
royalty free 3d model rocket for download as on turbosquid: 3d models for games, architecture, videos. (1247547)
3d_export
$5

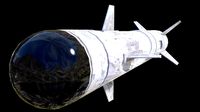
scifi rocket
...scifi rocket
3dexport
scifi rocket
turbosquid
$199

rockets
...turbosquid
royalty free 3d model rockets for download as max on turbosquid: 3d models for games, architecture, videos. (1233135)
turbosquid
$30
Rocket
...
turbosquid
royalty free 3d model rocket for download as fbx on turbosquid: 3d models for games, architecture, videos. (1290260)
Kits
turbosquid
$3

Bathroom Kit Baño kit
... available on turbo squid, the world's leading provider of digital 3d models for visualization, films, television, and games.
turbosquid
$19

Kit
... available on turbo squid, the world's leading provider of digital 3d models for visualization, films, television, and games.
3d_export
$20

Drift Kit
...drift kit
3dexport
turbosquid
$40

BitCoin Kit
...urbosquid
royalty free 3d model bitcoin kit for download as on turbosquid: 3d models for games, architecture, videos. (1519068)
turbosquid
$9

Industrial kit
...osquid
royalty free 3d model industrial kit for download as on turbosquid: 3d models for games, architecture, videos. (1144117)
turbosquid
$6

Kit Vases
...
turbosquid
royalty free 3d model kit vases for download as on turbosquid: 3d models for games, architecture, videos. (1285114)
turbosquid
free

Survival Kit
...rbosquid
royalty free 3d model survival kit for download as on turbosquid: 3d models for games, architecture, videos. (1637721)
turbosquid
$50

Ninja Kit
...rbosquid
royalty free 3d model ninja kit for download as fbx on turbosquid: 3d models for games, architecture, videos. (1672364)
turbosquid
$35

Brushes Kit
...osquid
royalty free 3d model brushes kit for download as max on turbosquid: 3d models for games, architecture, videos. (1216721)
turbosquid
$19
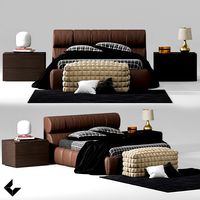
Kit Bedroom
...osquid
royalty free 3d model kit bedroom for download as max on turbosquid: 3d models for games, architecture, videos. (1290049)