Thingiverse
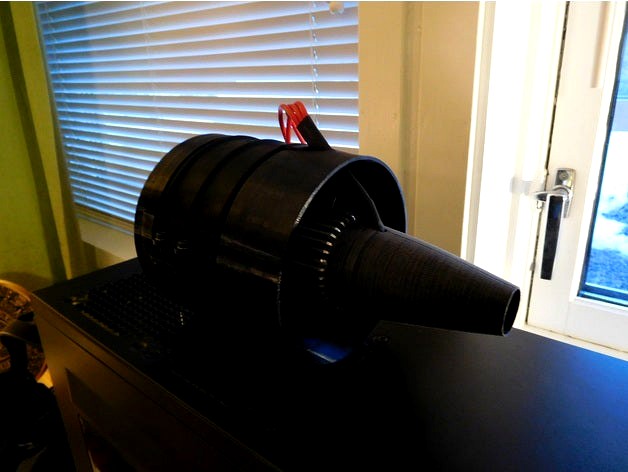
120 mm EDF by tahustvedt
by Thingiverse
Last crawled date: 3 years ago
The EDF that powers my EL-39 3D printed jet: https://youtu.be/9tShEHO5M5shttps://cults3d.com/en/3d-model/various/el-39-semi-scale-rc-jet-for-120-mm-edf
I recommend a 120 A ESC and 12S lipos. Expect 85-100 A current draw. I haven't measured max thrust as my thrust stand maxes out at 5 kgf.
the photos show the fan with rubber inlet and exhaust installed. It will be shorter without them.
Safety warnings:
-This is a very highly loaded assembly at high speed so it's important that you know what you are doing.
-Make sure the integrity of the printed impeller is good before trying to run it.
-Always wear protective glasses when test runnin the fan. Always protect your eyes.
-Do NOT run the fan at high power while holding in your hand.
-Keep your hands and any loose items away from the fan when running. It WILL shred your fingers if they get sucked in, and the suction force is very strong. If something gets sucked in it can damage the impeller and potentially shatter, throwing loose debris out.
To secure the fan to the motor it is recommended that you drill a 3 mm hole half way through the shaft 17 mm from the motor mounting face so that one grub screw is driven by the motor. A flat spot is probably not enough to keep it on due to the softness of the plastic.Use two grub screws. A high quality carbide drill and a drill press makes drilling the hole easy. Regular HSS drills will struggle to cut the shaft.
If the fan rubs when new it will usually stop rubbing after slow speed running for a few seconds. If the interference between the fan and shroud is great then you'll need to sand the blades slightly until it spins freely. The ideal fit is when the fan barely touches some places when new, and rubs itself to a very close fit after a few seconds.
Use thermal paste between the motor and heatsink. I recommend a good quality thermal paste for PC CPU heatsinks.
Use thread locking compound on the motor mounting bolts.
I recommend balancing the fan statically before running, and then balancing by feel while running slowly. Use aluminum tape on the respective blades to balance the fan.
The tail cone should be glued to the end of the motor using CA. Use heatshrink tubing around the motor wires so that they form a slim shape fr less air resistance.
The bell intake is for test running on a test bench. Running without the bell intake produces artificially low thrust.
Expect 4,2 kW in a test bench and 3,8+ kW installed in an airframe.
It needs a HET 800-73-590kv motor with a heatsink:https://www.effluxrc.com/HET-800-73-590-Motor-8mm-shaft-HET800-73-590-8MM.htmhttps://www.effluxrc.com/Jetfan-120-1-Heat-Sink-for-50mm-Motors-JF50mmHS-1.htm
M3x20 grub screws for securing the impeller to the shaft:https://rover.ebay.com/rover/1/711-53200-19255-0/1?ff3=4&toolid=11800&pub=5575353675&campid=5338226872&mpre=https%3A%2F%2Fwww.ebay.com%2Fitm%2FM3x20mm-12-9-Alloy-Steel-Hex-Socket-Set-Cap-Point-Grub-Screws-Black-20pcs%2F351462953237
M3x8 countersunk screws for attaching the motor to the housing:https://rover.ebay.com/rover/1/711-53200-19255-0/1?ff3=4&toolid=11800&pub=5575353675&campid=5338226872&mpre=https%3A%2F%2Fwww.ebay.com%2Fitm%2FM3x8mm-10-9-Carbon-Steel-Countersunk-Head-Hex-Socket-Screw-50pcs-T7M8%2F253244968159
Thermal paste for the heatsink:https://hobbyking.com/en_us/thermal-heat-transfer-compound-with-applicator-2pc.html?affiliate_code=BSFWYBUNYWDKXJN&_asc=8924049282https://rover.ebay.com/rover/1/711-53200-19255-0/1?ff3=4&toolid=11800&pub=5575353675&campid=5338226872&mpre=https%3A%2F%2Fwww.ebay.com%2Fitm%2FArctic-Artic-Silver-5-Thermal-Compound-Paste-FOR-Grease-CPU-Heatsink-XBOX-PS4%2F263410160737
Similar models
thingiverse
free

Work in progress 120 mm EDF by tahustvedt
... lipo and neumotor 1907/2y motor:
910 g at 250 w
1500 g at 500 w
2000 g at 750 w
2500 g at 1000 w
3600 g at 1700 w full throttle.
cults
$17

Nuclear bomb PC case. "Nuke"
...cooler: noctua nh-l9i, thermolab itx30, silverstone - sst-nt08-115xp or similar low profile cooler. larger coolers will fit with an...
thingiverse
free

Alternate Static Air Switch
...ion-headlight-head-light-switch-jk106-dc-12v-5a%2f153742835898%3fepid%3d6018230080%26hash%3ditem23cbc980ba%3ag%3azdmaaoswn7jyecap
thingiverse
free

Diode Mounts for Flashback Diode Packs by dhench
...ther-for-stepper-motor-compatible-with-drv8825-a4998-drivers%2f152813847024%3fhash%3ditem23946a41f0%3am%3ampfztgaeyk4d5gduz_meela
thingiverse
free

Mosfet Mount with 50mm Fan by dhench
...-printer-heated-bed-power-module-i3-heatbed%2f152890867085%3fsspagename%3dstrk%253amebidx%253ait%26_trksid%3dp2057872.m2749.l2649
thingiverse
free

Cooler Master Sickleflow 120mm fan performance mod. by tahustvedt
...the photo of the ring installed is an early test version of the ring. the updated version is slightly different for improved fit.
thingiverse
free

DIY Arduino RC Car with Battery and Remote by atc1441
...ame-controller-dual-achse-ausbruch-modul-passend-fur-arduino-ky-023%2f201802907423%3fhash%3ditem2efc63ff1f%3ag%3a5meaaoswmtxxvyzt
thingiverse
free

Electric Potato gun Handle by atc1441
...dicht-momentanen-ein-mini-runde-drucktaster%2f192210022844%3fsspagename%3dstrk%253amebidx%253ait%26_trksid%3dp2060353.m2749.l2649
thingiverse
free

Alexa TV Lamp esp8266 infrared Arduino by atc1441
...5-100pcs-uln2003-uln-2003-uln2003an-uln2003apg-dip-16-ic-new%2f401409516658%3fhash%3ditem5d75df2472%3am%3amtnnvulzcegcec7agiukiea
cults
free

Cooler Master Sickleflow 120mm fan performance mod.
...the photo of the ring installed is an early test version of the ring. the updated version is slightly different for improved fit.
Tahustvedt
thingiverse
free

Hextronix HXT900 servo by tahustvedt
... hxt900 servo by tahustvedt
thingiverse
accurate model of a hextronix hxt900 servo. made from measurements form an actual servo.
thingiverse
free

540 AND 550 MOTORS. by tahustvedt
...e
540 and 550 motor models to help with design work. the backplate timing isn't right, but all dimensions are very accurate.
thingiverse
free

RC airplane wheel chocks. by tahustvedt
... chocks. by tahustvedt
thingiverse
wheel chocks for rc planes. these fit 114 mm/4,5" wheels. scale up or down as necessary.
thingiverse
free

Lynx Helicopter cookie cutters by tahustvedt
...edt
thingiverse
cookie cutters in the shape of the rnoaf westland lynx mk. 86 helicopter. 01 is 21 cm long and 02 is 28 cm long.
thingiverse
free

Wing for Schumacher CAT XLS by tahustvedt
...le wing for the schumacher cat xls and other vintage cat's. print solid for strength.
catwing02 has integrated mounting lugs.
thingiverse
free

Hitec HS-65HB Mighty Feather servo by tahustvedt
...ghty feather servo by tahustvedt
thingiverse
accurate model of a hitec hs-65hb servo. modeled from measurements of a real servo.
thingiverse
free

Gary the pilot. by tahustvedt
...your slicer to achieve the height you need. i didn't use any support between the head and headset arch and it came out great.
thingiverse
free

Hitec HS-225MG Mighty Mini servo by tahustvedt
...i servo by tahustvedt
thingiverse
an accurate model of the hitec hs-225mg servo modeled using measurements from an actual servo.
thingiverse
free

Skis for RC planes by tahustvedt
...he curved underside with thick ca and then glue the keels. use a spring, rubber band or rubber bumper to hold it level in flight.
thingiverse
free

Wanhao Duplicator i3 fan mount spacers by tahustvedt
...f fans which are mounted to the original mounting bracket on the wanhao duplicator i3 printer.
the spacers are 3mm and 1mm tall.
Edf
turbosquid
$49

EDF fleet Complete
... available on turbo squid, the world's leading provider of digital 3d models for visualization, films, television, and games.
turbosquid
$30

Zingy EDF energy blob
... available on turbo squid, the world's leading provider of digital 3d models for visualization, films, television, and games.
3d_export
$6

Company car 3D Model
...car 3d model 3dexport travel company car post ups edf vialis carrier company car 3d model pio33d 67443...
3d_export
$6

huawei p-smart z whit hidden camera
...preview images.<br>file formats:<br>.wire autodesk alias, with animation of the camera<br>.edf for icem<br>.step (multiformat)<br>.iges (multiformat)<br>.catpart (multiformat for catia)<br>.bip for render...
3dfindit
free

EDF
...edf
3dfind.it
catalog: rcm
thingiverse
free

edf motor by arinc
...edf motor by arinc
thingiverse
it is printable edf fan
thingiverse
free

Quad with edf by bobsito
...quad with edf by bobsito
thingiverse
just for fun make a model of quadcopter on edf turbine
thingiverse
free

EDF Whistle by WhiteTrashFPV
...edf whistle by whitetrashfpv
thingiverse
this is to make edf jets sound just like the real thing.
thingiverse
free

EDF Props by yannoch
...edf props by yannoch
thingiverse
edf props for 1106 burshless motor.
model for sla printer. do not print this thing with fdm !
thingiverse
free

Clef EDF - Triangle 11mm by erwan1
...clef edf - triangle 11mm by erwan1
thingiverse
clef edf
120
3ddd
$1

Life 120-120-50
... журнальный , круглый
автор модели: aeroslon
design_connected
$13
XZ3 120
...xz3 120
designconnected
magis xz3 120 computer generated 3d model. designed by van onck, andries & hiroko.
3ddd
$1
diamond so 120
...diamond so 120
3ddd
diamond , morosini
люстра diamond so 120
3ddd
$1

Bench 120
...bench 120
3ddd
скамья
bench for two.
turbosquid
$9

Office 120
... available on turbo squid, the world's leading provider of digital 3d models for visualization, films, television, and games.
3ddd
free

kerasan Bentley 120
... цветок , полотенце
комплект kerasan bentley 120
3ddd
$1

Rishar R-120
...ar r-120
3ddd
rishar , стол
кабинет rishar
стол компьютерный r-120
размеры: 1200х880х790
3ddd
$1

Revox Scala 120
... scala , колонки
revox scala 120, напольная акустика
www.alef-elektro.ru
3ddd
free

Revox Scala 120
... scala , колонки
revox scala 120, напольная акустика
www.alef-elektro.ru
evermotion
$7

railing 120 am79
...key sculptures 120 am79 railing
highly detailed architecture railing with all textures and materials.. evermotion 3d models shop.
Mm
3ddd
$1

MM Lampadari
...mm lampadari
3ddd
mm lampadari
mm lampadari
бра
люстра
3ddd
$1

MM lampadari
...mm lampadari
3ddd
mm lampadari
lampa mm lampadari,art.
3ddd
$1

MM lampadari
...mm lampadari
3ddd
mm lampadari
lustra mm lampadari,art.
3ddd
free

MM lampadari
...mm lampadari
3ddd
mm lampadari
bra mm lampadari,art.
3ddd
$1

MM Lampadari
...mm lampadari
3ddd
mm lampadari
люстра от фабрики mm lamparadi.арт:7032/8 размеры:а (d 72 x h37 см)
3ddd
$1

MM Lampadari
...mm lampadari
3ddd
lampadari
mm lampadari, 5972/12+6 1700x1800h
3ddd
$1

MM Lampadari
...mm lampadari
3ddd
mm lampadari
настольная лампа (высота - 52 см)
3ddd
$1

MM Lampadari
...mm lampadari
3ddd
mm lampadari
бра от фабрики mm lamparadi.арт:. 7032/a1 размеры:(l 16 x h 27 x sp 27 см)
3ddd
$1

MM Lampadari
...mm lampadari
3ddd
mm lampadari
люстра с рассеивателем из стекла
и позолоты и металлической арматурой
3ddd
$1

MM LAMPADARI 6578
...mm lampadari 6578
3ddd
mm lampadari
торшер mm lampadari 6578/lt3+1 v2172